Mastering Image Flattening in Photoshop: Your Guide to Optimized Visuals for Tophinhanhdep.com

In the dynamic world of digital imagery, where every pixel contributes to the overall impact, efficiency and quality are paramount. Whether you’re a seasoned photographer, a graphic designer, or simply someone looking to share stunning visuals online, understanding the nuances of image optimization is crucial. One such fundamental technique in Adobe Photoshop is “flattening an image.” This process, far from being a mere technicality, is a powerful step that can significantly reduce file size, improve load times, ensure print accuracy, and streamline your workflow. For anyone creating or managing visual content for platforms like Tophinhanhdep.com – a hub for everything from captivating wallpapers and backgrounds to high-resolution stock photos and inspiring digital art – mastering image flattening is an essential skill.
Imagine your digital artwork or photograph as a meticulously constructed sandwich, where each ingredient – a text layer, a filter, a transparency adjustment, a separate image element – represents an individual layer in Photoshop. While this multi-layered approach offers unparalleled flexibility during the editing process, allowing for non-destructive adjustments and infinite creative possibilities, it also results in a substantial file size. When this “sandwich” of layers is complete and ready for its final presentation, the act of “flattening” essentially compresses all those individual ingredients into a single, cohesive slice. This transformation is key for preparing images for web display, professional printing, or simply for efficient storage and sharing. On Tophinhanhdep.com, where users seek seamless access to beautiful photography and aesthetic backgrounds, optimized file sizes contribute directly to a superior user experience, ensuring quick previews and downloads without compromising visual integrity.
What Does “Flattening an Image” Truly Mean?
At its core, flattening an image in Photoshop refers to the process of merging all visible layers into a single background layer. This action essentially “bakes in” all the edits, effects, and transparencies that were previously separate, transforming a complex, multi-layered file into a simplified, single-layer image. Think of it as consolidating all your carefully arranged components – be it elements of a nature wallpaper, abstract art, or intricate photo manipulation – into one unified picture.
This concept might sound counterintuitive if you’re accustomed to the flexibility layers offer. Why would you want to lose the ability to edit individual elements after investing so much time in their creation? The answer lies in the purpose of the final image. During the creation phase, layers are indispensable. They allow for experimental graphic design, precise photo retouching, and the iterative development of digital art. However, for the final output – whether it’s a high-resolution photograph destined for print, a stunning background for Tophinhanhdep.com, or an aesthetic image for a mood board – the need for individual layer manipulation often diminishes, while the demand for efficiency and broad compatibility increases.

The analogy of sending your image “to the gym” to “lose weight” is surprisingly apt. A multi-layered Photoshop Document (PSD) can be incredibly “heavy” due to the vast amount of data each layer holds, including its pixels, masks, effects, and historical states. By flattening the image, you shed all this excess data associated with individual layers, drastically reducing the file size. This “slimmed-down” version is faster to process, quicker to upload, and consumes less storage space. For content creators contributing to Tophinhanhdep.com, this means their beautiful photography or digital art can be showcased more efficiently, reaching a wider audience without bandwidth concerns. It’s a critical step in the journey from a creative idea to a shareable, usable visual asset.
The Indispensable Benefits of Flattening Your Images
The decision to flatten an image is usually driven by practical considerations centered around performance, compatibility, and file management. For professionals and enthusiasts alike, especially those who frequently interact with digital platforms such as Tophinhanhdep.com, understanding these benefits is key to optimizing their visual design workflow.
Streamlined Performance and Web Optimization
One of the most significant advantages of flattening an image is the dramatic reduction in file size. This reduction directly translates to improved performance across various digital environments.
- Faster Loading Times for Web Content: In today’s fast-paced digital landscape, page load speed is critical. Heavy image files can slow down websites, leading to frustrated users and lower engagement. When you upload a flattened image to Tophinhanhdep.com, particularly for sections like “Wallpapers” or “Backgrounds,” the smaller file size ensures that visitors can view and download your aesthetic and nature images quickly. This optimization is crucial for maintaining a smooth user experience and can even impact search engine rankings. Flattening works hand-in-hand with other “Image Tools” like compressors and optimizers offered by Tophinhanhdep.com, providing a comprehensive approach to web-ready visuals.
- Enhanced Compatibility and Accessibility: Flattened images, especially when saved in universal formats like JPG or PNG, are far more compatible across different software, devices, and platforms. Complex layered files (like PSDs) often require specific software (Photoshop) to be opened and viewed correctly, which isn’t always feasible for recipients or web browsers. By flattening, you ensure that your high-resolution photography or digital art can be easily displayed and accessed by anyone, anywhere. This is particularly relevant for “Image Inspiration & Collections” on Tophinhanhdep.com, where broad accessibility encourages sharing and creativity.
Enhanced Sharing and Workflow Efficiency
Beyond web optimization, flattening offers practical benefits for sharing and protecting your visual assets.
- Effortless Sharing and Uploads: Smaller file sizes make it much faster and easier to upload images to social media, email them to clients, or transfer them between devices. This efficiency is invaluable for photographers and graphic designers working with numerous files. Imagine preparing a thematic collection of images for Tophinhanhdep.com; flattening each image saves considerable time during the upload process.
- Print-Friendliness and Consistency: For images destined for commercial printing, flattening is often a mandatory step. Print production equipment, like Raster Image Processors (RIPs), work best with consolidated files. Unflattened files can lead to a host of problems during printing, including missing fonts, shifting elements, unexpected transparency issues, or color inaccuracies. By flattening your file, you provide a single, stable, “print-ready” image that ensures the final output precisely matches your visual design intentions. This is crucial for “High Resolution” photography from Tophinhanhdep.com that might be used for large-format prints.
- Protection of Creative Work: When you send a flattened image, you effectively protect your original, editable layers. This means that while others can view and use the final image, they cannot easily dissect or reverse-engineer your intricate “Digital Art” or “Photo Manipulation” techniques. It safeguards your creative process and intellectual property, preventing unauthorized or unintended alterations to your specific “Editing Styles.”
Understanding Key Image File Formats and Their Role in Flattening
The decision to flatten an image often goes hand-in-hand with choosing the appropriate file format for your final output. Each format has distinct characteristics that make it suitable for different purposes, and knowing these helps you make informed choices, especially when optimizing content for Tophinhanhdep.com.
PSD: The Editable Masterpiece
PSD (Photoshop Document) files are the native format for Adobe Photoshop. They are renowned as “master files” because they retain every single layer, adjustment, mask, smart object, and vector path created during the editing process.
- Key Characteristic: Multi-layered and fully editable.
- Role in Workflow: Always save your initial project as a PSD. This serves as your crucial backup, allowing you to return and make detailed revisions to any individual element even after countless saves. Before flattening, creating a PSD backup is a non-negotiable best practice for any visual design or photo manipulation project. For digital artists showcasing their work on Tophinhanhdep.com, saving the PSD means they can always revisit their original artwork for new creative ideas or alternative versions.
- Why it’s not for final output: PSDs are typically large in file size and are not universally supported by web browsers or most viewing software. They are meant for ongoing editing within Photoshop, not for sharing or printing directly (unless specifically requested by a print service that can handle them, which often still involves internal flattening).
JPG: The Universal Standard for Flattened Images
JPG (Joint Photographic Experts Group), also commonly referred to as JPEG, is arguably the most widespread image file format. Its popularity stems from its efficient compression and broad compatibility.
- Key Characteristic: Single layer, compressed (lossy), widely compatible.
- Role in Workflow: When you flatten an image and save it as a JPG, all layers are merged into one, and the image undergoes a lossy compression process. This means some data is permanently discarded to achieve a smaller file size. While this can slightly reduce image quality, it’s often imperceptible for web display, making it ideal for the vast majority of “Images” like wallpapers, backgrounds, and general photography on Tophinhanhdep.com. JPGs are perfect for situations where file size is a priority and minor quality degradation is acceptable, such as fast-loading galleries of aesthetic or sad/emotional images.
- Considerations: Not suitable for images requiring transparency or where absolute pixel-perfect quality is critical after multiple saves and edits, as each save can introduce more compression artifacts.
PNG: Quality and Transparency Preserved
PNG (Portable Network Graphics) was developed as an improved, patent-free alternative to GIF. It’s a versatile format that strikes a balance between file size and quality.
- Key Characteristic: Supports lossless compression, retains image quality, and handles transparency.
- Role in Workflow: Unlike JPG, PNG uses lossless compression, meaning no data is discarded when the file is saved (though file sizes tend to be larger than JPGs for photographic images). Its standout feature is its ability to support varying levels of transparency (alpha channels). This makes PNG the go-to format for graphic design elements, logos, or images on Tophinhanhdep.com that need to appear seamlessly over different backgrounds, such as abstract overlays or thematic collections where a clean edge is crucial. Flattening an image and saving as a PNG is ideal when you need a single-layer output but still require transparency for an element or want to avoid any compression artifacts.
- Considerations: Generally larger file sizes than JPGs for photographs, making them less optimal for massive image collections where every kilobyte counts, unless transparency is a strict requirement.
TIFF: Archival Quality for Professional Printing
TIFF (Tagged Image File Format) is a robust and flexible format widely used in the publishing, graphic design, and photography industries.
- Key Characteristic: High quality, supports various compressions (lossless or lossy), can retain layers (though often flattened for print), ideal for archiving and commercial printing.
- Role in Workflow: TIFF files are one of the few formats that can support many of Photoshop’s features, including layers (though for print, they are often flattened, then saved as a TIFF). They are highly favored for “High Resolution” and “Stock Photos” destined for commercial printing due to their ability to maintain exceptional image quality, even with lossless compression options. When Tophinhanhdep.com hosts images for professional use or offers images that demand the highest fidelity for print, TIFF is often the recommended choice. It’s an excellent option for archiving your most valuable beautiful photography because of its data integrity.
- Considerations: TIFF files are typically much larger than JPGs or PNGs, consuming significant storage space. They are not suitable for web use due to their large file size, which would drastically increase page load times.
In conclusion, when preparing an image, especially after flattening, always consider its intended use. For web content on Tophinhanhdep.com, JPGs and PNGs are generally preferred. For print, depending on the specific requirements, TIFF (often flattened) is a robust choice, while a PSD remains your editable master file for any future “Photo Manipulation” or “Digital Photography” projects.
Step-by-Step: How to Flatten an Image in Photoshop
Flattening an image in Photoshop is a straightforward process, but it’s vital to follow the steps carefully to ensure you achieve the desired outcome and preserve your original work. Below are two common methods, along with essential post-flattening best practices, particularly for optimizing images for Tophinhanhdep.com.
Method 1: The Layer Panel Approach
This method gives you direct control through the Layers Panel, a central hub for managing your image’s components.
- Open Your Artwork in Photoshop: Begin by opening the image you wish to flatten in Adobe Photoshop. This could be any “Digital Art,” “Graphic Design” project, or “Photo Manipulation” you’ve been working on.
- Save a Master PSD (Crucial Backup!): Before proceeding, stop and save your file as a Photoshop Document (PSD). Go to
File > Save As..., choose “Photoshop” as the format, and give it a descriptive name (e.g.,MyProject_Editable.psd). This step is paramount. Once an image is flattened, its individual layers are permanently merged. Having a PSD backup ensures you can always return to your layered project for future edits, revisions, or client requests. For instance, if a client later wants a different “Editing Style” for a “High Resolution” photograph, you won’t have to start from scratch. - Locate the Layers Panel: If the Layers Panel isn’t visible on your screen, go to
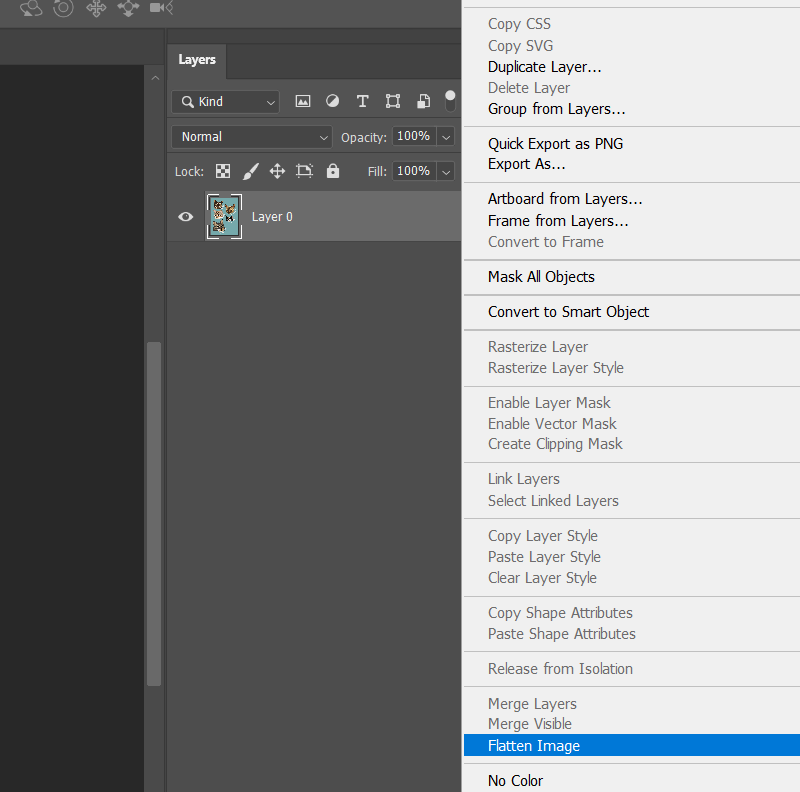
Windowin the top menu bar and selectLayers. It typically appears as a panel, often on the right side of your workspace, listing all the individual layers in your image. - Select All Layers (Optional, but good practice): You don’t strictly need to select all layers for flattening, but it can be a good visual confirmation. To select multiple layers, click on the top layer, then hold down
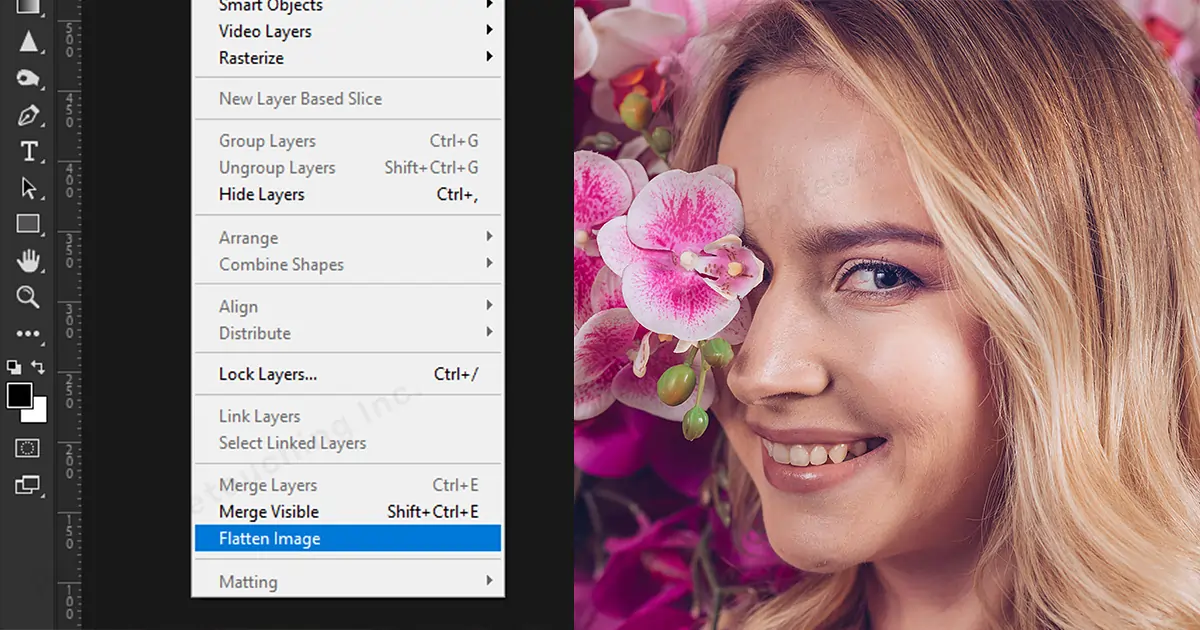
Shiftand click on the bottom layer to select all in between. Or, for convenience, you can often useCtrl+A(Windows) orCmd+A(Mac) to select all layers. - Flatten the Image: Right-click on any of the visible layers in the Layers Panel. A contextual menu will appear. From this menu, select
Flatten Image. - Confirmation: Instantly, all your selected (or visible) layers will collapse into a single “Background” layer. Your image is now flattened.
Method 2: The Menu Bar Shortcut
This is a quicker, more direct approach, especially when you know you’re ready to flatten.
- Open Your Artwork in Photoshop: As with Method 1, start by opening your image in Photoshop.
- Save a Master PSD (Again, Backup is Key!): Emphasizing this again: always create a PSD backup via
File > Save As...before flattening. This safeguard is critical for any “Creative Ideas” or “Digital Photography” work. - Access the Layer Menu: Go to the
Layermenu in the top menu bar of Photoshop. - Select Flatten Image: Scroll down through the options until you find and click
Flatten Image. - Confirmation: Similar to Method 1, all visible layers will be merged into a single background layer.
Post-Flattening Best Practices for Tophinhanhdep.com Users
Once your image is flattened, the next crucial step is saving it in the appropriate format for its intended use, especially when preparing content for Tophinhanhdep.com.
- Saving for Web Display (for Tophinhanhdep.com Wallpapers, Backgrounds, etc.):
- Go to
File > Export > Save for Web (Legacy...)orFile > Export > Export As.... - For
Save for Web (Legacy): ChooseJPEGfor photographs (adjust quality for optimal file size vs. visual fidelity, usually 60-80% is good) orPNG-24(with transparency checked if needed) for graphics. Preview the file size. - For
Export As...: SelectJPGorPNG. This interface often provides a cleaner preview and control over scaling. - Ensure the image dimensions are suitable for web display (e.g., common wallpaper sizes) and that the color profile is sRGB for consistent viewing across browsers. This directly contributes to the quality of “Aesthetic” and “Nature” images on Tophinhanhdep.com.
- Go to
- Saving for Professional Printing (for High-Resolution Stock Photos or Digital Art Prints):
- Go to
File > Save As.... - Format: Select “Photoshop PDF” or “TIFF.” These are widely accepted by professional printers.
- Color Mode: Ensure your image is in
CMYKcolor mode (Image > Mode > CMYK Color) for accurate print colors, especially for “Beautiful Photography.” - Resolution: Set to
300 DPI(dots per inch) for high-quality printing. - Compression (for PDF): When saving as a Photoshop PDF, select the
High Quality Printpreset. Untick “Preserve Photoshop Editing Capabilities” to ensure maximum flattening and smallest print-ready file size. For JPEG compression within the PDF, set it to “Maximum Image Quality.” - Bleed: If your design requires bleed (e.g., for full-bleed posters or graphic design elements), make sure it’s incorporated into your file before flattening, as per
Tophinhanhdep.com’s or your print service’s specifications.
- Go to
- Checking Your Flattened File: A simple way to confirm if your file is truly flattened, especially if you’re sending it to a print service, is to open the saved PDF in Adobe Illustrator. If you can still right-click on elements and see options like “Ungroup” or “Release Clipping Mask,” it indicates that layers or individual components remain. A truly flattened file will act as a single, indivisible image.
By diligently following these steps and incorporating the crucial backup strategy, you ensure that your visual assets, whether destined for the vibrant collections on Tophinhanhdep.com or for high-quality print production, are always optimized, efficient, and ready for their final purpose.
The Crucial Downside: Immutability and the Need for Backups
While flattening an image offers numerous benefits, particularly for optimization and output, it comes with one significant and irreversible drawback: the loss of individual layer editing capabilities. This single consequence is why the emphasis on creating backups is not just a recommendation but a critical best practice for any serious visual artist, photographer, or graphic designer.
Once you flatten an image, all the visible layers are merged into a single, uneditable background layer. This means:
- No More Individual Adjustments: You can no longer select a specific text layer to change its font, move an individual design element, adjust the opacity of a single filter, or selectively retouch a part of a portrait without affecting the entire image. Every alteration made to a flattened image becomes a global adjustment, or requires complex selections and masking to mimic individual layer edits.
- Loss of Non-Destructive Editing: Modern Photoshop workflows heavily rely on non-destructive editing techniques, using adjustment layers, smart objects, and masks to allow for endless revisions without permanently altering original pixel data. Flattening undoes all of this, committing every single change to the pixel data of the single background layer.
- Starting From Scratch for Revisions: Imagine you’ve spent hours on an intricate “Photo Manipulation” project, perhaps creating a surreal “Abstract” image for Tophinhanhdep.com. You flatten it to send a proof to a client. If the client then requests a minor change—say, adjusting the color balance of a single object or moving a small graphic element—without a layered PSD backup, you would have to either perform destructive edits on the flattened image (which is much harder and less precise) or, in many cases, literally start the entire project from the very beginning. This wastes valuable time and effort, proving that “getting your file right could just save you time and money!”
This scenario highlights why the practice of saving a multi-layered PSD file before flattening is not merely a suggestion, but a golden rule in digital imaging.
- Preserving Your Creative Freedom: The PSD acts as your editable archive, preserving every decision and every component of your “Visual Design” or “Digital Photography” project. It’s the blueprint that allows for future iterations, adaptations, or entirely new “Creative Ideas” to spring from the same foundation.
- Facilitating Client Feedback and Iteration: For professionals offering “Photo Retouching” or “Graphic Design” services, layered PSDs are indispensable for incorporating client feedback efficiently. You can make precise changes without affecting other elements, ensuring satisfaction without unnecessary re-work. This flexible approach can differentiate your service, whether you’re working on commercial stock photos or custom aesthetic images.
- Preparing for Multi-Platform Use: A single layered PSD can be the source for multiple flattened outputs—a small JPG for Tophinhanhdep.com, a larger PNG for social media, and a high-resolution TIFF for print. This versatility ensures that you’re always prepared for diverse distribution channels.
In essence, flattening is a finalization step, a commitment to a specific version of your image. It’s an essential part of the workflow for optimizing images for Tophinhanhdep.com and other platforms, but it must be performed with foresight and backed by a robust archiving strategy. Embrace flattening for its efficiency benefits, but always respect its finality by safeguarding your editable layered files.
Conclusion: Optimize Your Visual Journey with Smart Flattening on Tophinhanhdep.com
In the realm of digital imagery, where visual content reigns supreme, the ability to effectively manage and optimize your files is as important as the creative act itself. Flattening an image in Photoshop, a seemingly simple command, unlocks a world of efficiency and precision, transforming complex multi-layered artwork into streamlined, high-performance visuals. For users, contributors, and enthusiasts of Tophinhanhdep.com – a comprehensive platform dedicated to “Images,” “Photography,” “Image Tools,” “Visual Design,” and “Image Inspiration & Collections” – mastering this technique is an invaluable asset.
We’ve explored how flattening reduces file size, making your stunning “Wallpapers,” “Backgrounds,” and “Beautiful Photography” load faster and appear seamlessly across devices, enriching the user experience on Tophinhanhdep.com. This process is crucial for web optimization, enhancing compatibility for broader sharing, and significantly speeding up uploads to social media or other platforms. Furthermore, for those delving into commercial printing of “High Resolution” images or intricate “Graphic Design,” flattening ensures that your artwork is “print-friendly,” preventing common errors like missing fonts or shifted elements that can arise from unflattened files. This careful preparation guarantees that your final printed output perfectly mirrors your original “Creative Ideas” and “Editing Styles.”
Through practical, step-by-step methods, whether you prefer the direct approach via the “Layer” menu or the detailed control offered by the Layers Panel, flattening an image in Photoshop becomes an accessible skill. However, the golden rule remains: always save a multi-layered PSD backup before you flatten. This foresight preserves your artistic freedom, allowing for infinite revisions and adaptations of your “Digital Art” and “Photo Manipulation” projects without having to restart from scratch. It protects your investment of time and creativity, ensuring that your original vision remains intact for any future needs or client demands.
In an ecosystem like Tophinhanhdep.com, which thrives on visual excellence and accessibility, optimized images are paramount. By thoughtfully applying image flattening techniques, you contribute to a faster, smoother, and more reliable visual experience for everyone. It’s a testament to the power of informed digital practices in bringing “Trending Styles” and “Mood Boards” to life with clarity and impact. Embrace flattening not just as a technical chore, but as an integral part of your visual optimization journey, ensuring your images are always perfectly poised to captivate and inspire.
FAQs about Flattening Images in Photoshop
Q: What exactly is flattening an image in Photoshop? A: Flattening an image is the process of merging all visible, individual layers within a Photoshop document into a single, unified background layer. It consolidates all your edits, effects, and elements into one cohesive image.
Q: Why should I flatten an image for Tophinhanhdep.com or other platforms? A: Flattening offers several benefits:
- Reduced File Size: Makes images “slimmer,” leading to faster loading times on websites like Tophinhanhdep.com and quicker uploads to social media.
- Improved Performance: Optimized images contribute to a smoother user experience and can enhance SEO for web content.
- Print-Friendliness: Ensures consistent and accurate output when sending files for professional printing, avoiding issues with fonts, layers, or transparencies.
- Protection of Artwork: Safeguards your original, editable layers by sending a finalized, single-layer version to others.
- Enhanced Compatibility: Flattened images in formats like JPG or PNG are universally viewable across most devices and software.
Q: Does flattening an image reduce its quality? A: Not directly due to the flattening itself. Flattening merges pixels without inherently degrading them. However, if you then save the flattened image in a lossy format like JPG with high compression, some quality will be lost. Saving in a lossless format like PNG or TIFF after flattening will preserve quality while still reducing file size compared to a layered PSD. Always consider the intended use for the best balance of quality and file size.
Q: What is the main downside of flattening an image? A: The primary downside is that once an image is flattened, you lose the ability to individually edit its constituent layers. All non-destructive adjustments become permanent. This is why it’s crucial to always save a multi-layered PSD file as a backup before flattening, ensuring you can revisit and make changes to your original artwork if needed.
Q: Which file format should I choose after flattening for Tophinhanhdep.com? A:
- For Web (Wallpapers, Backgrounds, Photography): JPG is generally preferred due to its excellent balance of visual quality and small file size. Use PNG if your image requires transparency (e.g., a logo or graphic overlay for “Digital Art”) or if you need absolute lossless quality without transparency.
- For Print (High-Resolution projects): Often, professional print services, including
Tophinhanhdep.com’s recommendations, prefer TIFF or Photoshop PDF (saved with print-specific settings like CMYK color mode and 300 DPI), often after flattening to avoid print issues.
Q: Can I unflatten an image in Photoshop? A: No, not once it has been saved and closed after flattening. Flattening is a destructive process. The only way to “unflatten” and regain your layers is to revert to a previously saved multi-layered PSD file. This reinforces the importance of always saving a separate, editable PSD backup before performing a flatten operation.