Mastering Image Manipulation in Google Slides: A Comprehensive Guide to Flipping and Beyond with Tophinhanhdep.com

In today’s visually-driven world, presentations are no longer just about conveying information; they’re about captivating audiences, telling compelling stories, and creating memorable experiences. Google Slides, as a versatile and widely-used presentation platform, offers an array of tools to help users achieve this. Among the most fundamental yet impactful of these tools are image manipulation features, particularly the ability to flip and rotate images. Whether you’re a seasoned graphic designer, a professional creating a business presentation, or an individual crafting a personal project, understanding how to effectively transform images in Google Slides is crucial for elevating your visual content.
At Tophinhanhdep.com, we understand the power of stunning visuals. Our extensive collections of images—ranging from breathtaking nature photography and evocative aesthetic backgrounds to powerful abstract art and emotional compositions—serve as the perfect foundation for any presentation. Beyond static imagery, we also delve into the nuances of digital photography, offering high-resolution stock photos and insights into various editing styles. Our suite of image tools, including converters, compressors, optimizers, and AI upscalers, empowers users to prepare their visuals for any platform. This guide will not only walk you through the precise steps of flipping and rotating images in Google Slides but will also demonstrate how Tophinhanhdep.com can be your ultimate resource for visual design inspiration, high-quality image assets, and essential image tools, transforming your presentations into true visual masterpieces.
The Fundamentals of Image Transformation in Google Slides
Effective visual communication hinges on more than just selecting beautiful images; it also involves knowing how to strategically position and modify them to achieve your desired aesthetic and convey your message with clarity and impact. Flipping and rotating are two powerful techniques that allow you to reshape images without altering their core content, offering immense creative flexibility within Google Slides.
Why Flipping and Rotating Matters for Your Visual Content
Have you ever inserted an image into your Google Slides presentation only to find it’s facing the wrong direction, or perhaps you envision a more dynamic layout that requires a subtle shift in perspective? This is where image flipping and rotation become indispensable. These simple adjustments can profoundly influence the balance, flow, and narrative of your slides.
For instance, an image of a person looking off-screen might disrupt the flow if placed on the left, but flipping it horizontally to face inwards can guide the viewer’s eye towards your main content or text. Similarly, a nature photography shot that feels static can gain a sense of movement or artistic flair with a vertical flip, perhaps mimicking a reflection, or a slight rotation to break the rigidity of horizontal and vertical lines. These techniques are cornerstones of graphic design and photo manipulation, enabling you to integrate images seamlessly into your overall visual design. By mastering them, you can create aesthetic backgrounds, highlight specific elements within complex scenes, or even craft abstract compositions from existing imagery, all contributing to a more engaging and professional presentation. Tophinhanhdep.com provides a wealth of image inspiration and thematic collections that can benefit from these precise transformations, allowing you to adapt trending styles and unique photo ideas to your specific slide designs.
Understanding the Core Differences: Flip vs. Rotate
While both flipping and rotating are image modification techniques that alter an image’s orientation, they achieve different visual effects. It’s crucial to understand this distinction to apply the correct transformation for your design objectives.
Flipping an image involves creating a mirror image by reversing it along a specific axis.
- Horizontal Flip: Reflects the image from left to right, as if you were looking at it in a mirror. The top and bottom remain the same, but the left side becomes the right, and vice-versa. This is often used to change the direction a subject is facing, create symmetrical pairings, or adjust an image to better fit a textual layout.
- Vertical Flip: Reflects the image from top to bottom. The left and right sides remain the same, but the top becomes the bottom, and vice-versa. This can be used to simulate reflections in water or glass, or to create an inverted, surreal, or abstract effect.
Rotating an image, on the other hand, involves turning it around a central point.
- When a picture is rotated, its axis is moved, but its face remains unchanged.
- Rotation typically involves specified increments (e.g., 90 degrees clockwise or counter-clockwise) or a free rotation to any desired angle.
- The result is a turned version of the original image, allowing for adjustments in its position without changing its inherent characteristics or mirroring it. This is useful for correcting slightly skewed images, aligning visuals with diagonal design elements, or adding a dynamic tilt to emphasize certain content.
Both techniques are vital components of digital photography editing styles and visual design. Flipping produces a mirrored effect, while rotating repositions the image. Knowing when to use each is key to effective photo manipulation and achieving creative ideas within your Google Slides presentations.
Step-by-Step Guide to Flipping Images in Google Slides
Regardless of whether your image needs a simple orientation correction or a dramatic visual shift for artistic effect, Google Slides makes the process straightforward. Here’s how you can flip images with ease, drawing on the capabilities of Tophinhanhdep.com for sourcing and enhancing your images.
How to Flip an Image in Google Slides
Before you begin, ensure you have your Google Slides presentation open and the image you wish to flip is already inserted onto a slide. If you don’t know how to insert images, Tophinhanhdep.com offers guides and high-resolution stock photos that can be directly uploaded.
To insert a photo in Google Slides, you must do the following:
- In your Google Slides presentation, open the “Insert” tab.
- Click “Image” in the drop-down menu and select your preferred source, such as “Upload from computer”, “Search the web”, “Drive”, “Photos”, “By URL”, or “Camera”.
- Choose your picture and click “Insert.”
Once your image is on the slide, follow these steps for flipping:
Flipping an Image Horizontally for a Mirror Effect
Flipping an image horizontally is a common technique used to reverse the direction a subject is facing, create visual balance, or prepare an image for creative ideas like composite designs. This is a simple yet powerful form of photo manipulation that can significantly impact your slide’s aesthetic.
To flip an image in Google Slides horizontally:
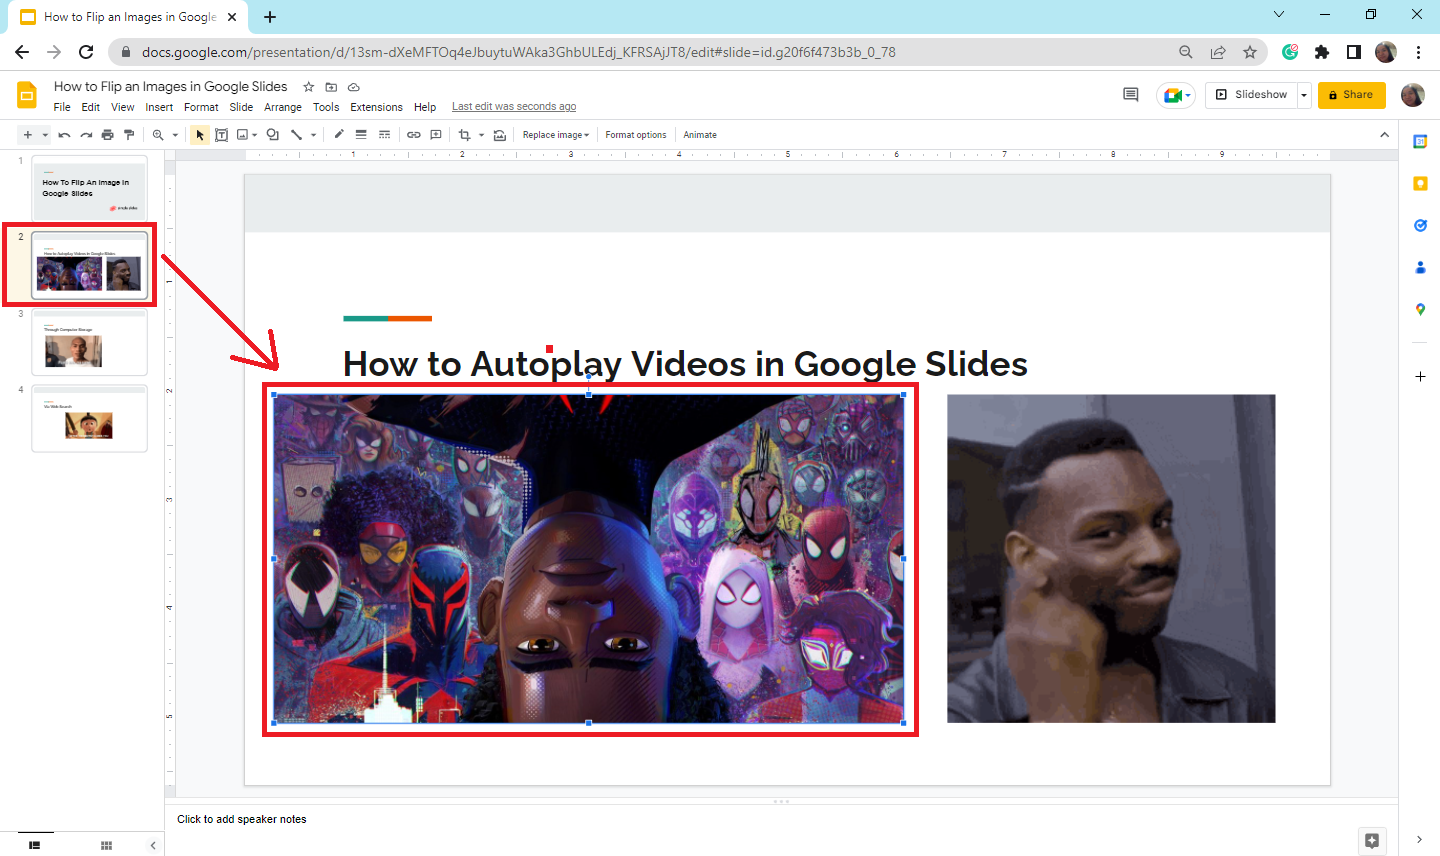
- Select the Image: Click on the image within your Google Slides presentation. A blue border with resizing handles will appear, indicating that the image is selected.
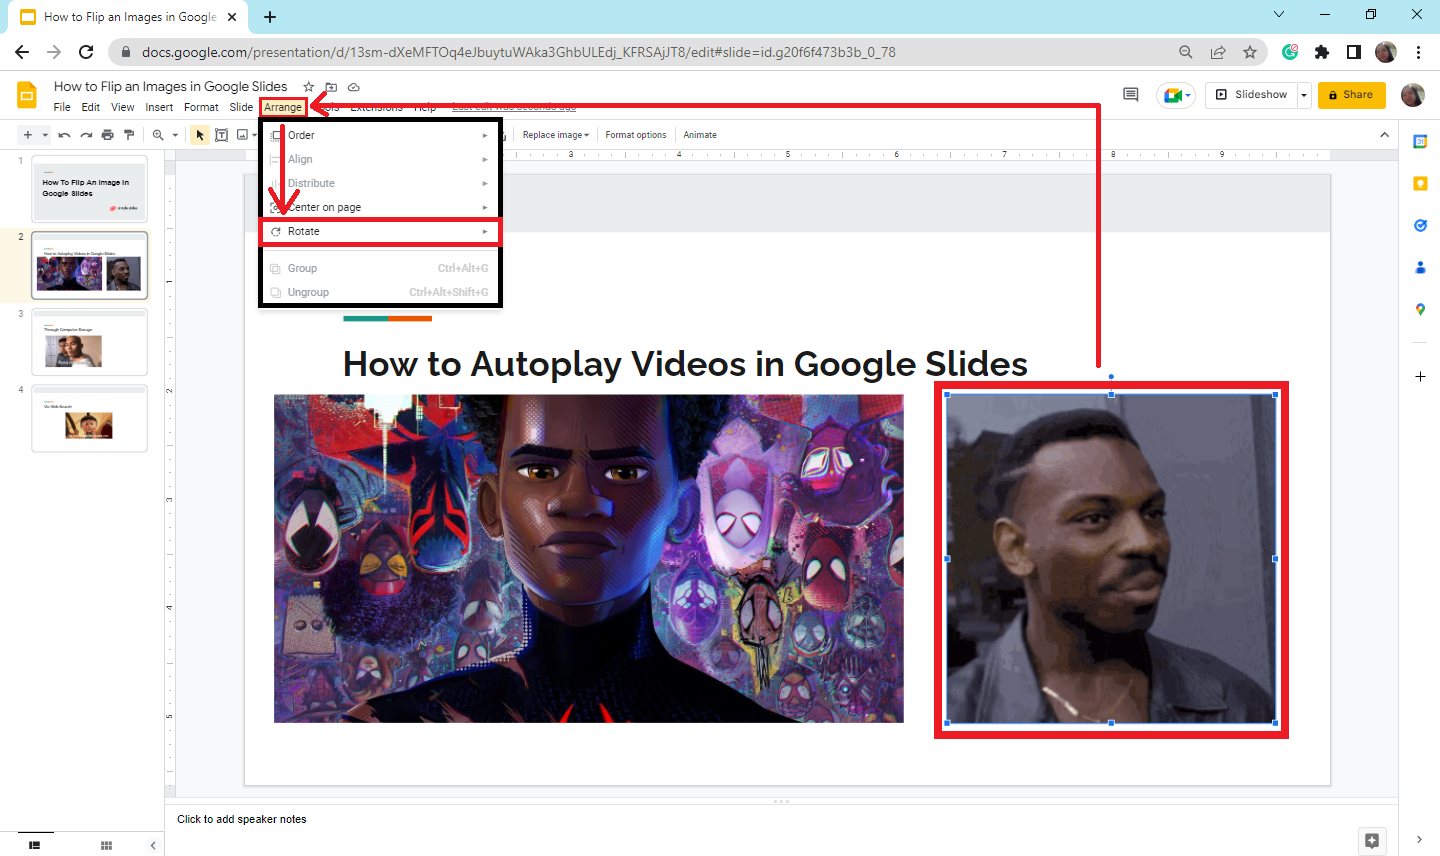
- Access the Arrange Menu: Look for the “Arrange” tab in the top menu bar of Google Slides and click on it.
- Choose Rotate Options: In the drop-down menu that appears, hover over the “Rotate” option. This will open a sub-menu.
- Execute Horizontal Flip: From the sub-menu, select “Flip horizontally.”
Instantly, your image will be mirrored along its vertical axis, reversing its left-to-right orientation. This is particularly useful when you have an image, perhaps a striking portrait or an action shot from Tophinhanhdep.com’s beautiful photography collection, that needs to face inward towards your text or another visual element to maintain a cohesive visual flow. It can also be a key step in creating symmetrical graphic design elements or even developing abstract art concepts by pairing mirrored images.
Flipping an Image Vertically for a Top-to-Bottom Reflection
Flipping an image vertically offers a distinct visual effect, often simulating reflections or creating a sense of inversion. This technique can add depth and an artistic touch to backgrounds or serve as a foundational element for more complex digital art pieces.
To flip an image in Google Slides vertically:
- Select the Image: Click the picture on your slide that you want to flip vertically. The blue selection border will appear.
- Navigate to Arrange Tab: Go to the “Arrange” tab in the top menu bar and click it.
- Select Rotate: In the drop-down menu, hover over the “Rotate” option.
- Execute Vertical Flip: From the sub-menu, click “Flip vertically.”
The image will now be inverted, reflecting its top portion to the bottom. Consider using this with a captivating nature image, perhaps a serene landscape from Tophinhanhdep.com, to create a stunning water reflection effect. Or, employ it with an abstract image to generate an entirely new, thought-provoking visual. This vertical flip can also be a creative way to play with perspective and visual symmetry, contributing to unique photo ideas and thematic collections within your presentations.
Once an image is flipped, you might need to resize or reposition it to fit your slide perfectly. Simply click and drag the image to move it, and use the blue resizing handles on its border to adjust its dimensions. For optimal clarity, especially with high-resolution images from Tophinhanhdep.com, ensure your adjustments maintain a good aspect ratio.
Beyond Simple Flipping: Advanced Image Arrangement Techniques
While flipping images provides powerful visual transformations, Google Slides offers an even broader suite of “Arrange” options that, when combined, allow for sophisticated visual design and photo manipulation. These tools are essential for achieving precise control over your visual elements, turning simple images into compelling graphic design components.
Precise Image Rotation for Perfect Alignment
Sometimes, a simple flip isn’t enough. You might need to adjust an image by a specific angle to align it with other elements, add a dynamic tilt, or correct a slight off-kilter perspective in a high-resolution photograph. Google Slides provides flexible rotation options beyond simple mirroring.
To rotate an image in Google Slides:
- Select Your Image: Click on the image you wish to rotate.
- Access the Arrange Menu: Click the “Arrange” tab in the top menu.
- Choose Rotate Options: Hover over “Rotate” in the drop-down menu.
- Apply 90-Degree Rotations: You’ll see options like “Rotate clockwise 90°” and “Rotate counter-clockwise 90°.” Select the one that suits your immediate need. These are perfect for quickly reorienting images that are completely sideways or upside down.
- Free Rotation with the Handle: For more nuanced rotation, select the image. A small circular handle will appear attached to a short line extending from the top center of the blue selection border. Click and drag this rotation handle to freely rotate the image to any desired angle. This method offers granular control, ideal for subtly tilting an aesthetic background or digital art piece.
- Precise Angle Rotation via Format Options: For absolute precision, if you know the exact angle you need:
- Select the image.
- Go to the “Format” tab in the top menu.
- Click “Format options” on the right sidebar.
- Expand the “Size & rotation” section.
- Under “Rotation,” you can type in a specific angle (e.g.,
45for 45 degrees clockwise, or-45for 45 degrees counter-clockwise). This level of control is invaluable for graphic design, ensuring perfect alignment across multiple elements.
These rotation capabilities, especially when combined with high-resolution images from Tophinhanhdep.com, allow you to fine-tune your visual composition, enhancing the professional look and feel of your presentations.
Mastering Object Ordering, Grouping, and Alignment
Beyond individual image transformations like flipping and rotating, Google Slides offers robust tools to manage how multiple objects interact on a slide. These features—ordering, grouping, and aligning—are fundamental to complex visual design, allowing you to build sophisticated layouts, manage layers, and ensure a polished appearance.
-
Bring Forward / Send Backward (Object Order): When you stack multiple images, text boxes, or shapes, they exist in layers. The “Order” option allows you to control which object appears on top of or beneath another.
- Select the object you want to reorder.
- Click “Arrange” in the menu bar.
- Hover over “Order”.
- Choose from:
- “Bring to front”: Moves the object to the very top layer.
- “Bring forward”: Moves the object up one layer.
- “Send backward”: Moves the object down one layer.
- “Send to back”: Moves the object to the very bottom layer. This is essential for creating depth in your visual design, ensuring that text stands out against a background image or that specific elements of a photo manipulation are correctly layered.
-
Group Objects: Grouping allows you to combine two or more selected objects into a single unit. Once grouped, they can be moved, resized, rotated, and flipped as one entity, simplifying complex layouts.
- Select two or more objects (hold
ShiftorCtrlwhile clicking each object). - Click “Arrange” in the menu bar.
- Select “Group”. To ungroup objects, select the group, click “Arrange”, and choose “Ungroup”. Grouping is invaluable for maintaining the integrity of intricate designs, like a collection of mood board images or a complex infographic, during adjustments. It streamlines the editing process and ensures consistency.
- Select two or more objects (hold
-
Align Objects: Perfect alignment is a hallmark of professional visual design. Google Slides helps you precisely position multiple objects relative to each other or to the slide itself.
- Select two or more objects.
- Click “Arrange” in the menu bar.
- Hover over “Align”.
- Choose from options like “Left,” “Center,” “Right” (horizontal alignment), or “Top,” “Middle,” “Bottom” (vertical alignment). For distributing objects evenly:
- Select three or more objects.
- Click “Arrange” > “Distribute”.
- Choose “Horizontally” or “Vertically”. These alignment tools are critical for creating visually balanced and clean presentations. Whether you’re arranging multiple image collections, text blocks, or design elements, precise alignment elevates your graphic design and ensures your content looks polished and intentional.
By combining flipping and rotating with these powerful arrangement tools, you gain a comprehensive suite of photo manipulation and visual design capabilities directly within Google Slides. This allows you to transform abstract images into structured layouts, curate thematic collections with impeccable precision, and bring your creative ideas to life with professional finesse.
Enhancing Your Google Slides with Tophinhanhdep.com’s Image Resources
Creating compelling presentations in Google Slides is a multi-faceted process that extends beyond simple image manipulation. It begins with sourcing the right visuals, involves pre- and post-processing, and is continuously fueled by creative inspiration. Tophinhanhdep.com serves as an invaluable partner throughout this journey, providing a holistic ecosystem for all your image needs.
Sourcing High-Quality Images for Your Presentations
The foundation of any visually stunning presentation is the quality of its images. Low-resolution or poorly composed visuals can undermine even the most carefully crafted content. Tophinhanhdep.com specializes in providing an extensive library of premium images that are perfectly suited for Google Slides.
- High Resolution and Clarity: Our collection boasts high-resolution images, ensuring that your visuals remain crisp and clear even when projected on large screens. This is crucial for professional presentations, where pixelation or blurriness can detract from your message.
- Diverse Stock Photos: Tophinhanhdep.com offers a vast array of stock photos covering every imaginable theme. Whether you need professional business imagery, serene nature backgrounds, captivating abstract patterns, or evocative aesthetic photography, our curated collections provide options for every slide.
- Specialized Collections for Impact:
- Wallpapers and Backgrounds: Discover stunning wallpapers and backgrounds that can set the tone for your entire presentation. Flipping these backgrounds can create unique symmetrical effects or shift focus depending on your slide layout.
- Aesthetic and Nature Photography: Elevate your slides with beautiful photography from our aesthetic and nature categories, perfect for creating an emotional connection or showcasing natural beauty.
- Abstract and Sad/Emotional Images: For presentations requiring a deeper artistic or emotional resonance, our abstract and sad/emotional image collections offer powerful visual metaphors. These are particularly ripe for creative manipulation through flipping and rotation to evoke specific feelings or artistic expressions.
By starting with top-tier images from Tophinhanhdep.com, you ensure that any flipping, rotating, or other photo manipulation you perform in Google Slides will yield superior results, contributing to truly impactful visual design.
Leveraging Image Tools for Pre- and Post-Processing
While Google Slides offers excellent in-platform editing, the journey of an image often benefits from powerful pre- and post-processing tools. Tophinhanhdep.com complements your Google Slides workflow with a suite of “Image Tools” designed for optimization and enhancement, ensuring your visuals are always presentation-ready.
- Converters: Before uploading to Google Slides, you might encounter images in unsupported or unnecessarily large formats. Our image converters can quickly transform files into optimal formats (like JPEG or PNG) for presentations, ensuring compatibility and efficiency.
- Compressors and Optimizers: Large image files can slow down your Google Slides presentation, leading to lag or delayed loading times. Tophinhanhdep.com’s compressors and optimizers reduce file sizes without sacrificing visual quality. Applying these tools before uploading your high-resolution stock photos can drastically improve your presentation’s performance. Even after flipping and rotating images within Slides, downloading them and running them through an optimizer can be beneficial if you plan to export the presentation as a PDF or image file.
- AI Upscalers: Sometimes, you might have an image that perfectly fits your “Image Inspiration & Collections” or thematic needs, but its resolution is too low. Our AI upscalers can intelligently enlarge and enhance lower-resolution images, making them suitable for your presentation. This is a game-changer for digital photography that might not have started as high-resolution.
- Image-to-Text: While not directly for visual manipulation, our image-to-text tool can be incredibly useful for extracting text from visual sources that you plan to incorporate into your slides. This can streamline research or content creation for presentations where text-heavy images are involved.
By integrating Tophinhanhdep.com’s image tools into your workflow, you ensure that every image, whether it’s a carefully chosen aesthetic background or a piece of digital art, is perfectly prepared and optimized for your Google Slides presentation. This comprehensive approach to image management is a hallmark of professional visual design.
Cultivating Visual Inspiration and Creative Design
The true power of image manipulation lies in its ability to unlock new creative ideas and enhance your overall visual design. Tophinhanhdep.com is not just a repository of images and tools; it’s a wellspring of inspiration, guiding you to new possibilities in your Google Slides presentations.
- Photo Ideas and Mood Boards: Explore our “Image Inspiration & Collections” for diverse photo ideas and pre-designed mood boards. These can spark concepts for how flipping and rotating can be used to achieve specific visual effects. For instance, a mood board featuring symmetrical designs might encourage you to experiment with horizontal flips to create perfectly balanced layouts.
- Thematic Collections and Trending Styles: Our thematic collections help you find images that resonate with specific presentation topics, from corporate to casual, scientific to artistic. Observing trending styles in digital photography and graphic design, often highlighted on Tophinhanhdep.com, can inform your approach to image manipulation. Flipping an image to create a duotone effect, for example, might align with a current visual trend you discover.
- Creative Expression through Manipulation: Consider how a simple vertical flip can transform a familiar image into an abstract piece, or how a series of horizontally flipped images can create a dynamic visual rhythm across your slides. These techniques are at the heart of photo manipulation and digital art, allowing you to imbue your presentations with a unique creative signature. For example, taking a beautiful photography piece and applying a subtle rotation can add a sense of dynamism often seen in modern visual design.
Tophinhanhdep.com encourages you to view image manipulation in Google Slides as a creative endeavor. Our resources are designed to help you not only execute the technical steps but also to inspire you to think outside the box, transforming ordinary slides into extraordinary visual narratives that stand out and engage your audience.
Troubleshooting and Best Practices for Image Manipulation in Google Slides
Even with straightforward tools, challenges can arise. Understanding how to troubleshoot common issues and adopting best practices ensures a smooth workflow when flipping, rotating, and arranging images in Google Slides. Tophinhanhdep.com not only provides solutions but also champions principles for optimal image integration.
Common Challenges and Quick Fixes
While Google Slides’ image manipulation tools are generally user-friendly, you might occasionally encounter minor hurdles.
- Image Not Flipping/Rotating:
- Check Selection: Ensure the image is correctly selected. If you see the blue border and resizing handles, it’s selected. If not, click on it again.
- Object Type: Confirm you are working with an actual image. If it’s part of a grouped object or a text box with a background fill, the flipping/rotating options might behave differently or be unavailable. Ungroup objects if necessary, or ensure you’re manipulating the image component specifically.
- Browser/Connection Issues: Sometimes, a temporary glitch with your web browser or internet connection can affect Google Slides’ functionality. Try refreshing the page or restarting your browser.
- Mobile App Limitations:
- The functionality described in this guide (especially the “Arrange” menu options for flipping) is primarily available in the desktop version of Google Slides. The Google Slides mobile app offers limited image editing capabilities. If you need to perform precise flips or rotations, it’s best to use a Windows or Mac computer. This is an important distinction to remember for digital photography editing on the go versus detailed graphic design work.
- Accidental Distortion:
- When resizing a flipped or rotated image, always drag from the corner handles while holding down the
Shiftkey (or locking the aspect ratio in “Format options”). This prevents unintentional stretching or squashing, preserving the integrity of your high-resolution images from Tophinhanhdep.com.
- When resizing a flipped or rotated image, always drag from the corner handles while holding down the
Tips for Optimal Image Integration
Beyond knowing how to flip or rotate, applying best practices ensures your image manipulations contribute positively to your overall visual design and presentation impact.
- Start with High-Quality Sources: As emphasized by Tophinhanhdep.com’s focus on high-resolution stock photos and beautiful photography, begin with the best possible image quality. Manipulation exaggerates existing flaws, so a strong foundation is key.
- Purposeful Manipulation: Every flip or rotation should serve a clear purpose. Is it to:
- Correct Orientation? A common need for digital photography.
- Guide the Viewer’s Eye? Direct attention towards key content.
- Create Symmetry or Balance? Essential for aesthetic backgrounds and graphic design.
- Add Artistic Flair or Abstract Elements? Elevate visual appeal. Avoid arbitrary changes that might confuse or distract your audience.
- Maintain Consistency: If you’re using flips or rotations as part of a thematic collection or trending style, ensure consistency across your slides. This creates a cohesive and professional visual experience.
- Consider Text and Other Elements: How does a flipped image interact with surrounding text or other graphic design elements? Always view the image in context of the entire slide to ensure harmony and readability. For example, flipping an image with embedded text might make that text unreadable.
- Utilize Tophinhanhdep.com’s Image Tools for Pre-Optimization: Before uploading your chosen images to Google Slides, especially if they are very large high-resolution files, consider using Tophinhanhdep.com’s compressors and optimizers. This proactive step ensures your presentation loads quickly and runs smoothly, a critical aspect of effective visual communication. Our AI upscalers can also salvage images that are initially too small, bringing them up to presentation standards.
- Experiment with Creative Ideas: Don’t be afraid to play! The “Image Inspiration & Collections” on Tophinhanhdep.com are designed to spark creative ideas. Try combining flips with slight rotations, or create mirrored pairs to form unique abstract art on your slides. The undo function is your friend!
By following these best practices, you can confidently integrate flipped and rotated images into your Google Slides presentations, transforming them into dynamic, engaging, and visually polished experiences. Tophinhanhdep.com is dedicated to providing you with both the knowledge and the resources to achieve visual excellence in all your creative endeavors.
Conclusion: Elevating Your Presentations with Intentional Image Manipulation
In the realm of digital presentations, images are more than mere decorative elements; they are powerful narrative tools that can inform, persuade, and inspire. Mastering the art of image manipulation within Google Slides, particularly the ability to flip and rotate, is an essential skill for anyone looking to create truly impactful visual content. From correcting basic orientation issues in a photograph to crafting intricate graphic designs and abstract art, these techniques offer immense creative freedom.
We’ve explored how a simple horizontal flip can reorient a subject to guide your audience’s gaze, or how a vertical flip can introduce striking reflections and artistic symmetry. Beyond individual transformations, Google Slides provides a comprehensive suite of arrangement tools—including ordering, grouping, and aligning—that empower you to orchestrate complex visual compositions with precision and elegance. These skills are fundamental to creating presentations that not only convey information but also leave a lasting aesthetic impression.
At Tophinhanhdep.com, we are committed to being your comprehensive resource for visual excellence. Our vast collections of high-resolution images, spanning everything from serene nature backgrounds to captivating aesthetic and emotional photography, provide the perfect starting point for any presentation. Furthermore, our robust suite of image tools—including converters, compressors, optimizers, and AI upscalers—ensures that every pixel you present is pristine and perfectly optimized. We aim to fuel your “Image Inspiration & Collections” by offering fresh photo ideas, thematic collections, and insights into trending styles, encouraging you to push the boundaries of photo manipulation and digital art.
By combining the practical steps outlined in this guide with the rich resources available on Tophinhanhdep.com, you are equipped to transcend the ordinary. Transform your Google Slides presentations into dynamic showcases of visual design, where every flipped, rotated, and perfectly placed image contributes to a compelling and unforgettable story. Let Tophinhanhdep.com be your partner in turning your creative visions into stunning realities.