How to Flip an Image in Adobe Illustrator: A Comprehensive Guide to Visual Transformation

In the dynamic world of visual content creation, precision and flexibility are paramount. Whether you’re a seasoned graphic designer or an aspiring digital artist, mastering the tools at your disposal can unlock incredible creative potential. Among the fundamental techniques in Adobe Illustrator, the ability to flip or mirror an image or object stands out as a deceptively simple yet incredibly powerful function. This guide, brought to you by Tophinhanhdep.com, will delve into the various methods of flipping images and objects in Illustrator, demonstrating how these techniques can elevate your graphic design, photo manipulation, and overall visual output.
Adobe Illustrator, while primarily celebrated for its prowess in vector graphics, frequently necessitates the integration and manipulation of raster elements, such as photographs and embedded images. The ability to flip these elements – be it a high-resolution stock photo for a banner, a nature background for a wallpaper, or a key component of an aesthetic composition – is crucial for achieving desired visual effects, optimizing layouts, and even exploring new creative ideas. From subtle adjustments to dramatic mirror effects, understanding how to effectively flip an image in Illustrator is an indispensable skill in your visual design toolkit, complementing the rich resources and tools available on Tophinhanhdep.com.
Understanding Image Manipulation in Adobe Illustrator
Adobe Illustrator is a versatile application that caters to a broad spectrum of design needs. While its core strength lies in creating scalable vector graphics, it also offers robust capabilities for handling and transforming raster images. Flipping an image is not merely about reversing its orientation; it’s about altering perspective, creating symmetry, achieving balance in a layout, or even generating entirely new visual narratives.
For designers and content creators, the functionality to flip an image is invaluable. Imagine you’re crafting a beautiful photography piece, and a specific element needs to face the opposite direction to guide the viewer’s eye or balance the composition. Or perhaps you’re working on a mood board and need to mirror an image to fit a thematic collection. These scenarios highlight why mastering image flipping techniques is essential. On Tophinhanhdep.com, we emphasize not just the aesthetic value of images like wallpapers and backgrounds, but also the practical tools and techniques that bring these visuals to life. This fundamental skill contributes significantly to digital art, photo manipulation, and overall graphic design excellence, aligning perfectly with the creative ideas and trending styles showcased on our platform.

Illustrator provides several intuitive ways to achieve this, primarily through its Reflect Tool and Transform Panel, each offering unique advantages depending on the specific creative task at hand. While some might be familiar with “Free Transform” from other Adobe applications, Illustrator offers dedicated, more precise methods for flipping and mirroring, ensuring that your high-resolution images and digital photography are manipulated with the utmost control.
Method 1: Flipping Images with the Reflect Tool (O)
The Reflect Tool in Adobe Illustrator is specifically designed for mirroring objects and images, allowing for precise control over the axis of reflection. It’s an excellent choice when you need to create perfect symmetry or simply view an element from an inverse perspective.
Step-by-Step Guide to Mirroring an Image
Flipping an object or image using the Reflect Tool is a straightforward process that offers both flexibility and precision. Here’s a detailed breakdown of the steps:
-
Select Your Image or Object:
- Begin by launching Adobe Illustrator and opening your desired project. If you need to add an image, go to
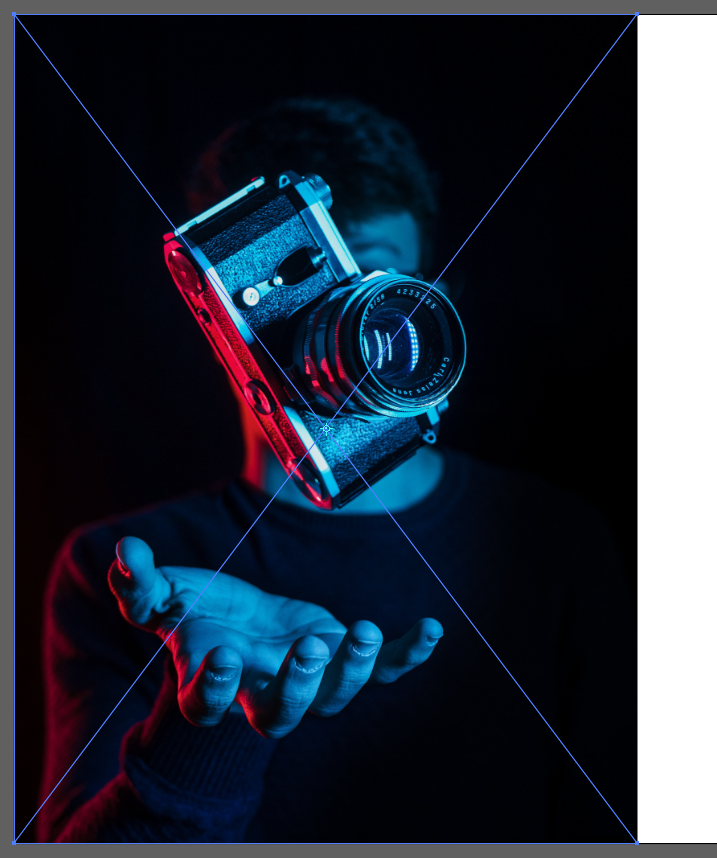
File > Placeor use the shortcutShift + Ctrl/Cmd + P, then click and drag on your canvas to position and size it. - Once your image or object is on the artboard, select the Selection Tool (keyboard shortcut
V) from the toolbar. Click once on the image you wish to flip. A bounding box with blue borders and diagonal lines will appear, indicating that the object is selected. This initial step is critical whether you’re manipulating a simple shape, an embedded photograph, or a complex group of vectors.
- Begin by launching Adobe Illustrator and opening your desired project. If you need to add an image, go to
-
Activate the Reflect Tool:
- Locate the Reflect Tool in your Illustrator toolbar. It’s often grouped with the
Rotate Tool. To access it, you might need to click and hold down theRotate Toolicon until a flyout menu appears, then select the Reflect Tool. Its keyboard shortcut isO. - When the Reflect Tool is active, you’ll notice a small blue crosshair, known as the anchor point, appearing at the center of your selected object. This anchor point is crucial as it defines the axis around which the reflection will occur. By default, it’s at the object’s geometric center, but you have the power to reposition it.
- Locate the Reflect Tool in your Illustrator toolbar. It’s often grouped with the
-
Understanding and Adjusting the Anchor Point:
- The anchor point is the pivot for your flip. If you need to mirror the image around a specific point other than its center—perhaps a corner, an edge, or even an external point on your canvas—you can click and drag this anchor point to its desired new location. The reflection will then be calculated based on this new pivot. This allows for highly customized mirror effects, essential for creative photo manipulation or detailed graphic design.
-
Accessing Reflect Settings for Precise Control:
- There are a couple of ways to open the Reflect settings dialog box for fine-tuned control:
- Double-Click: With the Reflect Tool (
O) active, simply double-click its icon in the toolbar. - Alt/Option + Click: A popular and efficient method is to hold down the
Alt(Windows) orOption(Mac) key and click directly on your selected image or object. This automatically brings up theReflectdialog box. - Right-Click/Control+Click: Alternatively, with the Selection Tool (
V) active, right-click (or Control+click on Mac) on your image, then navigate toTransform > Reflect.
- Double-Click: With the Reflect Tool (
- There are a couple of ways to open the Reflect settings dialog box for fine-tuned control:
-
Choosing Your Flip Orientation:
- Inside the Reflect dialog box, you’ll find options for
Axis:- Horizontal: Selecting
Horizontalwill flip your image upside down, mirroring it across a horizontal axis. This can be great for creating reflections on water or generating unique backgrounds. - Vertical: Choosing
Verticalwill flip your image sideways, mirroring it across a vertical axis. This is perfect for creating symmetrical compositions or changing the direction an object is facing. - Angle: For more advanced transformations, you can input a specific
Anglevalue. This allows you to define a custom axis for reflection, offering artistic flexibility beyond simple horizontal or vertical mirroring.
- Horizontal: Selecting
- Preview: Always check the
Previewbox within the dialog window. This enables you to see the live changes on your canvas as you adjust the settings, ensuring you achieve the exact visual outcome you desire before committing.
- Inside the Reflect dialog box, you’ll find options for
-
Finalizing the Flip:
- After selecting your desired axis (Horizontal, Vertical, or a specific Angle), you have two main options:
- OK: Clicking
OKwill apply the flip directly to your original selected image or object. - Copy: If you wish to create a mirrored duplicate of your image without altering the original, click
Copy. This is incredibly useful for creating symmetrical designs, generating repeating patterns for wallpapers, or constructing intricate mood boards with matching elements. The new flipped copy will appear directly over the original, ready for repositioning with the Selection Tool (V).
- OK: Clicking
- After selecting your desired axis (Horizontal, Vertical, or a specific Angle), you have two main options:
Mastering the Reflect Tool empowers you to create stunning symmetrical designs, achieve visual balance, and explore new aesthetic possibilities for your images, all contributing to the rich content themes found on Tophinhanhdep.com, from beautiful photography to abstract digital art.
Method 2: Flipping Images with the Transform Panel
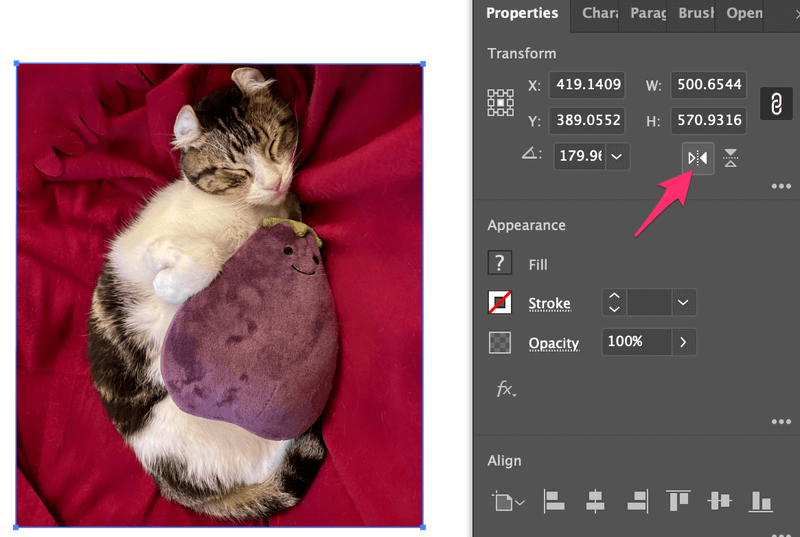
For quick, straightforward horizontal or vertical flips, the Transform Panel offers an incredibly efficient solution. This method is particularly convenient as it integrates directly into Illustrator’s Properties panel, providing immediate access to common transformation functions without needing to switch tools or open separate dialog boxes.
Quick Horizontal and Vertical Flips
The Transform panel provides an accessible and rapid way to flip images, making it a go-to for designers focused on speed and efficiency.
-
Select Your Image or Object:
- As with any manipulation, start by selecting the image or object you intend to flip using the Selection Tool (keyboard shortcut
V). Ensure the bounding box appears around your chosen element.
- As with any manipulation, start by selecting the image or object you intend to flip using the Selection Tool (keyboard shortcut
-
Accessing the Transform Panel:
- When an object is selected, the
Transformpanel often appears automatically within thePropertiespanel (usually on the right side of your Illustrator workspace). - If you don’t see it, you can manually open it by going to
Window > Transformfrom the overhead menu. This panel provides a comprehensive set of options for moving, scaling, rotating, shearing, and, crucially, flipping objects.
- When an object is selected, the
-
Choosing the Orientation for the Flip:
- Within the Transform panel, you’ll notice small icon buttons dedicated to flipping. Look for the
Flip HorizontallyandFlip Verticallybuttons. These icons typically depict an object being mirrored along its horizontal or vertical axis. - Flip Horizontally: Clicking this button will instantly mirror your selected image from left to right. This is ideal for quickly changing the orientation of a landscape photo or a character in an illustration.
- Flip Vertically: Clicking this button will mirror your selected image from top to bottom. Useful for creating reflections or inverting elements.
- The
Transformpanel also often includes anAngleinput field, allowing you to manually enter rotation degrees if needed, providing a versatile hub for basic transformations.
- Within the Transform panel, you’ll notice small icon buttons dedicated to flipping. Look for the
-
Instantaneous Result:
- Unlike the Reflect Tool’s dialog box, which often requires clicking “OK” or “Copy,” the Transform panel’s flip buttons apply the change immediately upon clicking. This makes it an incredibly fast method for straightforward inversions, perfect for adjusting aesthetic elements or compositions on the fly.
This method is highly favored for its speed and simplicity, especially when integrating stock photos or various aesthetic images into a design where quick directional changes are needed. It streamlines the workflow for tasks like adjusting backgrounds or arranging thematic collections, aligning with Tophinhanhdep.com’s goal of efficient image management and visual creation.
Advanced Techniques and Creative Applications
Beyond simple horizontal and vertical flips, Adobe Illustrator offers advanced methods for rotation and specialized text manipulation, providing designers with even greater control over their visual elements. These techniques are particularly beneficial for digital art, photo manipulation, and producing truly unique graphic designs, contributing to the “creative ideas” and “trending styles” frequently explored on Tophinhanhdep.com.
Rotating Images to Specific Angles
While flipping is a specific form of transformation, rotating an image to a custom angle is often intertwined with creating dynamic compositions and unusual perspectives.
-
Select the Image:
- Start by selecting the image or object using the Selection Tool (
V).
- Start by selecting the image or object using the Selection Tool (
-
Activate the Rotate Tool:
- Select the Rotate Tool (
R) from the toolbar. This tool often shares a spot with the Reflect Tool. - Similar to the Reflect Tool, a blue anchor point will appear at the center of your selected object. This is the pivot point for your rotation.
- Select the Rotate Tool (
-
Set the Center Point for Rotation:
- You can reposition this anchor point by clicking and dragging it to any desired location on your canvas. The image will then rotate around this new center. This is crucial for creative effects, such as orbiting elements or rotating around an off-center axis.
-
Interactive Rotation:
- With the Rotate Tool active, click on your image and drag your mouse. The image will rotate interactively around the anchor point. This allows for visual, intuitive adjustments.
- Creating Copies while Rotating: To make a copy of your image while rotating it (useful for radial patterns or spokes), start dragging the image to rotate, then hold down
Alt(Windows) orOption(Mac) before releasing the mouse button. This will create a rotated duplicate, leaving the original in place.
-
Precise Angle Rotation via Dialog Box:
- For exact rotations, double-click the
Rotate Toolicon in the toolbar, orAlt/Option + clickon your desired rotation point. This opens theRotatedialog box. - In this dialog, you can input a specific numerical
Angle(e.g., 45, 90, 180 degrees). - Ensure the
Previewbox is checked to see the rotation in real-time. - You can then click
OKto apply the rotation to the original image orCopyto create a rotated duplicate. This precision is vital for graphic design projects requiring exact alignments or intricate patterns for abstract wallpapers.
- For exact rotations, double-click the
Flipping Text on a Path for Unique Typography
Illustrator’s ability to manipulate text is unparalleled, and this extends to placing text on paths and then creatively flipping it. This is particularly useful for logos, badges, or circular designs where text needs to be legible from multiple orientations.
-
Create Your Path:
- First, you need a path for your text. For a common example, select the Ellipse Tool and draw a perfect circle by holding down the
Shiftkey while dragging. This path will be the base for your text.
- First, you need a path for your text. For a common example, select the Ellipse Tool and draw a perfect circle by holding down the
-
Apply Type on a Path:
- In the
Type Toolflyout menu on the toolbar, select the Type on a Path Tool. - Click on your created path (e.g., the top of the circle). Illustrator will add placeholder text (“lorem ipsum”) along the path.
- Type your desired text. Adjust font, size, and other character settings using the
Characterpanel (Window > Type > Character). - You’ll notice three handles (alignment brackets) on the path. Use these with the Selection Tool (
V) to position and rotate your text along the path.
- In the
-
Duplicate the Text Path:
- To have text on the top and bottom of a circle, facing the right way, you’ll need two separate text paths. Select your text path with the Direct Selection Tool (white arrow tool, keyboard shortcut
A). - Copy it by going to
Edit > Copy(Ctrl/Cmd + C). - Paste it directly in front of the original using
Edit > Paste in Front(Ctrl/Cmd + F). This creates an exact duplicate layered precisely over the first. You can verify this in theLayerspanel.
- To have text on the top and bottom of a circle, facing the right way, you’ll need two separate text paths. Select your text path with the Direct Selection Tool (white arrow tool, keyboard shortcut
-
Edit the Duplicated Text:
- In the
Layerspanel, temporarily hide the visibility of the bottom text layer (click the eye icon). - Select the visible (top) text layer with the
Type Tooland type the new text that you want to appear on the bottom of your design.
- In the
-
Flip the Text on the Path:
- With the new text path selected, go to
Type > Type on a Path > Type on a Path Options. - In the dialog box:
- Effect: Keep it as
Rainbow(default for basic path following). - Align to Path: This setting determines how the text sits relative to the path.
Baseline: Text sits directly on the path.Ascender: Text sits above the path (on the outside of a circle).Descender: Text sits below the path (on the inside of a circle).Center: Text is centered on the path.- For text at the bottom of a circle to face outwards, you’ll likely use
AscenderorBaseline.
- Check the
Flipbox. This is the crucial step that reverses the text’s orientation along the path, making it readable when moved to the opposite side of a circular path.
- Effect: Keep it as
- Ensure
Previewis checked to see the effect instantly, then clickOK.
- With the new text path selected, go to
-
Position the Flipped Text:
- With the Selection Tool (
V), use the alignment brackets on the path to move the newly flipped text to the bottom of your circle. Adjust spacing and position until it looks right.
- With the Selection Tool (
-
Reveal All Layers:
- Finally, return to the
Layerspanel and turn the visibility back on for your original text layer. You now have text on the top and bottom of your circle, both facing outwards and readable, perfect for creative logos or unique visual designs for Tophinhanhdep.com.
- Finally, return to the
These advanced techniques open up a world of possibilities, allowing for intricate visual storytelling and precise execution in your digital creations.
Why Mastering Image Flipping Enhances Your Visuals (Tophinhanhdep.com’s Perspective)
Mastering the art of image flipping in Adobe Illustrator is more than just a technical skill; it’s a gateway to unlocking greater creative control and achieving professional-grade visual outcomes. For anyone involved in content creation, from professional graphic designers to hobbyist photographers, these techniques are indispensable. Tophinhanhdep.com is dedicated to empowering users with both inspiration and practical tools, and understanding these Illustrator functions directly contributes to the quality and impact of your visual assets.
Let’s explore how mastering image flipping resonates with the core categories of Tophinhanhdep.com:
-
Images (Wallpapers, Backgrounds, Aesthetic, Nature, Abstract, Sad/Emotional, Beautiful Photography):
- Creative Composition: Flipping allows you to experiment with image composition. A nature photograph, for instance, might gain a new aesthetic appeal when mirrored to create a tranquil reflection effect for a wallpaper or background.
- Symmetry and Balance: For aesthetic or abstract imagery, achieving perfect symmetry through flipping can create visually captivating patterns and a sense of harmony that enhances the overall appeal.
- Emotional Nuance: The subtle shift in direction of an object or a person in a sad/emotional or beautiful photography piece can alter its perceived narrative, allowing for a more profound connection with the viewer. Flipping can help fine-tune these subtle cues.
- Variety for Collections: When curating thematic collections or photo ideas, minor adjustments like flipping can significantly expand the utility of a single image, offering more options for mood boards and trending styles without needing entirely new assets.
-
Photography (High Resolution, Stock Photos, Digital Photography, Editing Styles):
- Enhancing Stock Photos: Many high-resolution stock photos are generic. Flipping can customize them, making them fit specific layouts or artistic visions, thus reducing their “stock” appearance.
- Digital Photography Editing: For digital photographers, flipping objects or scenes can be a key part of post-processing. It allows for creative reinterpretation of shots, correcting unintentional compositional biases, or aligning elements for a more impactful image.
- Exploring Editing Styles: Experimenting with mirror effects opens up new editing styles, particularly for abstract or surreal photography, enabling the creation of unique digital art.
-
Image Tools (Converters, Compressors, Optimizers, AI Upscalers, Image-to-Text):
- While flipping itself is a design action rather than a conversion or compression, the output of your flipped images directly feeds into the need for these tools. A beautifully flipped and composed image might then need to be optimized for web use, compressed for faster loading, or upscaled if its resolution isn’t sufficient for its new context. Tophinhanhdep.com provides the necessary tools to ensure your creatively transformed images are also functionally ready for any platform.
-
Visual Design (Graphic Design, Digital Art, Photo Manipulation, Creative Ideas):
- Core Graphic Design Skill: Image flipping is a foundational skill in graphic design. From creating logos and icons to designing brochures and web graphics, the ability to control orientation is indispensable.
- Digital Art Creation: For digital artists, mirroring elements allows for rapid development of symmetrical designs, complex patterns, and intricate illustrations, streamlining the creative process.
- Advanced Photo Manipulation: In conjunction with other techniques, flipping forms the basis for complex photo manipulations, enabling the creation of reflections, duplicate elements, and surreal scenes.
- Fueling Creative Ideas: The simple act of flipping an image can spark entirely new creative ideas, prompting designers to reconsider layouts, balance, and visual flow in ways they hadn’t initially imagined.
-
Image Inspiration & Collections (Photo Ideas, Mood Boards, Thematic Collections, Trending Styles):
- Dynamic Mood Boards: Flipping images adds dynamism to mood boards, allowing for more cohesive and visually interesting arrangements of various elements.
- Enriching Thematic Collections: Whether building a collection of “sad/emotional” imagery or “beautiful photography,” the ability to flip ensures that each image aligns perfectly with the overarching theme and composition of the collection.
- Adapting to Trending Styles: Many trending styles in visual design leverage symmetry, reflection, or altered perspectives. Mastering flipping allows designers to quickly adapt their work to these popular aesthetics, keeping their content fresh and relevant.
In essence, the techniques for flipping images and objects in Adobe Illustrator are more than just features; they are essential components of a robust visual designer’s toolkit. They provide the flexibility needed to transform raw images into compelling visual stories and perfectly composed designs. Tophinhanhdep.com is committed to being your ultimate resource for all things images, offering not only inspiration through stunning visuals but also the practical knowledge and tools like this guide to help you bring your creative visions to life. We encourage you to explore, experiment, and integrate these techniques into your daily design workflow to produce truly impactful and aesthetically pleasing visual content.
Conclusion
The ability to flip an image or object in Adobe Illustrator is a fundamental skill that significantly enhances your capacity for visual design and manipulation. As explored in this comprehensive guide, Illustrator offers multiple, intuitive methods to achieve this transformation, each suited to different creative needs. Whether you opt for the precise control of the Reflect Tool for mirroring and custom angles, or the quick efficiency of the Transform Panel for immediate horizontal and vertical inversions, mastering these techniques will undoubtedly elevate your design workflow.
Furthermore, the advanced application of flipping text on a path demonstrates the depth of Illustrator’s capabilities, allowing for truly unique typographic designs. These skills are not merely about technical execution but about unlocking new avenues for creative expression in graphic design, digital art, and photo manipulation.
At Tophinhanhdep.com, we understand the critical role that precise image manipulation plays in creating impactful visual content. From selecting the perfect high-resolution background to crafting an aesthetic mood board or enhancing beautiful photography, the techniques discussed here are indispensable. We encourage you to practice these methods, experiment with different orientations and anchor points, and integrate them seamlessly into your projects. By doing so, you’ll not only gain proficiency in Illustrator but also broaden your creative horizons, enabling you to consistently produce stunning visuals that resonate with your audience. Keep exploring, keep creating, and let Tophinhanhdep.com be your trusted partner in your journey through the exciting world of images.