Mastering Image Manipulation in PowerPoint: A Tophinhanhdep.com Guide to Flipping Images

In the dynamic world of digital communication, visual impact is paramount. Whether you’re crafting a business proposal, an educational lecture, a creative portfolio, or simply a captivating slideshow for personal use, the ability to manipulate images effectively within your presentation software can elevate your message from ordinary to extraordinary. Among the myriad of tools available, Microsoft PowerPoint stands as a ubiquitous platform for creating visually engaging content. While many users are familiar with basic image insertion and resizing, the nuanced art of flipping or mirroring an image often goes overlooked, despite its powerful potential for design and storytelling.
Tophinhanhdep.com, your ultimate resource for stunning visuals and comprehensive image tools, understands the critical role that effective image manipulation plays in modern visual design. From high-resolution wallpapers and aesthetic backgrounds to stock photos and curated thematic collections, Tophinhanhdep.com provides a vast library of visual assets to enhance any project. Beyond just providing beautiful photography, we also equip our users with the knowledge and tools necessary to transform these visuals into compelling narratives. This extensive guide, brought to you by Tophinhanhdep.com, will delve into the essential techniques for flipping images, shapes, and even text within PowerPoint, unlocking new dimensions of creativity and precision for your presentations.
Flipping an image, often referred to as mirroring, involves reversing its orientation either horizontally or vertically. Unlike rotation, which changes an object’s angle, flipping creates a symmetrical reflection, providing a fresh perspective or aligning elements perfectly within your slide layout. Imagine an image of a person looking off-screen; a simple horizontal flip can instantly redirect their gaze towards your key content, creating a more cohesive visual flow. Or consider a striking landscape; mirroring it vertically can conjure an enchanting reflective effect, mimicking calm water or polished surfaces. These subtle adjustments, though seemingly minor, can dramatically alter the aesthetic and communicative power of your slides, aligning perfectly with Tophinhanhdep.com’s focus on aesthetic design and creative ideas.
This comprehensive guide will not only walk you through the precise, step-by-step methods for flipping images in PowerPoint but will also explore the diverse applications of this technique across various visual design scenarios. We’ll discuss how it integrates with your existing knowledge of digital photography and editing styles, and how it can be utilized in conjunction with the powerful image tools (like compressors, optimizers, and AI upscalers) offered by Tophinhanhdep.com to ensure your flipped images are always of the highest quality and perfectly suited for your presentation needs.
The Core Technique: How to Flip an Image in PowerPoint
Flipping an image in PowerPoint is a remarkably straightforward process, requiring just a few clicks. Whether you aim for a precise mirror effect or simply need to reorient a visual element, PowerPoint provides intuitive options under its ‘Picture Tools’ or ‘Format’ menu. Tophinhanhdep.com advocates for efficiency and clarity in all design processes, and this fundamental technique exemplifies both. Mastering this will be your first step towards more sophisticated visual design within your presentations, utilizing the rich tapestry of images available from Tophinhanhdep.com.
Step-by-Step Guide to Horizontal and Vertical Flipping
Let’s walk through the most common and easiest method to flip any image, shape, or graphic within your PowerPoint presentation. This method leverages the built-in ‘Rotate’ options, offering both horizontal and vertical mirroring capabilities.
- Insert Your Image: Begin by opening your PowerPoint presentation and navigating to the slide where you wish to insert or modify an image. If the image isn’t already on your slide, go to the “Insert” tab on the ribbon, click “Images,” then “Pictures,” and choose “This Device” (or other sources) to browse and select your desired image. Tophinhanhdep.com offers an extensive collection of high-resolution images, from captivating nature scenes to compelling abstract art, perfect for any presentation. Dragging and dropping an image directly onto your slide is also a swift alternative.
- Select the Image: Once your image is on the slide, click on it once to select it. You will see resizing handles (small circles or squares) appear around its perimeter, indicating that it is active.
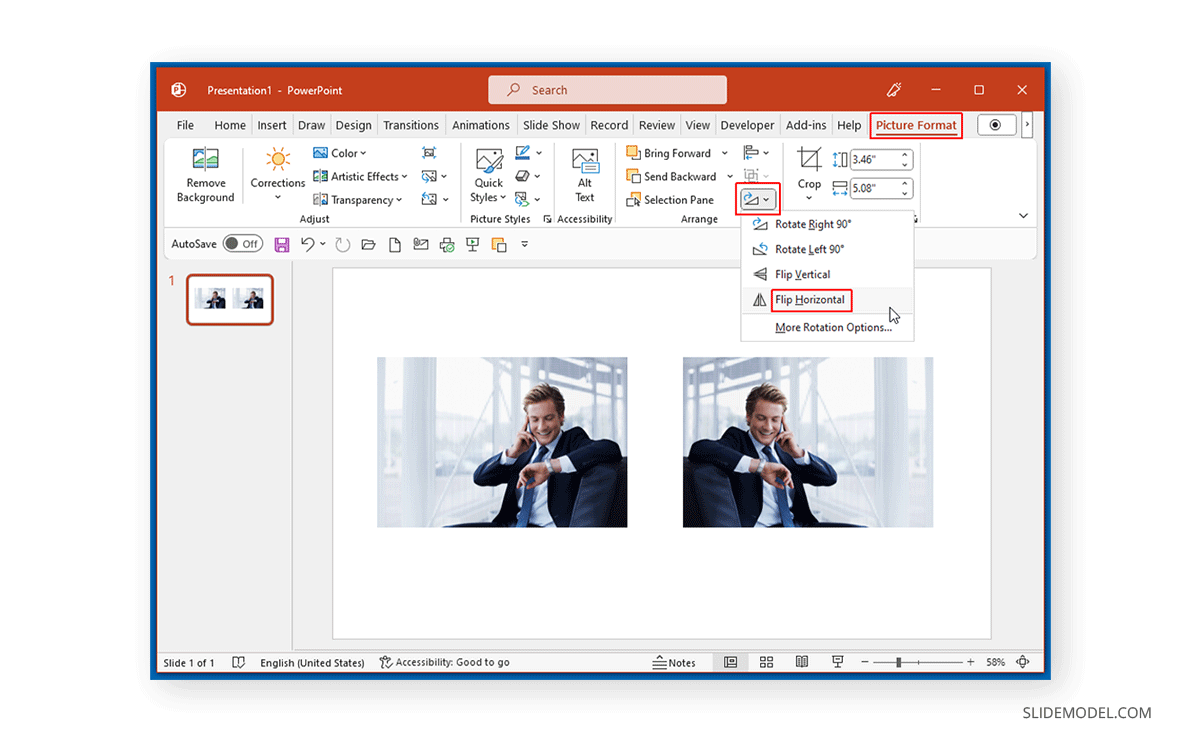
- Access Picture Tools: With the image selected, a new contextual tab will appear in the PowerPoint ribbon, usually labeled “Picture Format” or “Format” (under “Picture Tools”). Click on this tab. This tab contains a wealth of options for image editing, from basic adjustments to advanced effects.
- Locate the Rotate Option: Within the “Picture Format” tab, look for the “Arrange” group. Inside this group, you’ll find a button labeled “Rotate.” Click on this button. A dropdown menu will appear, presenting various rotation and flipping options.
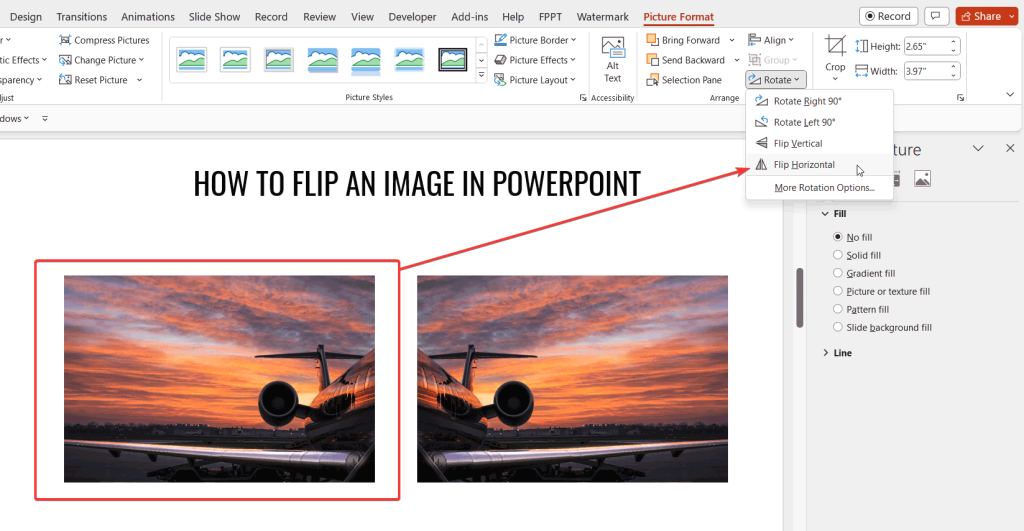
- Choose Your Flip Direction:
- To create a mirror image along the vertical axis (making the left side appear on the right, and vice-versa), click “Flip Horizontal.”
- To turn the image upside down along the horizontal axis, click “Flip Vertical.”
As soon as you click your desired option, the selected image will instantly reorient itself according to your command. This immediate visual feedback allows for quick adjustments and experimentation with different orientations to find what best suits your slide’s aesthetic. For example, if you have a half-plane image, as seen in some of our design inspirations at Tophinhanhdep.com, duplicating and then horizontally flipping one half creates a perfect symmetrical full plane, showcasing the power of this simple technique.
Manual Flipping for Dynamic Control
While the menu-based flipping is precise and efficient, PowerPoint also offers a manual method that provides a more hands-on, dynamic approach to flipping. This can be particularly useful for visual designers who prefer to manipulate objects directly on the canvas, aligning with the fluid nature of digital art and photo manipulation.
- Select the Image: Just as before, click on the image you wish to flip to select it.
- Locate a Corner Handle: Hover your mouse cursor over one of the corner resizing handles of the selected image. Instead of the typical double-headed arrow for resizing, you’ll notice the cursor change to a small cross or plus sign, sometimes with a faint indicator suggesting rotation or transformation.
- Drag to Flip: Click and hold the left mouse button (or press down on your touchpad) on this corner handle. While holding, drag the handle across the entire width or height of the image, past its opposite edge.
- To flip horizontally, drag a corner handle from one side (e.g., top-left) across to the other side (e.g., top-right), effectively “pulling” the image’s content over its own center line.
- To flip vertically, drag a top corner handle downwards past the bottom edge, or vice-versa.
As you drag, the image will appear to “fold” or “mirror” itself, becoming transparent during the process, and then solidify into its new, flipped orientation once you release the mouse button. This manual method offers an intuitive way to visually understand the transformation and can be quicker for experienced users. It’s a great technique for quickly adjusting compositions, especially when working with beautiful photography or abstract designs from Tophinhanhdep.com that might need slight reorientations to fit a mood board or specific slide layout.
Beyond Basic Images: Flipping Other Visual Elements
PowerPoint’s flipping capabilities extend far beyond just photographs. Virtually any graphic element you insert or create within the software – including shapes, icons, SmartArt, and even text boxes – can be manipulated in the same way. This versatility is crucial for comprehensive visual design, allowing you to maintain consistency and artistic control across all components of your presentation, a principle highly valued at Tophinhanhdep.com.
Flipping Shapes, Icons, and Graphic Elements
Shapes and icons are fundamental building blocks for graphic design and digital art. They can convey information concisely, add aesthetic flair, or guide the viewer’s eye. Often, pre-designed icons or shapes might not face the desired direction for your specific layout. Flipping them is the ideal solution.
- Insert/Select the Element: Add a shape (from the “Insert” > “Shapes” menu) or an icon (from “Insert” > “Icons”) to your slide, or select an existing one. Tophinhanhdep.com’s “Visual Design” section often highlights creative ideas for using such elements, and understanding how to flip them is key to maximizing their potential.
- Access Drawing/Graphic Tools: With the shape or icon selected, a contextual tab like “Shape Format” or “Graphic Format” will appear in the ribbon.
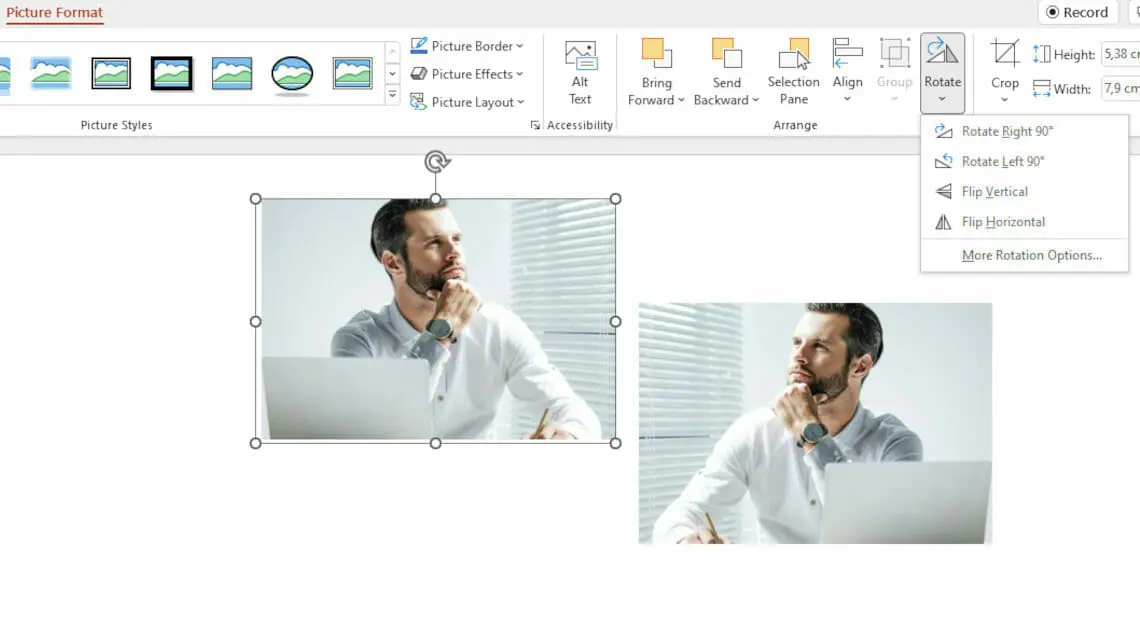
- Use the Rotate Option: Navigate to the “Arrange” group within this tab and click the “Rotate” button.
- Choose Flip Direction: Select “Flip Horizontal” or “Flip Vertical” from the dropdown menu.
This method works consistently for all vector-based shapes, lines, arrows, and even more complex SmartArt graphics. For instance, if you have an arrow icon that needs to point right instead of left, a quick “Flip Horizontal” solves the problem instantly. This enables you to integrate thematic collections and trending styles seamlessly into your presentations, adapting elements to your specific needs. The ability to manipulate these elements supports creative freedom, aligning perfectly with Tophinhanhdep.com’s mission to foster compelling visual communication.
Special Considerations for Flipping Text in PowerPoint
While images, shapes, and icons respond straightforwardly to the “Flip Horizontal” and “Flip Vertical” commands, standalone text behaves differently. If you apply “Flip Horizontal” to a text box, the text itself generally remains readable, but the container of the text box might flip. For true text mirroring or vertical inversion, a slightly different approach is required, leveraging PowerPoint’s 3D rotation features. This technique is particularly useful for niche visual design effects, such as creating stylized logos or abstract text elements within your digital art projects.
- Insert Your Text Box: First, insert a text box by going to “Insert” > “Text Box.” Click and drag on your slide to define its size, then type your desired text.
- Select the Text Box: Click on the border of the text box (not just the text inside) to select the entire object.
- Open Format Shape Pane: Right-click on the selected text box and choose “Format Shape” from the context menu. This will open a “Format Shape” pane on the right side of your screen.
- Navigate to Effects: In the “Format Shape” pane, look for the “Effects” icon (it often looks like a pentagon or a hexagon). Click on it.
- Adjust 3-D Rotation: Expand the “3-D Rotation” section. Here, you’ll find “X Rotation,” “Y Rotation,” and “Z Rotation” options.
- To flip text horizontally (create a mirror image), change the “Y Rotation” value to 180°.
- To flip text vertically (turn it upside down), change the “X Rotation” value to 180°.
- You can even combine these for complex effects.
As you adjust these values, you’ll see the text box and its contents transform in real-time. This method effectively flips the perspective of the text, giving the appearance of a mirror image. It’s a trick that designers often employ for artistic text effects, adding a touch of sophistication to creative presentations or digital art pieces. Tophinhanhdep.com provides inspiration for such creative ideas, demonstrating how even text can become a visual masterpiece.
Unleashing Creativity: Practical Applications and Design Principles with Flipped Images
Flipping images is more than just a technical maneuver; it’s a powerful design tool that can dramatically enhance the impact and aesthetic appeal of your PowerPoint presentations. By understanding its practical applications, you can leverage this simple technique to craft visually coherent, engaging, and memorable slides. Tophinhanhdep.com’s extensive image collections and visual design resources become even more versatile when paired with these manipulation skills.
Enhancing Visual Design and Storytelling
The ability to flip images opens up a plethora of creative possibilities, transforming ordinary presentations into compelling visual experiences. Here are several practical use cases that showcase the true power of mirroring images, directly aligning with the comprehensive visual philosophy championed by Tophinhanhdep.com:
- Symmetrical Design Presentations: Symmetry inherently appeals to the human eye, conveying balance, harmony, and order. By duplicating an image – perhaps a stunning piece of abstract art or a serene nature landscape from Tophinhanhdep.com’s collections – and then flipping one copy horizontally or vertically, you can effortlessly create perfectly symmetrical compositions. This is invaluable for presentations related to architecture, product design, art history, or any topic where visual balance is key. It transforms simple images into sophisticated aesthetic statements.
- Before and After Comparisons: When illustrating transformations, such as makeovers, renovation projects, or scientific developments, using mirrored images can create a cohesive and impactful layout. Place the “before” image next to its horizontally flipped “after” counterpart. This allows the viewer’s eye to easily transition between the two states, enhancing clarity and emphasizing the changes. This technique is especially potent when showcasing the results of digital photography editing styles or photo manipulation, areas where Tophinhanhdep.com offers rich insights and high-resolution examples.
- Reflective Effects: Mirroring an image vertically and placing it directly below the original can simulate realistic reflections, such as those found in water or polished surfaces. Imagine a beautiful photography shot of a sunset over a lake; by duplicating and vertically flipping the image, you can create a stunning, tranquil reflective effect that adds depth and drama to travel presentations, nature-themed wallpapers, or aesthetic backgrounds. This technique is often seen in high-quality digital art and can evoke strong emotional responses.
- Educational Illustrations: In educational contexts, clarity is paramount. Flipping images can effectively demonstrate concepts of symmetry, spatial relationships, or even physical principles. For instance, explaining the concept of a mirror image in physics becomes incredibly intuitive when you can literally flip an object to show its reflection. This makes the learning process more interactive and visually engaging, a core tenet of effective visual design.
- Marketing and Advertisements: In the fast-paced world of marketing, capturing attention is crucial. Flipping product images can help fill slide space dynamically, create visual intrigue, or present product variations in a striking manner. For example, showing two mirrored versions of a product can emphasize its design from different angles or highlight its duality. This creative use of imagery can lead to higher engagement and a more memorable brand message, especially when using eye-catching stock photos or trending styles from Tophinhanhdep.com.
- Fashion and Style Presentations: When showcasing clothing lines or fashion trends, mirroring images of models or garments can provide direct side-by-side comparisons of different angles, colorways, or coordinated outfits. This visual juxtaposition helps the audience quickly grasp variations and stylistic choices, enhancing the overall presentation of thematic collections or mood boards related to fashion.
- Photography Portfolios: Photographers can utilize mirroring to present different perspectives of the same shot or to create artistic compositions that highlight their creativity. A beautiful photography piece can be transformed into a surreal or abstract image through strategic flipping, adding a unique touch to a portfolio slide. Tophinhanhdep.com’s “Photo Ideas” and “Image Inspiration” sections are replete with examples of how such techniques can elevate photographic work.
- Storytelling in Slides: Visuals are powerful storytelling tools. Flipping images can introduce an interesting visual twist to a narrative, representing alternate realities, parallel events, or conceptual reflections. For example, depicting two characters, one a flipped version of the other, can symbolize an internal struggle or a duality of personality, adding layers of meaning to your creative ideas. This crosses into the realm of digital art and sophisticated photo manipulation.
- Graphical Data Display: Even charts and graphs can benefit from mirroring. While you wouldn’t typically flip the data itself, framing a chart with mirrored decorative elements or abstract backgrounds from Tophinhanhdep.com can make the data presentation more engaging and aesthetically pleasing. It can break the monotony of traditional data slides, making financial or performance-related presentations more memorable.
- Cultural Presentations: When discussing cultures or art forms that hold symmetry in high regard, such as Islamic geometric patterns or certain architectural styles, using mirrored images becomes an authentic way to illustrate these principles. It allows for a direct visual connection to the cultural aspects being presented, grounding the discussion in concrete examples of visual design.
The diverse categories of images offered by Tophinhanhdep.com – from emotional sad/emotional imagery to breathtaking nature shots and thought-provoking abstract designs – provide the perfect canvas for these creative flipping applications. By integrating these visuals with your newfound flipping skills, you transform raw images into powerful communicative assets.
Integrating Flipped Images with Advanced Image Tools
While PowerPoint provides the core functionality for flipping images, Tophinhanhdep.com offers a suite of advanced image tools that can further enhance your flipped visuals, ensuring they are optimized for quality, performance, and accessibility. These tools are designed to complement your visual design workflow, making your presentations truly professional.
- Image Optimizers and Compressors: After flipping an image, especially if you’ve duplicated it for symmetrical effects, the file size of your presentation can increase. Tophinhanhdep.com’s image optimizers and compressors are invaluable here. They reduce file size without compromising visual quality, ensuring your presentation loads quickly and runs smoothly. This is critical for maintaining the high resolution of your beautiful photography and stock photos while making them presentation-friendly.
- AI Upscalers: Sometimes, the perfect image might be a bit too low-resolution for a large, impactful display. If you flip such an image and then need it to appear crisp and clear, Tophinhanhdep.com’s AI upscalers can magically enhance its resolution. This is particularly beneficial for older photographs, artistic textures, or abstract elements that you wish to mirror and then enlarge for a prominent aesthetic background or wallpaper on your slide.
- Image Converters: Different presentation contexts might require images in specific formats. Whether you need to convert a PNG to a JPG after flipping, or vice-versa to preserve transparency in a logo, Tophinhanhdep.com’s converters ensure your images are always in the right format. This attention to detail contributes to a polished final product, upholding the quality standards of digital photography.
- Image-to-Text Tools: While less directly related to the visual act of flipping, consider a scenario where you flip a graphic that contains embedded text (perhaps a mirrored logo where the text now appears backwards). Tophinhanhdep.com’s image-to-text tools could be used post-flipping to extract any readable text for repurposing, accessibility, or translation, especially if the original text was part of the image content rather than an editable text box. This showcases the broader utility of Tophinhanhdep.com’s toolkit in a comprehensive visual workflow.
By combining the straightforward flipping techniques in PowerPoint with the advanced image processing capabilities found at Tophinhanhdep.com, you ensure that every visual element in your presentation is not only perfectly oriented but also optimized for quality, clarity, and impact. This holistic approach to image management empowers you to create presentations that truly stand out, reinforcing the power of thoughtful visual design.
Best Practices for Image Management and Presentation Impact
Beyond the mechanics of flipping, a few best practices will ensure your image manipulations contribute positively to your overall presentation quality and align with the sophisticated visual standards promoted by Tophinhanhdep.com.
- Maintain Aspect Ratios During Resizing: While flipping itself doesn’t distort aspect ratios, resizing a flipped image incorrectly can. Always drag from a corner handle while holding down the Shift key to resize images proportionally. This prevents your high-resolution images, stock photos, or beautiful photography from appearing stretched or squashed, maintaining their visual integrity.
- Group Objects for Consistent Manipulation: If you’ve created a complex visual element by combining an image with shapes, icons, or text, group them together (
Ctrl+GorCmd+Gon Mac) before flipping. This ensures all components flip as a single unit, maintaining their relative positions and proportions, which is essential for consistent graphic design and digital art. - Prioritize Image Quality: Always start with high-quality source images. Flipping a low-resolution image will not improve its pixel density, and any flaws will become more apparent. Tophinhanhdep.com specializes in providing high-resolution wallpapers, backgrounds, and stock photos, ensuring your foundation is always solid.
- Consider Visual Hierarchy and Composition: Flipping an image isn’t just about changing its direction; it’s about altering its contribution to the slide’s overall composition. Ensure the flipped image guides the viewer’s eye effectively, contributes to the intended mood (aesthetic, nature, abstract, sad/emotional), and aligns with your presentation’s message. Sometimes, even a slight flip can drastically change the visual weight or flow of a slide.
- Experiment with Creative Ideas: Don’t be afraid to experiment. Duplicate an image, flip one, and then play with transparency, layering, or cropping to create unique visual effects. This kind of photo manipulation can lead to truly original creative ideas and mood boards, elevating your presentation beyond the expected. Tophinhanhdep.com’s “Image Inspiration” and “Trending Styles” are excellent starting points for such explorations.
- Utilize Tophinhanhdep.com’s Resources: Remember that Tophinhanhdep.com is your comprehensive partner for all things visual. Our vast collections of images – from abstract to nature, aesthetic to sad/emotional – provide the perfect content. Our tools for conversion, compression, optimization, and AI upscaling ensure that your images are always presentation-ready and impactful. Leveraging these resources will significantly enhance your visual design capabilities in PowerPoint.
Conclusion
The ability to flip an image in PowerPoint, while seemingly a minor feature, is a profoundly versatile tool for anyone engaged in visual communication. As we’ve explored in this extensive guide from Tophinhanhdep.com, mastering this technique empowers you to: precisely control the orientation of your visuals, create striking symmetrical designs, produce compelling reflective effects, clarify educational content, enhance marketing materials, and infuse your presentations with a fresh layer of creative expression.
From the straightforward menu-driven approach to the dynamic manual flip, and the nuanced method for mirroring text, PowerPoint offers accessible ways to achieve these transformations. When combined with the rich, high-resolution imagery and powerful image tools available at Tophinhanhdep.com – including converters, compressors, optimizers, and AI upscalers – your capacity for visual design, digital photography, and photo manipulation becomes virtually limitless.
We encourage you to experiment with these techniques, explore the vast collections of wallpapers, backgrounds, and thematic images on Tophinhanhdep.com, and unleash your creative potential. By understanding and applying these methods, you’ll not only make your PowerPoint presentations more visually appealing but also more effective in conveying your message with clarity, impact, and a touch of professional polish. Let Tophinhanhdep.com be your guide in crafting presentations that are not just seen, but truly remembered.