Mastering Image Flipping in Photoshop: A Comprehensive Guide for Visual Creators

In the vast and dynamic world of digital imagery, the ability to manipulate and transform photos is an indispensable skill for photographers, graphic designers, and digital artists alike. Among the myriad of techniques available in Adobe Photoshop, flipping an image might seem like a simple function, yet its impact on visual composition, storytelling, and creative expression can be profound. Whether you’re aiming to correct an awkward orientation, create stunning mirror effects, or simply adjust the balance of a shot for a perfect aesthetic, understanding how to flip an image in Photoshop is a fundamental aspect of effective digital photography and visual design.
This guide will delve into the essential methods for flipping images and layers within Photoshop, offering step-by-step instructions for both beginners and seasoned professionals. We’ll explore not just the “how,” but also the “why,” connecting these techniques to broader concepts of photo manipulation, creative ideas, and enhancing your overall image collections. From adjusting a single element in a stock photo to reimagining entire wallpapers or backgrounds, mastering this simple yet powerful tool will streamline your workflow and unlock new dimensions of artistic possibility.
Understanding Image Flipping: Why and When to Flip
Flipping an image is more than just a quick reversal; it’s a powerful tool that can dramatically alter perception and create unique visual narratives. Essentially, flipping means mirroring an image along a horizontal or vertical axis. This seemingly minor adjustment can have significant implications for how viewers interpret your work, making it a cornerstone technique in various editing styles.
![]()
The Core Concept: Mirroring Your Vision
When you flip an image, you’re essentially creating a reflection. A horizontal flip takes what was on the left and moves it to the right, and vice versa. A vertical flip mirrors the image from top to bottom. This simple action can fundamentally change the directional flow of an image, shift the visual weight, and even correct subtle imbalances that might be imperceptible at first glance. For artists working on digital art or graphic design projects, this control over orientation is crucial for achieving desired compositions.
Practical Applications in Photography and Design
The reasons for flipping an image are as diverse as the images themselves. For photography, especially nature or beautiful photography, flipping can sometimes rescue a shot with an awkward composition. Perhaps a leading line points out of the frame, or a subject feels too close to one edge. A quick flip can redirect attention, bringing a fresh photo idea to life. In portraiture, a flipped image can sometimes make a subject appear more natural or less posed, aligning with our ingrained perceptions.
In visual design and photo manipulation, flipping layers or entire canvases is a routine task. Designers frequently flip logos, text, or graphic elements to fit specific layouts, create symmetrical patterns, or experiment with abstract compositions. It’s a key technique for developing mood boards and designing eye-catching thematic collections or trending styles. For instance, reflecting a landscape image vertically can create stunning, surreal wallpapers that challenge conventional perspectives, adding an intriguing aesthetic to any screen.
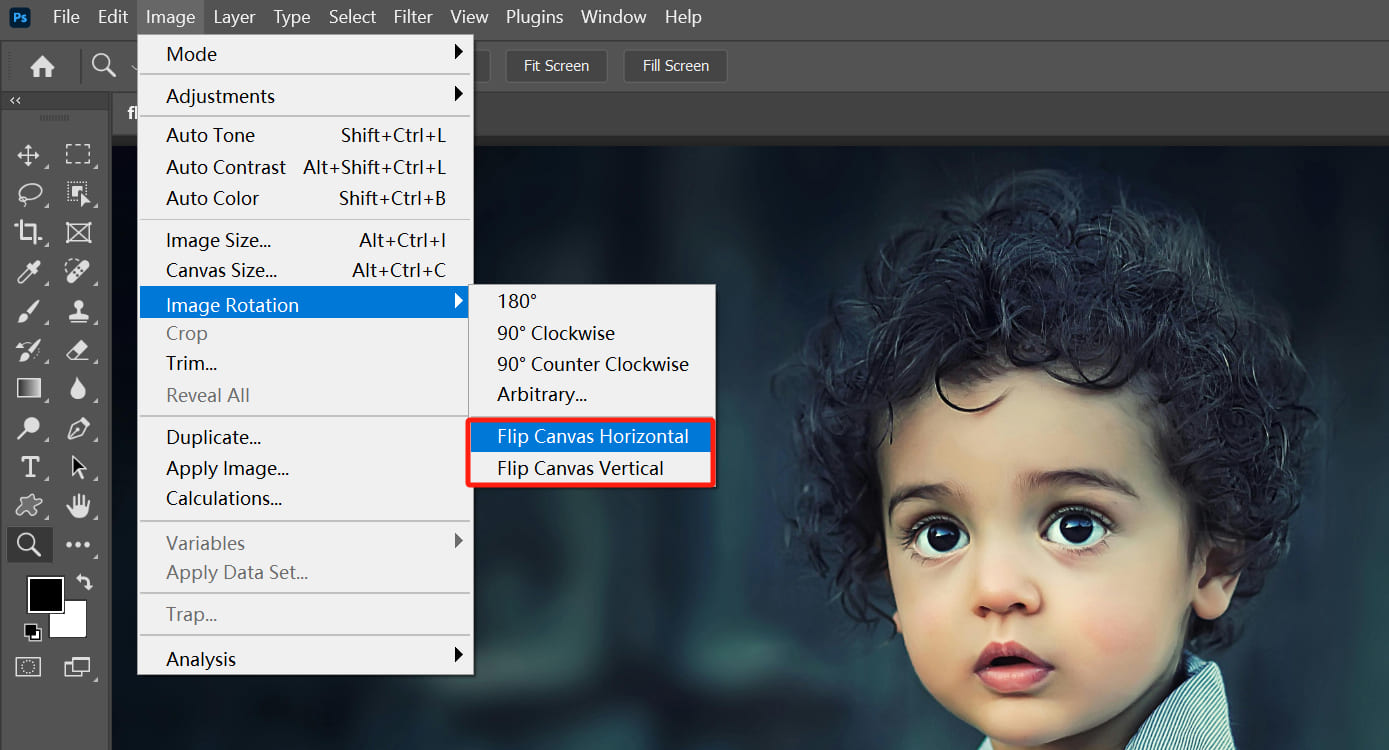
Step-by-Step: Flipping the Entire Canvas in Photoshop
One of the most straightforward applications of the flip function in Photoshop is mirroring the entire image, also known as the canvas. This is particularly useful when the overall orientation of your high-resolution image needs to be reversed, perhaps to balance elements or to prepare an image for a specific print orientation.
The Quick Horizontal Flip
To flip your entire image horizontally in Photoshop, follow these simple steps:
- Open Your Image: Launch Adobe Photoshop and open the image you wish to flip. This can be any type of image, from a beautiful photograph to an abstract digital creation.
- Access the Image Menu: Navigate to the top menu bar in Photoshop.
- Select “Image”: Click on “Image.”
- Go to “Image Rotation”: From the dropdown menu, hover over “Image Rotation.”
- Choose “Flip Canvas Horizontal”: Click this option.
Instantly, your entire image will be mirrored along its vertical axis, with everything on the left moving to the right and vice versa. This can be a game-changer for editing styles that demand a specific visual flow or when preparing images for backgrounds or artistic prints.
The Vertical Canvas Inversion
Similarly, if you need to flip your entire image vertically, the process is almost identical:
- Open Your Image: Ensure your desired image is open in Photoshop.
- Access the Image Menu: Go to the top menu bar.
- Select “Image”: Click on “Image.”
- Go to “Image Rotation”: Hover over “Image Rotation.”
- Choose “Flip Canvas Vertical”: Select this option.
Your image will now be mirrored along its horizontal axis, inverting the top and bottom portions. This is a fantastic technique for creating dramatic reflections, especially with nature photography featuring water or sky, or for generating intriguing abstract designs that play with symmetry.
Considering Photoshop Versions
While these instructions are generally applicable across most recent versions of Photoshop, slight variations in terminology or menu organization might occur in older software releases. If you find yourself unable to locate the “Image Rotation” or “Flip Canvas” options, a quick solution is to use Photoshop’s built-in help function. Simply click on “Help” in the top menu bar and search for “flip.” Photoshop will typically guide you directly to the relevant feature, ensuring that regardless of your version, you can execute this essential image tool function.
Precision Flipping: Working with Individual Layers
Often, you don’t want to flip the entire canvas, but rather a specific element within your composition. This is where layer-specific flipping comes into play, offering granular control essential for complex photo manipulation and graphic design projects. Whether it’s a logo, a piece of text, or an isolated subject within a stock photo, flipping individual layers maintains the integrity of the rest of your image.
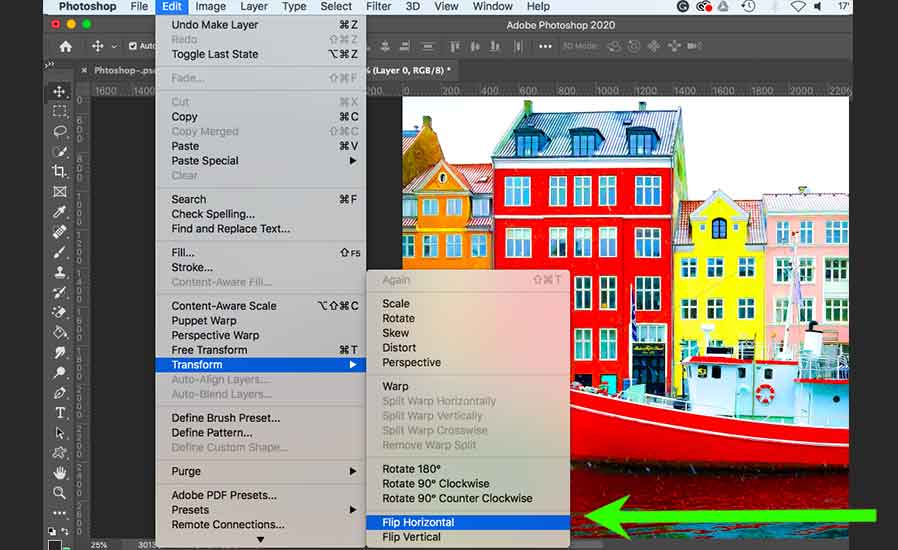
Method 1: Using the Transform Menu
The most direct way to flip a single layer is through the Transform menu:
- Select the Desired Layer: In the Layers panel (usually located on the right side of your Photoshop interface), click on the specific layer you wish to flip. Make sure it’s the active layer. If your element isn’t on its own layer, you might need to select it using a selection tool and then copy it to a new layer (Ctrl/Cmd + J) before proceeding. This is crucial for precise visual design.
- Access the Edit Menu: Go to the top menu bar.
- Select “Edit”: Click on “Edit.”
- Go to “Transform”: From the dropdown menu, hover over “Transform.”
- Choose “Flip Horizontal” or “Flip Vertical”: Select the appropriate flipping direction.
This will apply the flip transformation only to your selected layer, leaving all other layers unchanged. This method is straightforward and highly effective for tasks like adjusting text orientation or mirroring specific design elements in digital art.
Method 2: Free Transform Shortcut (Ctrl/Cmd + T)
For a more interactive and often quicker approach, the Free Transform tool offers a versatile way to flip layers:
- Select the Desired Layer: As with Method 1, ensure the layer you want to flip is selected in the Layers panel.
- Activate Free Transform: Press
Ctrl + T(for Windows) orCommand + T(for Mac) on your keyboard. A bounding box with transformation handles will appear around the content of your selected layer. - Right-Click Inside the Bounding Box: Place your mouse cursor inside this bounding box and right-click (or Control-click on Mac). A context menu will appear.
- Choose Flip Options: From this context menu, you’ll see “Flip Horizontal” and “Flip Vertical” options. Select the one you need.
- Confirm Transformation: Once you’re satisfied with the flip, press
Enter(orReturnon Mac) to commit the transformation, or double-click inside the bounding box.
This method is highly favored by many professionals due to its speed and the immediate visual feedback it provides. It’s an indispensable technique for quick adjustments in photo manipulation and when refining mood boards.
Flipping Multiple Layers Simultaneously
What if you need to flip several elements at once, but not the entire canvas? Photoshop allows you to do this with ease:
- Select Multiple Layers: In the Layers panel, hold down the
Ctrlkey (Windows) orCommandkey (Mac) and click on each layer you wish to flip. This will select multiple layers. - Activate Free Transform: Press
Ctrl + T(Windows) orCommand + T(Mac). A single bounding box will appear around all the selected layers combined. - Right-Click and Flip: Right-click inside the bounding box and choose either “Flip Horizontal” or “Flip Vertical.”
- Confirm: Press
Enterto apply the transformation to all selected layers simultaneously.
This technique is incredibly efficient for design projects involving multiple interconnected elements, ensuring consistency across your chosen components and maintaining your desired editing styles.
Beyond Simple Flips: Rotation and Creative Techniques
While flipping is a straightforward mirroring process, Photoshop offers related transformations like rotation that serve different purposes. Understanding the distinction and exploring creative applications can significantly elevate your visual design and image inspiration.
Distinguishing Between Flipping and Rotating
It’s easy to confuse flipping with rotating, but they achieve fundamentally different results.
- Flipping (Mirroring): As discussed, flipping creates a mirror image along an axis. Imagine looking at your reflection in a mirror – that’s a flip. The relative positions of elements change from left to right or top to bottom.
- Rotating (Tilting): Rotation changes the orientation of an image or layer around a central point, by a specified degree. Think of tilting your head; the world turns, but its inherent left-to-right or top-to-bottom relationships remain. Rotating by 90 or 180 degrees will simply turn the image, not mirror it.
For instance, if you have text, flipping it will make it unreadable (unless it’s perfectly symmetrical), whereas rotating it will merely change its angle. Recognizing this difference is key for precise photo manipulation.
To rotate an image or layer:
- Select Image/Layer: Open your image or select the specific layer.
- Image Rotation (for Canvas): Go to
Image > Image Rotationand choose from predefined angles like90° Clockwise,90° Counter Clockwise, or180°. - Free Transform (for Layers): Use
Ctrl + T(Windows) orCommand + T(Mac), then hover your mouse outside the bounding box until you see a curved arrow. Click and drag to rotate freely, or enter a specific angle in the options bar.
Utilizing the Rotate View Tool for Canvas Rotation
For a more intuitive way to rotate the entire canvas (all layers simultaneously), Photoshop provides the Rotate View Tool:
- Locate the Tool: In Photoshop’s Tools panel (usually on the left), find and select the “Rotate View Tool” (its shortcut is
R). - Rotate Interactively: Click and hold your mouse button anywhere on the image canvas. A compass-like indicator will appear. Drag your cursor clockwise or counter-clockwise to rotate the entire canvas to your desired angle.
- Reset View: If you want to revert to the original orientation, click the “Reset View” button in the Options bar at the top of the screen.
This tool is especially useful when you’re working on digital art or graphic design pieces and need to temporarily change your viewing angle without affecting the actual image data, which is beneficial for hand-eye coordination during painting or detailed editing.
Creative Exploration: Mirror Effects and Patterns
Flipping an image opens a gateway to imaginative creative ideas and captivating visual design. Beyond simple corrections, mirroring techniques can be used to generate intricate patterns, surreal landscapes, and artistic compositions that enrich your image inspiration.
-
The Classic Mirror Effect: One popular technique involves creating a perfect reflection. Take a photograph, duplicate the layer, flip the duplicate, and then carefully align the two halves. This works exceptionally well for nature photography (think reflected mountains in a lake) or for creating abstract symmetrical designs. For example, flipping half a building horizontally can create an illusion of it extending infinitely, suitable for unique wallpapers or backgrounds.
- Steps for a Mirror Effect:
- Unlock your background layer by double-clicking it in the Layers panel.
- Add extra canvas space to accommodate the reflection (
Image > Canvas Size). - Add a vertical or horizontal guide (
View > New Guide) down the center. - Use the
Move Toolto position your original image to one side of the guide. - Duplicate the layer (
Ctrl/Cmd + J). - With the duplicate layer selected, activate
Free Transform(Ctrl/Cmd + T), drag its reference point to the guide, andFlip HorizontalorFlip Vertical. - Align precisely and trim any excess canvas.
- Merge layers (
Ctrl/Cmd + E) if desired. This is a brilliant way to create new photo ideas for your thematic collections.
- Steps for a Mirror Effect:
-
Kaleidoscopic Patterns: By repeatedly flipping and duplicating sections of an image, you can construct mesmerizing kaleidoscopic patterns. This technique is a staple in digital art and can transform ordinary stock photos into extraordinary abstract masterpieces. It’s an excellent way to experiment with trending styles in visual content.
- Basic Kaleidoscope Steps:
- Start with a duplicated background layer and double your canvas width.
- Drag the duplicate to the right and
Flip Horizontal. Merge layers. - Duplicate this new merged layer and double the canvas height.
- Drag the new duplicate downwards and
Flip Vertical. Merge layers. - Experiment with rotating (
Ctrl/Cmd + Tthen rotate) and cropping this larger image, repeating flips and merges to build complex symmetry.
- Basic Kaleidoscope Steps:
These creative methods extend beyond mere utility, transforming flipping into a generative tool for image inspiration and producing truly unique aesthetic results.
Troubleshooting Common Flipping Issues
Even with a seemingly simple operation like flipping, users can encounter hiccups. Here’s a quick troubleshooting guide to address common problems and ensure your photo manipulation goes smoothly.
Can’t Locate the Flip Option
If the Image > Image Rotation > Flip Canvas or Edit > Transform > Flip options are missing or grayed out:
- Check Photoshop Version: As mentioned, older versions might have slightly different menu structures (e.g., “Rotate” instead of “Image Rotation”). Use the
Helpmenu and search for “flip” to pinpoint the exact location. - Layer Selection: For layer-specific flips, ensure a layer is actively selected in the Layers panel. If no layer is selected or you’re trying to flip a locked background layer without unlocking it, the option might be unavailable. Double-click the background layer to unlock it, changing it to “Layer 0.”
- Active Selection: If you have an active selection area (
marching ants), some options might be restricted. PressCtrl/Cmd + Dto deselect and try again.
Addressing Unintended Flips (Logos, Text)
A common issue arises when you want to flip an image but find that embedded text, logos, or watermarks also flip, rendering them unreadable.
- Layer Isolation is Key: The primary reason for this is attempting a “Flip Canvas” when you only needed a “Flip Layer.” Always ensure that any element you want to remain unflipped is on a separate layer from the element you intend to mirror.
- Re-apply Elements: If you’ve already flipped the canvas and your text is reversed, undo the flip (
Ctrl/Cmd + Z), place the text/logo on a new layer, and then flip only the image layer. Alternatively, re-type or re-import the text/logo after the main image flip, ensuring it’s on a new, separate layer. This principle applies to all graphic design elements.
Correcting Wrong Axis Flips
Accidentally flipping horizontally when you meant vertically (or vice-versa) is a simple mistake.
- Understand the Axes: Remember that “Flip Horizontal” mirrors along a vertical axis (left-to-right), and “Flip Vertical” mirrors along a horizontal axis (top-to-bottom).
- Use Undo: The easiest fix is to simply undo your last action (
Ctrl/Cmd + Z) and re-apply the correct flip. Photoshop’s History panel can also show you a sequence of actions, allowing you to revert to any previous state without affecting subsequent edits to other elements.
Making People Look Natural in Flipped Images
Sometimes, flipping portraits or photos with people can make them look unnatural or slightly “off.” This is often due to subtle asymmetries in faces or body language that our brains are accustomed to seeing in a particular orientation.
- Subtlety is Key: For beautiful photography involving people, a full canvas flip might not always be the best approach if the goal is naturalism. Evaluate the flipped image critically.
- Consider Layer-Specific Flips: Instead of the whole image, consider if flipping only a specific background element or a minor compositional detail could achieve your goal without altering the subject’s natural appearance.
- “Unnatural” Perception: This phenomenon is less about a technical flaw in Photoshop and more about human perception. We’re highly sensitive to facial symmetry and orientation. If a flip makes someone look awkward, it might be better to avoid flipping that particular image or to use more advanced photo manipulation techniques (like local warping or cloning) to achieve your desired effect while preserving natural features. For sad/emotional images, this natural look can be particularly important to convey authenticity.
Discover the Ease of Online Image Flipping with TopHinhAnhDep.com
While Photoshop offers unparalleled depth for image manipulation, sometimes you need a quick and easy way to flip an image without the complexity of a full-fledged editor. For those moments, exploring online Image Tools can be incredibly beneficial. Websites like TopHinhAnhDep.com provide intuitive converters, compressors, optimizers, and even AI upscalers that can handle basic tasks like flipping with just a few clicks. If you’ve just flipped an image in Photoshop and need to quickly compress it for web use or enhance its resolution, these online tools are perfect companions to your editing workflow. They streamline tasks, offering simple solutions for common needs, ensuring your high-resolution images are always ready for display, whether as wallpapers, backgrounds, or part of your thematic collections.
Creative Insights and Image Collections
Mastering image flipping in Photoshop is a fundamental step toward unlocking a world of creative ideas and enhancing your image inspiration. From developing unique photo ideas for your next shoot to curating stunning mood boards that capture trending styles, the ability to quickly and accurately flip images is a valuable asset.
Think about how you can use these techniques to create symmetrical wallpapers from striking nature photography, or how reflecting elements in a digital art piece can add depth and an abstract quality. Consider the impact of flipping a composition on a sad/emotional image – sometimes the mirrored perspective can evoke a new, powerful feeling. For those involved in stock photos, offering both original and creatively flipped versions can diversify your portfolio and appeal to a broader audience.
The versatility of this basic image tool extends beyond simple mirroring; it’s a gateway to advanced photo manipulation and a core skill in graphic design. As you continue your journey through digital photography and visual design, remember that even the simplest transformations can lead to the most impactful and beautiful photography. Keep experimenting, keep creating, and let your imagination guide your flips!
Conclusion
Flipping an image in Photoshop, whether it’s the entire canvas or a single layer, is a powerful technique that every visual creator should have in their arsenal. It offers practical solutions for compositional adjustments and opens up a realm of creative possibilities for digital art, graphic design, and photo manipulation. By understanding the various methods, distinguishing between flipping and rotating, and applying creative ideas like mirror effects and kaleidoscopic patterns, you can profoundly influence the aesthetic and narrative of your images.
Remember that tools like Photoshop are just the beginning; complementing your workflow with specialized image tools for conversion, compression, and AI upscaling from platforms like TopHinhAnhDep.com can further enhance your output. Whether you’re crafting high-resolution wallpapers, curating thematic collections, or simply refining a beautiful photograph, the ability to master flipping and other foundational editing techniques is essential for bringing your image inspiration to life. Keep practicing, explore new editing styles, and continue to transform your vision into captivating visuals.