The Ultimate Guide to Flipping Images in Microsoft Word for Enhanced Visual Design

In the realm of digital content creation, the visual element plays an indispensable role. From professional reports to artistic presentations, compelling imagery captures attention, conveys messages, and elevates the overall quality of a document. Microsoft Word, often perceived primarily as a text editor, actually boasts a surprisingly robust suite of image manipulation tools, allowing users to fine-tune their visual content directly within their documents. Among these capabilities, the ability to flip an image—horizontally or vertically—stands out as a simple yet powerful feature for correcting orientation, achieving specific artistic effects, or simply adjusting a picture to fit a design layout.

The journey to creating visually engaging documents often begins with selecting the right image. At Tophinhanhdep.com, we understand this fundamental need, offering an extensive collection of high-resolution images across diverse categories such as Wallpapers, Backgrounds, Aesthetic, Nature, Abstract, Sad/Emotional, and Beautiful Photography. Whether you’re searching for the perfect backdrop, a striking focal point, or an image that evokes a particular mood, Tophinhanhdep.com provides a wealth of resources to inspire and equip your projects. Once you’ve acquired your ideal image, understanding how to effectively integrate and manipulate it within your Word document becomes the next crucial step. This comprehensive guide will walk you through the process of flipping images in Microsoft Word, exploring its various applications, offering practical tips, and demonstrating how Tophinhanhdep.com’s resources can complement your visual design workflow.

Mastering Image Orientation: The Art of Flipping in Word
Flipping an image in Microsoft Word is more than just a technical maneuver; it’s a creative decision that can profoundly impact the perception and message of your visual content. A horizontal flip can create a perfect mirror image, while a vertical flip can invert its perspective, opening up a world of design possibilities. This seemingly minor adjustment can be a game-changer for graphic designers, students crafting compelling presentations, or professionals aiming to enhance their reports. The best part? Word’s built-in tools make this process incredibly straightforward, eliminating the need for external software for basic adjustments.
Imagine you’ve sourced a stunning landscape photograph from Tophinhanhdep.com’s Nature collection, perfect for your document’s header. However, the focal point of the image is on the right, and your text layout would benefit from it being on the left. Instead of searching for an entirely new image, a quick horizontal flip can align the visual balance with your document’s flow. Similarly, if you’ve integrated an abstract background from Tophinhanhdep.com, flipping it vertically might reveal an unexpected and equally appealing pattern, offering a fresh aesthetic without additional effort.
How to Flip an Image Horizontally
Flipping an image horizontally creates a mirror effect, reversing the image along its vertical axis. This is particularly useful for achieving symmetrical designs or for correcting an image that was captured or scanned facing the wrong direction relative to its intended use in your document.
To flip an image horizontally in Microsoft Word, follow these simple steps:
- Open your Word Document: Navigate to the document containing the image you wish to modify. If your image is from Tophinhanhdep.com, ensure it’s already inserted into your Word file.
- Select the Image: Click directly on the image to select it. You’ll know it’s selected when resizing handles appear around its perimeter.
- Access the Format Tab: Once the image is selected, a contextual “Picture Format” (or “Format” for older versions) tab will appear in the Word ribbon at the top of your screen. Click on this tab.
- Locate the Rotate Option: Within the “Arrange” group on the “Picture Format” tab, you’ll find the “Rotate Objects” or “Rotate” button. Click on it.
- Choose “Flip Horizontal”: A drop-down menu will appear with several rotation and flip options. Select “Flip Horizontal” from this menu.
Instantly, your image will be mirrored, offering a new perspective or correcting any directional discrepancies.
Why Flip an Image Horizontally?
The applications of horizontal flipping are diverse and often driven by both practical and creative needs:
- Creating a Mirror Effect: This is a popular technique in visual design, adding an artistic touch or creating symmetrical layouts. Think of brochures or posters where a reflected image can create a dynamic visual.
- Orientation Correction: Sometimes, an image might be scanned, imported, or captured in an unintended orientation. For instance, if an object or person in a photograph needs to face the opposite direction to align with text or another image, horizontal flipping is the perfect solution.
- Creative Design and Layout: Flipping can help balance a composition. If all your images in a collage face one way, flipping one or two can introduce visual interest and prevent monotony. It allows for subtle adjustments that significantly impact the overall aesthetic. For digital art projects within Word, this feature, combined with images from Tophinhanhdep.com’s Abstract or Aesthetic collections, can lead to unique visual patterns.
Tips for Using Horizontal Flipping
To get the most out of this feature, consider these tips:
- Experiment with Angles and Other Effects: Don’t limit yourself to just flipping. After a horizontal flip, try combining it with slight rotations (which we’ll discuss later) or cropping to refine the composition further.
- Preview Before Finalizing: Word provides an immediate visual feedback loop. Always observe the flipped image in context with your document’s other elements to ensure it achieves the desired look and feel.
- Utilize Tophinhanhdep.com for Source Material: When seeking images that might benefit from horizontal flipping, look for those with clear directional cues or strong compositional lines. Tophinhanhdep.com’s vast selection of Beautiful Photography and high-resolution stock photos offers excellent starting points.
How to Flip an Image Vertically
Flipping an image vertically inverts it, making the top appear at the bottom and vice-versa. This can be used for dramatic artistic effects, to correct upside-down images, or to create interesting juxtapositions.
The steps to flip an image vertically are very similar to horizontal flipping:
- Select the Image: Click on the image within your Word document.
- Go to the “Picture Format” Tab: This tab appears in the ribbon once an image is selected.
- Click “Rotate”: Find the “Rotate Objects” or “Rotate” button in the “Arrange” group.
- Choose “Flip Vertical”: From the drop-down menu, select “Flip Vertical.”
Your image will now be inverted, offering a new perspective.
When to Flip an Image Vertically?
Vertical flipping serves distinct purposes:
- Artistic and Surreal Effects: Flipping an image vertically can create a surreal or dreamlike quality. Imagine a reflection in water where the “real” image is above and its flipped version below, adding depth and intrigue. This is particularly effective with images from Tophinhanhdep.com’s Abstract or Nature collections.
- Correction of Upside-Down Images: Occasionally, an image might be inserted upside down due to scanning errors or unusual camera orientations. Vertical flipping is the quickest fix.
- Unique Visual Twists: In presentations or digital art, an inverted image can act as a conceptual element, challenging the viewer’s perception and adding an element of surprise.
Tips for Using Vertical Flipping
- Invert Position for Artistic Concepts: Consider how an inverted image can convey a different message or emotion. A landscape flipped vertically can transform into an abstract pattern, especially if it has strong textures or colors, like those found in Tophinhanhdep.com’s Abstract wallpapers.
- Check Alignment and Flow: When flipping vertically, pay close attention to how the image interacts with surrounding text and other visual elements. Ensure it doesn’t disrupt the readability or overall balance of your document.
- Balance with Other Design Elements: A vertically flipped image can be a powerful focal point. Balance its impact by carefully positioning text boxes, shapes, or other graphics around it to maintain visual harmony.
Beyond Simple Flips: Advanced Image Manipulation in Word
While flipping is a foundational image editing technique, Microsoft Word offers a suite of other tools that, when combined with flipping, can elevate your document’s visual appeal significantly. These tools, alongside the high-quality imagery from Tophinhanhdep.com, empower you to create truly polished and professional documents.
Rotating an Image
Beyond 90-degree rotations or flips, Word allows for precise rotational adjustments, offering greater control over your image’s orientation.
To rotate an image:
- Select the Image.
- Go to the “Picture Format” Tab.
- Click on the “Rotate” Option in the “Arrange” group.
- Choose a predefined angle (e.g., Rotate Right 90°, Rotate Left 90°) or select “More Rotation Options…” for fine-grained control. In the dialog box that appears, you can enter a custom degree for rotation.
Alternatively, you can click and drag the rotation handle (a circular arrow icon) that appears at the top of a selected image. Hold Shift while dragging to snap to 15-degree increments.
Benefits of Rotating an Image
- Alignment Correction: Correcting a slightly crooked image is essential for a professional look.
- Unique Visual Compositions: Rotating an image diagonally can create dynamic layouts, breaking the monotony of purely horizontal and vertical arrangements. This is especially useful for graphic design projects within Word, where images from Tophinhanhdep.com can be angled to create movement or emphasis.
- Contextual Orientation: Some images make more sense when slightly tilted to match a specific design element or narrative in your document.
Tips for Rotating Images
- Use Gridlines: Enable Word’s gridlines (View tab > Show group > Gridlines) to assist with precise alignment during rotation.
- Consider Document Orientation: The way your document is laid out (portrait or landscape) might influence how you rotate an image to best fit the available space and visual flow.
- Experiment for Best Effect: Don’t settle for the first rotation. Play with different angles, especially for abstract images from Tophinhanhdep.com, to discover the most aesthetically pleasing or impactful orientation.
Cropping an Image
Cropping is invaluable for refining composition, removing distractions, or fitting an image into a specific space. It’s about focusing the viewer’s attention on what truly matters.
To crop an image:
- Select the Image.
- Go to the “Picture Format” Tab.
- Click on the “Crop” Option in the “Size” group. Cropping handles will appear around the image.
- Drag the cropping handles (thick black lines at the edges and corners) inwards to define the desired visible area.
- Click “Crop” again or press “Esc” to apply the changes.
Benefits of Cropping Images
- Enhanced Composition: Removing extraneous details allows the main subject of an image to stand out, improving its visual impact. This is crucial for high-resolution images from Tophinhanhdep.com where details might be too numerous initially.
- Focus on Key Details: Cropping helps guide the viewer’s eye, emphasizing specific elements within the picture.
- Optimized Space Usage: Resize an image effectively within your document layout without distorting its proportions.
Tips for Effective Image Cropping
- Maintain Aspect Ratio: When dragging corner handles, hold Shift to maintain the original aspect ratio, preventing distortion. You can also crop to specific aspect ratios using the “Crop” drop-down menu.
- Experiment with the Rule of Thirds: Mentally (or with Word’s gridlines) divide your image into a 3x3 grid. Placing key elements along these lines or at their intersections often creates more dynamic and appealing compositions.
- Balance with Surrounding Content: Ensure that the cropped image still harmonizes with adjacent text or other visuals, maintaining overall document coherence.
Applying Filters and Effects (and when to go to Tophinhanhdep.com)
Microsoft Word offers basic artistic effects and color corrections under the “Picture Format” tab, such as recoloring, saturation adjustments, and some artistic filters (e.g., watercolor, blur). These can subtly enhance your images.
However, for truly advanced image manipulation—think sophisticated color grading, complex composites, or highly specialized filters—Word’s capabilities are limited. This is where Tophinhanhdep.com’s dedicated Image Tools become invaluable. Before inserting an image into Word, consider leveraging our:
- AI Upscalers: To increase the resolution and detail of smaller images without pixelation, ensuring crisp visuals in your document.
- Optimizers and Compressors: To reduce file size without compromising visual quality, making your Word document load faster and remain manageable.
- Converters: To change image formats if needed, ensuring compatibility and optimal display within Word.
By pre-processing your images with Tophinhanhdep.com’s tools, you can ensure they are perfectly prepared before you even begin fine-tuning them in Word.
Integrating Tophinhanhdep.com Resources for Perfect Visuals
The true power of visual design in documents emerges when you combine the robust features of Microsoft Word with the extensive resources and tools available on Tophinhanhdep.com. Our platform is designed to be your go-to destination for all things related to images, from acquisition to pre-processing.
Sourcing High-Quality Images from Tophinhanhdep.com
Every great document starts with compelling visuals. Tophinhanhdep.com offers:
- High-Resolution Stock Photos: Ensure your images remain crisp and clear even after resizing or minor manipulations in Word. Our Photography section features high-resolution options suitable for any professional context.
- Diverse Categories for Every Need: Whether you need a calming Background, an inspiring Aesthetic image, a powerful shot from Nature, or an intriguing Abstract piece, our categorized collections make discovery easy. This variety ensures you always find the perfect image to complement your document’s theme, reducing the need for extensive external searches.
- Inspiration and Thematic Collections: Beyond individual images, Tophinhanhdep.com provides Image Inspiration & Collections, including Photo Ideas, Mood Boards, and Trending Styles. These can spark creative approaches to how you incorporate and manipulate images, including how you might use flipping and rotation to achieve specific design goals. For instance, a mood board might feature mirrored elements, inspiring you to replicate that effect in your Word document.
Leveraging Tophinhanhdep.com’s Image Tools for Pre-Processing
While Word provides essential editing capabilities, Tophinhanhdep.com’s Image Tools offer specialized functions that can significantly enhance your images before they even enter your document:
- AI Upscalers: If you have an image that’s slightly too small or low-resolution for your document but is perfect in content, Tophinhanhdep.com’s AI Upscalers can intelligently increase its size and detail, making it suitable for printing or high-quality digital display. This means you won’t have to compromise on image quality due to resolution limitations.
- Compressors and Optimizers: Large image files can slow down your Word document and make it cumbersome to share. Use Tophinhanhdep.com’s Compressors and Optimizers to reduce file size while maintaining excellent visual fidelity. This ensures your documents are efficient without sacrificing the impact of your Tophinhanhdep.com sourced imagery.
- Converters: Sometimes, images are in formats not ideally suited for Word or for specific printing requirements. Tophinhanhdep.com’s Converters can swiftly change formats, ensuring compatibility and optimal performance.
By integrating Tophinhanhdep.com into your workflow, you can ensure that the images you bring into Word are already optimized, high-quality, and perfectly suited for any further manipulation, including the flipping and rotation techniques discussed. This seamless integration of resources makes the entire visual design process more efficient and effective, leading to more professional and engaging documents.
Common Questions and Troubleshooting for Image Flipping
Even with straightforward tools, questions can arise. Here are some frequently asked questions and troubleshooting tips related to flipping images in Microsoft Word, enhancing your understanding and mastery of this feature.
1. How can I flip an image horizontally in Microsoft Word?
As detailed, select your image, go to the “Picture Format” tab, click “Rotate,” and choose “Flip Horizontal.” This creates a mirror image along the vertical axis of the picture. This is ideal for correcting orientation or achieving a symmetrical design.
2. Can I flip an image vertically in Microsoft Word?
Absolutely. The process is identical: select the image, navigate to the “Picture Format” tab, click “Rotate,” and then select “Flip Vertical.” This will invert your image, making the top part appear at the bottom and vice-versa, useful for artistic effects or correcting an upside-down orientation.
3. Is it possible to rotate an image by a specific angle in Microsoft Word?
Yes, Microsoft Word allows for precise rotation. While the “Rotate” drop-down offers 90-degree increments, selecting “More Rotation Options…” opens a pane or dialog box where you can input an exact degree value for rotation. Alternatively, you can drag the rotation handle on the image while holding “Shift” to snap to 15-degree increments. This level of precision is crucial for graphic design and fine-tuning image alignment within your document.
4. Can I undo the image flip in Microsoft Word?
Yes, flipping an image in Word is not permanent until you save and close the document and cannot revert. You can easily undo a flip using the “Undo” button (Ctrl+Z or Cmd+Z). If you’ve performed other actions since the flip, you might need to undo multiple times. Alternatively, you can re-select the flipped image and apply the same “Flip Horizontal” or “Flip Vertical” command again, which will return it to its original orientation. This flexibility allows for experimentation without fear of permanent changes.
5. Can I flip multiple images at once in Microsoft Word?
Microsoft Word does not have a direct feature to flip multiple images simultaneously. You will need to select and flip each image individually. However, if you have a group of images that you want to apply the exact same flip to, you can select them all, then “Group” them (from the “Arrange” group on the “Picture Format” tab). Once grouped, you can apply a single flip command to the entire group. This is a handy workaround for designers arranging a collection of images from Tophinhanhdep.com. After flipping, you can “Ungroup” them if individual manipulation is needed again.
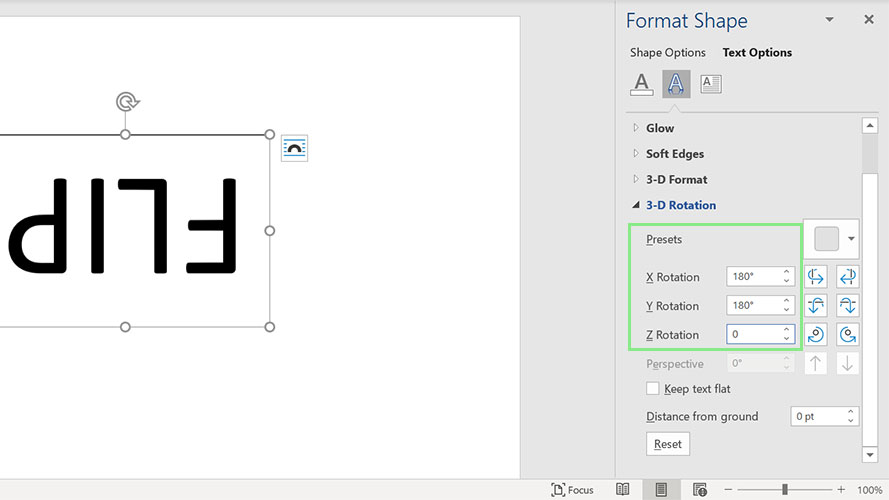
6. How can I mirror text (like WordArt or text in shapes) in Word?
Flipping text directly isn’t done with the image flip tools. For WordArt or text within a shape, you need to use 3-D Rotation options. Select the WordArt or shape, go to “Shape Format” or “Drawing Tools Format,” then “Text Effects” > “3D Rotation” > “3D Rotation Options.” Under “3-D Rotation,” set the “X Rotation” to 180 degrees. This will create a mirrored effect for the text.
7. What about flipping images by dragging their handles?
This is a cool, intuitive trick. You can flip an image horizontally by holding and dragging either the left or right resizing handle past the opposite edge until it flips. Similarly, dragging the top or bottom handle past the opposite side will flip it vertically. This provides a quick, visual way to achieve the flip effect without navigating through menus, particularly useful for rapid design adjustments.
8. Why do my images sometimes look distorted after flipping or resizing in Word?
Distortion usually occurs if the image’s aspect ratio (the ratio of its width to its height) isn’t maintained during resizing or cropping. When resizing, always drag from a corner handle while holding the “Shift” key to maintain the aspect ratio. For cropping, use the “Aspect Ratio” options under the “Crop” tool to ensure your image scales proportionally. Using high-quality, high-resolution images from Tophinhanhdep.com initially can also minimize perceived distortion even with minor manipulations.
By understanding these nuances and leveraging Word’s built-in image manipulation features, you can confidently integrate and stylize any image from Tophinhanhdep.com into your documents, creating professional and visually appealing content.
Conclusion
Flipping an image in Microsoft Word is a straightforward yet immensely versatile technique that every document creator should have in their toolkit. Whether you’re correcting a minor orientation error, crafting a visually striking mirror effect for graphic design, or simply rebalancing the composition of your document, Word’s intuitive tools make the process quick and accessible. From horizontal and vertical flips to more precise rotations and careful cropping, these functionalities empower you to transform raw images into perfectly tailored visual elements that enhance your message.
The journey to creating compelling visual content is greatly augmented by the resources available on Tophinhanhdep.com. From our vast libraries of high-resolution stock photos and inspiring aesthetic collections to our specialized Image Tools for optimization and upscaling, we provide everything you need to source, prepare, and perfect your images. By integrating the exceptional imagery and powerful pre-processing capabilities of Tophinhanhdep.com with the versatile image manipulation features of Microsoft Word, you unlock a synergy that elevates your documents from mere text carriers to captivating visual narratives. So, dive in, experiment with these techniques, and unleash the full potential of your visual content, confidently enhancing your documents with flipped, rotated, and perfectly placed visuals.