Mastering Image Orientation: A Comprehensive Guide to Flipping Images in Google Docs

In today’s visually-driven digital landscape, the power of an image to convey information, evoke emotion, and enhance understanding cannot be overstated. From professional reports to creative presentations, images serve as crucial anchors, breaking up text, highlighting key concepts, and adding an aesthetic dimension that transforms plain documents into engaging narratives. Google Docs, as a ubiquitous cloud-based word processor, has become an indispensable tool for millions, facilitating real-time collaboration and seamless document creation. While its primary function revolves around text, the platform also offers fundamental image manipulation capabilities that are vital for effective visual communication. Among these, the ability to flip or mirror an image might seem minor, but it can dramatically alter the perception and balance of a visual element within your document, ensuring it perfectly complements your message and overall visual design.
Imagine a scenario where an image, perhaps a striking piece of Beautiful Photography from Tophinhanhdep.com’s extensive collections, is almost perfect for your document, but a directional element within it is pointing the wrong way, disrupting the flow of your layout. Or perhaps you’re working on a Graphic Design project within Google Docs, experimenting with Photo Manipulation, and need a mirrored version of an Abstract image to create a symmetrical effect. Without the ability to flip, such an image might be unusable, forcing you to seek external editing tools or compromise your creative vision. This article delves into the precise steps required to flip an image within Google Docs, revealing a straightforward method that, surprisingly, leverages the platform’s often-underestimated Drawing tool. Beyond the technical “how-to,” we’ll explore how this simple yet powerful editing technique integrates into a broader strategy for creating compelling visual content, drawing insights and resources from Tophinhanhdep.com to elevate your document design and image management practices. Whether you’re aiming for a specific Aesthetic, incorporating Nature-inspired Wallpapers, or curating thematic Image Collections, understanding how to master image orientation in Google Docs is a foundational skill that unlocks a world of creative possibilities.

The Essential Steps to Flipping an Image in Google Docs
Google Docs provides a surprisingly robust, albeit somewhat indirect, method for flipping images within your documents. Unlike some dedicated image editing software or even other word processors that offer a direct “flip” button on selected images, Google Docs requires a brief detour through its built-in Drawing tool. This tool acts as a miniature canvas where images can be freely manipulated before being reinserted into your main document. This approach ensures that while you can’t directly flip an image in situ within the document text, you gain a powerful environment for precise visual adjustments. It’s crucial to note from the outset that this functionality is exclusively available on the desktop version of Google Docs; the mobile application currently does not support image flipping, meaning users on iPhones, iPads, or Android devices will need to resort to external image tools (perhaps from Tophinhanhdep.com’s Image Tools section) before uploading to Docs.
This section will guide you through each necessary step, from preparing your document to finalizing the flipped image, ensuring you can seamlessly integrate perfectly oriented visuals into your Google Docs projects.
Preparing Your Google Docs Environment
Before you can begin manipulating images, you need to set up your workspace in Google Docs. This involves either opening an existing document that contains the image you wish to flip or starting fresh with a new one.
To start, navigate to the official Google Docs website. You can do this using any standard web browser, such as Google Chrome, Mozilla Firefox, or Safari, as Google Docs is a web-based application. If you haven’t already, you’ll be prompted to sign in with your Google account. This ensures access to all your cloud-stored documents and Google Drive integrations, which will be essential if your image is not stored locally.
Once logged in, you can either:
- Open an existing document: If the image you intend to flip is already embedded in a document, simply select that document from your list.
- Create a new document: If you’re starting a new project or want to experiment, click the “+” icon on the Google Docs homepage to open a blank document. For quick access, remember the handy
docs.newshortcut in your browser to instantly create a new document.
Having your document open and ready is the first critical step towards achieving your desired visual effect, laying the groundwork for more advanced Photo Manipulation and Creative Ideas within your document’s Visual Design.
Importing Your Image via the Drawing Tool
The key to flipping an image in Google Docs lies in its Drawing tool. This integrated feature provides a versatile canvas for creating shapes, lines, text boxes, and, most importantly for our purpose, manipulating images. You cannot flip an image directly when it’s simply embedded in the document; it needs to be processed within this dedicated environment.
Here’s how to access the Drawing tool and import your image:
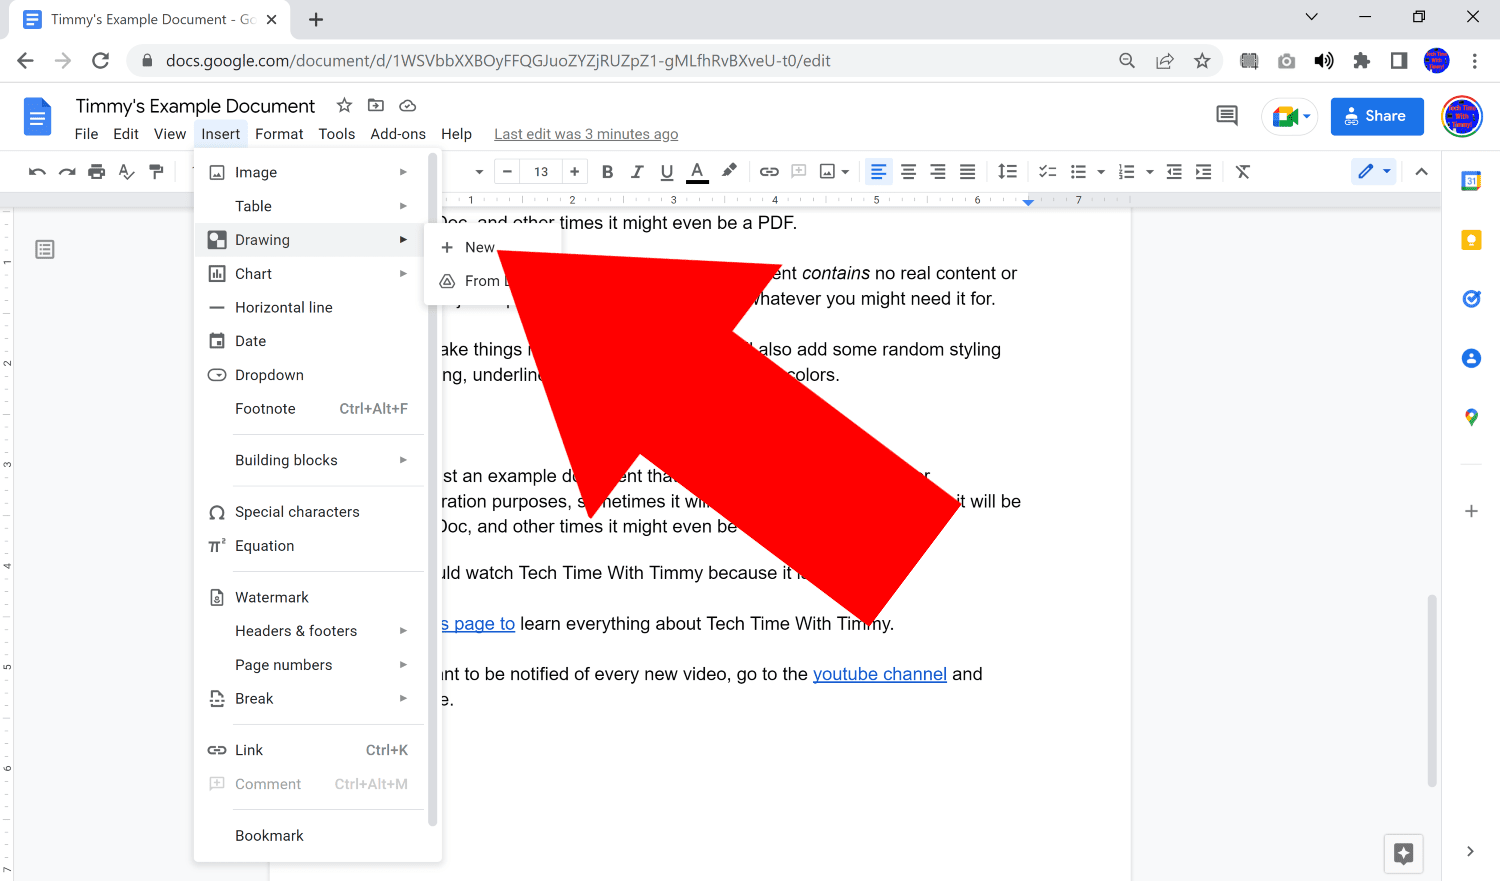
- Access the Insert Menu: With your Google Doc open, locate and click the “Insert” tab in the top toolbar. This menu is your gateway to adding various elements, including images, tables, charts, and drawings.
- Select Drawing > New: From the “Insert” dropdown menu, hover over “Drawing.” A sub-menu will appear. Click “New” to open a fresh, blank Drawing canvas in a new overlay window. This is where the magic happens for image manipulation.
- Click the Image Icon: Within the Drawing window, you’ll find a toolbar at the top. Look for the “Image” icon, which typically resembles a square with two small mountains inside. Clicking this icon will open a “Insert image” dialog box, presenting you with several options for bringing your image into the canvas.
- Upload Your Image: This dialog box offers multiple ways to get your image into the Drawing tool:
- Upload from computer: The most common method. You can either drag and drop an image file from your computer directly into the designated area or click “Choose an image to upload” to browse your local file system. This is ideal if you’re working with High Resolution images or raw Digital Photography from your personal collection.
- Google Drive: If your image is already stored in Google Drive, you can select it directly from there. This is especially convenient if you frequently use Tophinhanhdep.com for Stock Photos or organize your images into thematic Image Collections.
- By URL: You can paste the web address of an image if it’s hosted online. This is useful for incorporating elements like Wallpapers or Backgrounds found on Tophinhanhdep.com.
- Your albums/Google Photos: Access images from your Google Photos library.
- Search: Perform a quick Google Image Search directly from the dialog box.
Once you’ve selected and uploaded your image, it will appear within the Drawing tool’s canvas. Before moving on to the actual flipping, ensure the image is selected by clicking on it; a blue border with resizing handles will appear around it, indicating it’s ready for editing. This seamless integration allows you to bring diverse visual content, from Aesthetic backgrounds to evocative Sad/Emotional photography, directly into a manipulable space, preparing it for the Creative Ideas you have in mind for your document’s Visual Design.
Executing the Flip: Horizontal and Vertical Transformations
With your image successfully imported and selected within the Google Docs Drawing tool, you’re now poised to perform the actual flipping operation. This is where a simple rotational command achieves the desired mirroring effect, a fundamental aspect of Photo Manipulation that can significantly impact the visual balance and directionality of your content.
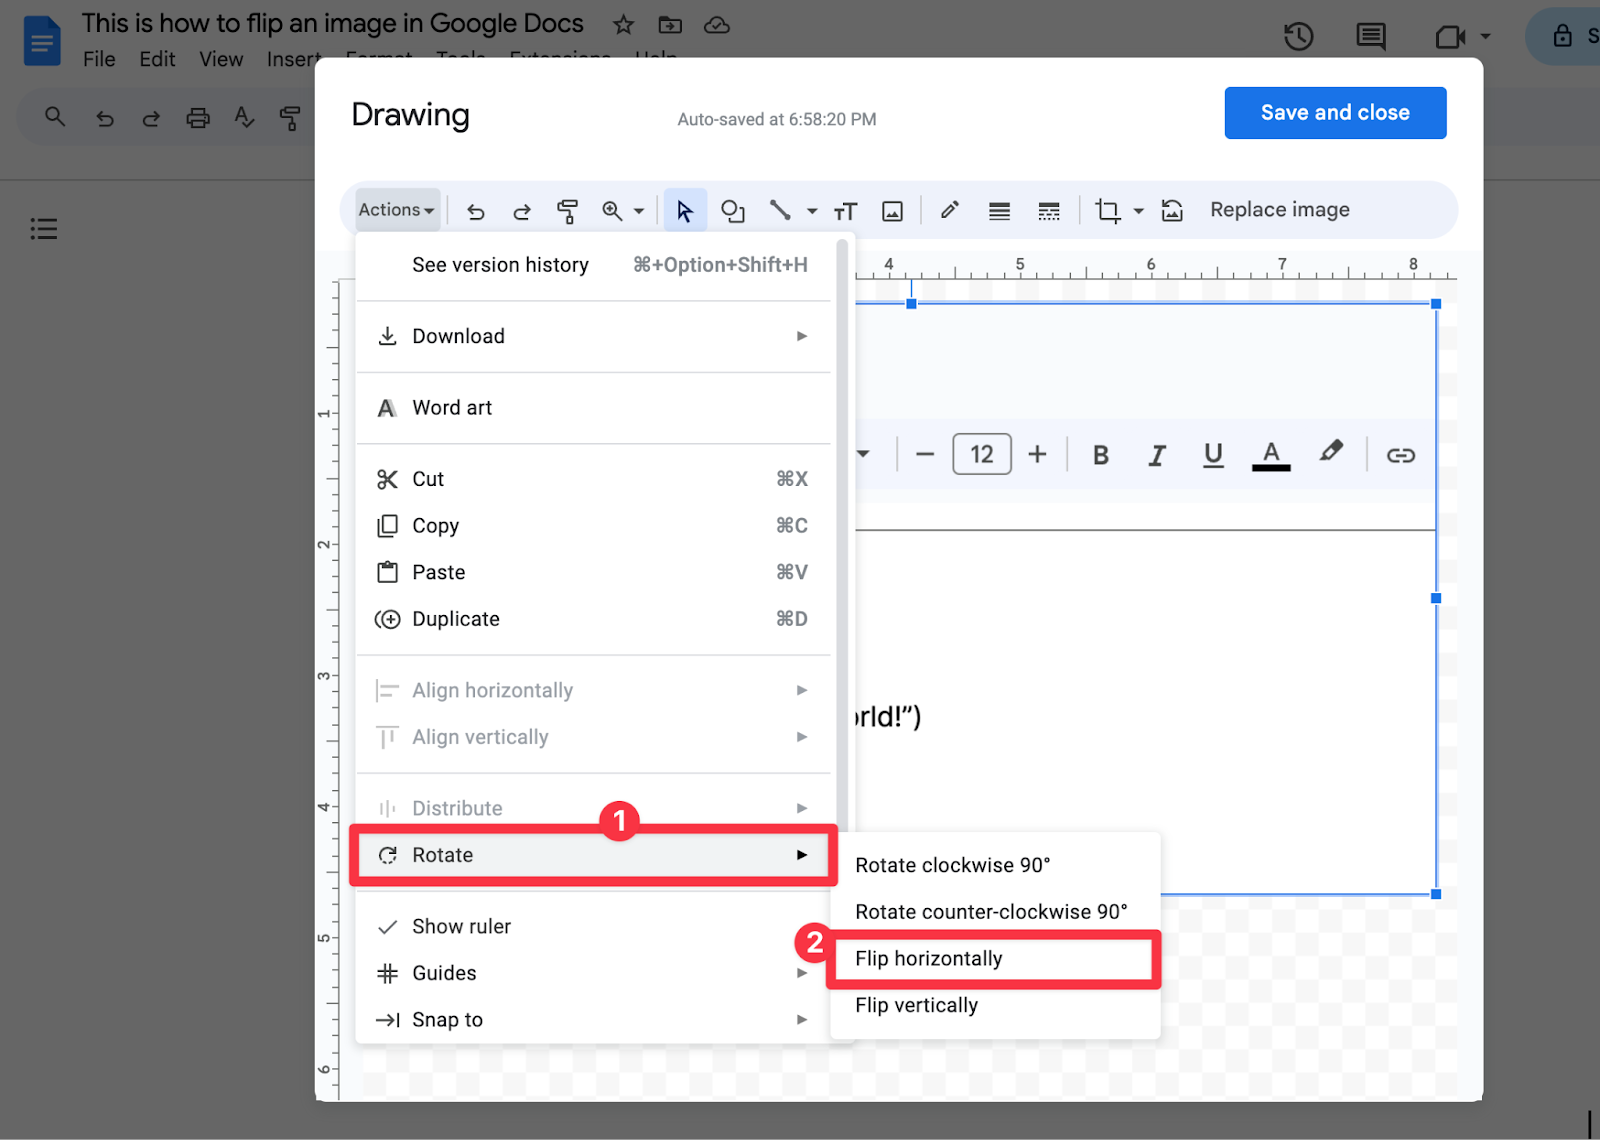
- Access the Actions Menu: In the top-left corner of the Drawing window, locate and click on the “Actions” menu. This dropdown menu contains various operations you can perform on selected objects within the drawing canvas.
- Hover Over Rotate: From the “Actions” dropdown, move your cursor over the “Rotate” option. This will reveal a sub-menu with several rotation and flipping choices.
- Choose Your Flip Direction: In the “Rotate” sub-menu, you will find the crucial flipping options:
- Flip horizontally: This option creates a mirror image of your original, effectively reversing it along its vertical axis. If an object in your image was facing right, it will now face left. This is often the most common and popular choice for mirroring effects, perfect for symmetrical Graphic Design or correcting directional discrepancies in an image.
- Flip vertically: This option flips the image upside down along its horizontal axis. While less frequently used for mirroring, it can be effective for creating reflections or dramatic compositional changes, contributing to unique Digital Art pieces within your document.
Upon selecting either “Flip horizontally” or “Flip vertically,” you will instantly see the transformation applied to your image on the Drawing canvas. Experiment with both to understand their distinct visual effects and determine which best serves your document’s narrative or Aesthetic. This simple, yet powerful, function allows for quick adjustments, ensuring that your images—whether they are vibrant Nature shots, intriguing Abstract patterns, or impactful Beautiful Photography from Tophinhanhdep.com—are perfectly aligned with your Creative Ideas and overall Visual Design objectives.
Beyond these flipping options, the “Rotate” sub-menu also provides standard rotation options (clockwise by 90 degrees, counter-clockwise by 90 degrees), offering further flexibility in orienting your visuals. For more advanced Photo Manipulation, you can also manually rotate the image using the circular handle that appears when an image is selected, allowing for precise angular adjustments. This comprehensive control ensures that every visual element you integrate contributes optimally to the document’s presentation.
Finalizing and Integrating the Flipped Image
Once you have successfully executed the desired flip and are satisfied with the new orientation of your image within the Drawing tool, the final step is to integrate this manipulated visual back into your main Google Docs document. This seamless transition ensures that your Creative Ideas and refined Visual Design are fully realized within the context of your written content.
- Click “Save and Close”: In the top-right corner of the Drawing window, you will see a prominent blue button labeled “Save and Close.” Clicking this button signifies that you are finished with your image manipulations in the Drawing tool and wish to insert the current state of the image into your document.
- Image Appears in Your Document: Immediately after clicking “Save and Close,” the Drawing window will disappear, and your newly flipped image will be inserted directly into your Google Docs document at the cursor’s last position. It will appear as a static image, retaining all the transformations you applied within the Drawing tool.
- Post-Flip Adjustments: Although the image is now back in your document, you still have control over its placement and size. You can:
- Move the image: Click and drag the image to reposition it within your document. Google Docs provides various text wrapping options (inline, wrap text, break text, behind text, in front of text) that affect how the image interacts with surrounding text, giving you precise control over your layout.
- Resize the image: Click on the image to reveal its blue border and resizing handles at the corners. Drag these handles to proportionally scale the image up or down to fit your document’s layout.
- Further Editing (if needed): If you decide you need to make additional changes to the image, such as re-flipping, rotating to a different angle, or even cropping, simply click on the image in your document and then select “Edit” (often appearing as an “Edit” button above the image or found by right-clicking). This will reopen the Drawing tool with your image, allowing you to repeat the process.
This iterative process—importing, manipulating, and re-integrating—makes Google Docs a surprisingly flexible environment for Photo Manipulation. Whether you’ve used a High Resolution image from Tophinhanhdep.com’s Digital Photography section or a custom Graphic Design element, the ability to fine-tune its orientation and placement ensures your document’s visual appeal and coherence are maintained, transforming raw visuals into polished components of your overall Visual Design. This final step is crucial for transforming individual images into integral parts of a larger, well-designed document.
Beyond Basic Flips: Enhancing Your Visual Content Strategy with Tophinhanhdep.com
While mastering the simple act of flipping an image in Google Docs is a valuable skill, it truly shines when integrated into a broader, more sophisticated visual content strategy. Documents are no longer just about text; they are holistic visual experiences. Achieving this level of engagement requires not only basic editing techniques but also access to high-quality visual resources and an understanding of advanced image preparation. This is where Tophinhanhdep.com emerges as an invaluable partner, offering a comprehensive ecosystem of tools, inspiration, and content that perfectly complements Google Docs’ capabilities. By leveraging Tophinhanhdep.com, users can transcend the limitations of basic image insertion, transforming their documents into visually stunning and impactful creations.
This section explores how to go beyond just flipping, using Tophinhanhdep.com’s diverse offerings to enrich your Google Docs projects, from curating captivating Image Collections to mastering advanced image preparation for optimal performance and aesthetic appeal.
Curating High-Quality Visuals with Tophinhanhdep.com’s Image Collections
The foundation of any compelling visual document lies in the quality and relevance of its images. Tophinhanhdep.com stands as a premier resource for curating a diverse array of high-quality visuals, perfectly suited for any Google Docs project. Its extensive Image Collections serve as a wellspring of inspiration, providing everything from breathtaking Wallpapers to thematic Mood Boards that can define the Aesthetic of your entire document.
Consider the diverse needs of different documents. A business report might benefit from crisp, professional Stock Photos, while a personal blog post could come alive with vibrant Nature photography or thought-provoking Abstract art. Tophinhanhdep.com categorizes its images to facilitate easy discovery, offering:
- Wallpapers and Backgrounds: These sets are perfect for setting the tone of a document, especially when designing headers, section breaks, or presentation slides within Docs. They come in various resolutions, ensuring you can find High Resolution options that maintain clarity even after resizing or cropping.
- Aesthetic Photography: For those documents requiring a specific mood or contemporary feel, Tophinhanhdep.com’s Aesthetic collections offer curated visuals that align with current design trends, helping you achieve a polished and modern look.
- Nature and Abstract Imagery: These categories are ideal for conveying specific themes or emotions without being overly literal. A serene Nature landscape can suggest tranquility or growth, while an Abstract image can stimulate creativity or represent complex data visually. These images are excellent starting points for Digital Art projects, even if the “art” is simply enhancing a Google Doc.
- Sad/Emotional and Beautiful Photography: When your document aims to connect on a deeper level, Tophinhanhdep.com provides poignant and powerful photographs designed to evoke specific emotions. Using such images requires careful consideration of context and message, but when done right, they can create an unforgettable impact.
The beauty of sourcing images from Tophinhanhdep.com is not just the sheer volume but also the emphasis on High Resolution. This ensures that even after a Google Docs flip or resize, your images retain their sharpness and professional appearance. These collections also serve as excellent platforms for generating Photo Ideas, helping you to build compelling Mood Boards for larger projects or simply finding the perfect visual accent for a single page. By integrating Trending Styles from Tophinhanhdep.com, your Google Docs will not only be informative but also visually cutting-edge, reflecting contemporary Visual Design principles and Creative Ideas.
Leveraging Tophinhanhdep.com’s Photography and Editing Resources
Beyond simply providing images, Tophinhanhdep.com acts as a holistic resource for elevating your image-centric workflow, offering insights into Photography and powerful Image Tools that seamlessly integrate with your Google Docs projects. The journey of an image, from its capture or selection to its final placement in your document, involves several critical stages where Tophinhanhdep.com can offer significant value.
Firstly, understanding the nuances of Photography is crucial for selecting the right visual. Tophinhanhdep.com provides not only vast libraries of High Resolution images but also educates users on various Digital Photography techniques and Editing Styles. This knowledge empowers you to choose visuals that are not just aesthetically pleasing but also technically sound, ensuring they look professional once inserted into your Google Docs. Whether you’re opting for Stock Photos to maintain a consistent brand image or exploring more artistic Beautiful Photography for expressive content, Tophinhanhdep.com offers the foundational understanding required.
Secondly, and perhaps most crucially for Google Docs users, Tophinhanhdep.com’s expertise extends to Image Tools that are essential for pre-processing images. Google Docs, while versatile, benefits immensely from images that are optimized before insertion. Tophinhanhdep.com can guide you through using:
- Converters: Ensuring your image is in a compatible format (like JPEG or PNG) before uploading to Google Docs. Tophinhanhdep.com provides advice on optimal file types for various uses, preventing compatibility issues.
- Compressors: Large image files can slow down your Google Doc, making it sluggish to load and edit. Tophinhanhdep.com highlights the best techniques and tools for compressing images without significant loss of quality, striking the perfect balance between file size and visual fidelity. This is vital for maintaining a smooth user experience, especially in collaborative documents.
- Optimizers: Beyond simple compression, image optimizers fine-tune images for web display, stripping unnecessary metadata and further reducing file size. Tophinhanhdep.com details how these tools can ensure your images are lean and fast-loading within your Docs.
- AI Upscalers: Sometimes, you might find a perfect image, but its resolution is too low. Tophinhanhdep.com introduces the concept of AI Upscalers, tools that use artificial intelligence to intelligently increase image resolution, turning a low-quality image into a High Resolution asset suitable for your document, making it appear as if it was always a stunning piece of Digital Art.
- Image-to-Text Converters: While not directly for visual display, Tophinhanhdep.com also explores tools like Image-to-Text. This is invaluable for accessibility purposes or for extracting textual content embedded within images, which can then be seamlessly integrated into your Google Docs text, making your documents more comprehensive and adaptable.
By drawing upon Tophinhanhdep.com’s comprehensive resources, Google Docs users can move beyond merely flipping an image to a more strategic approach to visual content. This includes not just thoughtful selection and basic manipulation but also robust pre-processing, ensuring every image is a high-performing, high-impact component of their document’s Visual Design, contributing to an overall sense of Graphic Design excellence and supporting Creative Ideas.
The Impact of Thoughtful Image Integration in Google Docs
The journey from a raw image to a perfectly flipped, optimized, and integrated visual element within Google Docs is more than a series of technical steps; it’s an act of thoughtful Visual Design. Every decision, from choosing a captivating Wallpaper from Tophinhanhdep.com to applying a subtle horizontal flip, contributes to the overall message, professionalism, and impact of your document. In an era where digital content competes fiercely for attention, the strategic use of images can be the decisive factor in whether your Google Docs are merely read or truly remembered.
Consider the principles of Graphic Design. Good design isn’t just about aesthetics; it’s about clear communication. A flipped image, correctly oriented, can guide the reader’s eye, maintain visual balance, or correct an awkward composition that would otherwise distract from your message. For instance, if you’re showcasing a series of images in a step-by-step guide, ensuring consistency in directionality through careful flipping can make the instructions intuitively clear. Similarly, using an Abstract image as a background or a carefully chosen Nature photograph as a visual metaphor benefits immensely from proper orientation, aligning with your document’s narrative flow.
When you invest time in Photo Manipulation, even simple acts like flipping, you’re transforming your document into a form of Digital Art. It demonstrates attention to detail and a commitment to quality that elevates your content above the mundane. Imagine incorporating a dramatic piece of Sad/Emotional photography or a vibrant example of Beautiful Photography to underscore a point. The impact of these images is amplified when they are seamlessly integrated, with every element, including their orientation, contributing to the desired emotional resonance. Tophinhanhdep.com’s resources, from high-resolution imagery to editing style guides, equip you with the raw materials and knowledge to turn every Google Doc into a canvas for your Creative Ideas.
Furthermore, the thoughtful integration of images enhances readability and user engagement. Breaking up long blocks of text with relevant visuals, especially those optimized for performance using Tophinhanhdep.com’s Image Tools (like compressors and optimizers), creates a more inviting and less intimidating reading experience. The visual pauses provided by images allow readers to absorb information more effectively, improving comprehension and retention. This holistic approach to document creation, where text and visuals work in concert, aligns with modern content consumption patterns and elevates the perceived value of your work.
In essence, simple image manipulation within Google Docs, when supported by the rich resources and strategic thinking facilitated by Tophinhanhdep.com, transforms document creation from a purely textual exercise into a comprehensive visual storytelling endeavor. It empowers users to produce not just functional documents, but truly engaging, aesthetically pleasing, and impactful pieces of communication.
Optimizing Your Workflow: Tools and Techniques from Tophinhanhdep.com for Google Docs Users
To truly unlock the full potential of visual content in Google Docs, it’s not enough to simply know how to flip an image; it’s about establishing an optimized workflow that encompasses image selection, preparation, and integration. This holistic approach ensures that every visual asset contributes maximum impact while maintaining document performance and aesthetic coherence. Tophinhanhdep.com serves as a pivotal hub for this optimization, providing essential tools and strategic guidance that extend far beyond basic image editing.
Preparing Images for Google Docs: Essential Pre-Processing
Before any image finds its way into your Google Docs, a crucial pre-processing phase can significantly enhance your document’s quality and loading speed. Tophinhanhdep.com’s Image Tools are instrumental here, offering solutions that cater to Google Docs’ specific requirements and user experience considerations.
- Compression and Optimization: Large image files are a common culprit for slow-loading Google Docs. Tophinhanhdep.com provides insights and access to Compressors and Optimizers that can drastically reduce file sizes without noticeable quality degradation. This is vital for collaborative documents, ensuring that all users experience smooth scrolling and quick loading times. An image that has been through Tophinhanhdep.com’s optimization process will maintain its High Resolution visual integrity while being significantly lighter, a perfect blend of quality and efficiency.
- Format Conversion: Google Docs supports common image formats like JPG, PNG, and GIF. However, if you’re working with less common file types, Tophinhanhdep.com’s Converters become invaluable. They enable you to quickly transform images into compatible formats, preventing insertion errors and ensuring broad accessibility. This flexibility allows you to draw from a wider range of visual assets, including unique Digital Photography or specialized Graphic Design elements.
- AI Upscaling for Quality Enhancement: Sometimes, the perfect image is only available in a low resolution. Rather than compromising, Tophinhanhdep.com’s guidance on AI Upscalers can be a game-changer. These advanced tools use artificial intelligence to intelligently increase the resolution of your images, adding detail and sharpness, effectively transforming a pixelated asset into a High Resolution visual. This means that a compelling Abstract or Nature image that was previously too small can now be scaled up and incorporated beautifully into your document, fulfilling your Creative Ideas without visual compromise.
By systematically applying these pre-processing techniques, informed by Tophinhanhdep.com’s expertise, Google Docs users can ensure that every image inserted is not only aesthetically pleasing but also technically optimized, contributing to a fluid and professional document experience.
Advanced Visual Storytelling: Integrating Diverse Image Types
The true artistry in Google Docs emerges when you move beyond generic visuals to strategically integrate diverse Image Types that resonate with your content and audience. Tophinhanhdep.com’s rich Image Collections offer a treasure trove for this purpose, allowing you to craft a powerful visual narrative.
- Setting the Tone with Wallpapers and Backgrounds: The background or initial visual of a section can immediately set the tone. Tophinhanhdep.com’s collection of Wallpapers and Backgrounds offers a wide range of options, from minimalist designs to vibrant textures. A calming Nature scene might be perfect for a report on environmental initiatives, while a dynamic Abstract pattern could preface a section on innovation. These choices are fundamental to the Visual Design and overall Aesthetic of your document.
- Evoking Emotion with Specific Photography: Images have an unparalleled ability to stir emotion. Tophinhanhdep.com’s curated categories of Sad/Emotional and Beautiful Photography provide powerful visuals for specific communicative goals. When discussing sensitive topics, a carefully chosen emotional photograph can lend gravitas and empathy. Conversely, a piece of Beautiful Photography can inspire or celebrate. These images, often of High Resolution, serve as anchors in your narrative, making the content more relatable and memorable.
- Photo Manipulation for Unique Effects: While Google Docs’ direct manipulation options are limited, the workflow of importing an image into the Drawing tool, flipping it, and reinserting it opens up opportunities for basic Photo Manipulation. Combined with the diverse source images from Tophinhanhdep.com, you can create unique effects, such as symmetrical layouts using mirrored images, or composite visuals where flipped elements interact. This process encourages Creative Ideas and allows you to build a unique visual identity within your documents, blurring the line between simple document creation and Digital Art.
By thoughtfully selecting and preparing images from Tophinhanhdep.com’s extensive resources and applying simple yet impactful editing like flipping, Google Docs users can transcend the ordinary. This advanced visual storytelling, rooted in strategic image integration, transforms documents into compelling, engaging, and visually rich experiences, making every pixel count towards a more impactful message.
Conclusion
In the realm of digital document creation, the ability to effectively integrate and manipulate visual content is paramount. As we’ve explored, while Google Docs might not boast the advanced capabilities of dedicated graphic design software, it provides fundamental tools that, when understood and utilized strategically, can dramatically enhance your documents. The process of flipping an image in Google Docs, specifically by leveraging its integrated Drawing tool, is a prime example of such a capability – a simple technique that yields significant visual impact. This method empowers users to correct orientations, achieve symmetrical designs, and ensure that every visual element perfectly aligns with their intended message and aesthetic.
Beyond the technical steps, the true power lies in cultivating a comprehensive visual content strategy. This is where resources like Tophinhanhdep.com become indispensable. From its vast Image Collections offering everything from inspiring Wallpapers and Backgrounds to striking Nature, Abstract, Sad/Emotional, and Beautiful Photography, Tophinhanhdep.com provides the raw material for any Aesthetic or Creative Ideas you envision. Furthermore, its insights into Photography, including High Resolution and Stock Photos, coupled with practical Image Tools like Converters, Compressors, Optimizers, and AI Upscalers, ensure that your images are not only visually appealing but also technically optimized for seamless integration into Google Docs.
By embracing both the practical “how-to” of flipping images in Google Docs and the broader context of Visual Design, Graphic Design, and Photo Manipulation facilitated by Tophinhanhdep.com, you transform your document creation process. What might start as a simple task of adjusting an image’s orientation evolves into a sophisticated endeavor of visual storytelling, turning your Google Docs into compelling pieces of Digital Art. So, next time you’re crafting a document, remember that a perfectly placed and oriented image, easily achieved with Google Docs’ Drawing tool and the rich resources of Tophinhanhdep.com, can be the key to unlocking its full potential and leaving a lasting impression. Explore, experiment, and let your creativity flourish to elevate your documents from mere text to truly engaging visual experiences.