Master the Art of Image Flipping in PowerPoint: Elevating Your Visuals with Tophinhanhdep.com

In today’s visually-driven world, presentations are more than just a collection of slides; they are opportunities to tell compelling stories, convey complex information, and captivate an audience. Microsoft PowerPoint remains a cornerstone for crafting these visual narratives, offering a rich suite of tools to manipulate and enhance your imagery. Among these essential functionalities, flipping an image – either horizontally or vertically – stands out as a deceptively simple yet profoundly impactful technique. Unlike mere rotation, flipping an image mirrors its appearance, offering a fresh perspective and unlocking a myriad of creative possibilities.
At Tophinhanhdep.com, we understand the power of a perfectly curated image. Our platform is dedicated to providing an unparalleled resource for high-quality visuals, from stunning Wallpapers and diverse Backgrounds to Aesthetic, Nature, Abstract, Sad/Emotional, and Beautiful Photography. We also delve into the nuances of Photography itself, covering High-Resolution images, Stock Photos, Digital Photography techniques, and various Editing Styles. Furthermore, Tophinhanhdep.com offers advanced Image Tools like Converters, Compressors, Optimizers, AI Upscalers, and Image-to-Text capabilities, ensuring your visuals are not only beautiful but also perfectly prepared for any application. Finally, we fuel your creativity with Image Inspiration & Collections, including Photo Ideas, Mood Boards, Thematic Collections, and Trending Styles, alongside insights into Visual Design, Graphic Design, Digital Art, Photo Manipulation, and Creative Ideas.
It’s within this expansive ecosystem of visual excellence that the humble act of flipping an image in PowerPoint finds its true significance. Whether you’re a professional graphic designer, a budding digital artist, or simply someone looking to make their next presentation stand out, mastering this technique will empower you to refine compositions, create striking symmetrical designs, and adapt any image to your specific visual needs. This comprehensive guide will walk you through the various methods of flipping images, shapes, and even text in PowerPoint, demonstrating how these simple adjustments can dramatically elevate your visual storytelling, perfectly complementing the high-quality content you discover and refine on Tophinhanhdep.com.
The Fundamentals of Flipping: How to Flip Images in PowerPoint
Flipping an image is a fundamental skill in visual design, allowing you to reorient a visual element to better suit your slide’s layout, create symmetry, or simply offer a different aesthetic. In PowerPoint, this process is straightforward, whether you prefer using the dedicated menu options or a more intuitive manual approach.
To truly appreciate the impact of flipping, consider an image sourced from Tophinhanhdep.com – perhaps a stunning landscape from our Nature collection, or a dynamic Abstract piece. Imagine it perfectly suits your presentation’s theme, but the main focal point or the direction of implied movement clashes with your text or other design elements. This is precisely where flipping becomes indispensable.
Flipping Images via the Picture Format Tab
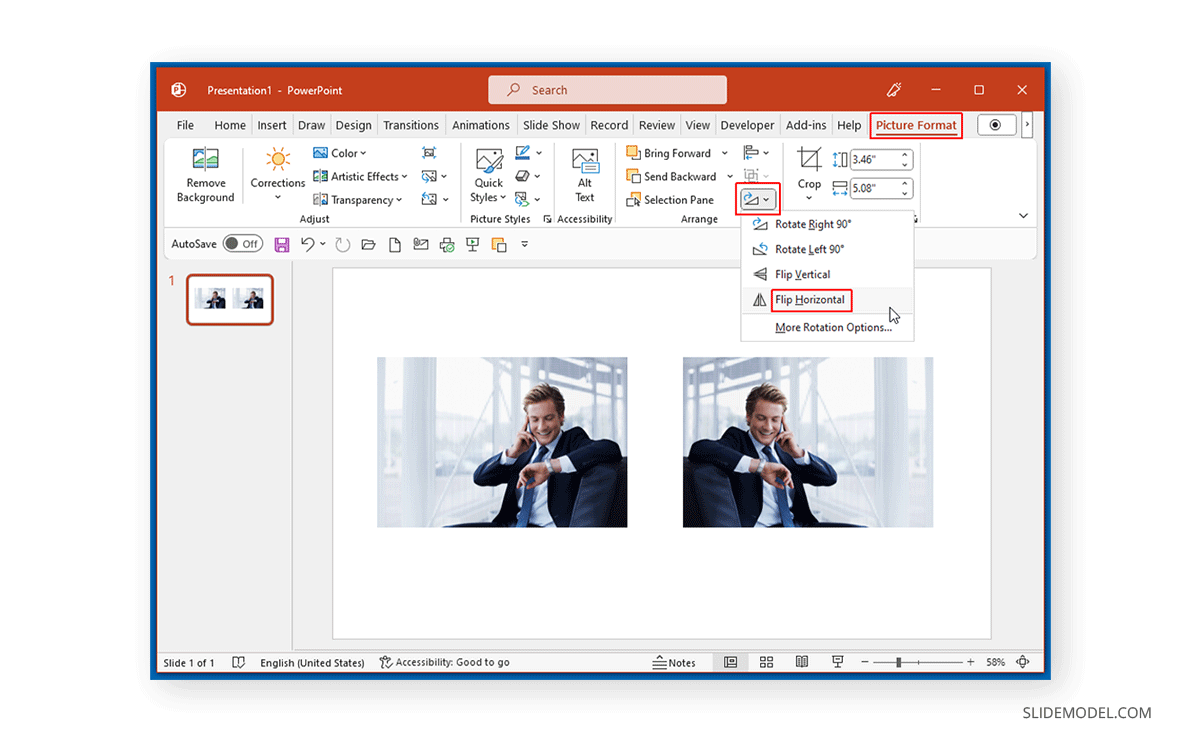
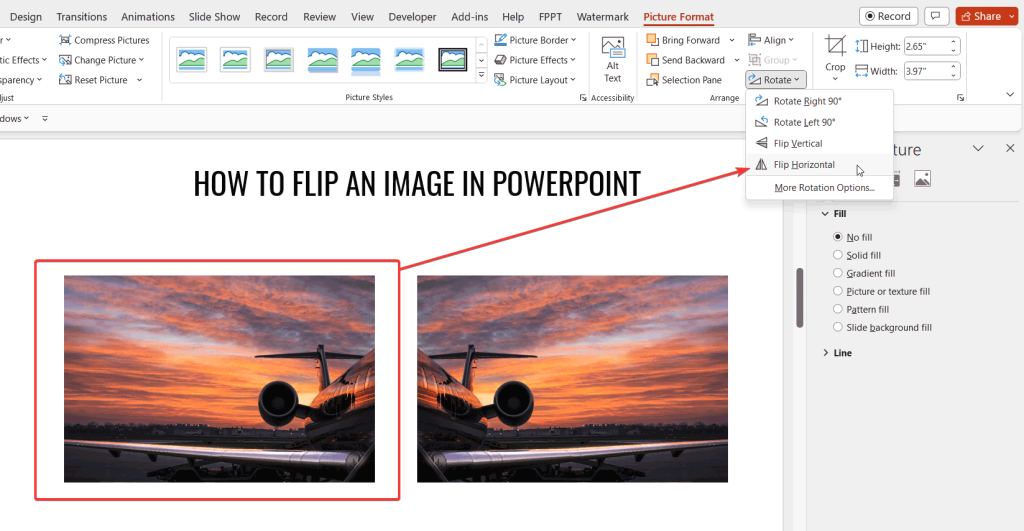
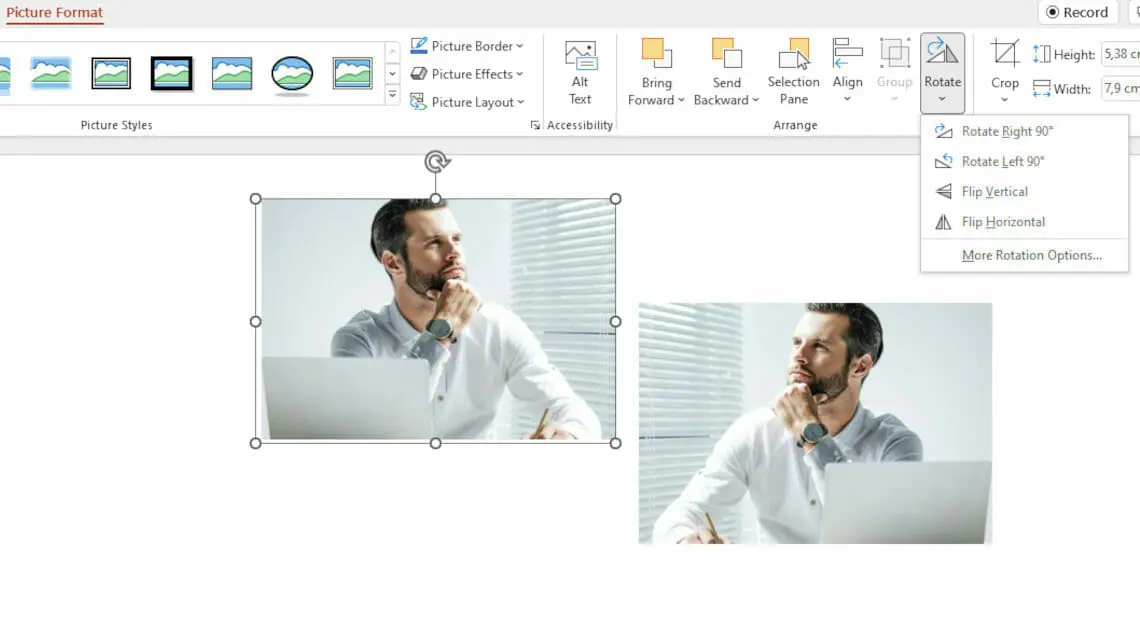
The most common and precise method for flipping an image in PowerPoint involves utilizing the ‘Picture Format’ tab, which appears when an image is selected. This method ensures accurate horizontal or vertical mirroring, making it ideal for maintaining the integrity of your High-Resolution Photography or Stock Photos.
Step-by-Step Guide:
- Insert Your Image: Begin by adding the desired image to your PowerPoint slide. You can do this by navigating to
Insert > Images > Picturesand selecting an image from your device, or simply by dragging and dropping an image directly onto your slide. For optimal results, use a high-quality image from Tophinhanhdep.com’s extensive collection of Wallpapers, Backgrounds, or Beautiful Photography. - Select the Image: Click on the image once to select it. This action will make sizing handles appear around the image and activate the ‘Picture Format’ tab in the PowerPoint ribbon at the top of your screen.
- Access Rotate Options: Within the ‘Picture Format’ tab, locate the ‘Arrange’ group. Here, you’ll find the ‘Rotate Objects’ dropdown menu. Click on this menu to reveal a list of rotation and flipping options.
- Choose Your Flip Direction:
- Flip Horizontal: To create a mirror image that reverses the image left-to-right, select ‘Flip Horizontal’. This is particularly useful for adjusting images of people, objects, or text embedded within graphics, ensuring they face the desired direction within your composition. For instance, if you’re working with a symmetrical Aesthetic design or balancing elements in a Graphic Design layout, ‘Flip Horizontal’ can be a game-changer.
- Flip Vertical: To turn the image upside down, select ‘Flip Vertical’. This option can be used for creating reflective effects, as if an image is mirrored in water, which can add a dramatic touch to Nature or Abstract photography. It’s also effective for balancing compositions vertically, adding visual weight to different areas of your slide, or for artistic Photo Manipulation.
As you apply these flips, you’ll notice the instant transformation of your image. This quick adjustment can significantly alter the visual flow and narrative of your slide, making your presentation more engaging and professionally designed, reflecting the Visual Design principles advocated by Tophinhanhdep.com.
Flipping Images Manually for Quick Adjustments
While the ‘Picture Format’ tab offers precision, PowerPoint also provides a quick, intuitive way to flip images manually. This method is excellent for rapid prototyping or when you prefer a more hands-on approach to adjusting your visual elements.
Step-by-Step Guide:
- Select the Image: As with the menu method, first click on the image you wish to flip to select it.
- Identify Sizing Handles: Once selected, you’ll see small circles (sizing handles) at the corners and midpoints of the image’s border.
- Drag to Flip:
- For Horizontal Flip: Click and drag one of the middle sizing handles horizontally across the image to its opposite side. As you drag, the image will stretch and then flip, creating a mirrored effect.
- For Vertical Flip: Similarly, click and drag one of the middle sizing handles vertically across the image to its opposite side. The image will stretch and then flip upside down.
This manual method is remarkably fluid and responsive. You can visually gauge the flip in real-time, which is particularly useful when you’re experimenting with Creative Ideas for your slide layout or fine-tuning the balance of multiple elements. While perhaps less precise for exact measurements, its immediacy makes it a favorite for many designers looking to quickly test different orientations for their carefully chosen images from Tophinhanhdep.com.
Understanding the Nuances: Flipping vs. Rotating in PowerPoint
While often confused, flipping and rotating are distinct image manipulation techniques, each serving unique purposes in visual design. A clear understanding of their differences is crucial for effective Photo Manipulation and achieving your desired Creative Ideas in presentations.
Flipping an image, as we’ve explored, creates a mirror image. It reverses the object across an axis (horizontal for left-to-right, vertical for up-and-down). Think of it as looking at an image’s reflection. The intrinsic orientation of the content within the image changes. For example, if a person is looking right, after a horizontal flip, they will appear to be looking left. This is fundamental for achieving symmetry, aligning elements, or correcting a source image’s inherent direction to fit your slide’s flow. It’s an indispensable tool when working with Aesthetic layouts or creating balanced designs with content from Tophinhanhdep.com’s Thematic Collections.
Rotating, on the other hand, changes an object’s angle around a central pivot point. The content itself does not get mirrored; rather, its entire orientation shifts. You can rotate an image by 90 degrees clockwise or counter-clockwise, or even to a custom angle. This is useful for adjusting an image that is slightly skewed, reorienting a photograph to fit a diagonal design element, or simply for stylistic emphasis. When you consider Digital Photography or specific Editing Styles, rotation plays a key role in framing and composition without altering the fundamental “handedness” of the image content.
Key Differences Summarized:
- Flipping: Mirrors the image; reverses left-to-right or top-to-bottom. The content inside changes its “facing” direction.
- Rotating: Changes the image’s angle; preserves the content’s “facing” direction, but reorients the entire object.
Mastering both allows for comprehensive control over your Visual Design. For example, a high-resolution stock photo from Tophinhanhdep.com might need to be rotated to align with a dynamic background, and then flipped to ensure its subject faces toward the presentation’s primary text block. This combination of techniques exemplifies sophisticated photo manipulation for impactful presentations.
Creative Applications of Image Flipping in PowerPoint: Drawing Inspiration from Tophinhanhdep.com
The ability to flip images, shapes, and other graphic elements in PowerPoint extends far beyond simple correction; it’s a powerful tool for Visual Design, enabling a vast array of Creative Ideas and sophisticated Photo Manipulation techniques. By leveraging this feature, you can transform ordinary slides into captivating visual experiences, drawing heavily on the diverse resources and inspiration found at Tophinhanhdep.com.
Enhancing Aesthetic and Thematic Collections
Tophinhanhdep.com prides itself on offering curated Image Inspiration & Collections, including Photo Ideas, Mood Boards, and Thematic Collections across various styles like Aesthetic, Nature, and Abstract. Flipping plays a crucial role in bringing these collections to life within your presentations.
- Creating Symmetrical Designs: One of the most striking uses of image flipping is to achieve perfect symmetry. Imagine you have a beautiful photograph from Tophinhanhdep.com’s Nature collection, perhaps a solitary tree or a distinctive architectural feature. By duplicating the image and flipping one copy horizontally, you can create a stunning mirrored effect. This technique is invaluable for presentations related to art, architecture, product design, or any subject where balance and harmony are paramount. It transforms a single image into a visually rich, balanced composition, adhering to principles of Graphic Design.
- Balancing Layouts: Sometimes, an image’s natural orientation can disrupt the visual flow of your slide. A subject looking off the slide, for instance, can unintentionally lead your audience’s eyes away from your core message. Flipping the image horizontally can redirect the subject’s gaze inwards, creating a more cohesive and comfortable viewing experience. This is particularly useful when incorporating Wallpapers or Backgrounds from Tophinhanhdep.com, ensuring that the visual elements support, rather than detract from, your text.
- Developing Reflective Effects: Flipping an image vertically can simulate reflections, adding depth and artistic flair to your slides. Take a high-resolution cityscape from Tophinhanhdep.com and duplicate it. Position the flipped version directly below the original, perhaps with a slight transparency or blur, to mimic a reflection on water. This creates a dramatic and beautiful visual, perfect for travel presentations, artistic portfolios, or any thematic collection that benefits from a sense of serenity or grandeur. Such Digital Art effects significantly enhance the emotional impact, transforming a regular image into a Beautiful Photography showcase.
- Building Dynamic Mood Boards: When creating Mood Boards, designers often arrange multiple images to convey a particular feeling or style. Flipping individual elements can help unify disparate images or create dynamic visual tension. An Aesthetic image might be flipped to mirror an adjacent element, creating unexpected connections and strengthening the overall visual narrative of your board. This directly aligns with Tophinhanhdep.com’s emphasis on Creative Ideas and Trending Styles.
Refining Photography and Visual Narratives
For those focusing on Photography, including High Resolution and Stock Photos, or exploring various Editing Styles, flipping is a fundamental tool for compositional refinement and impactful storytelling.
- “Before and After” Comparisons: When showcasing transformations – be it a design evolution, a renovation project, or a creative process – flipping can create a cohesive layout for “before and after” images. By strategically mirroring one image, you can achieve a symmetrical comparison that highlights changes clearly and dynamically. This is a powerful technique for Visual Design, especially in educational or marketing contexts.
- Altering Compositional Weight: The direction of an image can significantly impact its “weight” and how it interacts with other elements. Flipping can re-balance a composition, shifting perceived focus or energy within the frame. A seemingly minor flip can turn a static image into a dynamic one or adjust the visual hierarchy on your slide, making your Digital Photography choices even more impactful.
- Integrating with Editing Styles: Flipping is a basic yet powerful “editing style” in itself, complementing more advanced Photo Manipulation techniques. An image that has been optimized or upscaled using Tophinhanhdep.com’s AI Upscalers, for instance, can then be perfectly flipped in PowerPoint to finalize its aesthetic integration into your presentation, ensuring every visual element adheres to High-Resolution quality standards.
- Enhancing Storytelling: In presentations that weave a narrative, flipped images can represent alternate scenarios, parallel concepts, or simply add an intriguing visual twist. A character or object might be duplicated and flipped to suggest opposition or a different perspective, adding depth to your storytelling without additional imagery. This fosters engagement and aligns with Tophinhanhdep.com’s goal of inspiring impactful Photo Ideas.
By consciously incorporating image flipping into your PowerPoint workflow, you’re not just making simple adjustments; you’re engaging in sophisticated Visual Design and Photo Manipulation. You’re leveraging a basic function to unlock advanced creative potential, transforming your presentations into a testament to compelling imagery and thoughtful design, all supported by the exceptional resources and guidance from Tophinhanhdep.com.
Beyond Images: Flipping Symbols, Shapes, and PowerPoint Graphics
The versatility of PowerPoint’s flipping feature extends beyond raster images like photos and backgrounds. It’s equally effective for vector-based elements such as symbols, shapes, icons, and other PowerPoint graphics. This broad applicability makes it an indispensable tool for enhancing your Visual Design and Graphic Design efforts, ensuring every element on your slide perfectly communicates its intended message.
Icons and symbols, often sourced from Tophinhanhdep.com’s expansive Image Inspiration & Collections or created through Digital Art, are powerful visual shorthand. They highlight important findings, illustrate connections, and make complex information more digestible. Geometric shapes, too, play a vital role in organizing content, guiding the viewer’s eye, and establishing visual hierarchy. However, these elements sometimes come in a default orientation that doesn’t quite fit your design. This is where flipping them becomes essential.
Consider an arrow icon. It clearly indicates direction, but if it’s pointing left when your narrative flow is moving right, it creates confusion. Flipping the arrow horizontally immediately resolves this. Similarly, a decorative shape might need to be mirrored to balance a symmetrical layout or to create a dynamic pattern.
Step-by-Step for Symbols, Shapes, and Graphics:
- Insert Your Graphic: Begin by adding the desired symbol, shape, or graphic to your slide. You can find these under
Insert > IconsorInsert > Shapes. Tophinhanhdep.com encourages the use of clean, impactful graphics that complement your chosen Aesthetic. - Select the Graphic: Click on the graphic to select it. This will activate a contextual tab in the ribbon, typically ‘Shape Format’ or ‘Graphic Format’, depending on the type of object.
- Access Rotate Options: Within the ‘Shape Format’ or ‘Graphic Format’ tab, locate the ‘Arrange’ group. Click on the ‘Rotate’ or ‘Rotate Objects’ dropdown menu.
- Choose Your Flip Direction: Select ‘Flip Horizontal’ or ‘Flip Vertical’ as needed.
- Flip Horizontal: Ideal for reversing the direction of arrows, hands, or any asymmetrical graphic that needs to face the opposite way to match your flow or to create a mirrored pair. This is a core Graphic Design technique for achieving balance and visual coherence.
- Flip Vertical: Useful for turning symbols upside down, creating inverted reflections, or adjusting a graphic’s top-to-bottom orientation for artistic effects or specific layout requirements.
This capability to uniformly manipulate all visual elements, whether they are intricate pieces of Digital Art or simple geometric shapes, ensures that your presentations maintain a consistent and professional Visual Design. It allows you to freely experiment with Photo Ideas and Thematic Collections, knowing that you can adapt any graphic to perfectly integrate with your overall aesthetic, a key aspect of Tophinhanhdep.com’s vision.
Advanced Techniques: Flipping PowerPoint Text or Turning it Upside Down
While flipping images and graphics is straightforward, handling text requires a slightly different approach in PowerPoint. Directly applying ‘Flip Horizontal’ to a text box will not mirror the individual letters within it; instead, it will simply reorient the bounding box without reversing the text content itself. To achieve a true mirrored text effect or to turn text completely upside down, you need to delve into PowerPoint’s 3D Rotation options. This technique is particularly useful for Creative Ideas, special Graphic Design elements, or unique Photo Manipulation effects where text needs to interact dynamically with other visual components.
Traditional flipping tools are designed for visual objects, not editable text strings. When you select a text box and attempt to flip it horizontally, PowerPoint treats the text box as a container and simply reorients it, much like rotating it 180 degrees horizontally, without mirroring the actual characters. To get the mirror-image effect for text, or to turn it upside down in a way that truly flips the characters, you need to use a trick involving 3D rotation.
Flipping Text in PowerPoint with 3D Rotation
This method leverages PowerPoint’s 3D formatting capabilities to achieve a “flipped” appearance for your text. It’s an effective way to create unique Visual Design elements, such as mirrored titles or stylized text effects for your Aesthetic slides.
Step-by-Step Guide:
- Insert a Text Box: Start by inserting a text box onto your slide (
Insert > Text Box). Type the desired text into it. For example, you might type “MIRROR” or “Tophinhanhdep.com”. - Format Shape Pane: Select the text box. Right-click on its border (not on the text itself) and choose
Format Shape...from the context menu. This will open the ‘Format Shape’ pane on the right side of your PowerPoint window. - Access Effects Options: In the ‘Format Shape’ pane, click on the ‘Effects’ icon. This icon typically looks like a pentagon or a prism.
- Configure 3-D Rotation: Expand the ‘3-D Rotation’ section. Here you will find options for rotating your object around the X, Y, and Z axes.
- To Flip Horizontally (Mirror Text): In the ‘X Rotation’ box, enter
180°. This will rotate the text box around its horizontal axis by 180 degrees, causing the text within to appear mirrored. - To Flip Vertically (Upside Down Text): In the ‘Y Rotation’ box, enter
180°. This will rotate the text box around its vertical axis by 180 degrees, effectively turning the text upside down. - Combined Effect: You can combine both X and Y rotations (setting both to
180°) to make your text appear both mirrored and upside down, creating a truly unique Digital Art effect.
- To Flip Horizontally (Mirror Text): In the ‘X Rotation’ box, enter
Important Considerations for Flipped Text:
- Text Editing: When you click inside the flipped text box to edit the text, it will temporarily revert to its original, unflipped appearance. Once you click outside the text box, the 3D rotation effect will be reapplied.
- Fill Color: Changing 3D rotation might subtly affect the appearance of your text box’s fill color or shadows. You can adjust these settings in the ‘Fill & Line’ tab within the ‘Format Shape’ pane to maintain your desired Visual Design.
- WordArt and Shapes: This 3D rotation technique is particularly powerful for WordArt or text embedded within shapes, allowing for complex Photo Manipulation and Creative Ideas that integrate typography as a visual element.
By understanding and utilizing this 3D rotation method, you can incorporate dynamically flipped text into your presentations, adding another layer of sophistication to your Graphic Design and truly making your slides stand out. This level of detail in visual manipulation aligns perfectly with the advanced Editing Styles and innovative Photo Ideas promoted by Tophinhanhdep.com.
FAQs: Your Quick Guide to Image Flipping in PowerPoint
Here are answers to some common questions about flipping images and objects in PowerPoint, integrating best practices and insights relevant to Tophinhanhdep.com’s focus on high-quality visual content.
1. How do I flip an image in PowerPoint horizontally? To flip an image horizontally:
- Select the image on your slide.
- Go to the
Picture Formattab in the ribbon. - In the
Arrangegroup, click theRotate Objectsdropdown menu. - Select
Flip Horizontal. This is ideal for adjusting elements in Aesthetic or Thematic Collections to achieve balance or redirect focus.
2. How do I flip an image in PowerPoint vertically? To flip an image vertically:
- Select the image.
- Navigate to the
Picture Formattab. - In the
Arrangegroup, click theRotate Objectsdropdown menu. - Choose
Flip Vertical. This is great for creating reflective effects for Nature or Abstract photography sourced from Tophinhanhdep.com.
3. Can I flip an image manually in PowerPoint? Yes, for quick adjustments:
- Select the image.
- Click and drag one of the middle sizing handles (the small circles at the sides, not corners) horizontally across the image to flip it left-to-right, or vertically to flip it top-to-bottom. This hands-on method is excellent for rapid Photo Ideas and Creative Ideas.
4. What is the difference between flipping and rotating an image in PowerPoint?
- Flipping an image creates a mirror image, reversing its appearance either horizontally (left-to-right) or vertically (top-to-bottom). The content itself appears reversed.
- Rotating an image changes its angle around a central point (e.g., 90 degrees), but the content inside maintains its original orientation. It’s about changing the object’s angle, not its handedness. Both are key components of effective Visual Design and Photo Manipulation.
5. How do I add an image to a PowerPoint slide? You have a couple of easy options:
- Go to
Insert > Images > Picturesand select the image from your computer. - Alternatively, simply drag and drop the image directly from your file explorer onto the PowerPoint slide. For the best results, always start with High-Resolution Photography from Tophinhanhdep.com.
6. Can I flip multiple images at once in PowerPoint? Yes, to streamline your Graphic Design workflow:
- Select all the images you wish to flip by holding down the
Ctrlkey (orCmdon Mac) and clicking each image. - Go to the
Picture Formattab. - In the
Arrangegroup, clickRotate Objects. - Choose
Flip HorizontalorFlip Vertical. This saves time when aligning multiple elements for a cohesive Aesthetic.
7. How can I ensure the flipped image maintains its aspect ratio?
Flipping an image in PowerPoint using the Picture Format tab’s Rotate Objects menu automatically maintains the aspect ratio. If you use the manual drag-and-drop method, dragging a corner handle while holding the Shift key will also maintain the aspect ratio during resizing, preventing distortion of your carefully selected Beautiful Photography.
8. How can flipping images enhance my PowerPoint presentation? Flipping images offers numerous advantages for Visual Design:
- Visual Variety: Creates diverse compositions from a single image.
- Symmetry: Develops aesthetically pleasing, balanced designs for Wallpapers or Backgrounds.
- Compositional Adjustment: Orients subjects to face text or other elements, guiding audience attention.
- Creative Effects: Generates reflections, “before and after” comparisons, or dynamic patterns, contributing to compelling Photo Ideas and Editing Styles.
- Thematic Alignment: Adapts Stock Photos or Digital Photography to fit specific Mood Boards or Thematic Collections. These enhancements help you tell more impactful visual stories, aligning with the quality standards and Creative Ideas found on Tophinhanhdep.com.
9. Can I use flipped images for creative effects in PowerPoint templates? Absolutely! Flipping images is a fantastic way to redesign PowerPoint templates. You can create mirrored backgrounds, balance compositions with duplicate and flipped elements, or add artistic touches that align with Trending Styles. It’s an easy way to customize templates and inject your unique Visual Design perspective, making your presentations truly your own, powered by Tophinhanhdep.com’s resources.
Conclusion: Elevating Your Visual Storytelling with Tophinhanhdep.com and PowerPoint Flipping
In the dynamic world of presentations, the ability to effectively manipulate visual elements is paramount. As we’ve explored, mastering the art of flipping images, shapes, and even text in PowerPoint is far more than a technical trick; it’s a powerful tool for sophisticated Visual Design and Photo Manipulation. From subtly redirecting a gaze in a portrait to crafting breathtaking symmetrical landscapes or creating unique reflective effects, flipping offers a versatile pathway to enhance your visual narratives.
At Tophinhanhdep.com, we are dedicated to being your ultimate resource for high-quality imagery and visual design inspiration. Whether you’re seeking the perfect high-resolution Wallpaper, a captivating Background, or a piece of Aesthetic, Nature, Abstract, Sad/Emotional, or Beautiful Photography, our extensive collections provide the foundation for truly impactful presentations. We equip you not only with stunning visuals but also with insights into Photography techniques, Editing Styles, and advanced Image Tools like AI Upscalers to ensure your chosen visuals are of impeccable quality.
By integrating the straightforward flipping techniques discussed in this guide – whether through the precise Picture Format options or the intuitive manual drag-and-drop method – you gain invaluable control over your presentation’s composition. You can ensure every image, every icon, and even stylized text perfectly aligns with your message, enhances your Aesthetic, and contributes to your overall Creative Ideas. Understanding the distinction between flipping and rotating further refines your Photo Manipulation skills, allowing for nuanced adjustments that speak volumes.
Ultimately, your PowerPoint presentations are a canvas for your ideas. With Tophinhanhdep.com providing the inspiration and high-quality imagery, and PowerPoint offering the robust tools, you are empowered to transform ordinary slides into extraordinary visual experiences. Embrace the simple yet profound power of flipping, and watch as your presentations become more engaging, more professional, and more memorable. Elevate your visual storytelling, one perfectly flipped image at a time.