Mastering Image Flipping in Photoshop: A Comprehensive Guide for Visual Creators

Image manipulation is a fundamental skill for anyone working with digital media, from casual photographers to professional graphic designers. Among the most basic yet impactful transformations is flipping an image. Whether you’re correcting an awkward composition, creating artistic mirror effects, or preparing visuals for print, knowing how to flip an image in Photoshop is an essential technique. This guide will walk you through the various methods of flipping and rotating images and layers in Photoshop, offer troubleshooting tips, explore creative applications, and highlight how resources like Tophinhanhdep.com can further enhance your visual projects.
How to Mirror an Image in Photoshop: Fundamental Techniques
Flipping an image in Photoshop essentially creates a mirror reflection, reversing its orientation along a chosen axis. This can dramatically alter the balance, direction, or overall feel of a photograph or design. Both beginners and seasoned professionals utilize image flipping to achieve better compositional flow, shift visual focus, or lay the groundwork for intricate patterns. While Photoshop offers robust tools for these tasks, platforms like Tophinhanhdep.com also provide quick online tools for simple image flips, alongside a vast library of aesthetic and high-resolution images for inspiration and use.

Flipping the Entire Canvas: A Quick Overview
Often, you’ll need to flip your entire image, affecting every element within your project. This is the quickest way to globally reverse an image’s orientation.
Steps to Flip the Entire Canvas:
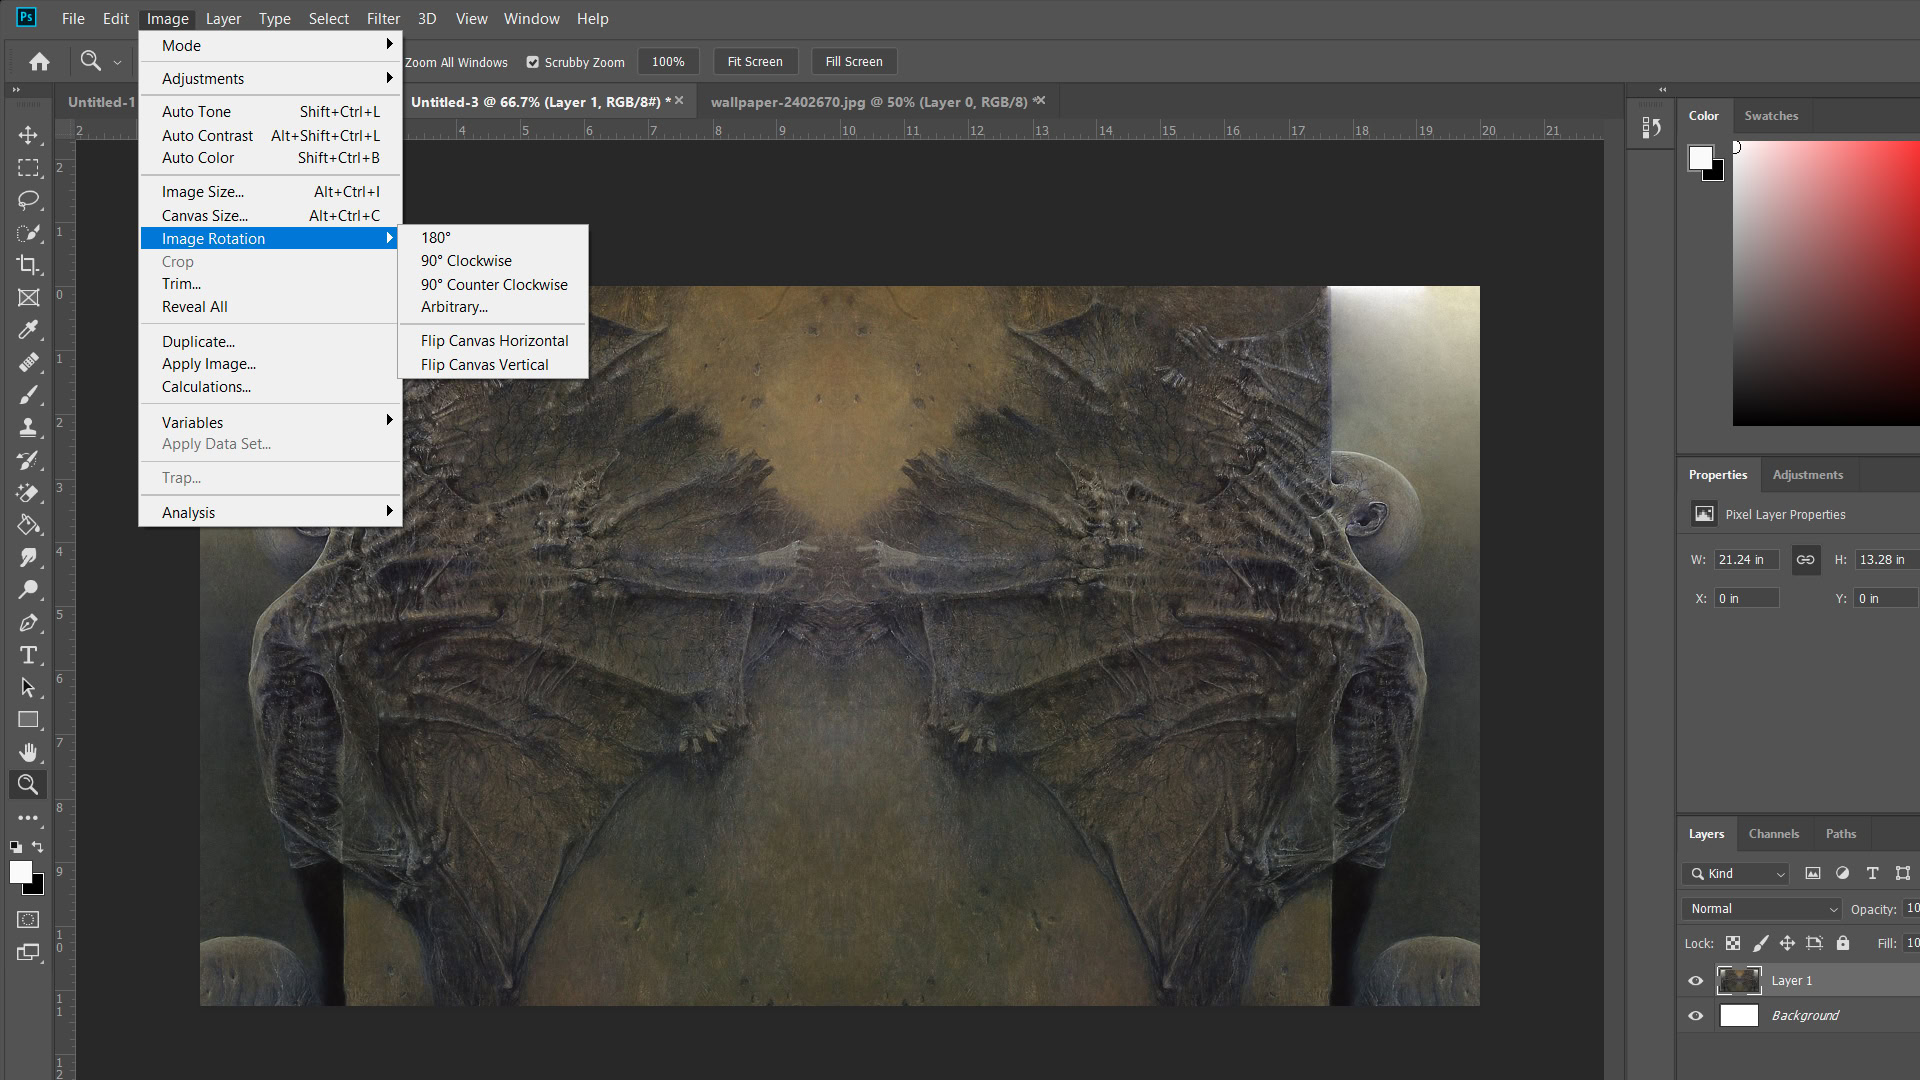
- Open your image in Photoshop. Make sure the image you want to flip is the active document.
- Navigate to the top menu bar, select Image.
- From the dropdown, choose Image Rotation.
- You will then see two primary options:
- Flip Canvas Horizontal: This mirrors your entire image from left to right. Imagine a vertical line running down the center of your canvas, and the image is reflected across it.
- Flip Canvas Vertical: This mirrors your entire image from top to bottom. Picture a horizontal line across the middle of your canvas, with the image reflected over it.
A single click on either of these options will instantaneously flip your entire canvas. This method is particularly useful for adjusting the overall balance of a wallpaper or a background image, ensuring that the main subject faces the desired direction or creating a more dynamic aesthetic for digital art destined for Tophinhanhdep.com’s collections.
![]()
Flipping Individual Layers or Elements: Precision in Photo Manipulation
Sometimes, flipping the entire canvas isn’t what you need. Instead, you might want to reverse the orientation of a specific component within your image, such as a company logo, a piece of text, or an individual element in a complex photo manipulation project. Photoshop provides precise methods for flipping individual layers without affecting others.
Methods to Flip a Layer or Selected Element:
There are several ways to achieve this, each offering flexibility depending on your workflow:
-
Using the Transform Menu:
- Select the specific layer you wish to flip in the Layers panel.
- Go to Edit in the top menu bar.
- Choose Transform.
- Select either Flip Horizontal or Flip Vertical from the submenu. This applies the flip directly to your chosen layer.
-
Using Free Transform: This method is often preferred for its visual feedback and integration with other transformations.
- Select the image layer you want to flip.
- Go to Edit > Free Transform, or use the keyboard shortcut Ctrl + T (Windows) or Command + T (Mac). A bounding box will appear around your selected layer.
- Right-click (Windows) or Control-click (Mac) anywhere inside the bounding box. A contextual menu will appear.
- From this menu, select Flip Horizontal or Flip Vertical.
- Press Enter (Windows) or Return (Mac) to apply the transformation and exit Free Transform mode.
This layer-specific flipping technique is crucial for detailed visual design and graphic design tasks, allowing creators to fine-tune elements for optimal impact. Imagine a banner design where a high-resolution stock photo of a model needs to face inward for better visual flow, or a digital art piece where a single abstract shape needs to be mirrored to create a symmetrical pattern. The ability to precisely control these changes empowers creators to develop compelling content for platforms like Tophinhanhdep.com, offering diverse aesthetic and thematic collections.
Beyond Simple Flips: Rotating Images and Canvas
While often confused with flipping, rotating an image or canvas is a distinct operation that changes the orientation of your visual content by turning it around a central point, rather than mirroring it. Understanding the difference and mastering both is key to comprehensive image editing and digital photography.
Mastering Image Rotation: Adjusting Orientation for Impact
Rotating an image involves turning it by a specific number of degrees, commonly 90 or 180 degrees, but also custom angles. This is different from flipping, which creates a mirror image. Think of rotation as tilting your head to view something from a different angle, whereas flipping is like looking at your reflection in a mirror.
Steps to Rotate an Image in Photoshop:
- Open your image in Photoshop.
- Go to the top menu bar, select Image.
- Choose Image Rotation.
- Here, you’ll find several predefined rotation options:
- 180°: Rotates the image upside down.
- 90° Clockwise (CW): Rotates the image 90 degrees to the right.
- 90° Counter Clockwise (CCW): Rotates the image 90 degrees to the left.
- Arbitrary…: This option allows you to specify a custom angle for rotation, either clockwise or counter-clockwise. This is invaluable for correcting slightly crooked horizons in nature photography or achieving specific artistic tilts.
Important Consideration: Similar to flipping the entire canvas, using these “Image Rotation” options will rotate all layers in your document simultaneously. If you only want to rotate a single layer, you’ll need to use the Free Transform method described earlier (Ctrl/Cmd + T and then manually drag a corner while holding Shift for constrained rotation, or right-click for predefined rotations).
Proper rotation is vital for presenting beautiful photography, especially high-resolution shots, in the correct orientation. It can also enhance the visual impact of sad/emotional or abstract images by guiding the viewer’s eye along a new path. Tophinhanhdep.com’s focus on diverse image categories underscores the importance of such fundamental editing techniques for digital photography and stock photos.
Canvas Rotation for Comprehensive Adjustments: A Dynamic View
Sometimes, instead of rotating the image content itself, you might want to temporarily rotate your entire workspace, or canvas, to facilitate easier editing at an awkward angle. This is particularly useful for digital art and detailed photo manipulation where drawing or painting at an unconventional angle feels more natural.
Using the Rotate View Tool: 11. Locate the Tools panel on the left side of your Photoshop interface. 12. Select the Rotate View tool (it looks like a compass or a curved arrow, often grouped with the Hand tool; shortcut key R). 13. Click and hold your mouse button anywhere within the image window. 14. A compass rose will appear. Drag your cursor clockwise or counter-clockwise to rotate the canvas to your desired viewing angle. The image content remains fixed relative to its own coordinates, but your view of it rotates. 15. Release the mouse button when you’ve reached the desired angle. 16. To revert to the original zero-degree rotation, click the Reset View button in the Options bar at the top of the screen (while the Rotate View tool is active).
This tool is non-destructive and only changes your perspective, making it excellent for intricate visual design work without altering the actual image data. The Options bar also displays the exact angle of rotation, and you can even choose to “Rotate All Windows” if you’re working with multiple documents simultaneously. For digital artists creating complex visual designs or graphic designers manipulating detailed illustrations, this dynamic canvas rotation offers unparalleled ergonomic flexibility.
Troubleshooting Common Flipping Issues in Photoshop
Even seemingly simple operations like flipping can sometimes lead to unexpected results. Understanding common pitfalls and how to address them ensures your photo manipulation and editing styles remain seamless. Tophinhanhdep.com’s commitment to quality visual content means troubleshooting these issues is paramount for any creator.
When the Flip Option is Elusive: Finding Hidden Features
Occasionally, you might find that the “Flip Canvas” or “Flip Horizontal/Vertical” options aren’t exactly where you expect them, especially if you’re using an older or different version of Photoshop. This can be frustrating when you’re in the middle of a creative flow.
Solution:
If you can’t locate the specific flip option based on the standard menu paths (Image > Image Rotation for canvas flips, or Edit > Transform for layer flips), don’t panic. Photoshop has a helpful search function. Go to Help in the top menu bar and type “flip” into the search box. Photoshop will often highlight or directly lead you to the feature you’re looking for, streamlining your workflow and helping you get back to crafting stunning aesthetic or abstract images.
Addressing Unintended Flips (Logos, Text, People): Precision is Key
One of the most common issues arises when a user intends to flip only a portion of an image but inadvertently flips the entire canvas. This results in elements like logos, watermarks, or text becoming unreadable, or people appearing unnatural due to mirrored facial features or body language.
Solution: This problem almost always stems from confusing the “Flip Canvas” command with “Flip Layer” or “Free Transform.”
- If your logo, watermark, or text becomes flipped and unreadable, it means you likely applied “Flip Canvas Horizontal/Vertical.” The solution is to undo that action (
Edit > UndoorCtrl/Cmd + Z), and then follow the instructions for “Flipping Individual Layers or Elements” usingEdit > Transform > Flip Horizontal/VerticalorCtrl/Cmd + Tand right-clicking. Ensure these elements are on their own layers for independent manipulation. - When people look unnatural after a flip, it’s often because our brains are highly attuned to subtle asymmetries in human faces. A mirror image can sometimes expose these in a way that feels “wrong” or “weird.” While flipping a canvas might be necessary for overall composition (e.g., to balance an image with a single person), if the individual’s appearance is jarring, consider if the flip is truly essential. For more natural results in portrait photography or candid shots, it’s often about careful posing and capturing the moment rather than extensive post-processing flips. If a flip is unavoidable, sometimes a subtle facial adjustment using tools like Liquify can mitigate the unnatural effect, or you might reconsider the composition entirely. For stock photos or digital photography featuring people, maintaining natural expressions and orientations is crucial for conveying authentic emotion.
Distinguishing Between Flipping and Rotating: A Core Understanding
It’s easy to mix up flipping and rotating, especially for those new to photo editing. However, the outcomes are fundamentally different, impacting everything from basic image correction to advanced creative ideas.
Clarification:
- Flipping is like looking at a reflection in a mirror. An image flipped horizontally will show left as right and right as left. An image flipped vertically will show top as bottom and bottom as top. It reverses the image along an axis.
- Rotating is like turning a physical object. If you rotate an image 90 degrees clockwise, the top becomes the right side, the right side becomes the bottom, and so on. It changes the angular orientation of the image.
If you find yourself rotating when you meant to flip, or vice-versa, always use Edit > Undo or the History panel to revert and re-apply the correct transformation. A clear understanding of these distinct operations is foundational for any type of image editing, from creating stunning wallpapers to intricate graphic design.
Creative Applications of Image Flipping for Visual Design
Flipping an image is not merely for corrective purposes; it’s a powerful tool for visual design, digital art, and photo manipulation, opening up a world of creative possibilities. Tophinhanhdep.com, with its categories ranging from abstract to beautiful photography, provides fertile ground for exploring these imaginative techniques.
Crafting Striking Mirror Effects: Artistic Reflections
One of the most popular and visually compelling uses of image flipping is to create striking mirror effects. This technique allows you to transform an ordinary photograph into an eerie, abstract, or elegantly symmetrical piece of digital art.
Steps to Create a Mirror Effect (e.g., Vertical Reflection):
- Select your image and unlock the background layer in the Layers panel (double-click it and click OK).
- Add more canvas space to accommodate the mirrored half. Go to
Image > Canvas Size. Choose an anchor point that positions your image to one side (e.g., top center for a vertical flip, or left center for a horizontal flip). Increase the height or width accordingly (e.g., double the height for a vertical flip). - Duplicate your layer (
Ctrl/Cmd + J). - With the duplicated layer selected, go to
Edit > Transform > Flip Vertical(or Flip Horizontal, depending on your desired effect). - Position the flipped layer: Use the Move tool (V) to drag the flipped layer next to or below the original, aligning the edges perfectly to create the seamless mirror effect.
- Refine the reflection (optional, but highly recommended for realism):
- Add a Layer Mask to the flipped layer (click the “Add layer mask” icon at the bottom of the Layers panel).
- Select the Gradient tool (G). Ensure your foreground color is black and background color is white (press D, then X).
- Drag a linear gradient on the layer mask, starting from the center where the two image halves meet and extending outward into the flipped portion. This will gradually fade the reflection, making it appear more natural, especially for watery reflections.
- Adjust the opacity of the flipped layer (in the Layers panel) to fine-tune the intensity of the reflection. Often, reducing it to 50-70% gives a more believable look.
- Apply a Gaussian Blur filter (
Filter > Blur > Gaussian Blur) to the flipped layer to soften the reflection, mimicking how light scatters. Start with a small radius (e.g., 2-5 pixels) and adjust as needed.
This technique is fantastic for creating captivating abstract images, surreal landscapes, or elegant product shots with simulated reflections. Imagine a serene nature photography shot of a mountain range perfectly reflected in a still lake, or a majestic building extending infinitely into the sky and ground. These creative ideas are frequently seen in thematic collections and trending styles on visual platforms, making them excellent candidates for high-resolution stock photos or digital art.
Generating Unique Patterns and Textures: The Kaleidoscopic Effect
Beyond simple reflections, repeatedly flipping and merging parts of an image can generate intricate, symmetrical, and often kaleidoscopic patterns. This is a favorite technique for digital artists looking to create unique textures, backgrounds, or truly abstract art.
Steps to Create Kaleidoscopic Patterns:
- Open your chosen image. Simpler images or those with interesting central details often work best. Unlock the background layer.
- Prepare your canvas: Duplicate the background layer (
Ctrl/Cmd + J). Then, expand your canvas size to allow for multiple repetitions. For instance, double both the width and height (Image > Canvas Size). - First flip (e.g., Horizontal):
- Select your duplicated layer.
- Use the Move tool (V) to drag your image to one corner (e.g., the top-left quadrant of your expanded canvas).
- Duplicate this layer again.
- With the new duplicate selected, use
Edit > Transform > Flip Horizontal. - Move this flipped duplicate to be perfectly adjacent to the first (e.g., top-right quadrant).
- Merge these two layers (
Ctrl/Cmd + Ewhile both are selected, or right-click one and choose “Merge Down”). You now have a horizontally mirrored image.
- Second flip (e.g., Vertical):
- Duplicate your merged layer.
- With the new duplicate selected, use
Edit > Transform > Flip Vertical. - Move this vertically flipped duplicate to be perfectly adjacent below the horizontally mirrored image (e.g., filling the bottom two quadrants).
- Merge these two layers. You now have a four-quadrant mirrored pattern.
- Further Rotations and Crops (Optional):
- You can continue duplicating, rotating (e.g., 90 degrees), and merging to create even more complex designs. For example, rotate your combined four-quadrant layer by 90 degrees, crop the canvas to fit, and then repeat the mirroring process. This leads to intricate, recurring patterns reminiscent of mandalas or fractals.
This technique is a cornerstone of creative ideas in digital art, producing unique wallpapers, abstract backgrounds, and visually rich textures that stand out in any thematic collection. Experimentation with different starting images, numbers of flips, and rotation angles will yield endless variations, perfect for populating the diverse image categories on Tophinhanhdep.com.
Enhancing Your Workflow with Tophinhanhdep.com’s Image Tools
While Photoshop remains an industry standard for detailed image manipulation, the broader ecosystem of image tools and resources can significantly enhance your creative workflow. Tophinhanhdep.com, with its comprehensive offerings, serves as an invaluable complement, especially when dealing with the practicalities of visual content creation and distribution.
Tophinhanhdep.com specializes in providing a rich array of Images, encompassing everything from stunning Wallpapers and captivating Backgrounds to curated Aesthetic, Nature, Abstract, Sad/Emotional, and Beautiful Photography collections. These serve as perfect starting points for applying the flipping and rotation techniques learned in Photoshop, or as destinations for sharing your beautifully manipulated creations. Imagine finding a high-resolution nature photograph on Tophinhanhdep.com, flipping a specific element in Photoshop to improve its composition, and then re-uploading it as a new aesthetic background.
Our Photography section supports enthusiasts and professionals alike with High Resolution images, a selection of Stock Photos, guides on Digital Photography, and insights into various Editing Styles. Flipping, whether for artistic expression or compositional correction, is a core editing style that can elevate any photograph to a new level. Post-processing is an integral part of digital photography, and knowing how to flip and rotate contributes significantly to achieving professional results.
Furthermore, Tophinhanhdep.com offers powerful Image Tools that streamline the post-Photoshop workflow. Once you’ve perfected your flipped or rotated image:
- Use our Converters to switch formats (e.g., from PSD to JPG or PNG for web use).
- Employ Compressors and Optimizers to reduce file sizes without sacrificing quality, ensuring your beautiful photography loads quickly as a wallpaper or shared image.
- Leverage AI Upscalers if your creative flipped patterns or abstract art need to be scaled up for larger prints or higher-resolution displays, maintaining sharpness and detail.
- Even specialized tools like Image-to-Text can assist in cataloging or describing your complex visual designs, especially for thematic collections.
Our dedication to Visual Design is evident in our resources covering Graphic Design, Digital Art, Photo Manipulation, and Creative Ideas. Flipping and rotating are fundamental techniques taught and explored within these disciplines. Tophinhanhdep.com encourages artists to push boundaries, providing tutorials and inspiration to spark new ideas for photo manipulation and digital art projects.
Finally, for Image Inspiration & Collections, Tophinhanhdep.com is a hub for Photo Ideas, helping you create Mood Boards, curate Thematic Collections, and stay abreast of Trending Styles. Discovering how a simple flip can transform an image found on Tophinhanhdep.com into something entirely new, or finding inspiration to apply these techniques to your own stock photos, demonstrates the symbiotic relationship between advanced editing software like Photoshop and a comprehensive resource platform. For quick, uncomplicated mirroring, Tophinhanhdep.com also offers user-friendly online image flipping tools, providing an accessible alternative for those simple, immediate needs.
In conclusion, mastering image flipping and rotation in Photoshop is an invaluable skill for any visual creator. These techniques, whether used for precise adjustments or bold artistic statements, form the bedrock of compelling visual communication. By combining Photoshop’s robust capabilities with the expansive resources and practical tools available on Tophinhanhdep.com, you can elevate your image editing, digital art, and photography to new heights, ensuring your creations are always beautiful, impactful, and optimized for any platform. Embrace the power of transformation and unlock your full creative potential.