How to Flip Images in CapCut: A Comprehensive Guide for Stunning Visuals

In the bustling digital landscape of today, visual content reigns supreme. From captivating wallpapers and aesthetic backgrounds to breathtaking nature photography and intricate digital art, images are the cornerstone of communication, expression, and inspiration. At Tophinhanhdep.com, we understand the power of a perfectly crafted visual, and we’re dedicated to providing you with the tools and insights to create them. Sometimes, achieving that perfect visual involves a simple but transformative technique: flipping, mirroring, or rotating an image.
Whether you’re a seasoned graphic designer, an aspiring photographer looking to enhance your beautiful photography, or simply someone who loves to create engaging social media posts, mastering image manipulation is key. CapCut, a widely popular and incredibly versatile editing tool, isn’t just for videos; it’s a powerful ally for image editing too, offering intuitive features that can elevate your still visuals.
This comprehensive guide will demystify the art of flipping, mirroring, and rotating images within CapCut. We’ll explore the subtle differences between these techniques, walk you through step-by-step processes on both desktop and mobile platforms, and share expert tips to ensure your images—whether they’re abstract compositions, emotional portraits, or high-resolution stock photos—stand out. Get ready to transform your creative ideas into visually arresting realities, making your content truly unique and inspiring, just like the image inspiration we strive to provide on Tophinhanhdep.com.
Understanding the Nuances: Flipping, Mirroring, and Rotating Your Visuals
Before diving into the practical steps of using CapCut, it’s crucial to understand the distinct actions of flipping, mirroring, and rotating. While often used interchangeably, especially by beginners, each technique offers a unique way to alter your visual content, catering to different creative or corrective needs. Grasping these distinctions is the first step towards precise photo manipulation and achieving your desired aesthetic.
The Art of Flipping Images: Redefining Perspective
Flipping an image involves reversing its orientation along a specific axis, either vertically or horizontally. It’s like taking your picture and turning it inside out along a chosen line.
-
Vertical Flipping: This action turns your image upside down. Everything at the top moves to the bottom, and vice versa.
- Corrective Use: Imagine you took a stunning landscape photo, but your camera was accidentally inverted, capturing the scene upside down. A vertical flip instantly corrects this common mistake, bringing the horizon back to its rightful place.
- Creative Effects: For abstract or digital art, a vertical flip can create intriguing symmetrical effects. Think of a skyline reflecting perfectly in water – a vertical flip can help simulate or enhance this kind of reflective quality, adding a surreal or balanced aesthetic to your composition. It’s a fantastic technique for developing unique backgrounds or experimenting with mood boards for new projects.
-
Horizontal Flipping: This reverses the image from left to right, creating a mirror image.
- Corrective Use: If a piece of text or a logo in your image appears backward (perhaps from a reflection or specific camera settings), a horizontal flip can correct its orientation.
- Creative Effects: This is exceptionally useful for graphic design and photo manipulation. You can create perfect symmetrical compositions, duplicate elements with a mirrored appearance, or give a new perspective to a portrait. For instance, flipping a portrait horizontally can sometimes reveal a more appealing angle or create a balanced visual when combined with other elements. It’s a subtle change that can significantly impact the overall visual design.
Mirroring Images: Crafting Symmetrical Reflections
Mirroring an image is essentially synonymous with horizontal flipping. It specifically refers to reflecting the visual along a vertical axis, creating a precise “mirror image” of the original. While “flipping” can refer to both horizontal and vertical reversals, “mirroring” almost exclusively implies the left-to-right transformation.
- Specific Image Uses:
- Graphic Design: Mirroring is invaluable for creating intricate patterns, symmetrical logos, or balanced layouts. Imagine designing a header image for Tophinhanhdep.com – mirroring an element can add a sophisticated touch without complex duplication.
- Aesthetic Photography: For “beautiful photography” or “aesthetic” shots, mirroring can enhance dramatic effects, multiply subjects, or create a sense of harmony. It’s a trick used by digital artists to turn ordinary photographs into captivating pieces of “digital art.”
- Developing Mood Boards: When curating image inspiration, a mirrored version of a photo can offer a fresh perspective or fit better into a specific layout for a thematic collection.
Rotating Images: Adjusting Angles for Perfect Alignment
Rotating an image means turning the entire visual around a central point by a specific degree, either clockwise or counter-clockwise. Unlike flipping or mirroring, rotation doesn’t reverse the image; it simply changes its angle.
- Corrective Use: This is the most common application. If you’ve taken a photo that’s slightly tilted—a common occurrence when capturing nature scenes or abstract patterns—rotating it by a few degrees can straighten the horizon or align elements perfectly. This ensures your “high-resolution” images look professional and polished.
- Artistic Effects: Beyond correction, rotation can be used creatively.
- Dynamic Compositions: A subtle rotation can add a sense of movement or tension to a static image, enhancing its visual impact.
- Orientation Adjustment: Converting a portrait-oriented photo (like a “sad/emotional” close-up) into a landscape orientation (for a wide “background”) or vice-versa to fit specific display requirements or social media platforms.
- Visual Design: For graphic designers, precise rotation is essential for aligning text, shapes, or various image elements within a larger composition. It helps in creating structured yet dynamic layouts for “creative ideas” or “thematic collections.”
By understanding these distinctions, you empower yourself to make deliberate choices in CapCut, moving beyond simple adjustments to truly manipulate your visuals with intent and precision, aligning perfectly with the diverse image editing styles promoted on Tophinhanhdep.com.
Flipping Images on Desktop with CapCut: Precision and Power
For those who prefer a larger workspace and detailed control over their “photo manipulation” and “digital art” projects, CapCut Desktop offers a robust platform. It brings the intuitive ease of its mobile counterpart to a powerful desktop environment, making it an excellent choice for refining high-resolution images, creating stunning wallpapers, or developing intricate visual designs. This section will guide you through using CapCut Desktop to flip, mirror, and rotate your images with precision.
Getting Started with CapCut Desktop for Image Editing
CapCut Desktop is available for both Mac and Windows, providing a comprehensive, all-in-one tool for editing your visual content. While often highlighted for video editing, its image manipulation capabilities are equally impressive, making it ideal for the “editing styles” and “graphic design” needs emphasized on Tophinhanhdep.com.
Key Features for Image Editing:
- One-Click Flip/Mirror: Instantly reverse your image horizontally or vertically with minimal effort, perfect for quick aesthetic adjustments.
- Precise Rotation Control: Rotate your images to any desired degree, ensuring perfect alignment or achieving unique artistic angles without compromising quality.
- Effortless Cropping and Repositioning: Easily crop your image to fit specific aspect ratios (important for “social media compatibility”) and reposition elements within the frame for optimal composition.
- Advanced Editing Tools: Beyond basic transformations, CapCut offers an array of tools to enhance your images, including color grading, filters, and effects, allowing you to polish your “beautiful photography” or add flair to “abstract” creations. These tools contribute to the “aesthetic” quality of your final output.
Step-by-Step Guide to Flipping Images on CapCut Desktop
Before you begin, ensure you have the CapCut desktop video editor installed. If not, you can download it for free.
Step 1: Import Your Image Launch CapCut Desktop and click on “Create project” to begin. In the editing interface, locate and click the “Import” button. This allows you to add various media, including images. Select the image (or multiple images) you wish to edit from your computer. Once imported, drag your image file onto the timeline at the bottom of the screen. This is where your editing journey begins, allowing you to arrange and manipulate your visual content. You can even import “stock photos” or your own “high-resolution” images to get started.
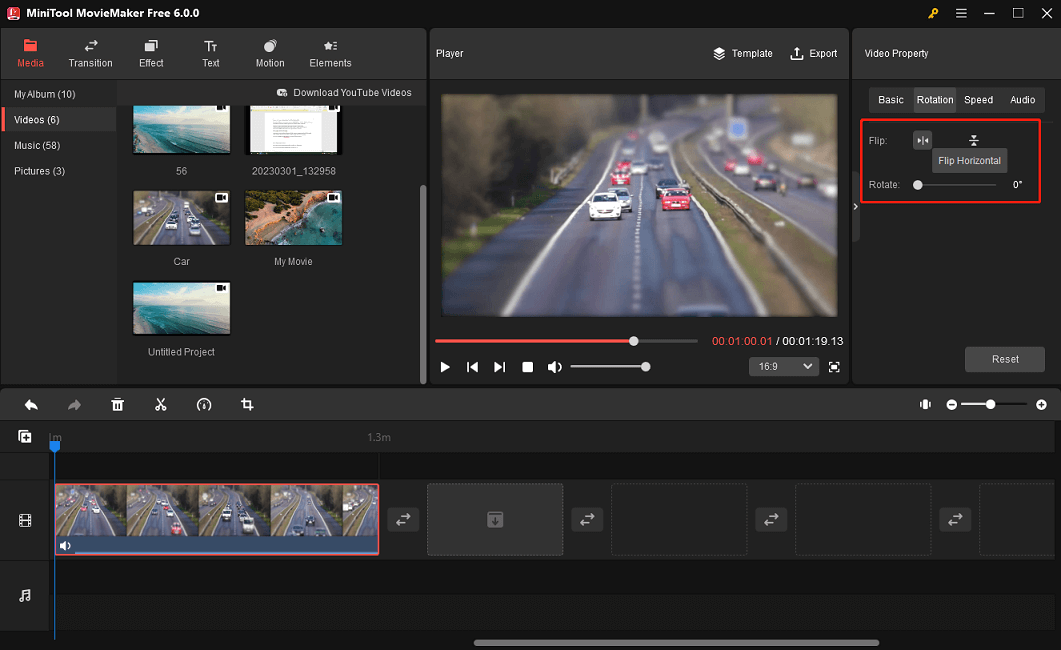
Step 2: Apply the Flip/Mirror Effect With your image selected on the timeline, you’ll see a range of editing tools.
- For Horizontal Flip (Mirroring): Look in the top bar above the timeline for the “Mirror” symbol (often depicted as two opposing triangles or a mirror icon). Clicking this symbol will instantly flip your image horizontally, creating a mirrored effect. This is fantastic for achieving symmetrical designs or correcting horizontally oriented elements.
- For Vertical Flip: If you need to flip your image vertically (turn it upside down), navigate to the right-hand function bar. Select “Video” (even for images, as CapCut uses a unified panel for basic transformations), then “Basic.” Here, you’ll find the “Rotate” option. To achieve a vertical flip, input “180” degrees into the rotation field or drag the slider until the image is perfectly inverted. This method gives you precise control over orientation adjustments.
Step 3: Refine, Export, and Share After flipping or rotating your image, take a moment to preview it. Ensure the orientation is exactly as you desire and that no unintended distortions have occurred. You can further enhance your image using CapCut’s advanced editing tools – perhaps adding a filter to boost its “aesthetic” appeal or adjusting colors for “nature” photography.
Once satisfied, click the “Export” button, usually located in the top right corner. A menu will appear with various download options. You can choose to export your image (or a video sequence incorporating it) in different resolutions (e.g., 1080p, 2K, or 4K for “high resolution” output) and formats. After selecting your preferred settings, you can save the final image to your device, ready to be used as a “wallpaper,” “background,” or for sharing directly on platforms like TikTok or YouTube if it’s part of a “visual design” project. The quality preservation ensures your digital art and beautiful photography maintain their sharpness.
Seamless Image Flipping on Mobile: CapCut at Your Fingertips
In a world where content creation often happens on the go, the CapCut mobile app is an indispensable tool for quick, intuitive image editing. Whether you’re adjusting a photo for an Instagram story, creating an aesthetic background for your phone, or experimenting with “trending styles,” CapCut mobile brings powerful manipulation features directly to your smartphone. It’s perfect for capturing those spontaneous “photo ideas” and turning them into polished visuals.
CapCut Mobile App: Instant Image Transformation
The CapCut mobile app is renowned for its user-friendly interface, making sophisticated editing accessible to everyone, from casual users to aspiring digital artists. Its capabilities extend far beyond simple cropping, offering a suite of features that enhance “photo manipulation” and “creative ideas” right from your pocket.
Key Features for Mobile Image Editing:
- One-Tap Mirror Function: Effortlessly flip or mirror your image horizontally or vertically with a single tap, providing immediate visual feedback.
- Integrated Advanced Features: Beyond mirroring, the app allows you to rotate, resize, blur, or apply various effects to your images, making it a comprehensive tool for developing “thematic collections” or perfecting individual shots.
- Ideal for Short-Form Visuals: While often associated with short videos, its image editing capabilities are perfect for quickly preparing images for social media platforms, ensuring your “mood boards” and aesthetic posts are always on point.
- No Professional Skills Required: CapCut’s intuitive design ensures that even beginners can achieve professional-looking results without a steep learning curve, empowering more users to create stunning “digital art” and “beautiful photography.”
How to Flip Images Using the CapCut Mobile App
Getting started with CapCut mobile is straightforward. Ensure the app is installed on your smartphone.
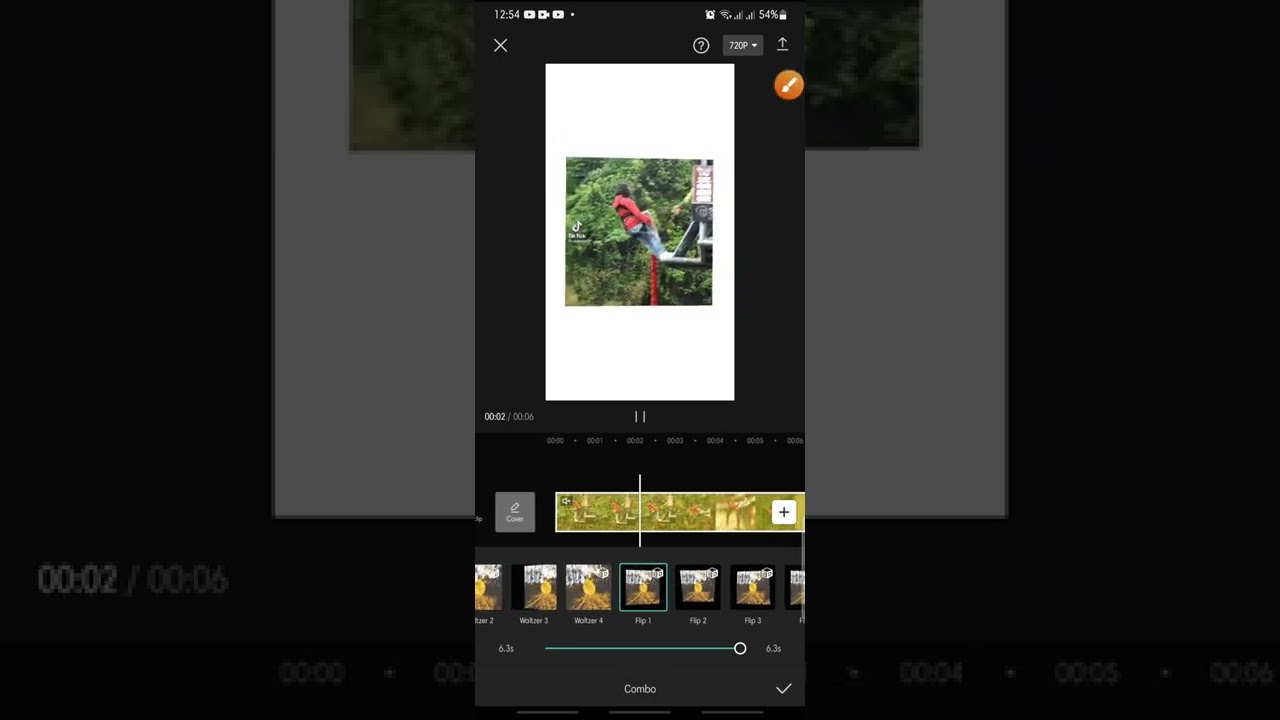
Step 1: Upload Your Image Open the CapCut mobile app. Tap on “New project” to select the image(s) from your device’s gallery. Once selected, tap “Add” to bring your chosen image(s) into the CapCut editing timeline.
Step 2: Mirror or Flip the Image With your image uploaded, tap on the image clip in the timeline. This will bring up a menu of editing options at the bottom of the screen.
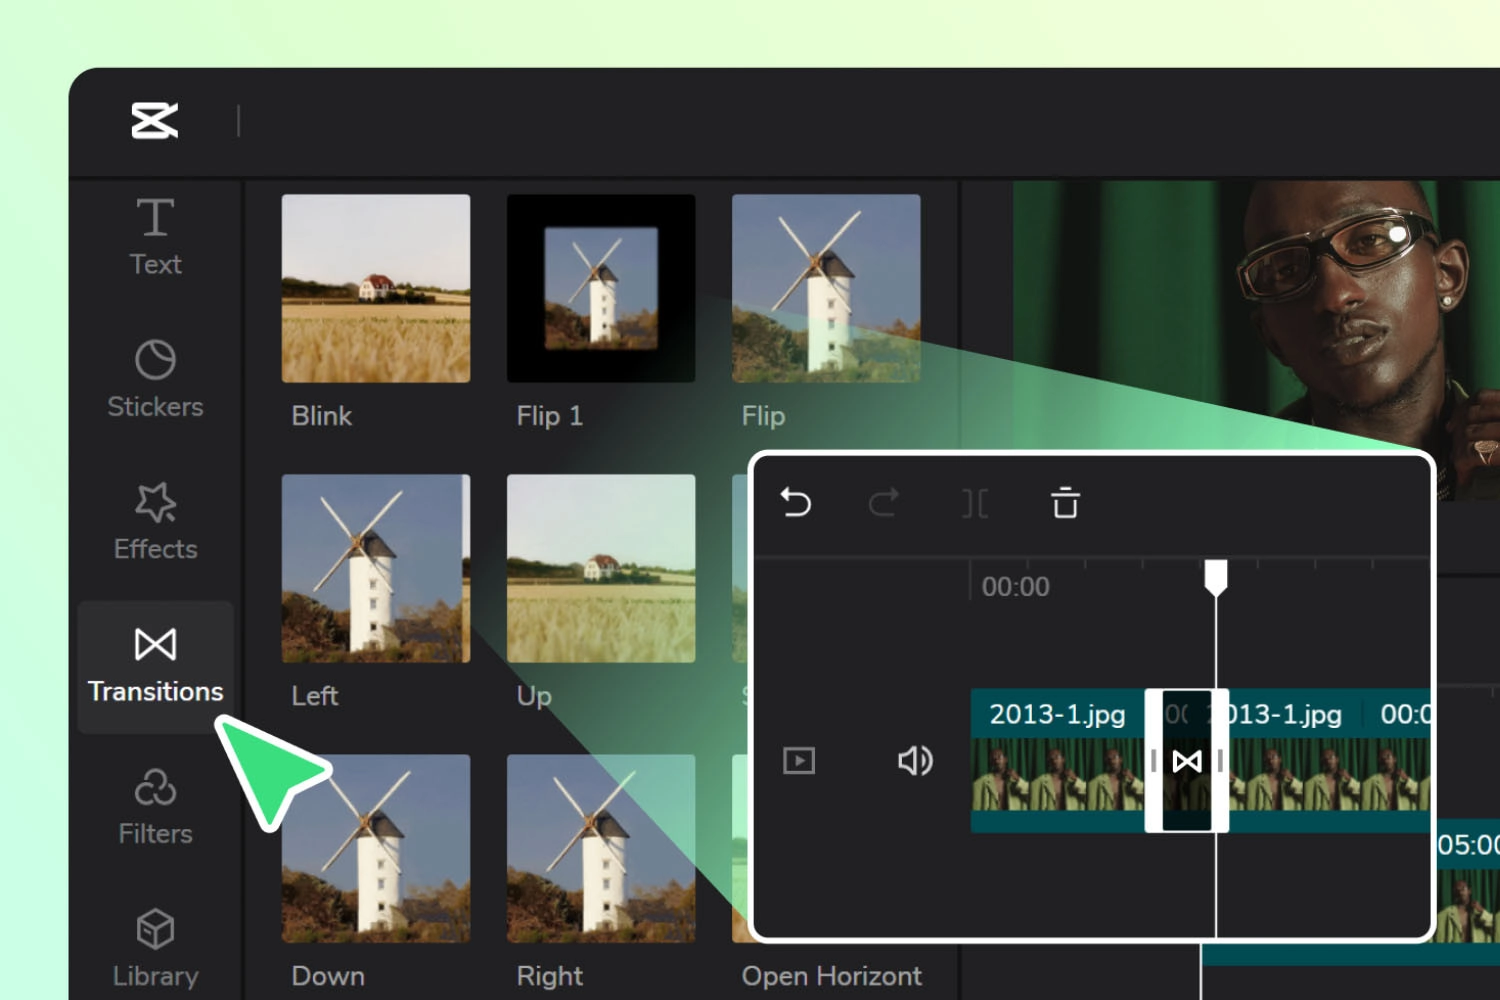
- Scroll through the options and tap on “Transform.”
- Within the “Transform” menu, you will see icons for “Rotate,” and crucially, a “Mirror” icon.
- Tap the “Mirror” icon to instantly apply a horizontal flip to your image.
- If you need to achieve a vertical flip, you can tap the “Rotate” icon repeatedly until your image is inverted (180 degrees rotation).
- CapCut also allows you to resize, reposition, or apply other immediate enhancements to your image within this same “Transform” menu, giving you comprehensive control over your “visual design.”
Step 3: Download and Share Once you are satisfied with the flipped, mirrored, or rotated image, review your edits. When ready, look for the export icon (often an arrow pointing upwards or a “Download” symbol) usually located in the top right corner of the screen. Tap it to export your image. CapCut mobile allows for high-quality exports, ensuring your final image retains clarity and detail. You can then save the image to your device or directly share it on popular social media platforms, making it effortless to publish your “aesthetic” creations or contribute to your “thematic collections.”
Beyond the Flip: Enhancing Your Visuals with CapCut’s Advanced Tools
While flipping, mirroring, and rotating are fundamental techniques, CapCut’s desktop editor and mobile app offer a much broader suite of features that can transform your images into true masterpieces. These tools align perfectly with Tophinhanhdep.com’s focus on “image tools,” “visual design,” and “creative ideas,” allowing you to go beyond basic adjustments and delve into sophisticated “photo manipulation” and “digital art.”
Elevating Your Image Editing with CapCut’s Ecosystem
CapCut is more than just a simple flip tool; it’s a comprehensive creative hub. By exploring its advanced functionalities, you can infuse your images with new life, detail, and narrative.
- Rich Media and Music Resources: CapCut boasts an extensive library of stock images (complementing Tophinhanhdep.com’s “stock photos”), high-quality music, and sound effects. This means you’re not limited to your own captures; you can seamlessly integrate professional assets to enhance your “aesthetic” projects or create compelling “mood boards.” Imagine finding the perfect background or overlay to complement your “beautiful photography.”
- AI Upscalers and Optimizers: Connecting directly to Tophinhanhdep.com’s “Image Tools” category, CapCut integrates functionalities that can help you with “AI upscalers.” If you have an older, lower-resolution image, these tools can intelligently enhance its quality, making it suitable for “high-resolution” wallpapers or detailed “graphic design” projects without compromising clarity. It also includes “compressors” and “optimizers” to manage file sizes efficiently without significant quality loss.
- Background Removal with One Click: One of CapCut’s most powerful features for image editing is its advanced background eraser. With a single click, you can isolate subjects in your image, allowing you to change the background entirely. This is invaluable for “photo manipulation,” creating transparent PNGs for “digital art,” or placing subjects into “abstract” or “nature” backgrounds, providing immense flexibility for “creative ideas.”
- Customized Popular Visual Templates: For those seeking inspiration or a quick start, CapCut provides a diverse range of customizable templates. While many are video-centric, they often feature stunning visual styles that can inform your image-only projects. Adapting these “trending styles” or “thematic collections” can save time and ensure a professional, cohesive look for your “visual design” endeavors.
- Advanced Text and Effects: CapCut allows you to add dynamic text overlays, stickers, and a wide array of visual effects to your images. This is crucial for crafting engaging social media posts, designing “sad/emotional” visual narratives, or simply adding a unique flair to your “image inspiration” projects.
- Share Your Work on Social Media Platforms: After perfecting your images, CapCut streamlines the sharing process. You can directly export and upload your creations to various social networks, ensuring your “beautiful photography” or intricate “digital art” reaches your audience efficiently, maintaining its “high resolution” quality for maximum impact.
By leveraging these advanced tools in conjunction with basic transformations like flipping and rotating, you can unlock CapCut’s full potential, turning your raw images into polished, professional-grade visual assets that align perfectly with the high standards and diverse categories found on Tophinhanhdep.com.
Mastering the Art of Image Flipping: Tips and Best Practices
Flipping, mirroring, and rotating images in CapCut can significantly enhance your visual content, whether for artistic expression, corrective adjustments, or optimized “visual design.” However, to consistently achieve professional results and truly make your “beautiful photography” and “digital art” stand out, it’s essential to follow some best practices. These tips will help you avoid common pitfalls and maximize the impact of your image transformations.
Achieving Professional Results with Your Flipped Images
- Start with High-Quality Source Files: The foundation of any stunning edit is a “high-resolution” original. Flipping or rotating a low-quality, pixelated image will only amplify its flaws. Always begin with the best possible image file to ensure clarity and detail are preserved throughout the editing process. This is particularly important if your goal is to create “wallpapers” or “backgrounds” that need to look crisp on large screens.
- Understand Your Creative Intent: Before you click that flip or rotate button, ask yourself: Why am I doing this? Are you correcting a mistake, creating a symmetrical pattern for “graphic design,” adding a unique artistic perspective for “abstract” art, or enhancing a specific “mood board” aesthetic? Having a clear goal will guide your adjustments and prevent arbitrary edits.
- Preview Meticulously: Always preview your image after applying any flip, mirror, or rotation. Pay close attention to details like text (which will appear backward if horizontally flipped), recognizable objects, and natural elements. An unintended reflection or an upside-down logo can distract from your “beautiful photography” or diminish the impact of your “creative ideas.”
- Combine with Other Effects Thoughtfully: Flipping an image is often just one step in a larger “photo manipulation” process. Experiment with combining transformations with other CapCut features:
- Filters and Color Grading: Apply an “aesthetic” filter or adjust colors to complement the new orientation or mood.
- Overlays and Text: Add textual elements or graphic overlays that work harmoniously with the flipped composition, especially for “visual design” projects.
- Cropping: After rotating, you might have empty spaces at the corners. Use CapCut’s cropping tool to perfectly frame your new composition.
- Consider the Output Platform and Aspect Ratio: Different platforms (e.g., social media, website banners, print) have specific aspect ratio and orientation requirements. Rotating an image might change its aspect ratio or create empty space that needs to be filled (which CapCut can help with). Always tailor your final image to its intended destination to maximize reach and impact for your “trending styles” or “thematic collections.”
- Save Iterations: When experimenting with “digital art” or complex “editing styles,” it’s wise to save different versions of your image before and after significant transformations. This allows you to revert to an earlier stage or compare different artistic directions without losing your work.
By integrating these tips into your workflow, you’ll not only master how to flip, mirror, and rotate images in CapCut but also ensure that every visual you produce is of the highest quality, impactful, and perfectly aligned with your creative vision, echoing the standards of “image inspiration” on Tophinhanhdep.com.
Conclusion
In the dynamic world of visual content, the ability to skillfully manipulate images is an invaluable asset. Flipping, mirroring, and rotating your photographs, graphic designs, and digital art are fundamental techniques that offer both corrective solutions and boundless creative possibilities. As we’ve explored, CapCut stands out as an exceptionally versatile and user-friendly tool, empowering everyone from casual users to professional graphic designers to achieve stunning results on both desktop and mobile platforms.
By leveraging CapCut’s intuitive interface and powerful features, you can easily transform the orientation and perspective of your images, creating everything from perfectly aligned “beautiful photography” and symmetrical “visual designs” to compelling “abstract” art and “aesthetic” backgrounds. These simple transformations, when applied thoughtfully, can significantly enhance your content, making it more engaging, professional, and visually appealing.
We encourage you to experiment with CapCut, exploring its extensive range of “image tools” and “editing styles” to unlock your full creative potential. Dive into “photo manipulation,” develop captivating “mood boards,” and find endless “image inspiration” to bring your unique vision to life. For more resources, tips, and a vast collection of high-quality visuals, continue to explore Tophinhanhdep.com – your ultimate destination for all things images.
FAQs
1. How can I flip an image effectively for aesthetic purposes?
To flip an image effectively for aesthetic purposes, first, consider the visual balance and composition. A horizontal flip can create symmetry for “graphic design” or reveal a more pleasing angle in a portrait. A vertical flip can be used for surreal effects in “digital art” or to correct perspective. In CapCut, after importing your image, select it on the timeline. For a horizontal flip, click the “Mirror” icon. For a vertical flip, use the “Rotate” option and set it to 180 degrees. Always preview the result to ensure it aligns with your “aesthetic” vision and “creative ideas.”
2. Does flipping an image in CapCut affect its quality?
Flipping or rotating an image in CapCut itself generally does not degrade the image quality if done correctly. The process is a transformation of pixels, not a lossy compression. However, the export process can impact quality. To maintain “high resolution,” always export your edited image with the highest possible settings (e.g., original resolution, minimal compression). CapCut’s “optimizers” are designed to minimize quality loss during export, ensuring your “beautiful photography” remains crisp.
3. What’s the difference between flipping and mirroring an image for visual design?
For “visual design,” the terms “flipping” and “mirroring” are often used interchangeably, but “mirroring” specifically refers to a horizontal flip (left-to-right reversal), creating a reflection-like effect. “Flipping” can encompass both horizontal and vertical reversals. In CapCut, the “Mirror” tool specifically performs a horizontal flip. For a vertical flip (turning upside down), you would typically use the “Rotate” function and apply a 180-degree turn. Both are powerful “photo manipulation” techniques for creating distinct “graphic design” elements or “abstract” compositions.
4. Can I use CapCut to prepare images for unique backgrounds or wallpapers?
Absolutely! CapCut is an excellent tool for preparing images for “wallpapers” and “backgrounds.” You can flip, mirror, or rotate images to correct orientation, create symmetrical patterns, or achieve desired compositions. Additionally, CapCut offers tools to adjust aspect ratios, crop, apply filters, and even remove backgrounds, allowing you to tailor any image to perfectly fit your screen or serve as a distinctive “visual design” element for your “thematic collections.”
5. Are there specific tips for rotating abstract or nature images in CapCut?
When rotating “abstract” or “nature” images, creativity is key.
- Abstract Images: Experiment with rotations to find unexpected angles that enhance patterns, textures, or forms. A slight rotation can sometimes transform an ordinary abstract photo into a dynamic piece of “digital art.” Don’t be afraid to go beyond 90-degree increments.
- Nature Images: For “nature” photography, precise rotation is crucial for straightening horizons or aligning natural elements like trees or mountains. However, you can also use subtle rotations to add a sense of movement or an unconventional perspective, creating more engaging “beautiful photography” or inspiring “photo ideas.” Always preview your changes carefully to ensure they enhance the image’s natural beauty.