Master the Art of Image Flipping in Photoshop: A Comprehensive Guide for Tophinhanhdep.com Users

At Tophinhanhdep.com, we understand that mastering image manipulation is crucial for photographers, graphic designers, digital artists, and anyone passionate about visual content. Whether you’re curating stunning wallpapers, perfecting aesthetic backgrounds, or undertaking intricate photo manipulation projects, the ability to precisely control your images is paramount. Among the fundamental techniques, knowing how to flip an image in Adobe Photoshop stands out as a simple yet incredibly powerful skill.
This comprehensive guide, tailored for the Tophinhanhdep.com community, will demystify the process of flipping images in Photoshop. We’ll delve into flipping entire canvases, manipulating individual layers, and exploring creative applications that can transform your visual designs. From correcting a simple orientation error to crafting elaborate mirrored patterns, you’ll discover how this versatile tool can enhance your high-resolution photography and elevate your creative ideas. We’ll also touch upon common troubleshooting tips to ensure your editing journey is smooth and productive.

By understanding the nuances of image flipping, you can achieve perfect symmetry for abstract art, create realistic reflections for nature photography, or adjust the composition of a sad/emotional background to evoke a different feeling. This skill is invaluable for anyone looking to refine their digital photography, optimize images for various platforms, or simply experiment with new editing styles. Let’s dive into the core methods and unlock the full potential of your Photoshop toolkit.
Understanding the Fundamentals: What is Image Flipping?
Before we jump into the “how-to,” it’s essential to clarify what “flipping” an image truly means in the context of digital editing, especially for Tophinhanhdep.com users who constantly work with various image types. Image flipping, often referred to as mirroring, involves reversing the image along a chosen axis – either horizontally (left to right) or vertically (top to bottom). This creates a mirror image of the original.
It’s crucial not to confuse flipping with rotating. Rotation involves turning an image around a central point, changing its orientation (e.g., 90 degrees clockwise, 180 degrees). Flipping, on the other hand, doesn’t change the intrinsic orientation but rather its directionality. Imagine holding a photograph up to a mirror; that’s the effect of flipping.
Why is Image Flipping Important for Visual Design and Photography?
For Tophinhanhdep.com’s diverse audience, image flipping serves a multitude of purposes across various categories:
- Compositional Balance: Sometimes, an image’s composition feels “off” or imbalanced. Flipping it horizontally can sometimes magically rebalance the elements, leading to a more aesthetically pleasing arrangement. For instance, a subject leading the eye off the left side of the frame might look better leading off the right after a horizontal flip. This is particularly useful for beautiful photography and aesthetic backgrounds.
- Creating Symmetry and Patterns: For abstract and digital art, flipping is fundamental to generating symmetrical designs, intricate patterns, and captivating mandalas. Duplicating a layer and flipping it can quickly create perfect reflections or repeating motifs, adding depth and visual interest to your image collections.
- Correcting Orientation: While less common for original photos, sometimes scanned images or elements within a collage might be unintentionally reversed. Flipping provides a quick fix.
- Generating Reflections: One of the most common creative uses is to create realistic reflections, such as a building mirrored in water or a product reflecting on a glossy surface. This technique is invaluable for digital photography and photo manipulation, allowing you to add elegant touches to your images.
- Enhancing Mood and Storytelling: The direction of elements in an image can subtly influence its emotional impact. A figure moving from left to right often conveys progression, while right to left can suggest introspection or resistance. Flipping an image can alter this subconscious narrative, making it a powerful tool for crafting sad/emotional or thematic collections.
- Integrating Elements Seamlessly: In photo manipulation, when you’re combining elements from different sources, a flipped layer might be the perfect fit to maintain visual consistency or fill a gap in your creative ideas.
Understanding these foundational reasons underscores why this seemingly simple technique is a must-know for anyone serious about high-resolution imaging and visual design, especially those who frequently explore the rich content offered on Tophinhanhdep.com.
Method 1: Flipping the Entire Canvas in Adobe Photoshop
The first and most straightforward method to flip an image in Photoshop involves manipulating the entire canvas. This means that every single pixel, every layer, and every element within your document will be mirrored. This is ideal when the overall orientation of your image needs to be reversed, perhaps to adjust the flow of a landscape or to create an abstract mirrored background.
Step-by-Step Guide to Canvas Flipping
This process is remarkably simple and can be executed in just a few clicks, making it a favorite for quick adjustments to wallpapers or large backgrounds found on Tophinhanhdep.com.
-
Open Your Image in Photoshop:
- Launch Adobe Photoshop.
- Go to
File > Open(or pressCtrl+Oon Windows /Cmd+Oon Mac) and select the image you wish to flip from your computer. The image will open in its own document window.
-
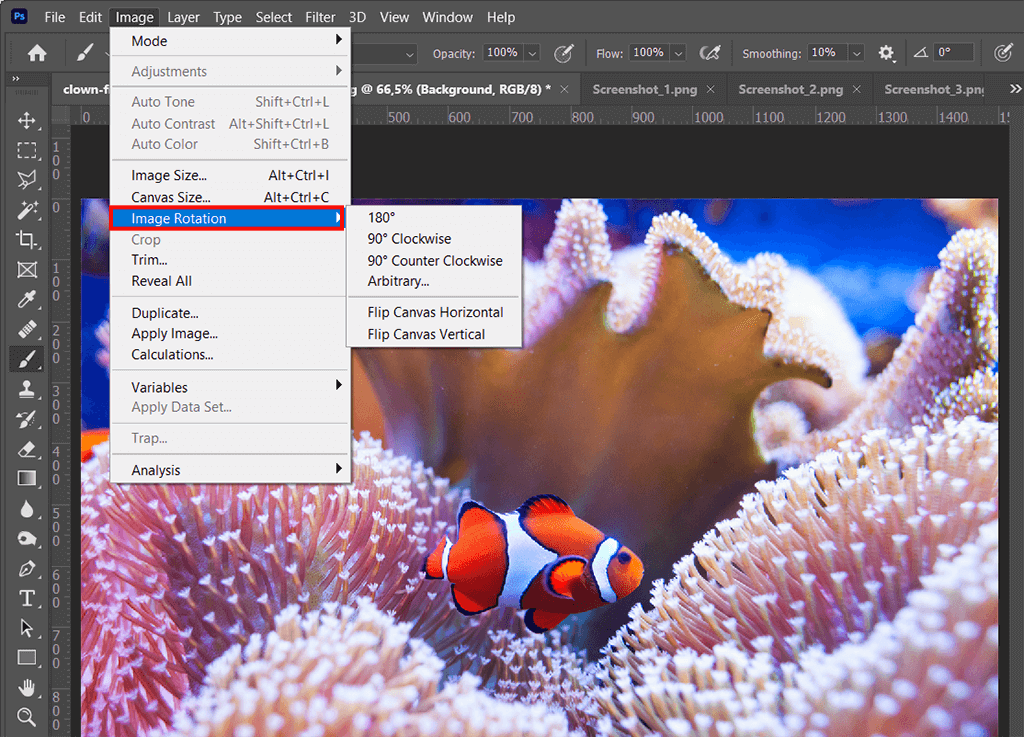
Navigate to the Image Rotation Menu:
- Once your image is open, look at the top menu bar in Photoshop.
- Click on
Image. A dropdown menu will appear with various image adjustment options. - Hover your mouse over
Image Rotation. This will open a submenu.
-
Choose Your Flipping Direction:
- In the
Image Rotationsubmenu, you will see two primary options for flipping the canvas:Flip Canvas Horizontal: Selecting this will mirror your entire image from left to right. Anything on the left side will move to the right, and vice-versa, creating a horizontal reflection.Flip Canvas Vertical: Choosing this option will mirror your entire image from top to bottom. Elements at the top will appear at the bottom, and vice-versa, creating a vertical reflection.
- In the
-
Observe the Change:
- As soon as you select either “Flip Canvas Horizontal” or “Flip Canvas Vertical,” Photoshop will instantly apply the transformation to your entire image. All layers, masks, and smart objects will be flipped simultaneously.
Important Note for Tophinhanhdep.com Users: While the exact wording of these commands might vary slightly across different Photoshop versions (older versions might use “Rotate” instead of “Image Rotation”), the core functionality remains the same. If you ever struggle to find it, remember you can always use Photoshop’s Help menu in the top bar and search for “Flip” to quickly locate the option.
When to Use Canvas Flipping
This method is best suited for scenarios where the entire visual context of your image needs to be reversed. Consider these applications relevant to Tophinhanhdep.com’s content:
- Rebalancing Overall Composition: If you have a beautiful photography piece where the primary subject’s gaze or direction feels more natural or impactful when facing the opposite way, a canvas flip can be the simplest solution.
- Creating Full Mirrored Backgrounds: For abstract or aesthetic wallpapers, flipping the entire canvas and potentially merging it with the original can lead to interesting symmetrical backgrounds or duotone effects.
- Correcting Misoriented Scans: If you’ve scanned an old photograph for digital photography archiving and it appears backward, a quick canvas flip corrects the issue.
- Setting the Stage for Complex Photo Manipulations: Sometimes, flipping the canvas is the first step in a larger photo manipulation project, establishing a new base orientation before individual elements are added or adjusted.
- Experimenting with Visual Perception: For creative ideas, flipping can make you see an image in a completely new light, revealing compositions or emotional tones you hadn’t noticed before.
However, remember that this method affects all layers. If you have text, logos, or specific elements that should not be flipped along with the rest of the image, you’ll need to use Method 2, which focuses on individual layer manipulation. For Tophinhanhdep.com members working with intricate graphic design or stock photos, understanding this distinction is key to a streamlined workflow.
Method 2: Precision Flipping – Manipulating Individual Layers and Elements
While flipping the entire canvas is useful, more often than not, designers and photographers on Tophinhanhdep.com need to flip only specific parts of an image. This could be a text layer, a logo, a cut-out object, or even a selected area within a single layer. Photoshop provides powerful tools for this precise manipulation, allowing you to maintain control over every detail of your visual design.
Flipping a Specific Layer
This is the go-to technique when you want to mirror an isolated element without affecting the rest of your composition. It’s particularly useful for photo manipulation, adding stock photos, or refining elements in your digital art.
-
Select the Target Layer:
- Ensure the element you want to flip resides on its own layer. If it’s part of the background layer or merged with other elements, you might need to isolate it first (e.g., using selection tools and copying it to a new layer via
Ctrl+J/Cmd+J). - In the
Layerspanel (usually on the right side of your Photoshop interface), click on the specific layer you wish to flip to make it active.
- Ensure the element you want to flip resides on its own layer. If it’s part of the background layer or merged with other elements, you might need to isolate it first (e.g., using selection tools and copying it to a new layer via
-
Enter Free Transform Mode:
- With the desired layer selected, there are two common ways to enter
Free Transformmode:- Menu Option: Go to
Editin the top menu bar, then selectFree Transform(orCtrl+Ton Windows /Cmd+Ton Mac). - Keyboard Shortcut (Recommended): Simply press
Ctrl+T(Windows) orCmd+T(Mac).
- Menu Option: Go to
- Once in
Free Transformmode, a bounding box with handles will appear around your selected layer, indicating that it’s ready for transformation.
- With the desired layer selected, there are two common ways to enter
-
Access Flip Options:
- Right-Click within the Bounding Box: Place your mouse cursor inside the bounding box (but not on a handle) and right-click (or
Ctrl+Clickon Mac). A contextual menu will pop up. - Choose Your Flipping Direction: At the bottom of this menu, you’ll find the flip options:
Flip Horizontal: Mirrors the selected layer from left to right.Flip Vertical: Mirrors the selected layer from top to bottom.
- Right-Click within the Bounding Box: Place your mouse cursor inside the bounding box (but not on a handle) and right-click (or
-
Confirm the Transformation:
- After selecting your desired flip, the layer will instantly reflect the change.
- To apply the transformation and exit
Free Transformmode, press theEnterkey (orReturnon Mac). You can also double-click anywhere inside the bounding box.
Flipping a Selection within a Layer
Sometimes, you don’t want to flip an entire layer, but rather a specific region within that layer. This is a slightly more advanced technique that offers granular control for intricate photo manipulation.
-
Make a Selection:
- Use any of Photoshop’s selection tools (e.g.,
Rectangular Marquee Tool,Lasso Tool,Quick Selection Tool,Pen Tool) to select the precise area within your layer that you want to flip. A marching ants outline will indicate your selection.
- Use any of Photoshop’s selection tools (e.g.,
-
Access Transform Selection:
- With the selection active, go to
Selectin the top menu bar, then chooseTransform Selection. - A bounding box will appear around your selection, similar to
Free Transform, but this only transforms the selection boundary, not the pixels within it yet.
- With the selection active, go to
-
Flip the Selection Boundary:
- Right-click within this bounding box.
- Choose
Flip HorizontalorFlip Vertical. The marching ants outline will now reflect the flipped orientation.
-
Apply the Transformation to Pixels (Important Step!):
- Copy to New Layer and Flip: The safest and most flexible method is to first copy the selected content to a new layer (
Ctrl+J/Cmd+J). Then, follow the steps for “Flipping a Specific Layer” on this new layer. This keeps your original layer intact. - Cut and Paste: Alternatively, you can
Cutthe selection (Ctrl+X/Cmd+X), thenPasteit (Ctrl+V/Cmd+V). This will automatically place the cut content onto a new layer. Then, with this new layer selected, enterFree Transformmode (Ctrl+T/Cmd+T) and applyFlip HorizontalorFlip Verticalas described above.
- Copy to New Layer and Flip: The safest and most flexible method is to first copy the selected content to a new layer (
Practical Applications for Layer Flipping
For the Tophinhanhdep.com community, the ability to flip layers with precision opens up a world of possibilities:
- Correcting Flipped Text or Logos: If you’re incorporating a logo into a design or using text in an aesthetic background, and accidentally flip the entire canvas, individual layer flipping allows you to restore the text/logo to its readable orientation without redoing the entire image. This is a common need in graphic design.
- Creating Realistic Reflections for Objects: Imagine adding a product to a stock photo and needing a realistic reflection. Duplicate the product layer, flip the duplicate vertically, position it correctly, and then apply a subtle gradient mask for a seamless reflection effect. This enhances high-resolution photography.
- Achieving Symmetrical Designs: For abstract or digital art, duplicate a layer (e.g., a shape or brushstroke), flip it horizontally or vertically, and align it perfectly with the original. This is a quick way to build complex, symmetrical patterns and textures.
- Adjusting Character or Object Direction: In photo manipulation, if a person or object in a beautiful photography piece looks better facing the other way, you can easily flip just that layer to adjust its perceived direction or interaction with other elements.
- Mirroring Specific Facial Features: In advanced portrait retouching (a form of digital photography editing), you might occasionally flip a small, selected area of a face to achieve perfect symmetry, though this should be used judiciously to avoid an unnatural look.
By mastering layer-specific flipping, you gain an immense amount of control over your image editing, allowing you to execute your creative ideas with precision and finesse, all supported by the rich resources and inspiration you find on Tophinhanhdep.com.
Beyond Basic Flips: Creative Techniques and Troubleshooting
While knowing the basic flip operations is essential, true mastery for Tophinhanhdep.com users lies in leveraging these techniques creatively and efficiently, while also being able to troubleshoot common issues. Image flipping is not just about correcting errors; it’s a gateway to innovative visual design, stunning photo manipulation, and unique artistic expressions.
Unleashing Creativity with Mirrored Effects and Patterns
The power of flipping extends far beyond simple orientation changes. It’s a foundational technique for generating captivating visual effects.
-
The “Mirror” Effect for Landscapes and Objects: This technique creates a reflection, often used to make it appear as if an object is mirrored in water or on a polished surface. It’s fantastic for nature photography, aesthetic backgrounds, or abstract pieces.
- Step 1: Duplicate Your Image: Open your desired image. Go to the
Layerspanel, right-click on the background layer, and chooseDuplicate Layer(or drag the layer to the new layer icon). This keeps your original safe. - Step 2: Expand Your Canvas (if needed): If you want the reflection to appear below or next to your image, you’ll need more canvas space. Go to
Image > Canvas Size. Choose an anchor point that extends the canvas in the direction you want the reflection (e.g., top-middle anchor for a vertical flip to expand downwards, or left-middle for a horizontal flip to expand rightwards). Double the height or width accordingly. - Step 3: Position the Original: Using the
Move Tool(V), drag your original (unflipped) image to one side of the expanded canvas, leaving room for its reflection. For a vertical reflection, move it to the top. - Step 4: Duplicate and Flip the Reflection: Duplicate your image layer again (
Ctrl+J/Cmd+J). With this new duplicate layer selected, enterFree Transform(Ctrl+T/Cmd+T), right-click, and chooseFlip Vertical(for a water reflection) orFlip Horizontal. - Step 5: Align the Layers: Use the
Move Toolto align the flipped layer perfectly with the original, so their edges meet seamlessly. - Step 6: Create a Realistic Transition with a Layer Mask and Gradient: This is where the magic happens for
Tophinhanhdep.comquality.- With the flipped layer active, click the
Add layer maskicon at the bottom of theLayerspanel (a white rectangle with a circle). - Select the
Gradient Tool(G) from the toolbox. Ensure your foreground color is black and your background color is white (pressDthenXto toggle). - With the layer mask selected (click on the white mask thumbnail in the
Layerspanel), click and drag theGradient Toolfrom the point where the two images meet (e.g., the bottom of the original image, moving downwards) towards the end of the flipped image. This will create a gradual fade, making the reflection look natural.
- With the flipped layer active, click the
- Step 7: Refine (Optional): You can further reduce the
Opacityof the flipped layer (in theLayerspanel) to make the reflection more subtle or apply a slightFilter > Blur > Gaussian Blurfor a softer, more atmospheric effect. This technique can elevate your beautiful photography and add a sophisticated touch to your aesthetic images.
- Step 1: Duplicate Your Image: Open your desired image. Go to the
-
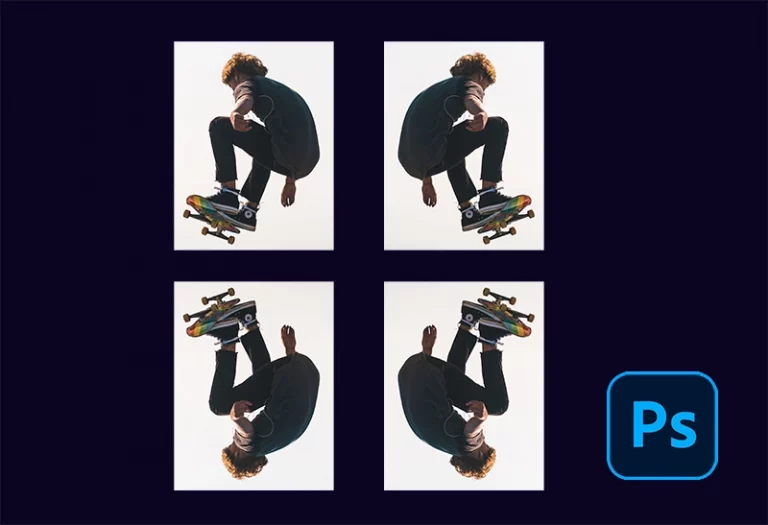
Flip Multiple Times for Fun Patterns (Kaleidoscopic Effects): For abstract, aesthetic, or graphic design projects, repeatedly flipping and duplicating can generate incredibly intricate and visually stunning patterns.
- Step 1: Prepare Your Base: Open an image, duplicate the background layer (
Ctrl+J/Cmd+J), and unlock it. - Step 2: First Horizontal Flip: Duplicate the layer (
Ctrl+J/Cmd+J). Expand your canvas horizontally (Image > Canvas Size). Drag one of the duplicated layers to the side, thenFree TransformandFlip Horizontal. Merge these two layers. - Step 3: Second Vertical Flip: Duplicate the newly merged layer. Expand your canvas vertically. Drag one duplicated layer downwards, then
Free TransformandFlip Vertical. Merge these two layers. - Step 4: Rotate and Repeat (Optional): You now have a 2x2 grid. Duplicate this larger merged layer, rotate it 90 degrees (
Edit > Image Rotation > 90° Clockwise), and continue duplicating, flipping, and merging to create more complex, radial patterns, reminiscent of kaleidoscopes. This is a fantastic way to generate unique high-resolution photography for abstract wallpapers or digital art collections on Tophinhanhdep.com.
- Step 1: Prepare Your Base: Open an image, duplicate the background layer (
Common Challenges and Solutions
Even seasoned Tophinhanhdep.com contributors encounter hiccups. Here’s how to troubleshoot common flipping issues:
- “Can’t locate the flip option!”
- Solution: Photoshop versions may have slightly different menu structures. If
Image > Image Rotationisn’t obvious, use Photoshop’sHelpmenu (top bar) and search for “Flip.” It will often highlight or direct you to the correct command. Tophinhanhdep.com ensures its tutorials are adaptable to various software versions, but the ‘Help’ feature is your best friend for specifics.
- Solution: Photoshop versions may have slightly different menu structures. If
- “My logo/text flipped and is unreadable!”
- Problem: You likely used
Flip Canvas Horizontal/Vertical, which affects everything. - Solution:
Undo(Ctrl+Z/Cmd+Z) the canvas flip. Then, isolate your logo/text onto its own layer. Select that specific layer and useEdit > Free Transform(Ctrl+T/Cmd+T), right-click, and chooseFlip Horizontal/Verticalfor just that layer. This preserves the readability of your graphic design elements.
- Problem: You likely used
- “Image is flipped the wrong way (e.g., vertically instead of horizontally).”
- Problem: You selected the incorrect axis.
- Solution:
Undoand re-apply the flip, making sure to selectFlip Canvas Horizontalif you want a left-to-right mirror, orFlip Canvas Verticalfor a top-to-bottom mirror.
- “I’m rotating instead of flipping.”
- Problem: Confusing rotation (turning) with flipping (mirroring).
- Solution: Always remember the distinction.
Image > Image Rotationoffers specific degrees of rotation (90°, 180°, Custom) alongside theFlip Canvasoptions. For layers,Free Transform(Ctrl+T) allows rotation by dragging corner handles (while holdingShiftfor 15-degree increments), but theFlip Horizontal/Verticaloptions are found in the right-click menu withinFree Transformmode.
- “People look unnatural after flipping.”
- Problem: Our brains are highly attuned to facial symmetry and direction. A flipped face, even if perfectly symmetrical, can often look “off” or “weird” because we are used to seeing someone’s unique, subtle asymmetries.
- Solution: For portraits, exercise caution. Sometimes, an image’s entire composition might benefit from a flip, but if it’s primarily a portrait or beautiful photography of people, a flip might alter their recognizable features or direction of gaze in an unexpected way. Consider if the compositional benefit outweighs the potential for an unnatural appearance. This is a judgment call in photo manipulation.
- Does Flipping an Image Affect Its Quality?
- Solution: No, flipping an image in Photoshop is a non-destructive operation (unless you’re flattening layers or saving in a lossy format after the flip). It simply rearranges the pixels without degrading their quality. You can always
Undoif you don’t like the result, or refer to yourHistorypanel for a visual approach to undoing actions. This means you can experiment with confidence when working on high-resolution photography or stock photos from Tophinhanhdep.com.
- Solution: No, flipping an image in Photoshop is a non-destructive operation (unless you’re flattening layers or saving in a lossy format after the flip). It simply rearranges the pixels without degrading their quality. You can always
Integrating Flipping with Your Tophinhanhdep.com Workflow
For dedicated users of Tophinhanhdep.com, image flipping is more than just a trick; it’s an integral part of a sophisticated visual workflow.
- Enhancing Visual Design Projects: Use flipping to create dynamic layouts, mirror graphic elements for striking posters, or generate symmetrical patterns for digital art that complements our aesthetic and abstract collections.
- Advanced Photo Manipulation: Combine flipping with other editing styles to create fantastical scenes, add ethereal reflections, or seamlessly integrate new elements into existing backgrounds. This skill is vital for pushing the boundaries of what’s possible in image creation.
- Curating Image Inspiration & Collections: When building mood boards or thematic collections, flipping an image can allow it to fit a specific aesthetic or compositional need, even if its original orientation didn’t quite work. This flexibility helps you find perfect photo ideas.
- Optimizing Images for Web: While flipping doesn’t directly relate to image optimization (like file size reduction or AI upscaling), correctly orienting and composing an image through flipping ensures it looks its best before being processed by Tophinhanhdep.com’s image tools like compressors or optimizers.
Moreover, while Photoshop is a powerful tool, complementary software like Skylum’s Luminar Neo offers user-friendly interfaces with similar flipping and rotation capabilities, sometimes with AI-powered enhancements for digital photography. For those who prefer tactile control, devices like the TourBox controller can be customized to execute Photoshop commands, including flips and rotations, with unparalleled speed and fluidity. Tophinhanhdep.com constantly explores how these tools integrate to streamline your creative process, ensuring you have access to the best techniques and resources for all your image needs.
By fully grasping and creatively applying the art of image flipping in Photoshop, you empower yourself to take your visual creations to new heights. Tophinhanhdep.com is committed to providing you with the knowledge and inspiration to transform your images, from simple wallpapers to complex digital masterpieces, equipping you with the skills to truly shine in the world of digital photography and visual design. We encourage you to practice these techniques and explore the endless creative possibilities they unlock for your next project. Happy creating!