Mastering Image Manipulation: How to Flip Photos and Objects in PowerPoint for Stunning Visuals

In the dynamic world of digital presentations, visual appeal is paramount. A compelling PowerPoint slide transcends mere information delivery, transforming into an immersive visual experience that captivates and informs. While fundamental actions like inserting, resizing, and cropping images are common, the art of flipping—or mirroring—an image or object often goes underutilized, yet it holds immense power to revolutionize your slide’s aesthetic and communicative impact. At Tophinhanhdep.com, we understand the profound influence of high-resolution images, stunning photography, and meticulous visual design in crafting truly memorable presentations. Our extensive collections of Wallpapers, Backgrounds, Aesthetic, Nature, Abstract, Sad/Emotional, and Beautiful Photography are designed to inspire, and our suite of Image Tools (including Converters, Compressors, Optimizers, and AI Upscalers) ensures your visuals are always presentation-ready.
This comprehensive guide will delve into the various methods of flipping images, shapes, and even text within PowerPoint, transforming them from static elements into dynamic components of your creative vision. We’ll explore both the direct, intuitive options and the clever workarounds for more challenging manipulations, all while connecting these techniques to broader principles of Graphic Design, Digital Art, and Photo Manipulation. Whether you’re crafting a mood board, building a thematic collection, or simply perfecting a single slide, mastering the flip function in PowerPoint is an indispensable skill for any visual storyteller. By the end of this article, you’ll be equipped to leverage flipping as a powerful tool, drawing on Tophinhanhdep.com’s resources to achieve presentation excellence.
The Fundamentals of Flipping: Why and What You Can Flip in PowerPoint
Flipping an object in PowerPoint is distinct from rotating it. While rotation changes the angle of an object (e.g., 90 degrees clockwise), flipping creates a mirror image, effectively turning the object to its opposite side either horizontally or vertically. This subtle yet powerful distinction allows for sophisticated visual adjustments that can dramatically enhance your presentation’s impact.
The versatility of PowerPoint’s flipping tools extends beyond just photographs. You can apply these manipulations to a wide array of visual elements, each serving a unique design purpose:
- Pictures: Whether you’re using High-Resolution Stock Photos from Tophinhanhdep.com, personal Digital Photography, or a captivating Aesthetic image, flipping can correct an awkward gaze direction, create striking symmetrical compositions, or even generate reflective effects for a touch of Digital Art.
- Shapes: Basic geometric shapes are fundamental to Graphic Design. Flipping them can help achieve perfect symmetry in logos, infographics, or background elements, contributing to a cohesive Visual Design.
- Text Boxes (and WordArt): While flipping standalone text boxes has a slight nuance (which we’ll cover), WordArt, treated more like a graphic, can be flipped directly. This opens doors for Creative Ideas in title slides or artistic text displays.
- Icons and Symbols: Many icons, often used to clarify concepts in presentations, might only be available in a single orientation. Flipping an arrow, for instance, allows it to point in the desired direction, improving visual flow and clarity.
The practical applications are numerous. Imagine designing a symmetrical layout for a product comparison in a marketing presentation, where mirrored images create a harmonious and balanced look. Or perhaps you’re building a mood board for a new design project, and flipping an image helps align its composition perfectly with other elements, drawing on Image Inspiration. Flipping can also be instrumental in Photo Manipulation, allowing you to seamlessly integrate images by adjusting their orientation to fit the overall slide narrative. By understanding what can be flipped and why, you unlock a new dimension of creative control over your presentation’s Visual Design.
Flipping Images: Step-by-Step Guide for Pictures and Graphics
PowerPoint provides straightforward methods for flipping your images. These techniques are essential for correcting orientation, creating mirrored effects, and enhancing the overall aesthetic of your slides, especially when working with the rich variety of images found on Tophinhanhdep.com.
Step-by-Step: The Standard Method
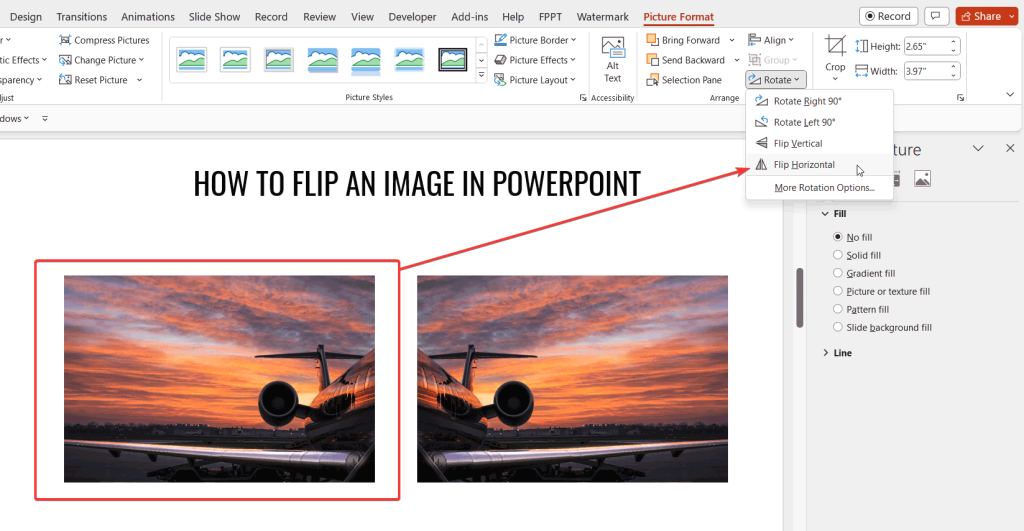
The most common and user-friendly way to flip images and graphics involves using the dedicated “Rotate” menu under the “Format” tab. This method offers precise control over horizontal and vertical mirroring.
-
Insert Your Image:
- Begin by adding the image or photo you wish to manipulate to your PowerPoint slide. You can do this by navigating to the “Insert” tab on the ribbon, clicking “Pictures,” and then choosing “This Device” to select an image from your computer, or “Online Pictures” if you’re sourcing directly. For the highest quality, we recommend utilizing the High-Resolution images and Beautiful Photography available on Tophinhanhdep.com and then uploading them from your device.
- Alternatively, you can simply drag and drop the image directly onto your slide.
-
Select the Object:
- Once the image is on your slide, click on it once with your left mouse button. This will select the image, and you’ll see resize handles (small circles or squares) around its perimeter, along with a rotation handle (a circular arrow) at the top. This also applies to other objects like shapes, WordArt, or icons.
-
Access Picture Tools (or Drawing/Shape Tools):
- With the image selected, a new contextual tab will appear in the PowerPoint ribbon, usually labeled “Picture Format.” If you’ve selected a shape or icon, this tab might be “Shape Format” or “Graphic Format.” Click on this tab.
-
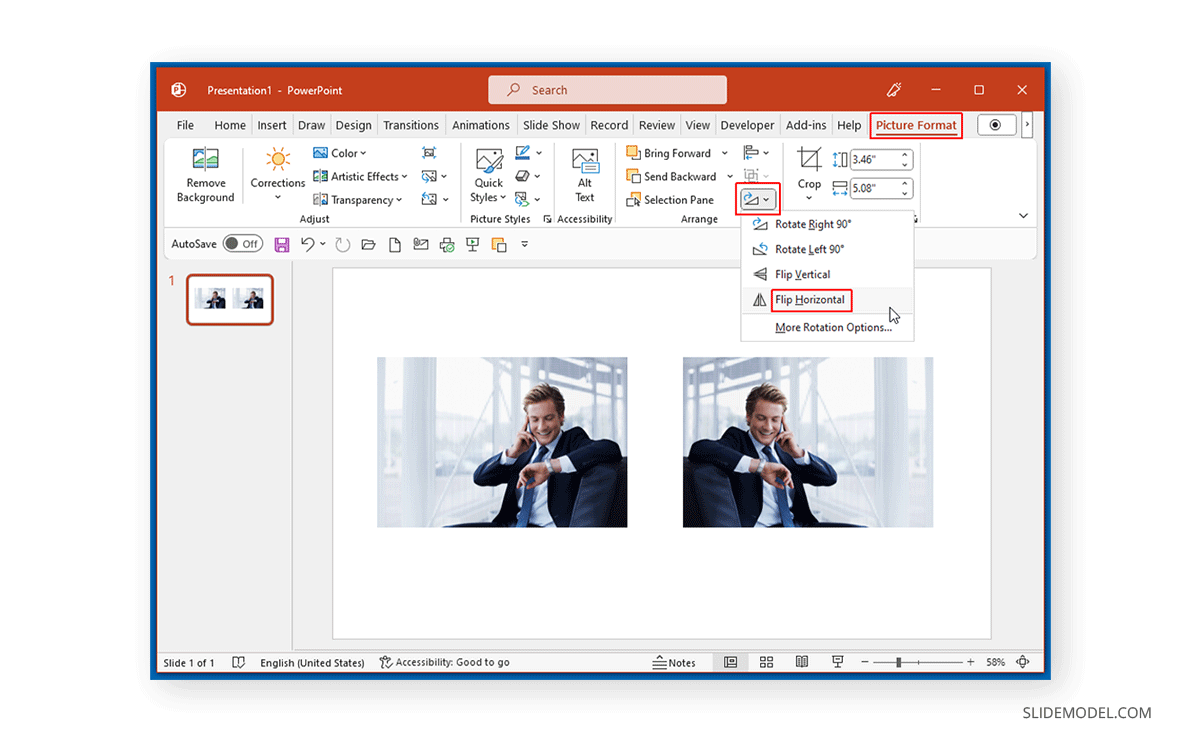
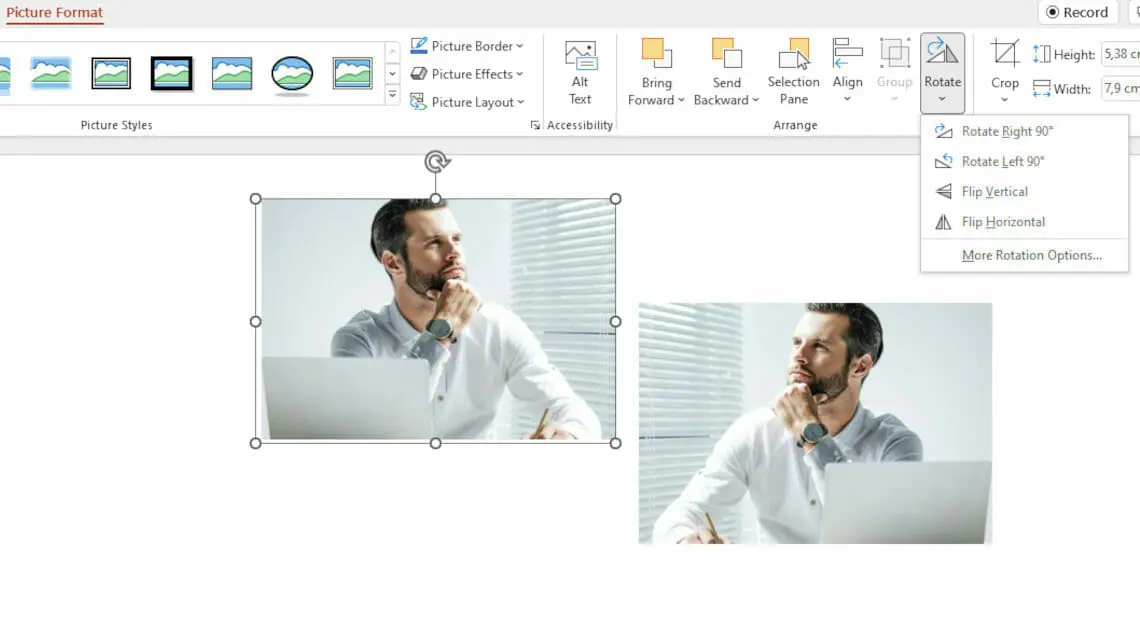
Locate the Rotate Option:
- Within the “Picture Format” (or equivalent) tab, look for the “Arrange” group. Inside this group, you’ll find a button labeled “Rotate” (often depicted with a circular arrow icon). Click on it.
-
Choose Flip Direction:
- A dropdown menu will appear with several rotation and flipping options.
- To create a mirror image (flipping it left-to-right), select “Flip Horizontal.”
- To turn the object upside-down (flipping it top-to-bottom), select “Flip Vertical.”
The image will instantly transform according to your selection. This method is incredibly useful for Photo Manipulation, allowing you to seamlessly integrate an image by adjusting its orientation to fit a specific layout or to create a symmetrical design, drawing on Creative Ideas for your presentation.
Manual Flipping: Precision and Control
For those who prefer a more tactile approach or need fine-tuned adjustments, PowerPoint also allows you to manually flip images and objects using their resize handles. This method offers a hands-on feel for Digital Art and Visual Design.
-
Select the Image:
- Click on the image you wish to flip to select it.
-
Identify Resize Handle:
- Hover your cursor over one of the middle resize handles on the left, right, top, or bottom of the image (not the corner handles). Your cursor will change into a double-headed arrow. In some PowerPoint versions, as you approach the edge, a “plus sign” might appear, indicating readiness for manipulation.
-
Drag to Flip:
- Click and hold down your mouse button on the chosen middle handle.
- To flip horizontally: Drag the side handle across the opposite side of the image. For example, if you grab the right-middle handle, drag it past the left edge of the image until it mirrors.
- To flip vertically: Drag the top-middle or bottom-middle handle past the opposite edge of the image until it inverts.
As you drag, the image will become transparent, allowing you to see the original position and the new mirrored position before releasing the mouse button. This manual technique is particularly effective for immediate visual feedback and can be a fast way to experiment with different orientations for your Aesthetic layouts or Thematic Collections.
Beyond Simple Flips: Advanced Techniques and Creative Applications
While basic horizontal and vertical flipping are fundamental, PowerPoint’s capabilities extend to more nuanced manipulations, allowing for truly advanced Visual Design and Photo Manipulation.
Flipping Symbols, Shapes, and PowerPoint Graphics
Icons, symbols, and geometric shapes are vital elements in Graphic Design, serving to clarify complex information, guide the viewer’s eye, or simply add visual interest. PowerPoint makes it easy to incorporate these and, crucially, to orient them precisely as needed.
-
Insert the Object:
- Go to the “Insert” tab on the ribbon.
- Click on “Shapes” to choose from a library of geometric shapes, lines, and arrows.
- Click on “Icons” (often found under “Illustrations”) to access a vast collection of searchable symbols. Tophinhanhdep.com also offers resources that can inspire your use of various graphic elements.
- Select your desired shape or icon and draw it onto your slide.
-
Select the Object:
- Click on the inserted shape or icon to select it.
-
Access Formatting Tools:
- A contextual tab, either “Shape Format” or “Graphic Format,” will appear on the ribbon. Click this tab.
-
Locate and Apply Flip:
- Within the “Arrange” group, click the “Rotate” button.
- From the dropdown menu, choose “Flip Horizontal” or “Flip Vertical” to orient your symbol or shape as desired.
Consider an arrow icon from your Thematic Collections pointing left, but your narrative flow requires it to point right. A quick “Flip Horizontal” instantly corrects this, maintaining visual consistency without needing to find a new icon. This ability to manipulate basic Graphic Design elements is crucial for creating cohesive and aesthetically pleasing presentations.
Mastering Text Manipulation: Flipping Text Boxes and WordArt
Flipping text in PowerPoint presents a slightly different challenge than flipping images or shapes because text within a standard text box doesn’t inherently mirror with the same direct “flip” commands. However, there are effective methods to achieve mirrored or inverted text for specific Creative Ideas and Aesthetic effects.
Method 1: Using 3D Rotation for Mirroring Text
This technique uses PowerPoint’s 3D rotation features to simulate a horizontal or vertical flip for text within a text box. It’s a clever workaround for advanced Photo Manipulation and Digital Art effects.
-
Insert a Text Box:
- Go to the “Insert” tab and click “Text Box.”
- Click and drag on your slide to create the text box, then type in your desired text.
-
Access Format Shape Options:
- Right-click on the border of the text box (not on the text itself).
- From the context menu that appears, select “Format Shape.” A “Format Shape” pane will open on the right side of your PowerPoint window.
-
Apply 3D Rotation:
- In the “Format Shape” pane, click on the “Effects” icon (it looks like a pentagon).
- Expand the “3-D Rotation” section.
- To achieve a horizontal mirror effect, locate the “X Rotation” box and change its value to 180°.
- To achieve a vertical flip (upside-down), locate the “Y Rotation” box and change its value to 180°.
- You can apply both 180° X and Y rotations for a combined mirrored and inverted effect.
Important Notes:
- When you click inside the text box to edit the text, it may temporarily revert to its original, unflipped appearance. The flipped effect will reappear once you click outside the text box.
- Changing the 3D rotation might also subtly affect the fill color or shading of your text box. You can adjust these properties on the “Fill & Line” tab within the “Format Shape” pane if needed.
Method 2: Flipping WordArt or Text within Grouped Objects
For more direct text manipulation, consider using WordArt or embedding text within other objects:
-
WordArt:
- Go to “Insert” > “WordArt” and choose a style.
- Type your text. WordArt behaves more like a graphic object.
- Select the WordArt, go to “Shape Format” (or “Drawing Tools” > “Format”), click “Rotate,” and you can directly apply “Flip Horizontal” or “Flip Vertical.” This is perfect for Creative Ideas where text itself is a graphical element.
-
Text within Grouped Objects:
- If you have text inside a shape (e.g., a rectangle with text typed directly into it) and that shape is part of a larger group of objects, flipping the entire group will also flip the text along with it. This can be useful for complex Graphic Design layouts.
By utilizing these methods, you can add unique Artistic elements to your presentations, creating visually striking titles, logos, or emphasized text sections that contribute to your overall Aesthetic and Visual Design goals.
Practical Applications and Enhancing Your Visuals with Tophinhanhdep.com
Mastering the art of flipping in PowerPoint isn’t just about knowing the steps; it’s about understanding its profound impact on your Visual Design. Tophinhanhdep.com is your ultimate resource, not only for providing a rich library of stunning visuals but also for inspiring how you manipulate them to create truly exceptional presentations.
-
Symmetrical Design Presentations: Flipping is the cornerstone of creating visually balanced and harmonious layouts. Whether you’re showcasing architectural blueprints, product designs, or fashion trends, mirroring elements ensures equilibrium, which is fundamental to good Graphic Design and Aesthetic appeal. Use two copies of a single high-resolution image from Tophinhanhdep.com, flip one horizontally, and arrange them side-by-side to create perfect symmetry.
-
Reflective Effects: Imagine adding a serene water reflection to a beautiful landscape or cityscape image from our Nature Photography collection. By duplicating your image, flipping the duplicate vertically, positioning it below the original, and then slightly reducing its transparency (using “Picture Format” > “Transparency”), you can craft stunning reflective effects that add depth and artistic flair, transforming simple Beautiful Photography into Digital Art.
-
Before and After Comparisons: When presenting transformations – be it a makeover, a renovation project, or even data trends – mirrored images can offer a cohesive and impactful “before and after” narrative. Place the “before” image, duplicate and flip it to serve as the “after,” subtly altered to show the change. This helps in clear visual storytelling and Photo Manipulation.
-
Storytelling and Visual Variety: Flipping can introduce an unexpected visual twist or represent alternate scenarios in your narrative. A mirrored character could symbolize introspection or a parallel universe, adding a layer of intrigue to your presentation. This aligns perfectly with leveraging Image Inspiration for unique storytelling.
-
Adjusting Composition for Flow: Sometimes, an otherwise perfect image from your Thematic Collections might have a subject looking “out” of the slide, disrupting the visual flow. A quick horizontal flip can redirect the subject’s gaze inwards, guiding the audience’s eye towards your key message or other slide elements, optimizing the overall Visual Design.
Integrating with Tophinhanhdep.com’s Offerings
Tophinhanhdep.com is more than just a gallery; it’s a comprehensive ecosystem for visual excellence. Our extensive categories—Wallpapers, Backgrounds, Aesthetic, Nature, Abstract, Sad/Emotional, and Beautiful Photography—provide the raw material for your creative endeavors. When you download a High-Resolution Stock Photo or a piece of Digital Art from our site, you’re not just getting an image; you’re getting a canvas for your PowerPoint manipulations.
Before even thinking about flipping, consider using Tophinhanhdep.com’s advanced Image Tools. Our Optimizers and Compressors ensure your images are perfectly sized for PowerPoint without sacrificing quality, preventing bloated file sizes. For images that need an extra boost, our AI Upscalers can enhance resolution, ensuring that even after intricate Photo Manipulation and flipping, your visuals remain crisp and professional.
Flipping an image from Tophinhanhdep.com empowers you to:
- Enhance Editing Styles: Create custom visual styles by mirroring elements, blending them seamlessly with other components on your slide.
- Build Dynamic Mood Boards: Combine original and flipped versions of images to explore design possibilities and quickly create compelling mood boards for new projects.
- Curate Unique Thematic Collections: Develop presentations around specific themes (e.g., reflections, symmetry) using flipped images to reinforce the concept.
By thoughtfully combining the vast resources of Tophinhanhdep.com with the practical flipping techniques in PowerPoint, you gain unparalleled control over your presentation’s narrative, aesthetic, and overall impact.
Conclusion: Elevate Your Presentations with Advanced Image Manipulation
The ability to flip images, shapes, and text in PowerPoint is a fundamental yet incredibly powerful skill that can dramatically enhance the visual impact and communicative clarity of your presentations. Far from a mere cosmetic tweak, mastering these techniques empowers you to craft compelling narratives, achieve impeccable visual balance, and inject a distinctive artistic flair into every slide.
We’ve explored both the straightforward methods of horizontal and vertical flipping for standard images and graphics, as well as the ingenious workaround using 3D rotation for text boxes. Whether you’re aligning an icon to guide the viewer’s eye, creating a stunning symmetrical backdrop, generating realistic reflections from nature photography, or adding unique artistic touches with mirrored text, PowerPoint provides the tools.
At Tophinhanhdep.com, we are dedicated to providing the highest quality visual assets and the inspiration needed to bring your creative visions to life. From our diverse collections of high-resolution wallpapers and beautiful photography to our essential image tools like optimizers and AI upscalers, we ensure you have everything required to excel. By integrating the vast resources of Tophinhanhdep.com with the image manipulation skills learned today, you are not just making presentations; you are creating immersive visual experiences.
Don’t underestimate the power of a perfectly oriented image. Start experimenting, unleash your creativity, and let every flip transform your digital storytelling into an unforgettable visual masterpiece.