Mastering Image Flipping in Photoshop: A Comprehensive Guide by Tophinhanhdep.com

In the dynamic world of digital imagery, the ability to manipulate and transform photographs is a cornerstone of creativity and precision. Whether you’re a budding photographer, an experienced graphic designer, or a digital artist exploring new visual horizons, mastering fundamental techniques like flipping and rotating images in Adobe Photoshop is indispensable. This guide, brought to you by Tophinhanhdep.com, delves deep into the “how-to” of image flipping, offering practical steps, troubleshooting tips, and creative ideas to elevate your visual content.
Tophinhanhdep.com is your ultimate resource for everything related to images and visual design. From a vast collection of high-resolution wallpapers, aesthetic backgrounds, and stunning nature photography, to essential image tools like converters, compressors, optimizers, and AI upscalers, we provide everything you need to create, enhance, and inspire. This tutorial is just one example of our commitment to empowering creators with the knowledge and tools for digital photography and image manipulation.
Flipping an image, also known as mirroring, fundamentally changes its orientation along a chosen axis. This seemingly simple action can have profound effects on composition, mood, and visual balance. Photographers often use it to correct an awkward gaze, create a more pleasing leading line, or simply to see a fresh perspective on their work. Graphic designers might flip elements to achieve symmetry, create reflections, or fit components within a specific layout. At Tophinhanhdep.com, we understand the nuances of visual design and aim to simplify complex tasks while unlocking boundless creative ideas.
This tutorial will streamline your Photoshop experience, guiding you through the process of flipping an entire image or just a specific layer, rotating your canvas, and offering solutions to common issues. We’ll also explore advanced creative applications that leverage these techniques, drawing inspiration from the rich “Visual Design” and “Image Inspiration & Collections” categories available on Tophinhanhdep.com.
The Essentials of Mirroring Images in Photoshop
Flipping an image is akin to looking at it in a mirror. It reverses the image along a vertical or horizontal axis, changing the left-to-right or top-to-bottom orientation. This technique is widely used across various visual disciplines, from creating captivating abstract art to ensuring optimal composition in beautiful photography. While Photoshop is a powerful tool designed for professional users, Tophinhanhdep.com offers simpler, user-friendly approaches and complementary online tools for quick edits, suitable for both beginners and seasoned pros.
Flipping the Entire Canvas: A Quick Overview
When you need to change the orientation of your entire image, including all its layers, flipping the canvas is the most straightforward method. This is perfect for initial compositional adjustments or when you want to see your photograph from a completely new perspective.
![]()
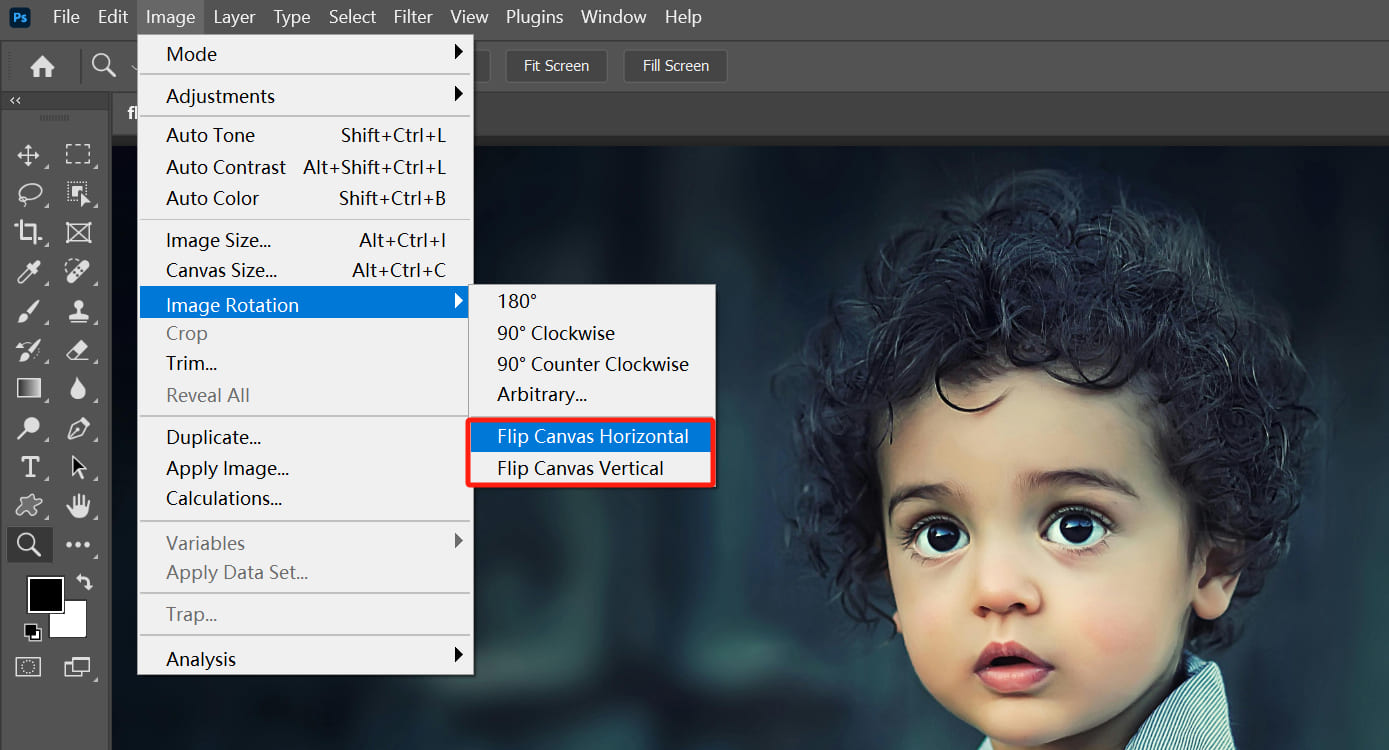
To flip the entire image in Photoshop:
- Open your image in Photoshop.
- Navigate to the top menu bar, select Image.
- From the dropdown, choose Image Rotation.
- You will then see two options:
- Flip Canvas Horizontal: This mirrors the entire image from left to right.
- Flip Canvas Vertical: This mirrors the entire image from top to bottom.
- Select your desired option with a single click, and Photoshop will immediately apply the transformation to your entire project.
This quick image flip can instantly alter the visual impact, helping you decide if a different orientation enhances the “Aesthetic” or “Mood” of your photograph, a common consideration in the “Image Inspiration & Collections” featured on Tophinhanhdep.com.
Flipping Individual Layers for Precision
Often, you won’t need to flip your entire image. Instead, you might only want to mirror a specific element, such as a company logo, a watermark, a piece of text, or a distinct object within your composition. In such cases, flipping only the relevant layer is crucial. Photoshop provides several flexible ways to achieve this precision.
Here are at least three effective methods to flip a single layer in Photoshop:
Option 1: Direct Transform Command
- In the Layers panel, select the specific image layer you wish to flip.
- Go to the top menu bar, select Edit.
- Choose Transform.
- From the Transform submenu, select Flip Horizontal or Flip Vertical, depending on your needs.
Option 2: Using Free Transform with Right-Click
- Select the desired layer in the Layers panel.
- Go to Edit in the top menu bar and select Free Transform. A bounding box will appear around your selected layer.
- Right-click (or Control-click on Mac) anywhere inside this transform box. A small dropdown menu will appear.
- From this menu, choose Flip Horizontal or Flip Vertical.
- Press
Enterto confirm the transformation.
Option 3: Keyboard Shortcut for Free Transform
- Select the layer you want to flip in the Layers panel.
- Press
Ctrl + T(Windows) orCommand + T(Mac) to activate Free Transform. - Right-click (or Control-click on Mac) on the image within the bounding box.
- Select Flip Horizontal or Flip Vertical from the context menu.
- Press
Enterto confirm.
These methods offer flexibility, allowing you to choose the workflow that best suits your editing style. The ability to precisely flip elements is vital for “Photo Manipulation” and “Graphic Design,” ensuring your visual components are perfectly aligned and aesthetically pleasing. Tophinhanhdep.com emphasizes these precision techniques in our tutorials, enabling you to create polished and professional visuals.
Beyond Flipping: Rotating Images and Canvas in Photoshop
While often confused, flipping and rotating are distinct operations with different visual outcomes. Flipping creates a mirror image, whereas rotating changes the angle of an image or canvas around a central point. Understanding this distinction is key to effective image editing and photo manipulation. Tophinhanhdep.com provides clear guides for both, recognizing their importance in achieving perfect “Digital Photography” and “Editing Styles.”
Rotating an Image Layer
Sometimes, you don’t want to mirror an image but rather adjust its orientation by a specific degree, such as 90 or 180 degrees. This is commonly used to correct horizon lines, reorient portrait/landscape shots, or introduce creative angles.
To rotate an image layer in Photoshop:
- Open your image in Photoshop.
- Select the specific layer you wish to rotate in the Layers panel.
- Go to the top menu bar and select Image.
- Choose Image Rotation.
- From the submenu, select the desired rotation option:
- 180°: Rotates the layer completely upside down.
- 90° Clockwise (CW): Rotates the layer 90 degrees to the right.
- 90° Counter Clockwise (CCW): Rotates the layer 90 degrees to the left.
- Arbitrary: Allows you to enter a custom angle for rotation.
- Remember: If your image has multiple layers, this option will rotate only the layer you have currently selected. If you intend to rotate all layers simultaneously, you’ll need to use the canvas rotation method described next.
Rotating the Entire Canvas with the Rotate View Tool
If your entire project or composite image needs to be rotated, using the Rotate View Tool is the most efficient approach. This tool allows you to rotate your entire workspace, providing a comprehensive view of how the rotation affects your composition.
To rotate the canvas in Photoshop:
- Locate the Tools panel (usually on the left side of your Photoshop interface).
- Select the Rotate View tool (it looks like a compass or a curved arrow, often found nested with the Hand tool, or accessed by pressing
R). - Place the cursor of the tool within your image window and hold down the mouse button.
- A compass rose will appear. Drag your cursor clockwise or counter-clockwise to rotate the canvas to your desired angle.
- Once you’ve reached the desired angle, release the mouse button.
- To quickly reset your view to the original zero-degree rotation, click the Reset View button in the Options bar at the top.
- Note: Using
Edit > Undoor the History panel to revert changes will undo actions, but not necessarily reset the view rotation. The Reset View button is specifically for the canvas orientation.
- Note: Using
- The Options bar also displays the current angle of rotation, allowing for precise adjustments. You can also check the “Rotate All Windows” option to rotate all open documents simultaneously, a useful feature for comparative “Visual Design” or “Photo Ideas.”
Tophinhanhdep.com encourages experimenting with both layer and canvas rotation. These adjustments are fundamental to achieving balanced compositions and can significantly impact the “Aesthetic” and narrative of your images, whether they are “Nature” shots, “Abstract” creations, or “Beautiful Photography.”
Troubleshooting Common Image Flipping Issues
Even seasoned Photoshop users can encounter unexpected hiccups when flipping images. From misplaced options to undesired effects, these issues can interrupt your creative flow. Tophinhanhdep.com aims to smooth out your “Digital Photography” and “Editing Styles” journey by providing clear solutions to these common problems. Our comprehensive guides anticipate your challenges and offer practical advice to ensure your image manipulations go as planned.
The basic task of flipping a single layer is straightforward:
- Select the desired layer.
- Press
Ctrl + T(PC) orCommand + T(Mac). - Choose
Flip HorizontallyorFlip Vertically.
However, sometimes the process doesn’t go as smoothly. Here’s a quick troubleshooting guide:
“Where’s the Flip Option?” Finding Your Way Around Photoshop Versions
Photoshop undergoes frequent updates, and menu names or locations can sometimes shift. If you can’t locate the image flip option exactly as described or shown in screenshots:
- Click on Help in the top menu bar.
- Use the search bar and type “flip.” Photoshop’s built-in help will usually pinpoint the feature’s current location in your specific version. Tophinhanhdep.com regularly updates its tutorials to reflect the latest Photoshop interfaces, ensuring you always have accurate information.
Accidental Logo or Text Flips: Layer vs. Canvas
A common frustration is when you want to flip an image, but your embedded logo, watermark, or text also flips, rendering it unreadable.
- The Cause: This usually happens when you apply the “Flip Canvas” command instead of flipping only the specific layer containing the graphic or text.
- The Solution: Always ensure you are working on the correct layer. If your logo or text is on a separate layer, select only that layer in the Layers panel before using any of the “Flip Layer” methods outlined in this guide. This precision is essential for maintaining professional “Visual Design” standards.
Understanding Horizontal vs. Vertical: Getting the Right Orientation
The choice between flipping along the vertical or horizontal axis yields vastly different results.
- Horizontal Flip: Mirrors the image from left to right (e.g., an object on the left moves to the right).
- Vertical Flip: Mirrors the image from top to bottom (e.g., an object at the top moves to the bottom).
- The Key: Always visualize the axis of reflection. If the outcome isn’t what you expected, try the other flip option. This often resolves simple orientation mistakes.
When Rotation Isn’t the Answer: Differentiating Flip from Rotate
It’s easy to confuse flipping with rotating, but their effects are strikingly different.
- Flipping: Think of it as looking at your image in a mirror. The image’s content is reversed.
- Rotating: Imagine tilting your head. The entire image or layer turns around a central point, but the content itself is not reversed.
- The Distinction: If you see parts of your image appearing “backward” (like text), you likely needed to flip, not rotate. Conversely, if you just need to change the angle, rotation is the correct choice. Tophinhanhdep.com’s “Graphic Design” and “Digital Art” resources further elaborate on these foundational distinctions.
Ensuring Natural-Looking People in Flipped Photos
Sometimes, flipping a photograph of a person can make them appear unnatural or slightly “off.” Our brains are highly tuned to human faces and body language, and subtle asymmetries or directional cues can feel strange when reversed.
- The Challenge: People are accustomed to seeing themselves and others a certain way. Flipping an image can sometimes make familiar features seem unsettling.
- The Approach: This issue is less about the technical “how-to-flip” and more about the art of “Photo Manipulation” and understanding visual perception. While flipping can correct compositional issues (e.g., a person looking out of the frame), it requires careful judgment.
- Tophinhanhdep.com’s Advice: When editing photos of people, consider the context and the subject’s natural appearance. If a flipped image looks odd, it might be better to maintain the original orientation or explore other editing techniques. Tophinhanhdep.com offers extensive tutorials on “Editing Styles” for portraits, focusing on making people look their best and most natural.
For complex issues, or if you’re looking to explore more advanced “Image Tools” for perfection, Tophinhanhdep.com is always here to guide you. Our “AI Upscalers” can refine details after manipulation, and our “Image-to-Text” tools can help document your creative process.
Creative Applications and Visual Design Inspiration from Tophinhanhdep.com
Flipping and rotating images aren’t just for correction; they are powerful tools for artistic expression. Tophinhanhdep.com champions “Visual Design,” “Graphic Design,” and “Digital Art” by providing not just tools but also a wealth of “Creative Ideas” and “Image Inspiration & Collections.” Let’s explore how mirroring and rotating can transform your photos into compelling works of art, ideal for “Aesthetic” collections or “Abstract” galleries.
Crafting Engaging Mirror Effects
The mirror effect is a fantastic way to introduce symmetry, create surreal scenes, or add depth to your images. By knowing how to flip a layer in Photoshop, you unlock a ton of fun ways to get creative.
Here’s how to create an interesting mirror effect:
- Select your image and unlock the background layer in the Layers panel (double-click the layer, then click OK).
- Add more canvas space to accommodate the mirrored half. Go to
Image > Canvas Size. Increase the width or height (depending on whether you want a horizontal or vertical mirror) and ensure the anchor point is set to the side you don’t want to expand from. For example, to mirror horizontally to the right, anchor to the left and double the width. - Add a New Guide to mark the center. Go to
View > New Guideand add a Vertical or Horizontal guide down the middle. - Use the Move tool (
V) to drag your subject to one side of the guide. - Duplicate the layer (
Ctrl/Cmd + J). - With the duplicated layer selected, enter Free Transform (
Ctrl/Cmd + T). - Right-click inside the bounding box and choose
Flip Horizontal(orFlip Vertical). - Drag the flipped layer until it aligns perfectly with the original layer at the guide.
- Press
Enterto confirm. - To make the reflection more realistic, especially for water or glass, consider reducing the opacity of the flipped layer and applying a slight
Filter > Blur > Gaussian Blur. You can also add a Layer Mask to the flipped layer and use theGradient tool(black to white) to fade the reflection naturally. This is a staple technique in “Photo Manipulation.” - Finally, clear the guide (
View > Clear Guides) and crop any extra canvas space (Image > TrimorCrop tool).
Imagine a picture of a majestic building; flip it horizontally, and it appears to extend both into the earth and into the sky, creating an eerie, “Abstract” masterpiece. Or, by flipping an animal picture vertically, you can create a whimsical two-headed creature. There are truly no limits to your creativity with Tophinhanhdep.com as your inspiration hub.
Developing Dynamic Patterns Through Multiple Flips
Another captivating technique is to flip images multiple times to generate intricate, fun patterns, transforming simple photographs into mesmerizing kaleidoscopic designs. This is a favorite among “Digital Art” enthusiasts looking for unique “Photo Ideas.”
Follow these steps to create wonderful repeating patterns:
- Open your desired picture in Photoshop.
- Prepare your canvas: Duplicate the background layer (
Ctrl/Cmd + J) and then double the width of your canvas (Image > Canvas Size, set anchor to left, double width). - Select the duplicated layer. Use the Move tool (
V) to drag this photo onto the newly created canvas space, placing it to the right of the original. - With the right image layer selected, activate Free Transform (
Ctrl/Cmd + T), then right-click and chooseFlip Horizontal. This creates your first mirrored pair. PressEnter. - Merge these two layers into a single new layer (
Select both layers in Layers panel, then Ctrl/Cmd + E). - Now, repeating similar steps, duplicate this new merged layer (
Ctrl/Cmd + J) and double the height of the canvas (Image > Canvas Size, set anchor to top, double height). - Drag the newly duplicated merged image below the original.
- Activate Free Transform (
Ctrl/Cmd + T) for this bottom layer, then right-click and chooseFlip Vertical. PressEnter. - Merge these two vertical layers into a new single layer.
- To add another dimension, duplicate this layer again. Rotate the new duplicated layer
90 degrees clockwise(Edit > Transform > Rotate 90° CW). - You can now arrange these two layers to form a complete quadrant pattern, or continue duplicating and rotating by
90 degreesto create a symmetrical, four-part design. Trim any excess canvas.
This method allows you to create a dynamic, kaleidoscopic image with recurring patterns, perfect for “Abstract” images or unique “Wallpapers.” Tophinhanhdep.com showcases numerous examples of such “Thematic Collections” and “Trending Styles” in digital art, providing endless “Image Inspiration & Collections” for your next creative project.
The journey through image manipulation in Photoshop is both technical and artistic. From fundamental adjustments to intricate “Photo Manipulation,” mastering techniques like flipping and rotating is crucial. We hope this comprehensive guide from Tophinhanhdep.com has equipped you with the skills and inspiration to confidently transform your images.
Tophinhanhdep.com is committed to being your premier destination for all visual content needs. Explore our vast libraries of “High Resolution” and “Stock Photos,” discover new “Editing Styles,” or dive into tutorials for “AI Upscalers” and “Image-to-Text” tools. Whether you’re seeking “Photo Ideas” for your next shoot, building “Mood Boards,” or just browsing “Beautiful Photography” and “Nature” landscapes, Tophinhanhdep.com is here to support your creative vision. Continue your learning journey with Tophinhanhdep.com, and happy creating!