Mastering Image Orientation: How to Flip Images on Google Docs with Tophinhanhdep.com

In the realm of digital document creation, Google Docs stands as an indispensable tool for countless individuals and professionals. Its collaborative features, accessibility, and intuitive interface make it a go-to choice for everything from simple notes to complex reports. However, users often encounter specific challenges when it comes to image manipulation within the platform. One such common query, as highlighted by searches for “how to flip images on Google Docs,” reveals a need for a straightforward solution to orient visual content. While Google Docs offers robust text editing capabilities, directly flipping or mirroring an image inserted into the document isn’t a readily apparent one-click feature.
This comprehensive guide, brought to you by Tophinhanhdep.com, will unveil the simple yet powerful method of flipping or mirroring your images horizontally or vertically within Google Docs. The key lies in leveraging the often-underestimated integrated Drawing tool. Beyond the practical steps, we will also explore why this seemingly minor editing trick holds significant value for visual design, digital photography, and how it connects to the broader universe of image tools and creative inspiration, all central to Tophinhanhdep.com’s mission to empower your visual content journey. Understanding this process is not just about a technical workaround; it’s about gaining greater control over your document’s aesthetic and message.
Why Flipping Images Matters for Your Visual Content
In the dynamic world of visual communication, the orientation of an image can profoundly influence its impact, readability, and overall harmony within a document. What might seem like a trivial adjustment can, in fact, be a critical step in refining your visual narrative. Tophinhanhdep.com champions the idea that images are far more than mere embellishments; they are powerful communicators, capable of conveying mood, directing attention, and reinforcing textual information. Mastering even fundamental image manipulation techniques like flipping is therefore essential for anyone aiming to produce polished and effective documents.
Enhancing Aesthetic and Composition
The aesthetic appeal of a document is often dictated by the careful arrangement and composition of its visual elements. An image’s inherent composition, while perfect in isolation, might clash with the surrounding text or layout once placed in a Google Doc. For instance, a photograph featuring a prominent subject facing left could inadvertently lead the reader’s eye off the page if the accompanying text is positioned to the right. Flipping that image horizontally to have the subject face right instantly resolves this directional conflict, guiding the viewer’s gaze towards the content and creating a more balanced and engaging flow.

This simple act of reorienting an image can dramatically improve the overall aesthetic of your document. It allows for a more deliberate arrangement of visual weight and can prevent your document from feeling unbalanced or disjointed. Consider how professional wallpapers and backgrounds are often designed with specific symmetrical or dynamic qualities to create visual interest; by applying a flip, you can achieve a similar level of thoughtful composition within your own documents. This control transforms standard inserted pictures into integral components of beautiful photography, contributing actively to the document’s visual story and enhancing the reader’s experience. It’s a subtle yet impactful form of photo manipulation that brings an artistic sensibility to everyday document creation, aligning with the principles of effective graphic design.
Practical Applications in Document Design
Beyond pure aesthetics, the ability to flip images offers immense practical utility across various document design scenarios. For technical documentation, product manuals, or instructional guides, mirroring an image might be a necessity to correctly illustrate a process, diagram, or component. Imagine needing to show a mirrored version of a circuit board layout or a product component to match a specific reference point in your text; flipping the image is a far more efficient solution than attempting to redraw or reshoot the original.
When working with stock photos or elements sourced through digital photography, you frequently encounter visuals that are nearly perfect but require a slight orientation adjustment to seamlessly integrate into your design vision. A generic hand pointing left might need to point right to match your call to action; a reflected image of a natural landscape might create a more compelling background for a section header. This technique is a fundamental aspect of practical photo manipulation and creative problem-solving in graphic design. It’s a quick image editing style that saves valuable time and resources, preventing the need for extensive rework or searching for an elusive perfectly oriented alternative. Whether you’re integrating serene nature scenes, intricate abstract graphics, or powerful sad/emotional imagery, the simple flip ensures that your visuals serve your precise document design requirements without compromise, reinforcing the versatility that Tophinhanhdep.com advocates in managing diverse visual assets.
The Essential Guide to Flipping Images in Google Docs (Desktop)
As previously noted, Google Docs, in its standalone image handling, does not provide a direct “flip” button for images inserted straight into your document. This is a common point of confusion for users accustomed to more robust image editing software. However, Google has equipped Docs with a versatile internal tool—the Drawing tool—that acts as the essential workaround for this functionality. This method is exclusively available on the desktop version of Google Docs, accessed via a web browser (such as Chrome, Safari, or Mozilla Firefox). Users relying on the Google Docs mobile app (on iPhone, iPad, or Android devices) will find this specific feature absent and will need to prepare their images using external photo editing applications before uploading them to their documents. Tophinhanhdep.com is here to guide you through this precise process, ensuring you can achieve perfect image orientation with confidence.
Step-by-Step Process: Accessing the Drawing Tool
The journey to flipping an image in Google Docs begins by correctly accessing its powerful Drawing tool. This dedicated canvas provides the necessary environment for image manipulation.
-
Open or Create Your Google Docs Document: Initiate the process by opening an existing Google Docs document where you intend to place or modify an image, or create a brand new document if you’re starting from scratch. This operation should always be performed on your desktop computer using a compatible web browser. Ensure you are properly logged into your Google account to access all Google Docs functionalities.
-
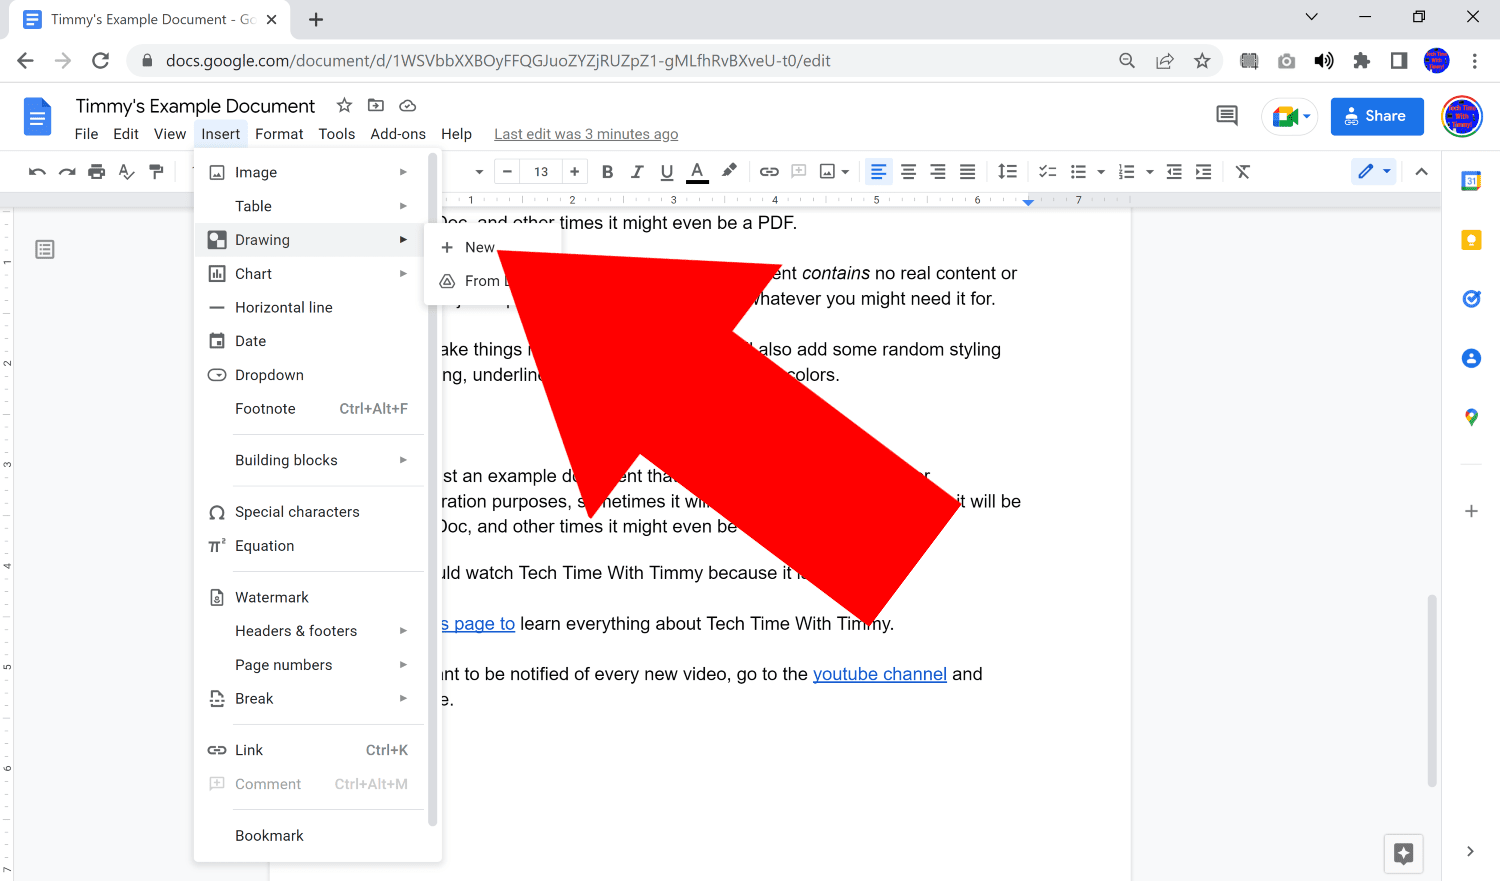
Locate and Click the “Insert” Tab: Once your Google Doc is open and ready, direct your attention to the top toolbar, typically positioned horizontally at the very top of your document window. Within this toolbar, you will find a series of menu options. Locate and click on the “Insert” tab. This menu serves as your primary gateway for adding a wide array of content elements to your document, ranging from images and tables to drawings and special characters.
-
Select “Drawing” then “New”: Upon clicking “Insert,” a drop-down menu will unfurl, presenting numerous options. Hover your mouse cursor over the “Drawing” option within this menu. This action will usually expand a secondary sub-menu. From this sub-menu, click on “New.” Opting for “New” will launch a fresh, pristine, blank “Drawing” canvas, which opens in a separate, dedicated window or modal dialog. This new canvas is the precise environment where all your subsequent image manipulation and flipping will occur, providing a sandbox isolated from the main document layout. While Google Docs does offer the ability to insert drawings “From Drive,” choosing “New” for flipping is generally more straightforward as it provides an immediate, clean workspace.
Uploading and Selecting Your Image for Manipulation
With the Drawing canvas now open and presenting a blank workspace, the next crucial step is to introduce the image you wish to flip into this specialized editing environment.
-
Click the “Image” Icon within the Drawing Window: Inside the newly opened Drawing window, you will observe a distinct toolbar at the top, separate from the main Google Docs toolbar. Scan this toolbar for an icon that visually represents an image. This icon typically appears as a square depicting two mountains or landscapes, often accompanied by a small sun or moon. Clicking this specific “Image” icon will trigger a new dialog box, prompting you to specify how you wish to import your image.
-
Upload Your Desired Image: The image upload dialog provides several convenient methods to bring your visual content into the Drawing tool:
- Drag-and-Drop: This is often the most expedient method. Simply navigate to your computer’s file explorer or desktop, locate the image file you intend to flip, and drag it directly into the designated “Drag an image here” field within the dialog box.
- “Choose an Image to Upload” Button: If drag-and-drop isn’t your preferred method, click on the “Choose an image to upload” button. This will open your computer’s standard file browser, allowing you to navigate through your local directories, select your image file, and confirm its upload.
- Alternative Sources: Google Docs also provides options to insert images from a URL, from your Google Photos albums, or even perform a quick Google Image Search directly from this dialog. Choose the method most suitable for the location of your image.
-
Ensure the Image is Selected on the Canvas: Once your image has been successfully uploaded, it will appear squarely on the Drawing canvas. Before you can proceed with any manipulation, including flipping, it is absolutely vital that the image is actively selected. You can confirm this by observing the visual cues around the image: a prominent blue border, typically accompanied by eight small blue squares (resizing handles) at its corners and midpoints, will appear if the image is selected. If this blue border is not visible, simply click anywhere on the image itself to select it. Without the image selected, the manipulation options will remain inactive or grayed out.
Executing Horizontal or Vertical Flips
With your image now confidently residing on the Drawing canvas and properly selected, you are poised to apply the desired orientation change. This is the core action of the flipping process.
-
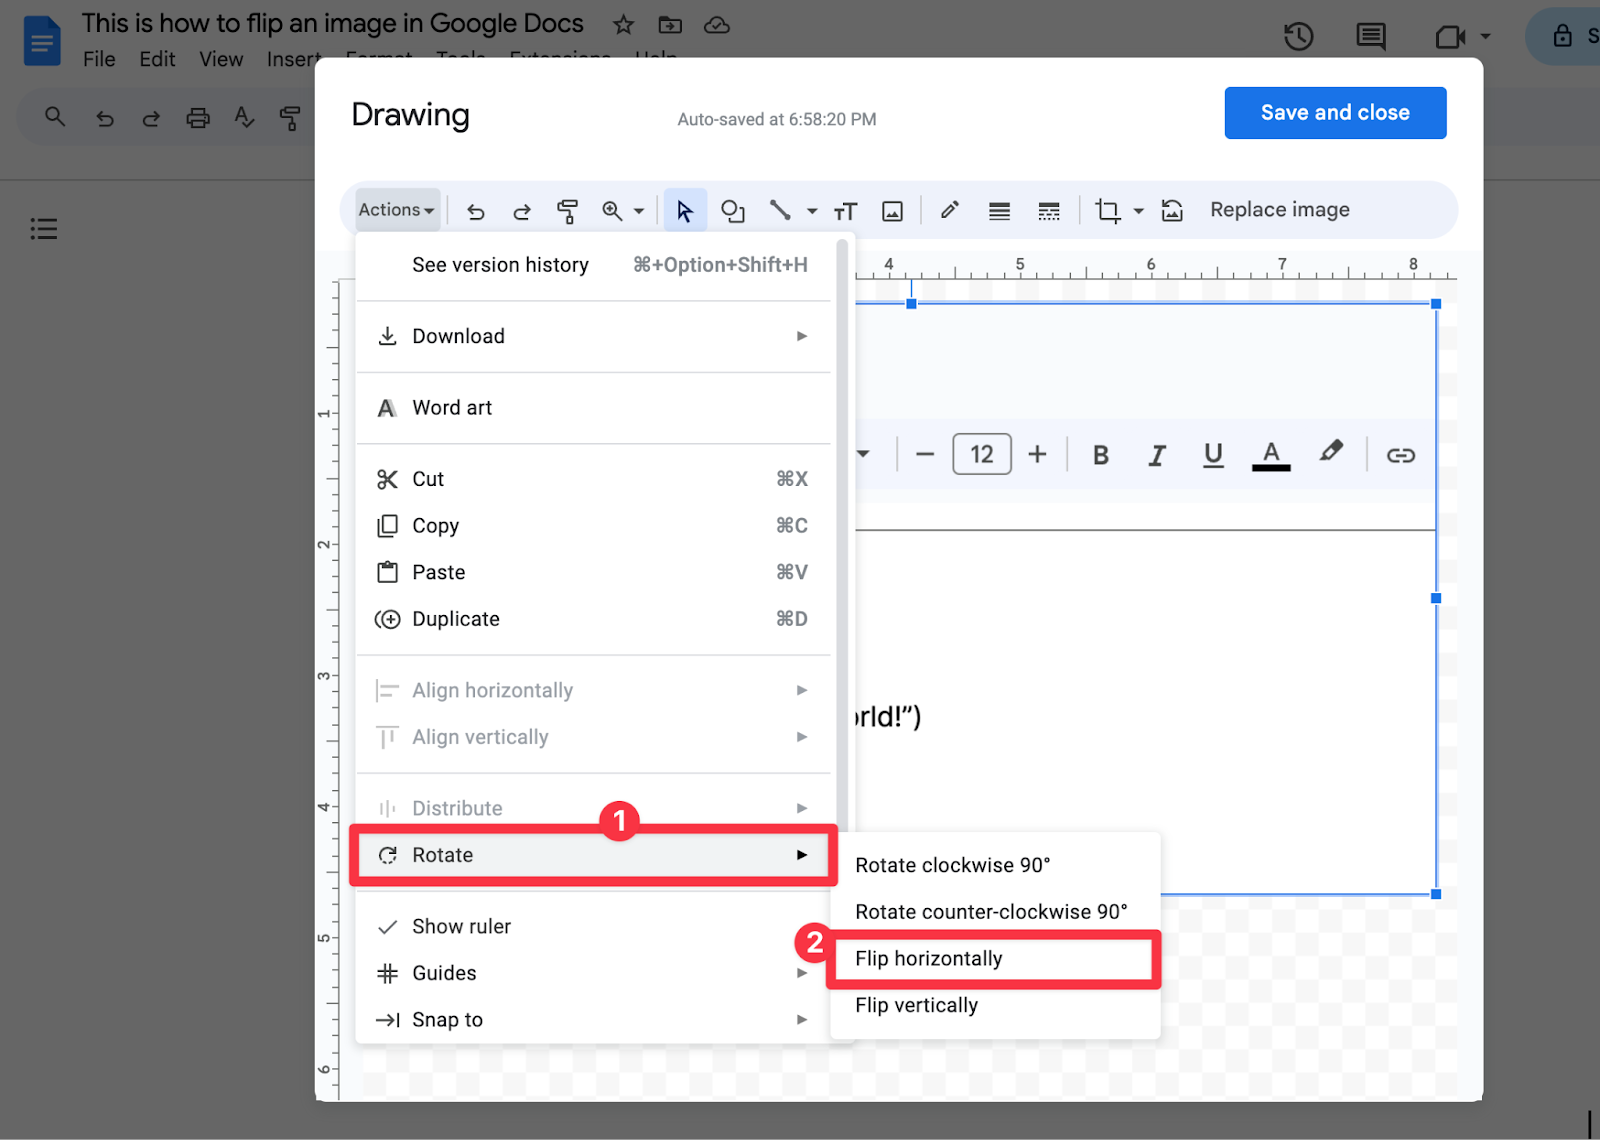
Access the “Actions” Menu: Within the Drawing window’s own toolbar, typically located towards the top-left corner, you will find a menu labeled “Actions.” Click on this “Actions” menu. A drop-down list will appear, presenting various editing and manipulation commands applicable to the selected object (your image).
-
Hover Over “Rotate”: Within the “Actions” drop-down menu, direct your mouse cursor to hover over the “Rotate” option. This specific action does not initiate a command directly but rather expands a secondary sub-menu. This sub-menu is crucial as it contains all the available rotation and mirroring choices.
-
Choose Your Desired Flip Orientation: The expanded “Rotate” sub-menu will display a selection of options for reorienting your image:
- “Flip horizontally”: This is the most frequently sought-after option. Selecting “Flip horizontally” will reflect your image across its vertical axis, effectively creating a mirror image. This is ideal for altering the direction a subject is facing, reversing text (though this would only be readable in a mirror), or achieving visual symmetry within your design. It’s particularly useful for correcting images that are intended to face a certain way in a layout, such as a person or an arrow.
- “Flip vertically”: Choosing “Flip vertically” will invert your image along its horizontal axis, turning it upside down. While less common than a horizontal flip, this can be incredibly useful for creating artistic reflections, preparing images for specific printing requirements, or correcting scans that were inserted in an inverted orientation.
- (Note: This menu also includes options for “Rotate clockwise 90 degrees” and “Rotate counter-clockwise 90 degrees,” which are useful for simple rotations without mirroring the image.)
As an alternative to navigating through the “Actions” menu, you can also achieve the same result by right-clicking directly on the selected image on the Drawing canvas. A context-sensitive menu will pop up, which also contains a “Rotate” option, offering the identical horizontal and vertical flip choices. This can often be a quicker and more intuitive method for many users.
Saving and Integrating Your Flipped Image
Having successfully flipped your image to its desired orientation within the Drawing tool, the final step involves confirming these changes and bringing the manipulated image back into your main Google Docs document.
-
Click the “Save and Close” Button: Once you are completely satisfied with the flipped image and any other adjustments you may have made within the Drawing tool, locate the prominent blue “Save and Close” button. This button is typically situated in the top-right corner of the Drawing window or dialog box. Clicking this button signifies your approval of all changes and your readiness to insert the modified image.
-
Observe the Image’s Appearance in Your Document: Immediately after clicking “Save and Close,” the Drawing window will disappear, and your newly flipped and confirmed image will be seamlessly inserted into your Google Docs document. It will usually appear at the precise location where your text cursor was last positioned before you initiated the Drawing tool. From this point onward, your flipped image functions just like any other image inserted directly into Google Docs. You retain full control to further adjust its size by dragging its corner handles, modify its text wrapping style (e.g., “Wrap text,” “Break text,” “In front of text,” “Behind text”), or precisely reposition it within your document using drag-and-drop or the image options menu. The transformation is now complete, and your document benefits from the enhanced visual flow and aesthetic balance provided by the correctly oriented image.
Beyond Basic Flips: Integrating Advanced Image Concepts
While Google Docs’ built-in Drawing tool efficiently handles basic image flipping, the vast landscape of digital imagery extends far beyond these foundational manipulations. At Tophinhanhdep.com, we understand that true mastery of visual content involves embracing a wider array of techniques and technologies. This simple act of flipping an image in Docs serves as an entry point into a broader appreciation for digital photography, sophisticated editing styles, and the power of dedicated image tools that can transform your visuals from good to outstanding. We aim to be your ultimate resource for unlocking this potential and providing endless visual inspiration.
Leveraging External Tools for Complex Photo Manipulation
For mobile users who lack the desktop Drawing tool functionality in Google Docs, or for anyone requiring more intricate and professional-grade transformations, external image editing software is absolutely indispensable. Tools like Snapseed (a popular, free mobile app mentioned in some references), Adobe Photoshop, GIMP, or specialized online editors offer a wealth of capabilities far beyond simple flips. These platforms allow for advanced photo manipulation, including precise cropping, nuanced color correction, applying artistic filters and effects, background removal, and even the revolutionary power of AI upscalers for enhancing the resolution and clarity of lower-quality images.
Before uploading your images to Google Docs, you can utilize these powerful image tools to:
- Achieve High-Resolution Quality: Ensure your visuals are sharp and crisp, making your document look more professional. Tophinhanhdep.com provides insights into optimizing image quality for various uses.
- Convert Formats: Use image converters to change file types (e.g., JPEG to PNG) as needed, ensuring compatibility and transparency.
- Compress and Optimize: Employ image compressors and optimizers to reduce file sizes without sacrificing visual quality, which is crucial for faster loading documents and website performance.
- Experiment with Editing Styles: Explore diverse editing styles—from vintage filters to cinematic tones—to imbue your digital photography with a specific mood or brand identity.
- Extract Text: Even experiment with image-to-text tools to extract editable content from scanned documents before incorporating them into Google Docs.
This comprehensive approach ensures that your visuals, whether they are striking nature photography, thought-provoking abstract art, or deeply expressive sad/emotional imagery, always meet your precise visual design specifications. Tophinhanhdep.com offers curated resources and guides on these very image tools to help you prepare your visuals perfectly before they even touch your Google Docs canvas.
Curating Image Collections and Thematic Visuals
The act of flipping and performing basic edits is a foundational step within a much grander visual strategy. Tophinhanhdep.com actively encourages its users to cultivate their sense of image inspiration and strategically build compelling image collections. Just as expertly chosen wallpapers and backgrounds set the mood for a digital space, so too can a thoughtfully curated collection of images elevate the impact of your documents, presentations, and creative projects.
Consider these aspects for advanced visual integration:
- Developing Mood Boards: Create mood boards by gathering images that evoke a specific feeling, color palette, or thematic concept. This ensures visual consistency across your document.
- Building Thematic Collections: Organize images into thematic collections—be it urban landscapes, minimalist patterns, vibrant portraits, or serene vistas. This makes it easy to access the right visual for the right section.
- Generating Creative Ideas: A simple flip of an image might be the catalyst for entirely new creative ideas for your layout, leading to unexpected and impactful visual designs.
- Staying Current with Trending Styles: Keep abreast of trending styles in visual media. Tophinhanhdep.com regularly updates its insights on current design trends, helping you ensure your digital photography and chosen visuals possess a contemporary edge and resonate with modern audiences.
By thoughtfully curating your visuals, including applying subtle adjustments like flipping to achieve perfect harmony, you transform your documents into powerful platforms for communication. Whether you are showcasing beautiful photography, building a gallery of aesthetic images, or conveying complex ideas through precise visual metaphors, Tophinhanhdep.com provides the inspiration and resources to help you tell your story effectively.
Tophinhanhdep.com: Your Hub for Image Excellence and Creative Inspiration
At Tophinhanhdep.com, we are driven by the profound belief in the transformative power of visuals to communicate, inspire, and captivate. Our platform is meticulously crafted to be an unparalleled resource, offering an extensive array of solutions and creative assets to fulfill all your image-related needs, from basic manipulations to advanced artistic endeavors.
Whether your quest is for stunning wallpapers and backgrounds to personalize your digital environments, an exploration into diverse visual categories like aesthetic imagery that stirs the senses, immersive nature photography that transports you, intricate abstract art that challenges perception, or deeply resonant sad/emotional visuals that convey profound feelings, Tophinhanhdep.com is designed as your ultimate destination. We celebrate the artistry and impact of beautiful photography in all its forms, providing a rich tapestry of images to elevate your projects and daily life.
Our dedication extends deeply into the realm of photography. We offer comprehensive insights into achieving high-resolution results that captivate with clarity, guiding you on where to source the finest stock photos that convey professionalism, educating you on mastering advanced digital photography techniques that push creative boundaries, and inspiring you to experiment with a vast spectrum of editing styles to define your unique visual voice.
Beyond the static image, we remain at the forefront of visual design. Our resources span fundamental graphic design principles that build strong visual foundations, delve into the intricacies of digital art creation for expressive freedom, and explore sophisticated photo manipulation methods that transform reality. All of this is geared towards sparking creative ideas for every conceivable project, fostering innovation and artistic exploration.
To ensure you are fully equipped, our comprehensive image tools section provides invaluable practical utilities. We guide you through essential converters for format flexibility, efficient compressors and optimizers for web and document readiness, revolutionary AI upscalers that breathe new life into older images, and cutting-edge image-to-text technologies that bridge the gap between visuals and data. These tools ensure you have the technical prowess to manage and enhance your visual assets with ease.
Furthermore, for continuous growth, enrichment, and boundless inspiration, our image inspiration & collections section is a wellspring of creativity. It offers endless photo ideas to ignite your imagination, helps you build captivating mood boards that solidify your visual themes, guides you in curating impactful thematic collections for coherent storytelling, and keeps you meticulously updated on trending styles to ensure your visual content remains fresh, relevant, and engaging.
From the straightforward yet essential act of flipping an image in Google Docs to conceiving and executing intricate digital masterpieces, Tophinhanhdep.com is committed to empowering you. We equip you with the knowledge, tools, and inspiration to harness the full potential of visual content, transforming your creative vision into a stunning, tangible reality. Visit us today and embark on a journey where every image tells a story, beautifully and effectively.
Conclusion
The ability to flip an image in Google Docs, though requiring a specific pathway through the Drawing tool, is an accessible and remarkably valuable technique for any document creator. This skill underscores the importance of visual precision and the impact that even seemingly minor adjustments can have on a document’s overall professional appearance and aesthetic appeal. It transforms a potentially awkward image into one that seamlessly integrates with your content, enhancing readability and visual flow.
As Tophinhanhdep.com continually illustrates, the world of imagery is rich with boundless possibilities for creative expression and effective communication. Mastering straightforward techniques like image flipping is merely the initial step in a much larger journey of leveraging powerful visual elements across all your digital endeavors. By understanding these tools and embracing the broader concepts of visual design, photography, and image optimization, you are not just editing a document; you are crafting a more compelling, engaging, and professional narrative. Embrace these skills, and let your visuals speak volumes.