Mastering Image Flipping in Photoshop: A Comprehensive Guide for Digital Artists

In the dynamic world of digital imagery, the ability to manipulate and transform photographs is an indispensable skill for graphic designers, photographers, and visual artists alike. Among the myriad of powerful tools Adobe Photoshop offers, the simple yet incredibly versatile “flip image” function stands out. Whether you’re looking to refine a composition, correct an awkward orientation, or unleash a wave of creative artistry, understanding how to effectively flip images in Photoshop is fundamental.
At Tophinhanhdep.com, we understand the nuances of creating captivating visuals. Our extensive resources cover everything from high-resolution photography and digital art to image optimization and visual design. This guide delves deep into the process of flipping images within Photoshop, ensuring you can seamlessly integrate this technique into your workflow and unlock new creative possibilities for your wallpapers, backgrounds, and aesthetic image collections.

Fundamental Methods for Flipping Entire Images in Photoshop
Flipping an entire image in Photoshop is a straightforward process that applies a horizontal or vertical mirror effect to your entire canvas. This can be particularly useful for correcting the orientation of a photo, creating a mirrored background, or preparing an image for print that requires specific left-to-right or top-to-bottom alignment. When you flip the entire canvas, every layer within your document is affected simultaneously, ensuring your entire composition remains intact but mirrored.
Horizontal Canvas Flip: Mirroring Your Entire Composition
To perform a horizontal flip on your entire image, Photoshop provides a direct and easy-to-access command. This action effectively mirrors the image along a vertical axis, transforming what was on the left side to the right, and vice-versa.
Here’s how to do it:
- Open Your Image: Begin by opening the image you wish to flip in Adobe Photoshop. This will be the foundational “canvas” upon which all subsequent actions will be performed.
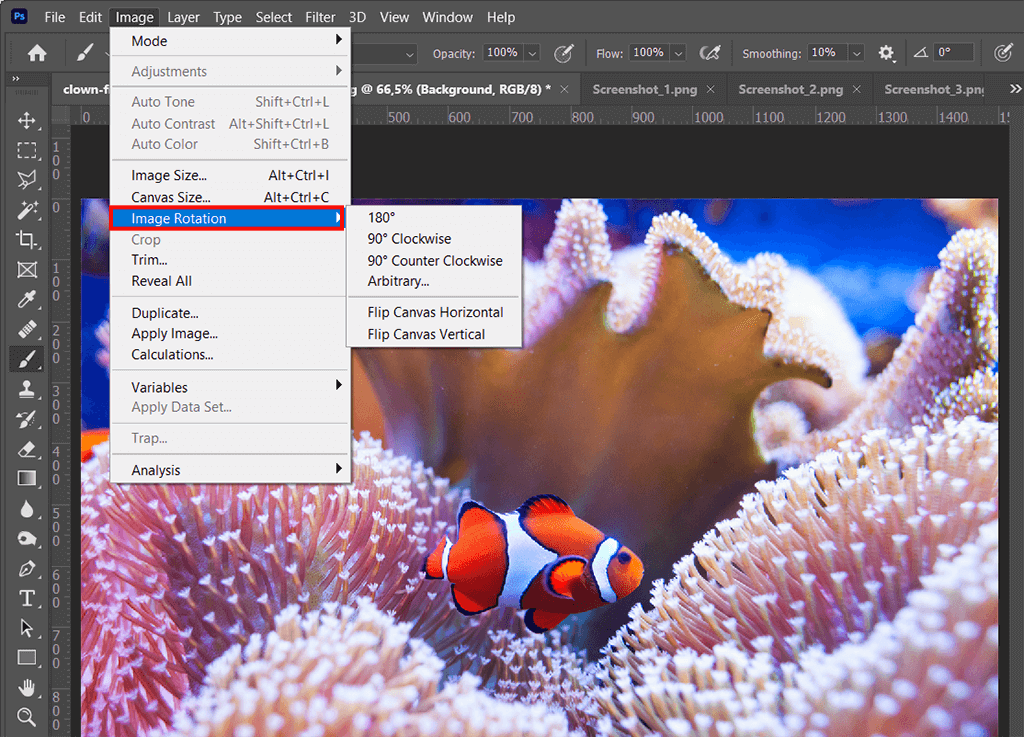
- Navigate to the Image Menu: In the top menu bar of Photoshop, click on “Image.”
- Select Image Rotation: From the “Image” dropdown menu, hover over “Image Rotation.”
- Choose “Flip Canvas Horizontal”: A sub-menu will appear. Select “Flip Canvas Horizontal.”
Instantly, your entire image will be mirrored horizontally. This simple click can dramatically alter the balance and visual flow of your photograph, often revealing new perspectives or correcting compositional imbalances. For instance, if an object or subject is facing awkwardly towards the edge of the frame, a horizontal flip might reposition it to face inwards, guiding the viewer’s eye more effectively through your composition.
Vertical Canvas Flip: Inverting from Top to Bottom
Similar to a horizontal flip, a vertical canvas flip mirrors your entire image along a horizontal axis, effectively inverting the image from top to bottom. This technique is less commonly used for simple corrective purposes but opens doors to intriguing abstract effects, especially when combined with other manipulations. Imagine creating a surreal landscape where the sky is mirrored below, blending seamlessly with a watery reflection.
To perform a vertical flip:
- Open Your Image: Load the desired image into Photoshop.
- Navigate to the Image Menu: Go to the “Image” menu in the top bar.
- Select Image Rotation: Hover over “Image Rotation.”
- Choose “Flip Canvas Vertical”: From the sub-menu, select “Flip Canvas Vertical.”
Your image will now be inverted vertically. This can be a powerful tool for crafting unique digital art pieces or preparing images for specific print layouts where an upside-down orientation is desired.
Important Note on Photoshop Versions: While the core functionality remains consistent, the exact wording of these commands might vary slightly across different Photoshop versions. For example, older versions might use “Rotate” instead of “Image Rotation.” If you’re struggling to locate the option, remember the trusty “Help” menu. Simply click “Help” in the top bar and type “Flip” into the search bar; Photoshop will guide you to the correct command. Tophinhanhdep.com regularly updates its tutorials to cover the latest Photoshop versions, ensuring you always have accurate information.
Precision Flipping: Working with Individual Layers and Selections
While flipping the entire canvas is useful, many scenarios in digital photography and graphic design require a more granular approach. Often, you’ll need to flip only a specific element—a logo, a piece of text, a person, or an object—without affecting the rest of the image. This is where Photoshop’s layer-based editing truly shines, allowing for precise control over individual components of your design.
Isolating Elements for Layer-Specific Flipping
The key to flipping individual elements is understanding Photoshop’s layer system. Each independent component of your image should ideally reside on its own layer. This isolation allows you to manipulate that specific element (including flipping) without altering other parts of your composition.
Before you begin, ensure the element you want to flip is on a separate layer. If it’s part of the background layer or merged with other elements, you might need to:
- Duplicate the Background Layer: If your element is on the background layer, duplicate it (Ctrl+J / Cmd+J) so you can work non-destructively.
- Select and Cut: Use selection tools (e.g., Marquee, Lasso, Quick Selection) to select the desired element, then cut it (Ctrl+X / Cmd+X) and paste it onto a new layer (Ctrl+V / Cmd+V).
- Use Layer Masks: For more complex shapes, a layer mask can help isolate the element without permanently altering pixels.
Once your target element is on its own layer, select that layer in the “Layers” panel. This action tells Photoshop that your subsequent operations should only apply to the pixels on that selected layer.
The Power of Free Transform for Layer Manipulation
The “Free Transform” tool is your best friend for manipulating individual layers, offering unparalleled flexibility for resizing, rotating, skewing, and, crucially, flipping elements. It wraps the selected layer in a bounding box, giving you interactive control over its transformation.
Here’s how to use Free Transform to flip a layer:
- Select the Desired Layer: In the “Layers” panel, click on the layer containing the element you want to flip.
- Enter Free Transform Mode:
- Go to the top menu bar, click “Edit,” then select “Free Transform.”
- Alternatively, use the universal shortcut: Ctrl+T (Windows) or Cmd+T (Mac). A bounding box with handles will appear around your selected layer, indicating you are in Free Transform mode.
- Access Flip Options: While in Free Transform mode, right-click (or Control-click on Mac) anywhere inside the bounding box. A contextual menu will appear.
- Choose Your Flip Direction: From this menu, you’ll find options:
- “Flip Horizontal”: Mirrors the layer from left to right.
- “Flip Vertical”: Mirrors the layer from top to bottom.
- Confirm the Transformation: Once you’re satisfied with the flipped orientation, press the Enter key. You can also double-click inside the bounding box to apply the transformation.
This method is incredibly versatile for anything from subtly adjusting a model’s posture in a portrait to creating symmetrical graphic design elements for posters or digital art.
Flipping Targeted Selections within a Layer
Sometimes you don’t want to flip an entire layer, but only a specific part of it. This requires making a selection before entering Free Transform.
- Select the Layer: Ensure the layer containing the desired area is active in the Layers panel.
- Make a Selection: Use any of Photoshop’s selection tools (e.g., Marquee Tool, Lasso Tool, Quick Selection Tool, Pen Tool for precise paths) to define the area you wish to flip.
- Enter Free Transform for Selection: With the selection active, go to “Select” > “Transform Selection” from the top menu. This creates a bounding box around your selection.
- Right-Click and Flip: Right-click inside the bounding box and choose “Flip Horizontal” or “Flip Vertical.”
- Apply and Deselect: Press “Enter” to apply the transformation to the selection. Then, press Ctrl+D (Cmd+D) to deselect.
This advanced technique allows for highly localized adjustments, perfect for intricate photo manipulation or refining specific details in your digital photography. Tophinhanhdep.com encourages experimenting with these tools to elevate your visual design skills.
Enhancing Your Visuals: Creative Applications and Rotational Techniques
Flipping an image is more than just a corrective tool; it’s a gateway to incredible creative possibilities. From crafting surreal mirror effects to generating intricate patterns, understanding how to apply flipping in imaginative ways can transform ordinary images into extraordinary digital art.
Crafting Stunning Mirror Effects and Reflections
The mirror effect is a popular application of image flipping, often used to create artistic reflections or abstract compositions. This technique can imbue your “aesthetic” images with a sense of depth and surreal beauty, making them ideal for “wallpapers” or “backgrounds” featured on Tophinhanhdep.com.
Here’s a common approach to creating a mirror reflection, often used for water reflections or architectural doubling:
- Prepare Your Canvas: Open your image in Photoshop. Unlock the background layer if it’s locked (double-click the layer in the Layers panel).
- Add Canvas Space: Extend your canvas to accommodate the reflection. Go to “Image” > “Canvas Size” and increase the height (for a vertical reflection) or width (for a horizontal reflection). Ensure “Anchor” is set so the original image remains at the top/left, and the new space is added below/right.
- Duplicate and Position: Duplicate your image layer (Ctrl+J / Cmd+J). Use the “Move Tool” (V) to drag the duplicated layer into the newly created canvas space, adjacent to the original image.
- Flip the Duplicated Layer: With the duplicated layer selected, go to “Edit” > “Transform” > “Flip Vertical” (for a bottom reflection) or “Flip Horizontal” (for a side reflection). Adjust its position precisely so it aligns with the original.
- Create a Natural Gradient (Optional but Recommended): To make the reflection more realistic, add a layer mask to the flipped layer (click the “Add layer mask” icon at the bottom of the Layers panel). Select the “Gradient Tool” (G), ensure foreground color is black and background is white. Drag a black-to-white gradient from the center of the reflection outwards. This will make the reflection gradually fade, mimicking how light disperses in real-world reflections.
- Adjust Opacity and Blur: Reduce the opacity of the flipped layer in the Layers panel (e.g., to 50-70%) and apply a slight “Gaussian Blur” (“Filter” > “Blur” > “Gaussian Blur”) to simulate a softer, more distant reflection.
This method can turn a simple photograph of a building into an eerie, abstract piece extending into both earth and sky, or create captivating “nature” aesthetics.
Generating Dynamic Patterns Through Multi-Flip Techniques
Beyond simple reflections, repeated flipping and rotation can lead to mesmerizing kaleidoscopic patterns, perfect for unique “abstract” digital art or “visual design” elements. This technique is a playground for “creative ideas” and can yield stunning “thematic collections.”
Here’s an example of creating a four-quadrant pattern:
- Initial Setup: Open your base image. Duplicate the background layer and ensure your canvas size is at least double the original image’s width and height.
- First Flip (Horizontal): Select the duplicated layer. Drag it to one side of your canvas. Duplicate this layer again. Drag the new copy to the other side. Now, with this second copy selected, go to “Edit” > “Transform” > “Flip Horizontal.” You now have two halves, mirrored horizontally. Merge these two layers.
- Second Flip (Vertical): Duplicate the merged layer (which now represents the top half of your final pattern). Drag this new duplicated layer to the bottom half of your canvas. Now, with this bottom layer selected, go to “Edit” > “Transform” > “Flip Vertical.”
- Merge and Refine: Merge all visible layers. You will now have a four-quadrant mirrored pattern. You can further refine it by cropping, adjusting colors, or adding filters.
This multi-flip approach, as explored on Tophinhanhdep.com, is a fantastic way to generate unique backgrounds and digital assets from “beautiful photography.”
Differentiating Image Flipping from Canvas Rotation
It’s crucial for any aspiring digital artist to understand the distinct differences between “flipping” and “rotating” an image. While both alter an image’s orientation, their effects are fundamentally different and serve different purposes in “digital photography” and “visual design.”
- Flipping (Mirroring): As discussed, flipping creates a mirror image. If an object is on the left, after a horizontal flip, it will be on the right, and vice-versa. Text becomes unreadable. It’s like looking at your image in a mirror.
- Rotating: Rotating an image or layer simply spins it around a central point. A 90-degree clockwise rotation will move the top edge to the right, the right edge to the bottom, and so on. The left-to-right relationship of elements remains, but their angular orientation changes. Text remains readable (though potentially sideways or upside down).
To rotate an image or layer in Photoshop:
- For Entire Canvas: Go to “Image” > “Image Rotation.” Here you’ll find options like “180°,” “90° Clockwise (CW),” “90° Counter Clockwise (CCW),” or “Arbitrary…” for custom angles.
- For Individual Layers: Select the layer, then go to “Edit” > “Transform” and choose “Rotate,” or simply enter “Free Transform” (Ctrl+T / Cmd+T) and drag one of the corner handles of the bounding box to rotate.
The Rotate View Tool: For a more interactive canvas rotation (which doesn’t affect the image pixels but rather your view of the canvas), use the “Rotate View Tool” (R) from the Tools panel. This is useful for getting a better angle to work on details without committing to a permanent rotation. After using it, click “Reset View” in the Options bar to return to the original orientation.
Understanding this distinction is vital for accurate “photo manipulation” and achieving your desired “editing styles.”
Troubleshooting and Best Practices for Flawless Image Transformation
Even with clear instructions, issues can arise when flipping images in Photoshop. Tophinhanhdep.com aims to provide comprehensive support, so here’s a quick troubleshooting guide to help you resolve common problems and adopt best practices for flawless image transformation.
Resolving Common Issues: Flipped Text and Unnatural Appearances
- “Can’t locate the flip option”: As mentioned earlier, Photoshop versions can vary. Always use the “Help” > “Search” function if menu items don’t match precisely. Alternatively, familiarize yourself with the Free Transform shortcuts (Ctrl+T / Cmd+T) which are consistent across versions.
- “Logo or text flipped”: This is a classic sign that you’ve flipped the entire canvas when you only intended to flip an element. The solution is to always ensure logos, text, and other specific graphical elements are on separate layers and then use the “Edit” > “Transform” > “Flip” or “Free Transform” method for that individual layer, not the entire image canvas.
- “Image is flipped the wrong way (e.g., horizontally when I wanted vertically)”: This is often a simple oversight. Double-check which “Flip Canvas” or “Flip Horizontal/Vertical” option you’re selecting. The preview in the Free Transform bounding box can also help you confirm before pressing Enter.
- “People look unnatural”: Sometimes, a horizontal flip of a portrait can make a person’s face or body appear subtly “wrong” to the eye, even if technically mirrored. This is due to our brain’s familiarity with specific facial asymmetries. In such cases, carefully consider the psychological impact of the flip. For “beautiful photography” of people, sometimes a slight rotation or cropping is preferable to a full flip if it causes an unsettling effect. Tophinhanhdep.com has resources on portrait photography editing to help maintain natural looks.
Understanding Non-Destructive Editing and Undo Options
A core principle in “digital photography” and “photo manipulation” is non-destructive editing. Photoshop excels at this, and understanding it can save you a lot of headaches.
- Non-Destructive Operations: Flipping an image or layer in Photoshop is generally a non-destructive operation, meaning it doesn’t permanently alter the original pixel data until you save and flatten the image. You can always revert your changes.
- Undo/Redo:
- Ctrl+Z (Cmd+Z): This universal shortcut undoes your last action. Pressing it repeatedly will cycle through recent actions in reverse order (depending on your Photoshop preferences for multiple undos).
- History Panel: For a more visual and powerful undo mechanism, use the “History” panel (Window > History). This panel lists every action you’ve taken since opening the document, allowing you to jump back to any previous state.
- Smart Objects: For maximum non-destructive flexibility, convert layers to “Smart Objects” before performing transformations. This embeds the original image data, allowing you to scale, rotate, and flip multiple times without any loss of quality.
Streamlining Your Workflow with Advanced Tools
For professionals and enthusiasts engaging in extensive “photo manipulation” and “visual design,” efficiency is key. While Photoshop offers robust built-in features, external tools can further streamline your workflow. For example, Tophinhanhdep.com features insights into specialized creative consoles that can assign custom shortcuts to Photoshop commands, including flipping, rotating, and zooming. Imagine executing complex transformations with a single hand, allowing your other hand to focus on tablet input or detailed mouse work. These “image tools” are designed to boost productivity for “digital art” and “high-resolution photography” projects.
Mastering the art of flipping images in Photoshop is a foundational skill that expands your creative toolkit significantly. Whether for correcting minor misalignments or crafting intricate “abstract” designs for “aesthetic” collections, the techniques outlined here from Tophinhanhdep.com provide a solid basis. Continue to explore our site for more “photo ideas,” “editing styles,” and “image inspiration” to bring your visual narratives to life. Happy creating!