How to Get a High-Resolution Image

In today’s visually-driven world, the clarity and sharpness of an image can make all the difference. Whether you’re selecting a breathtaking wallpaper for your desktop, preparing stunning visuals for a graphic design project, or curating a collection of beautiful photography, achieving high resolution is paramount. A high-resolution image is not merely about size; it’s about the density of detail, ensuring that every pixel contributes to a crisp, vibrant, and impactful visual experience. For users of Tophinhanhdep.com, which serves as a hub for diverse image needs—from aesthetic backgrounds to abstract art, and from nature photography to professional stock photos—understanding how to acquire or create high-resolution images is fundamental to unlocking the platform’s full potential.
This comprehensive guide will delve into the intricacies of image resolution, explaining its core concepts and demonstrating practical methods for both capturing and enhancing images to achieve superior quality. We will explore various software and tools, from professional desktop applications like GIMP and Photoshop to convenient mobile apps and powerful online solutions, including the advanced Image Tools available on Tophinhanhdep.com. By the end of this article, you’ll be equipped with the knowledge and techniques to ensure your visual content consistently meets the highest standards, elevating your digital art, photo manipulation, and creative ideas to new heights.
Understanding Image Resolution and Its Importance
Before we dive into the “how,” it’s crucial to understand the “what.” Image resolution is a fundamental concept in digital imaging, directly influencing an image’s quality, clarity, and suitability for various applications, especially within the diverse offerings of Tophinhanhdep.com.
Pixels, PPI, and DPI: The Fundamentals
At its core, a digital image is composed of tiny squares of color called pixels. The more pixels an image contains, the more detail it can display, leading to a sharper and more realistic appearance. This pixel count, often expressed as width x height (e.g., 1920x1080 pixels), is a direct indicator of an image’s overall resolution.
However, resolution is also defined by pixel density, which refers to how many pixels are packed into a given physical space. This is commonly measured in two ways:
- Pixels Per Inch (PPI): This metric applies primarily to digital displays. A higher PPI means more pixels per inch on your screen, resulting in a smoother and more detailed image when viewed digitally. For instance, a common standard for screen viewing is 72 PPI, but high-resolution displays like Retina screens often boast much higher PPIs. When selecting wallpapers or backgrounds from Tophinhanhdep.com, matching the image’s PPI to your screen’s capability ensures optimal display.
- Dots Per Inch (DPI): This metric is used for printed images. Printers use tiny dots of ink to reproduce an image, and DPI indicates the number of ink dots per inch on the printed page. While DPI and PPI are distinct, they function similarly in principle: more dots/pixels per inch equate to greater detail and sharpness. The accepted standard for high-quality printed images, such as those used in professional photography books or large art prints, is generally 300 DPI.
It’s vital to grasp that simply increasing an image’s dimensions (e.g., from 1000x667 to 6000x4000 pixels) doesn’t automatically add detail; it primarily adds more pixels. If the original image lacks inherent detail, these added pixels will merely replicate existing, often blurry, information, leading to a larger but not necessarily sharper image. The goal is to either capture enough detail from the start or intelligently “upscale” an image using sophisticated algorithms that can infer and generate new detail.
Why High Resolution Matters for Tophinhanhdep.com Users
For individuals and professionals who frequent Tophinhanhdep.com for their visual content needs, high resolution is not just a preference—it’s a necessity across multiple categories:

- Images (Wallpapers, Backgrounds, Aesthetic, Nature, Abstract, Sad/Emotional, Beautiful Photography): High-resolution images are crucial for these categories. A 4K nature wallpaper or a stunning aesthetic background truly shines when every leaf, every gradient, or every subtle emotion is rendered with impeccable clarity. Low-resolution images appear pixelated and detract from the intended visual impact, making them unsuitable for large screens or high-quality displays common among Tophinhanhdep.com users.
- Photography (High Resolution, Stock Photos, Digital Photography, Editing Styles): High resolution is at the heart of quality photography. Whether sourcing stock photos or engaging in digital photography, photographers strive for images that can be cropped, enlarged, and manipulated without degradation. Different editing styles, from HDR to vintage looks, also benefit from high-resolution originals, allowing for more nuanced adjustments and finer details to emerge.
- Visual Design (Graphic Design, Digital Art, Photo Manipulation, Creative Ideas): In graphic design, high-resolution source material is non-negotiable. Logos, marketing materials, and digital art pieces must maintain their sharpness across various media, from web banners to print advertisements. Photo manipulation thrives on detail, as intricate edits and composites require crisp edges and smooth transitions. High-resolution images provide the necessary foundation for creative ideas to be executed flawlessly.
- Image Inspiration & Collections (Photo Ideas, Mood Boards, Thematic Collections, Trending Styles): Building professional mood boards or thematic collections requires high-quality visuals to effectively convey concepts and emotions. Trending styles in visual culture often rely on detailed, high-resolution imagery to make their impact, and Tophinhanhdep.com provides a wealth of such content for inspiration.
In essence, high resolution ensures versatility, impact, and professionalism. It allows images to be scaled, printed, and displayed optimally across diverse platforms, fulfilling the varied needs of Tophinhanhdep.com’s community.
Capturing High-Resolution Images from the Start
The most effective way to obtain a high-resolution image is to capture it that way from the outset. This involves understanding and correctly configuring your camera settings, whether you’re using a sophisticated DSLR or the convenient camera on your mobile phone.
Mastering Your DSLR Camera Settings
Digital Single-Lens Reflex (DSLR) cameras offer extensive control over image capture, allowing photographers to maximize resolution and detail. For those who contribute to or appreciate the high-resolution photography collections on Tophinhanhdep.com, these settings are vital.
-
Set Resolution to the Highest Value: Your DSLR’s menu will typically have a “Quality” or “Resolution” setting. It might display options like “L,” “M,” “S” (Large, Medium, Small) or specific megapixel counts (e.g., 24 MP, 36 MP). Always select the largest size or highest megapixel value available. This ensures the camera captures the maximum number of pixels its sensor can record. Remember, you can always downsize a high-resolution image later without losing quality, but you cannot truly “upsize” a low-resolution image to gain detail that wasn’t initially captured.
-
Choose Fine/Superfine Compression (or RAW): Resolution isn’t just about pixel count; it’s also about how that pixel data is stored.
- JPEG Compression: Most DSLRs offer different JPEG compression levels (e.g., Fine, Normal, Basic). “Fine” or “Superfine” options apply less compression, resulting in larger file sizes but significantly better image quality and less information loss. This is crucial for maintaining the integrity of the captured resolution.
- RAW Format: For ultimate image quality and maximum editing flexibility, shoot in RAW format. A RAW file is an uncompressed, unprocessed image that contains all the data captured by the camera sensor. While RAW files are much larger than JPEGs, they preserve every detail, making them ideal for photo manipulation and professional digital photography. Many stock photos and high-quality aesthetic images on Tophinhanhdep.com originate from RAW captures. After editing, you can convert RAW to JPEG or PNG for sharing, retaining the highest possible quality.
-
Utilize Low ISO Settings: ISO controls your camera sensor’s sensitivity to light. While higher ISO allows for shooting in low-light conditions, it introduces “noise” (graininess) into the image. This noise can mask fine details, effectively reducing perceived resolution and making images look less sharp. To maintain optimal image quality and preserve resolution, always use the lowest possible ISO setting (e.g., ISO 100-400) that allows for proper exposure, especially when capturing beautiful photography or intricate nature scenes.
-
Employ Optical Zoom, Not Digital Zoom: If your lens has a zoom function, use its optical zoom capability to get closer to your subject. Optical zoom physically adjusts the lens elements to magnify the scene, capturing more detail. Digital zoom, on the other hand, merely crops and enlarges a portion of the image, essentially throwing away pixels and reducing the effective resolution. For crystal-clear close-ups or detailed shots that populate thematic collections on Tophinhanhdep.com, optical zoom is indispensable.
Optimizing High-Res Photography on Mobile Devices
Modern smartphones are remarkably capable cameras, often shooting in high resolution by default. However, knowing a few settings can further optimize your mobile photography for Tophinhanhdep.com’s aesthetic and background categories.
-
Default High Resolution: Most contemporary smartphones automatically capture photos at their highest available resolution. This design choice caters to the average user who may not delve into complex camera settings. Therefore, for most iPhone users, photos are already being captured at the maximum pixel count their device allows.
-
Adjusting Resolution on Android Devices: While iPhones typically don’t offer manual photo resolution settings (they prioritize maximum quality by default), many Android phones do.
- Navigate to your camera app’s settings.
- Look for “Photo Size,” “Picture Quality,” or “Resolution” options.
- These settings might be listed in megapixels (e.g., 12 MP, 48 MP) or aspect ratios with accompanying pixel counts (e.g., 4:3 at 4000x3000). Always select the option with the highest megapixel count or the largest pixel dimensions to ensure you’re capturing images with the most detail. This is particularly useful for creating high-quality aesthetic backgrounds or personal photography collections.
-
iPhone Video Resolution: Although photo resolution is usually fixed at maximum, iPhones often allow you to adjust video resolution and frame rate (e.g., 1080p HD at 30fps, 4K at 60fps). For visually rich content, choosing 4K resolution (if available on your device) will yield significantly sharper and more detailed videos, which can then be used for screen recordings, GIF creation, or even stills.
-
Set a Precise Focus Point: While not directly a resolution setting, proper focus is paramount for perceived sharpness. A blurry image, regardless of its pixel count, will never appear high-resolution. On most smartphones, tapping on your desired subject in the viewfinder sets the focus point. This ensures that the primary elements of your composition are crisp and clear, contributing to overall image quality, essential for any beautiful photography or abstract art.
By adopting these capture-focused strategies, you lay the strongest foundation for high-resolution images, ready for editing, sharing, or uploading to platforms like Tophinhanhdep.com.
Enhancing Existing Images to Achieve Higher Resolution
Sometimes, you start with an image that isn’t as high-resolution as you’d like. This could be an older photograph, a downloaded asset, or a picture captured with less-than-optimal settings. Fortunately, various tools and techniques exist to “upscale” these images, effectively increasing their pixel count and often improving their perceived quality. However, it’s crucial to remember that while these methods can add pixels, they don’t always add genuine detail that wasn’t present in the original capture. They intelligently extrapolate existing data to fill in the gaps.
Desktop Software Solutions (GIMP, Photoshop, Fotophire Maximizer)
Professional-grade desktop image editing software provides the most control over resolution enhancement, making them staples for digital photography, graphic design, and photo manipulation tasks.
Using GIMP for Image Upscaling
GIMP (GNU Image Manipulation Program) is a powerful, free, and open-source alternative to commercial software, available for Windows, macOS, and Linux. It offers robust tools for increasing image resolution.
- Open Your Image: Launch GIMP and go to
File > Opento load your low-resolution image. - Create a New Canvas with Desired Resolution: To prepare for a high-resolution output (e.g., 300 PPI for print), go to
File > New. In the ‘Create a New Image’ dialog, expand ‘Advanced Options’. Set both ‘X Resolution’ and ‘Y Resolution’ to 300 pixels/inch. Keep the width and height matching your current image’s dimensions for now. - Adjust Canvas Size: Select the new, high-resolution canvas window. Go to
Image > Canvas Size. Ensure the chain icon next to Width and Height is locked. Enter your desired new, larger dimensions (e.g., if you want to double the size, enter twice the original width). ClickResize. This creates a larger canvas with your specified DPI. - Paste and Scale Original Image: Copy your original (low-res) image (
Ctrl+A/Cmd+Ato select all, thenCtrl+C/Cmd+C). Paste it onto your new, larger canvas (Ctrl+V/Cmd+V). The pasted image will appear at its original size, centered on the larger canvas. - Scale the Pasted Layer: In the
Layersdialog, select ‘Floating Selection (Pasted Layer)’. Then, from theToolbox, select theScale Tool(it might be nested under the Shear tool). Click on the pasted image. In the ‘Scale’ dialog, ensure the chain icon is locked, then enter the new width you set for your canvas in step 3. ClickScale. This will stretch your pasted image to fill the new, larger, high-resolution canvas. - Refine and Export: Zoom in (
View > Zoom) to check the quality. Once satisfied, anchor the floating layer (Layer > Anchor Layer). Finally,File > Export(orExport As...) to save your enhanced image. When exporting, especially to JPEG, set the ‘Compression Level’ slider to zero or ‘100% Quality’ to minimize further loss of detail.
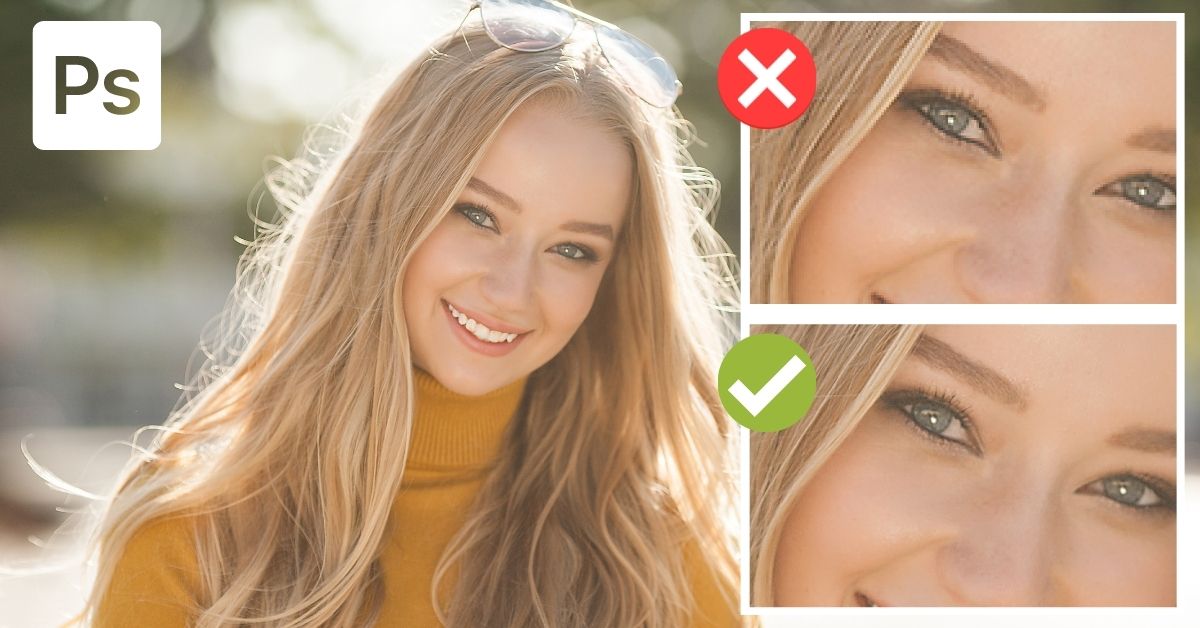
Enhancing Resolution with Adobe Photoshop
Photoshop is the industry standard for image editing, providing advanced algorithms for upscaling. Its “Preserve Details 2.0 Upscale” feature is particularly effective.
- Enable Technology Previews: Before starting, go to
Edit > Preferences > Technology Previews(Windows) orPhotoshop > Preferences > Technology Previews(Mac). EnsureEnable Preserve Details 2.0 Upscaleis checked. This advanced option uses AI-like capabilities to maintain sharpness during enlargement. - Open Image Size Dialog: Open your image in Photoshop. Go to
Image > Image Size(or useAlt+Ctrl+I/Option+Cmd+I). - Configure Settings:
- Resample: Make sure
Resampleis checked. This enables Photoshop to add or remove pixels. - Interpolation Method: From the dropdown menu next to
Resample, choosePreserve Details 2.0. This is the most recommended option for enlarging images while retaining detail. Other options likeBicubic Smootherare also good for enlargement. - Resolution: Change the ‘Resolution’ value (e.g., from 72 PPI to 300 PPI) to your desired print or display density.
- Dimensions: Adjust the ‘Width’ and ‘Height’ to your target pixel dimensions. Ensure the chain link icon is active to maintain the aspect ratio.
- Reduce Noise: If your image appears noisy after increasing the resolution, gently adjust the
Reduce Noiseslider (usually a small percentage, like 4-10%) to smooth out artifacts without losing too much detail.
- Resample: Make sure
- Apply and Sharpen (Optional): Click
OK. Your image will now have increased resolution. For an optional final touch, you can apply a sharpening filter. Duplicate your image layer (Ctrl+J/Cmd+J), then go toFilter > Other > High Pass. Adjust theRadiusuntil edges are highlighted but not overly generalized, then change the duplicated layer’s Blending Mode toOverlay. This can subtly enhance perceived sharpness, adding to the professional finish desired for graphic design or digital art.
Wondershare Fotophire Maximizer
Dedicated software like Wondershare Fotophire Maximizer focuses specifically on image enlargement. It aims to zoom pictures up to 1000% without pixelation or blur, making it suitable for print projects and high-res close-ups. Its key features include quality preservation during enlargement, adjustment of saturation and white balance, and real-time preview. This type of tool simplifies the process for users who might find GIMP or Photoshop too complex.
Mobile Applications and Online Tools
For quick enhancements on the go or without installing desktop software, mobile apps and web-based tools offer convenient solutions for increasing image resolution.
Image Size for iOS
Image Size is a free iOS app designed for quick image resizing and resolution adjustment.
- Import Image: Open the app and select the image picker (white box icon) to choose a photo from your gallery. Grant access to your Photos app if prompted.
- Adjust Dimensions & Resolution: Tap the chain icon to link width and height, maintaining aspect ratio. Enter your desired new width (e.g., 6000 pixels). The height will adjust automatically. The app resamples the photo at the new size.
- Output Quality: Tap the gear icon for additional options and ensure ‘Output Quality’ is at 100 percent.
- Save: Tap the save arrow to store your high-resolution image to your device.
Photo & Picture Resizer for Android
This popular Android app allows users to easily increase or decrease image size and resolution.
- Open and Select: Launch the app and select photos from your device.
- Choose Output: Select from preset dimensions or choose “Custom” to manually enter new width and height values.
- Automatic Resampling: The app automatically resamples the image to a higher resolution based on your input. Resized photos are saved in a separate folder.
Wondershare PixCut (Online Tool)
Wondershare PixCut is an online image editor that simplifies resolution enhancement directly in your web browser, ideal for quick adjustments without software installation.
- Access Tool: Go to the official PixCut website, navigate to “Tools,” and select “Enlarge Image.”
- Upload Image: Upload the picture you wish to make higher resolution.
- Enlarge & Download: PixCut will automatically enlarge the image, aiming to preserve quality. Once processed, download your resulting high-resolution image. This tool, much like Tophinhanhdep.com’s own Image Tools, leverages AI and cloud processing for efficiency.
Advanced Techniques: Image Stitching and AI Upscaling
For images that require a significant leap in resolution or detail, more advanced techniques are available.
Combining Multiple Images for “Super Resolution”
This method, often called “super-resolution imaging” or “image stitching,” artificially increases resolution beyond a camera’s native capabilities by combining multiple lower-resolution shots of the same scene.
- Capture Multiple Shots: Using a DSLR, manually set exposure and focus. Take a series of overlapping photos (e.g., 4 to 30 shots) of a static subject, ideally with a longer lens (135mm or more) and in continuous burst mode. Small shifts in perspective between shots provide additional data.
- Import to Photoshop: Load these files into Photoshop using
File > Script > Load Files into Stack. Crucially, uncheck “Attempt to Automatically Align Source Images.” - Resize and Align: Resize all stacked photos to 200% height and width (
Image > Image Size,Resamplechecked,Nearest Neighborinterpolation). Then, select all layers and useEdit > Auto-Align Layers, choosing “Auto” projection (ensure “Geometric Distortion” and “Vignette Removal” are unchecked). - Average Layers: With layers aligned, set the bottom layer’s opacity to 100%. For subsequent layers, set opacity using the formula
1 / layer number(e.g., layer 2 is 50%, layer 3 is 33%, etc.). This averaging helps to smooth out noise and enhance detail. - Sharpen and Crop: Apply a
Smart Sharpenfilter (Filter > Sharpen > Smart Sharpen) with appropriate settings (e.g., 300% amount, 2px radius, 0% noise reduction). Finally, crop the image to remove any uneven edges. This labor-intensive but rewarding technique is ideal for creating incredibly detailed images for large prints or intricate digital art pieces, perfectly suited for showcasing on Tophinhanhdep.com.
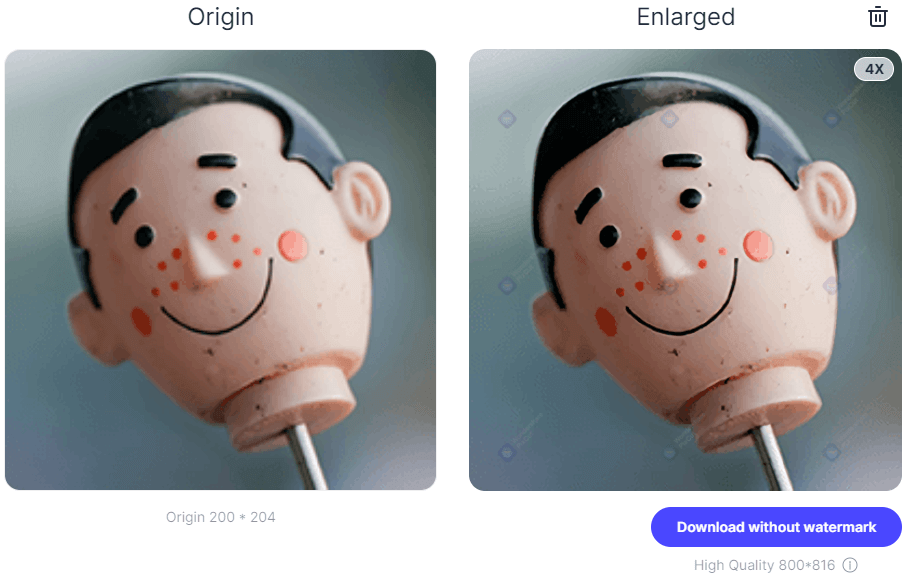
AI Upscalers on Tophinhanhdep.com and Beyond
The field of AI has revolutionized image enhancement. AI upscalers use deep learning algorithms trained on vast datasets of images to intelligently add pixels and reconstruct missing details, often producing astonishingly natural and high-quality results from low-resolution inputs. Tophinhanhdep.com’s Image Tools section, alongside other dedicated AI platforms, offers these capabilities.
These tools are particularly effective for:
- Enlarging small images for use as wallpapers or backgrounds.
- Improving old, low-resolution photographs for archival or display purposes.
- Preparing images for print projects where higher DPI is required.
- Enhancing stock photos that need to be adapted to larger sizes.
Users can upload an image, select the desired upscale factor (e.g., 2x, 4x, 8x), and the AI will process it, delivering a higher-resolution version with often remarkable clarity. These tools represent the forefront of image resolution enhancement, bridging the gap between existing content and the demand for pristine visuals.
Best Practices for Maintaining Image Quality
Acquiring high-resolution images is one part of the equation; maintaining that quality throughout its lifecycle—from editing to storage and display—is equally critical. This section outlines key considerations for anyone working with visuals, especially for those using Tophinhanhdep.com’s diverse resources.
The Limitations of Upscaling
While the methods discussed for enhancing existing images are powerful, it’s vital to manage expectations. Upscaling a low-resolution image cannot perfectly recreate genuine detail that was never captured by the camera. When you add pixels, software (even AI) essentially “guesses” what those new pixels should look like based on surrounding information. This process improves perceived sharpness and allows for larger prints or displays, but it doesn’t add new, authentic information.
Consider this: a 30-megapixel image captured by a professional camera contains significantly more unique data (focus, exposure, subtle textures) than a 5-megapixel image that has been upscaled to 30 megapixels. The upscaled image will look better, but it will never match the inherent quality of an image originally captured at a higher resolution.
Therefore, for critical applications like fine art printing, commercial photography, or high-end graphic design, always strive to capture images at the highest possible resolution from the outset. Upscaling is a fantastic solution for improving existing assets or making smaller images usable, but it’s not a magic bullet for achieving professional-grade quality from extremely poor sources.
Optimizing for Print and Digital Use
Different output mediums require different resolution and file optimization strategies. Understanding these nuances ensures your high-resolution images look their best everywhere.
-
Resolution for Print vs. Digital:
- Print: As a rule of thumb, high-quality prints require 300 DPI. For large format prints (e.g., billboards), even 150-200 DPI might suffice if viewed from a distance. If your image needs to be printed, ensure its pixel dimensions are large enough to achieve the desired physical size at 300 DPI (e.g., an 8x10 inch print at 300 DPI needs an image of 2400x3000 pixels).
- Digital: For web, social media, or general screen display, 72-150 PPI is often sufficient. Large pixel dimensions (e.g., 1920x1080 for HD, 3840x2160 for 4K) are more important than PPI for screen clarity, as screens render pixels directly.
-
File Formats and Compression:
- Lossless Formats (PNG, TIFF): These formats retain all original image data upon saving. PNG is excellent for web graphics with transparency and sharp edges, while TIFF is a professional standard for print and high-quality archiving. They result in larger file sizes but guarantee no loss of quality, which is crucial for digital art and photo manipulation where every detail matters.
- Lossy Formats (JPEG, WebP): JPEG uses compression that discards some image data to achieve smaller file sizes. This loss is often imperceptible at high quality settings but becomes apparent as compression increases, leading to “artifacts” and reduced sharpness. WebP is a modern format offering superior compression for web use. When saving JPEGs, always choose the highest quality setting (lowest compression) for the best balance between file size and visual fidelity. Tophinhanhdep.com’s Image Tools likely include Compressors and Optimizers that can help manage file sizes without sacrificing too much quality.
-
Image Tools: Converters, Compressors, Optimizers: Platforms like Tophinhanhdep.com offer a suite of online tools invaluable for managing image quality.
- Converters: Easily switch between formats (e.g., PNG to JPEG) to suit specific needs, such as optimizing an image for a website.
- Compressors: Reduce file sizes for faster loading times on websites or easier sharing, while attempting to preserve as much visual quality as possible.
- Optimizers: Fine-tune image settings for various uses, ensuring they are perfectly suited for wallpapers, backgrounds, or stock photo libraries without unnecessary bulk.
By thoughtfully applying these best practices, Tophinhanhdep.com users can ensure that their high-resolution images maintain their integrity and impact, whether they are destined for a personal collection, a professional portfolio, or a trending style guide.
In conclusion, mastering the art of high-resolution imaging is essential for anyone navigating the rich visual landscape of today’s digital world. From meticulously setting your camera for pristine captures to employing sophisticated software and AI upscalers, the journey to sharper, more detailed visuals is both accessible and rewarding. Tophinhanhdep.com, with its extensive categories of images and robust Image Tools (including Converters, Compressors, Optimizers, and AI Upscalers), stands as an invaluable resource in this endeavor. By understanding the fundamentals of pixels, PPI, and DPI, and by utilizing the diverse techniques outlined in this guide, you can ensure that your images—be they stunning nature photography, evocative abstract art, or crucial elements for graphic design—always achieve their maximum visual potential. Embrace these strategies, explore the tools available on Tophinhanhdep.com, and elevate your visual experiences to a new standard of clarity and impact.