How to Get Deleted Images Back: A Comprehensive Guide to Digital Photo Recovery

In our increasingly visual world, images are more than just data; they are cherished memories, vital documentation, artistic expressions, and essential components of our digital lives. From stunning wallpapers and aesthetic backgrounds to high-resolution nature shots and abstract digital art, the images we capture and create hold immense value. The thought of losing them – whether due to accidental deletion, system crashes, or corrupted storage – can be daunting. But what happens when that dreaded moment arrives, and your precious photos vanish? The good news is that in most cases, deleted images are not immediately gone forever. With the right knowledge and tools, you can significantly increase your chances of getting them back.
This comprehensive guide, presented by Tophinhanhdep.com, a hub for all things visual, from trending styles and thematic collections to powerful image tools, will walk you through various methods to recover your lost photographs across different devices and scenarios. We understand the profound impact of visual content, whether it’s for graphic design, photo manipulation, or simply preserving beautiful photography. Therefore, we’re dedicated to providing you with the insights and solutions to safeguard and restore your invaluable visual assets.

The Digital Lifecycle of Your Visual Memories: Understanding Image Deletion
Before diving into recovery methods, it’s crucial to understand what happens to an image when it’s “deleted.” Often, when you delete a file, it’s not immediately erased from your storage device. Instead, the operating system simply marks the space occupied by that file as “available” for new data. The actual image data remains until new information overwrites it. This brief window of opportunity is what makes image recovery possible.
From “Recently Deleted” to the Digital Abyss: Initial Recovery Steps
Most modern devices and cloud services employ a temporary holding area for deleted files, often called “Recently Deleted,” “Trash,” or “Recycle Bin.” This feature acts as your first line of defense, offering a straightforward way to undo accidental deletions.
1. The “Recently Deleted” Album (iPhone/iPad): Apple’s iOS Photos app includes a “Recently Deleted” album that stores deleted photos and videos for 30 to 40 days before permanent removal. This gives you a generous window to change your mind.
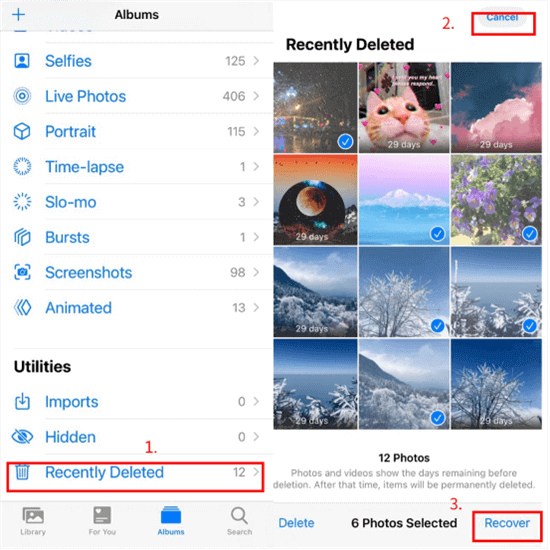
- How to Recover:
- Open the Photos app on your iPhone.
- Tap “Albums” at the bottom and scroll down to “Utilities.”
- Select “Recently Deleted.”
- Tap “Select” in the top-right corner.
- Choose the images you wish to restore.
- Tap “Recover” > “Recover [Number] Photos.” Your images will be returned to their original albums.
2. The Trash/Recycle Bin (Android/Windows/Mac): Similarly, Android galleries, Windows Recycle Bin, and Mac’s Trash function in a comparable manner.
-
Android (Google Photos Trash / Gallery Recycle Bin): If you use Google Photos with “backup & sync” enabled, deleted photos remain in the Trash for 60 days. Some Android device galleries also have their own “Recycle Bin” or “Trash” folder, typically holding items for 30 days.
- How to Recover from Google Photos:
- Open the Google Photos app.
- Tap “Library” > “Trash.”
- Touch and hold the photo(s) you want to recover.
- Tap “Restore” at the bottom.
- How to Recover from Android Gallery: (Steps vary by device brand, but generally involve):
- Open your Gallery app.
- Look for a “Recycle Bin,” “Trash,” or “Recently Deleted” option (often found in the app’s menu or settings).
- Select the desired photos and tap “Restore.”
- How to Recover from Google Photos:
-
Windows Recycle Bin:
- Double-click the “Recycle Bin” icon on your desktop.
- Locate the deleted image files. You can sort by date deleted or original location.
- Select the photos you want to restore.
- Right-click on the selection and choose “Restore.” The images will return to their original folders.
-
Mac Trash:
- Click the “Trash” icon in your Dock.
- Find the images you wish to retrieve.
- Right-click (or Control-click) on the item and select “Put Back.” The photo will be restored to its original location.
The Importance of High-Resolution Imagery and Digital Photography Preservation
For anyone passionate about photography – be it high-resolution stock photos, intricate digital art, or breathtaking nature shots – the loss of images can be particularly devastating. These aren’t just casual snaps; they represent hours of effort, creative vision, and sometimes, irreplaceable moments. Ensuring their preservation, and having reliable methods for recovery, is paramount. Tophinhanhdep.com, with its focus on visual quality and creative ideas, understands this deeply. The higher the resolution and the more effort put into the photography, the greater the need for robust recovery strategies when things go wrong.
Device-Specific Strategies for Image Retrieval
When images are “permanently deleted” – either by emptying the Recycle Bin/Trash, deleting directly from cloud services after their grace period, or overwriting storage space – the recovery process becomes more complex but is still often possible. This usually requires specialized tools or restoring from a comprehensive backup.
Recapturing Moments: iPhone and Android Image Recovery
Beyond the “Recently Deleted” folders, mobile devices rely heavily on cloud backups and dedicated recovery software.
1. iPhone Image Recovery: From Backups to Deep Scans
If your photos are no longer in the “Recently Deleted” folder, you’ll need to turn to backups or a powerful data recovery solution.
-
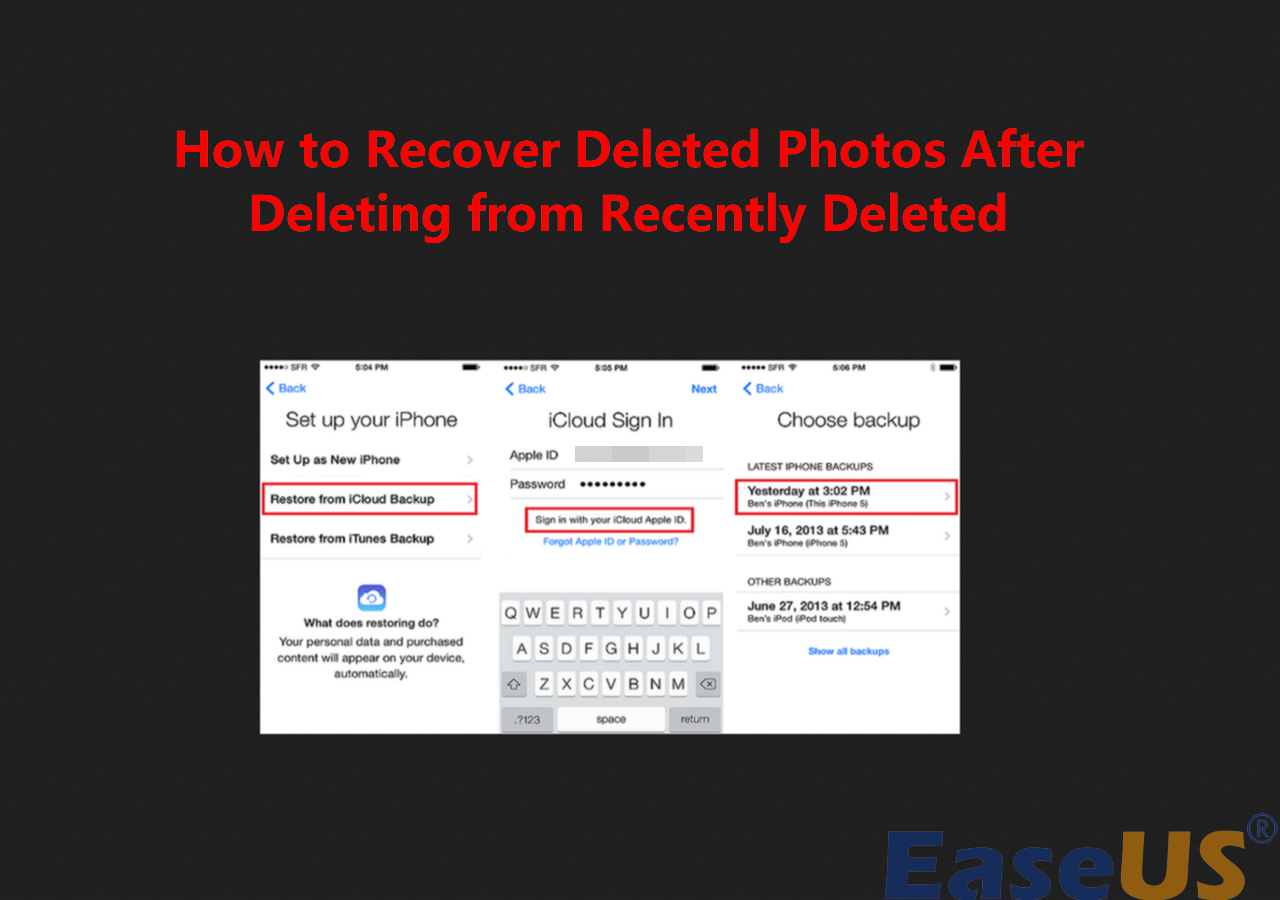
Via iCloud Backup: If you regularly back up your iPhone to iCloud and “iCloud Photos” was not enabled at the time the backup was created (as iCloud Photos syncs separately), your deleted photos might be in an older backup.
- First, check for an existing iCloud backup: Go to
Settings > [Your Name] > iCloud > Manage Storage > Backups. - If a suitable backup exists, you’ll need to erase your iPhone:
Settings > General > Transfer or Reset iPhone > Erase All Content and Settings. - During the setup process, choose “Restore from iCloud Backup” on the “Apps & Data” screen.
- Sign in with your Apple ID and select the relevant backup.
- Important Note: This method restores your entire device to a previous state, meaning any data created after the backup will be lost.
- First, check for an existing iCloud backup: Go to
-
Via iTunes/Finder Backup (for Mac users on macOS Catalina or later, it’s Finder): Similar to iCloud, if you’ve backed up your iPhone to your computer via iTunes (or Finder) and “iCloud Photos” was not active, your images might be in an older backup.
- Connect your iPhone to the computer used for backup.
- Open iTunes/Finder. Select your device.
- Choose “Restore Backup” and select the most recent backup that potentially contains your photos.
- Click “Restore.”
- Important Note: Like iCloud restore, this will replace your iPhone’s current data with the backup content.
-
Using Tophinhanhdep.com’s Recommended Recovery Solution: For scenarios where no backup exists, or you want to selectively recover photos without erasing your entire device, specialized iOS data recovery software is invaluable. Tophinhanhdep.com provides access to a powerful recovery solution designed to scan your iPhone’s internal storage or extract data from unreadable backups.
- Download and install Tophinhanhdep.com’s recommended recovery tool on your PC or Mac.
- Connect your iPhone to your computer and grant necessary permissions.
- Select the “Recover from iOS Device” option (or “Recover from iTunes/iCloud Backup” if you want to extract specific files from a backup).
- Initiate the scan. The tool will analyze your device or backup for recoverable data, including images.
- Preview the found images and select those you wish to restore.
- Choose a safe location on your computer to save the recovered photos. This method is particularly useful for recovering a wide range of image formats, even after permanent deletion, and offers the flexibility to retrieve specific files rather than a full system restore.
2. Android Image Recovery: Cloud, SD Card, and Device Scans
Android users have multiple avenues for recovery, especially if they leverage cloud services or external storage.
-
Via Google Drive/OneDrive/Dropbox: If you’ve enabled automatic photo backups to cloud services like Google Drive, Microsoft OneDrive, or Dropbox, your deleted images might still reside there.
- Google Drive: Open the Google Drive app, sign in, browse your synced photos, and download them.
- OneDrive: Open the OneDrive app, go to “Photos” or check the “Recycle Bin” within the app, then select and restore your files.
- Dropbox: Access Dropbox via a web browser (desktop site view is recommended on mobile), navigate to “Deleted files,” and restore.
-
From an SD Card (if applicable): Many Android phones use SD cards for expandable storage. If your photos were on an SD card, recovery is often more straightforward, as the card can be directly scanned by a computer.
- Safely eject the SD card from your Android phone.
- Insert the SD card into a card reader connected to your PC or Mac.
- Use Tophinhanhdep.com’s recommended recovery tool (same as for PC/Mac, see below) to scan the SD card.
- Preview and recover your photos to a location on your computer.
- Important Note: If your SD card was formatted as “adopted storage” (an extension of internal storage), it’s encrypted, making direct recovery by software very difficult.
-
Using Tophinhanhdep.com’s Advanced Android Recovery Solution: When photos are permanently deleted from internal storage and no cloud backup is available, a specialized Android data recovery tool is your best bet. Tophinhanhdep.com offers access to solutions capable of performing deep scans.
- Download and install Tophinhanhdep.com’s recommended Android recovery tool on your computer.
- Connect your Android device to the computer. Enable USB debugging on your phone (instructions provided by the software).
- Choose the “Quick Recovery” or “Deep Recovery” mode. Deep Recovery often requires rooting the device for the highest success rate, but some tools can recover without root for recently deleted files.
- Select “Photos” as the data type to scan.
- Once the scan completes, preview the recoverable images.
- Select the desired photos and click “Recover to PC” or “Recover to Device.” This method allows you to recover a wide array of image files, including those central to visual design and creative ideas, even when they seem long gone.
Desktop Data Rescue: Recovering Images on Windows and Mac
For images stored on personal computers, the recovery strategies leverage operating system features and powerful third-party software.
1. Windows Image Recovery: Recycle Bin, Backups, and Software Solutions
Beyond the Recycle Bin, Windows offers built-in backup options and robust software solutions.
-
From File History/Windows Backup: If you’ve enabled Windows’ built-in “File History” or regularly create system backups, you might be able to restore older versions of folders containing your images.
- Connect your backup drive.
- Go to
Control Panel > System and Security > File History(orBackup and Restore (Windows 7)for older systems). - Select “Restore personal files” or “Restore all users’ files.”
- Browse for the folders or files where your images were stored and restore them.
-
Using Tophinhanhdep.com’s Premier Photo Recovery Software for Windows: When photos are permanently deleted, bypassed the Recycle Bin (e.g., Shift+Delete), or lost from external drives, Tophinhanhdep.com recommends its dedicated recovery software for Windows. This tool is designed to retrieve a vast array of image formats, from common JPEGs to professional RAW files (CR2, NEF, ARW, DNG), and even Adobe PSD files crucial for digital art and photo manipulation.
- Download and install Tophinhanhdep.com’s powerful recovery software for Windows. Important: Install it on a drive different from where you lost the photos to avoid overwriting data.
- Launch the software and select the disk or partition where your images were lost (e.g., your C: drive, an external hard drive, or a USB flash drive).
- Click “Search for lost data” to begin a comprehensive scan.
- Once the scan is complete, use the “Pictures” filter to quickly find image files. Preview them to ensure they are the ones you need.
- Select the desired photos and click “Recover.”
- Choose a new, safe location (on a different drive) to save the recovered images.
2. Mac Image Recovery: Trash, Time Machine, and Specialized Tools
Mac users have Apple’s elegant backup solution, Time Machine, and access to advanced recovery software.
-
From Time Machine Backup: Time Machine is macOS’s integrated backup feature. If enabled, it continuously backs up your system, allowing you to go back in time to retrieve lost files.
- Connect your Time Machine backup drive.
- Open the folder where your photos were originally located (e.g., your Pictures folder).
- Click the Time Machine icon in the menu bar and select “Browse Time Machine Backups.”
- Use the timeline on the right to navigate to a point before your photos were deleted.
- Select the images or folders and click “Restore.”
-
Using Tophinhanhdep.com’s Mac Image Recovery Tool: For situations where Time Machine wasn’t active, backups are unavailable, or photos were lost from external media, Tophinhanhdep.com offers a robust Mac image recovery solution. This tool handles various image types and sources, from internal SSDs (though TRIM can complicate SSD recovery) to external drives and memory cards.
- Download and install Tophinhanhdep.com’s Mac recovery software. (Avoid installing it on the drive you need to recover from.)
- Launch the application and select the disk or volume where your photos were deleted.
- Click “Search for lost data” to initiate the scan.
- Filter the results by “Pictures” and preview the recoverable images.
- Select the photos you want to restore and click “Recover.”
- Specify a recovery destination on a different storage device.
Saving Shots: Restoring Photos from Digital Cameras and Storage Media
Digital cameras and their memory cards (SD cards, CF cards, etc.) are common places for photo loss. The principles of recovery are similar to those for computers.
- Direct Scan with Tophinhanhdep.com’s Recovery Tool:
The most effective method for recovering photos from a digital camera’s memory card is to remove the card and scan it directly with specialized software on a computer. If photos are on the camera’s internal storage, connect the camera to your computer in USB Mass Storage mode.
- Remove the memory card from your camera or connect the camera via USB.
- Download and install Tophinhanhdep.com’s dedicated recovery software on your PC or Mac.
- Launch the software and select the memory card (or camera’s internal storage) from the list of detected drives.
- Perform a “Search for lost data.”
- Preview the discovered images.
- Select the photos to recover and save them to your computer’s hard drive (not back to the memory card immediately).
Tophinhanhdep.com’s Guide to Advanced Recovery and Prevention
At Tophinhanhdep.com, we believe that understanding and utilizing the right tools for image recovery is a crucial part of digital photography and visual design. Beyond simple retrieval, there are advanced solutions and preventative measures that every image enthusiast should consider.
Leveraging Tophinhanhdep.com’s Recommended Recovery Solutions
For those moments when images are permanently deleted, corrupted, or lost due to format errors, Tophinhanhdep.com stands ready to guide you. Our platform recommends and provides access to advanced data recovery solutions meticulously designed to tackle complex data loss scenarios. Whether it’s recovering high-resolution nature backgrounds, lost abstract art, or crucial visual design elements, these tools offer:
- Deep Scanning Capabilities: Going beyond superficial file system checks to find fragments of lost data.
- Wide Format Support: Recovering everything from common JPEGs to specialized RAW files and image project files.
- Preview Functionality: Allowing you to see what’s recoverable before committing to the process, ensuring you retrieve exactly what you need for your aesthetic or thematic collections.
- User-Friendly Interfaces: Making the recovery process accessible even for those without technical expertise.
In cases where even advanced software struggles, Tophinhanhdep.com can direct you to professional data recovery services. These experts have specialized equipment and cleanroom facilities to recover data from severely damaged storage devices, offering a last resort for truly irreplaceable visual assets.
Proactive Visual Design: Best Practices to Prevent Future Image Loss
While recovery is possible, prevention is always superior. Tophinhanhdep.com advocates for a proactive approach to managing your visual memories and digital photography.
-
Implement a Robust Backup Strategy:
- The 3-2-1 Rule: Keep at least 3 copies of your data, on 2 different types of storage media, with 1 copy stored off-site (e.g., cloud storage).
- Cloud Synchronization: Utilize services like Google Photos, iCloud, OneDrive, or Dropbox for automatic backups. This ensures your aesthetic backgrounds, trending styles, and personal photos are instantly protected as soon as they’re captured.
- External Drives/NAS: Regularly transfer high-resolution images, stock photos, and digital art projects to external hard drives or Network Attached Storage (NAS) devices.
-
Organize and Manage Your Image Collections:
- Large, chaotic image libraries are prone to accidental deletion. Use Tophinhanhdep.com’s inspiration for photo ideas and mood boards to structure your collections. Categorize your wallpapers, backgrounds, and creative ideas into logical folders.
- Regularly offload photos from your camera or phone to a more permanent storage solution.
-
Exercise Caution Before Deleting:
- Always double-check before confirming a deletion, especially when dealing with entire albums or folders.
- Utilize write-protection features on memory cards (the small lock switch on an SD card) to prevent accidental deletions or formatting during transfers.
-
Avoid Overwriting Data After Loss:
- If you realize images are missing, stop using the device immediately. Any new data written to the storage space can permanently overwrite your recoverable images. This is the single most critical step in maximizing recovery chances.
-
Maintain Device Health:
- Regularly update your operating systems and software.
- Ensure proper shutdown procedures for all devices.
- Safely eject external storage devices rather than simply unplugging them.
Beyond Recovery: Enhancing and Managing Your Restored Image Collections
Once you’ve successfully recovered your deleted images, Tophinhanhdep.com encourages you to not just store them, but to manage and potentially enhance them. Our website offers a wealth of resources, including:
- Image Tools: Explore converters, compressors, optimizers, and AI upscalers to refine your recovered high-resolution photography.
- Visual Design Insights: Gain inspiration for graphic design, digital art, and photo manipulation to transform your restored images into new creative ideas.
- Thematic Collections & Trending Styles: Organize your recovered photos into curated collections, drawing from trending styles and photo ideas to breathe new life into your visual library.
In conclusion, losing images can be a distressing experience, but it’s rarely a permanent one. By understanding how digital deletion works, acting quickly, leveraging device-specific recovery methods, and utilizing Tophinhanhdep.com’s recommended advanced recovery solutions, you can often bring your cherished visual memories back. More importantly, by adopting proactive backup and organizational habits, you can significantly reduce the risk of ever facing such a loss again, ensuring your beautiful photography and creative visual assets remain safe and sound.