Mastering iPhone to Computer Photo Transfers: Your Ultimate Guide for Tophinhanhdep.com

In an era where our iPhones have become powerful pocket cameras, capturing stunning high-resolution images of everything from breathtaking nature scenes to intimate aesthetic moments is second nature. However, the sheer volume of beautiful photography, digital art, and even simple daily snapshots can quickly fill up your device’s storage. Transferring these precious memories and creative assets from your iPhone to your computer isn’t just about freeing up space; it’s a vital step for archiving, advanced editing, creating magnificent wallpapers and backgrounds, and preparing images for various visual design projects. For enthusiasts and professionals alike, a computer offers the robust environment needed to truly polish and manage your collection, whether you’re converting formats, optimizing file sizes, or experimenting with photo manipulation.
At Tophinhanhdep.com, we understand the importance of preserving your visual stories and leveraging them for various creative endeavors. This comprehensive guide will walk you through multiple quick and efficient methods to transfer your photos from your iPhone to your Windows PC or Mac. Whether you prefer the convenience of wireless syncing or the reliability of a wired connection, we’ll ensure you can securely move your images, ready for digital photography enhancements, integration into mood boards, or use with Tophinhanhdep.com’s powerful image tools like AI upscalers and compressors.
Seamless Wireless Solutions: Transferring Photos Without Cables
Wireless transfer methods offer unparalleled convenience, allowing you to move photos without hunting for a cable. This approach is particularly useful for regular backups or when you’re on the go, as long as you have a stable Wi-Fi connection and your Apple ID credentials handy. These methods are perfect for keeping your collection organized and ready for any image inspiration or thematic collections you might curate on Tophinhanhdep.com.
![]()
Effortless Syncing with iCloud Photos
iCloud Photos provides a robust, automatic solution for keeping your entire photo and video library updated across all your Apple devices and available on your Windows PC. It seamlessly uploads all new photos and videos you take, ensuring they’re accessible for download whenever you need them. This means your high-resolution images, ready for graphic design or even becoming abstract art, are always within reach.
To enable this feature on your iPhone, navigate to Settings > Photos > iCloud Photos and ensure it’s toggled on. With this setting active, every time you capture a moment, that image will automatically upload to your iCloud Photo Library as long as your iPhone is connected to Wi-Fi.
The next step involves setting up your Windows computer to receive these synced photos. You’ll need to download and install the iCloud for Windows application from Apple’s official website. Once installed, launch the application and sign in using the same Apple ID you use on your iPhone. In the iCloud for Windows interface, make sure the Photos option is checked. Click the Options button next to Photos. Here, you can select iCloud Photo Library and enable “Download new photos and videos to my PC.” You also have the option to “Upload new photos and videos from my PC” if you wish to keep your iCloud Photo Library bidirectional. After clicking Done and then Apply, any new photos captured on your iPhone will automatically download to your PC whenever you have an internet connection.

To access these automatically downloaded photos, open File Explorer (or Windows Explorer on older Windows 7 systems) on your computer. On the left sidebar, click This PC (or Computer), then double-click on iCloud Photos. Inside, you’ll find a Downloads folder where your synced images are neatly organized, often by date, making it easy to find that perfect background or element for photo manipulation.
Manual Downloads Through iCloud.com
For those who prefer a more selective approach or don’t want to install additional software on their computer, iCloud.com offers a web-based portal to your photo library. This method allows you to browse your entire collection and manually download specific images or albums, ideal for selecting a few key pieces for a visual design project or a mood board.
First, ensure your iPhone is set to upload photos to iCloud by going to Settings > Photos > iCloud Photos and enabling it, as described above. Once your photos are in iCloud, open any web browser on your computer and go to iCloud.com. Sign in with your Apple ID and password. If you have two-factor authentication enabled, you’ll receive a prompt on your iPhone to allow the sign-in, which will provide a six-digit verification code to enter on your computer. You can choose to trust your computer to avoid this verification process in the future.
After logging in, click on the Photos icon. You’ll be presented with your entire photo library, organized much like the Photos app on your iPhone. You can navigate through media types or specific albums displayed in the left-hand sidebar. Select the photos you wish to download by clicking on them. To select multiple, hold down the Ctrl key (Windows) or Command key (Mac) while clicking, or drag a selection box. Once your selection is complete, click the Download icon (a cloud with a downward arrow) located at the top of the screen. Your selected photos will then begin downloading to your computer’s default Downloads folder, ready for editing, converting, or incorporating into your digital art.
Direct Wired Connectivity: Importing Photos via USB Cable
For fast, reliable transfers, especially when dealing with a large volume of high-resolution images or if your internet connection is unreliable, a physical USB cable remains an excellent choice. This method ensures maximum transfer speed and data integrity, crucial for preserving the quality of your beautiful photography and digital captures. It’s particularly favored by those engaging in intensive digital photography and professional image editing.
Leveraging the Windows Photos App
For users on Windows 8, 10, or 11, the built-in Windows Photos app offers a straightforward way to import images directly from your iPhone. This application is pre-installed and designed for easy management of your photo collection. Before starting, it’s a good practice to ensure you have the latest version of iTunes installed on your PC, as it often provides the necessary drivers for your computer to properly recognize your iPhone. You can check for iTunes updates by opening iTunes, clicking Help, and then Check for Updates.
Begin by connecting your iPhone to your PC using its USB charger cable. Your iPhone may display a prompt asking if you “Trust This Computer” or “Allow access to photos and videos.” Confirm by tapping Trust or Allow and enter your device passcode if requested.
Next, open the Photos app on your Windows PC. You can find it through the Start menu. Once the app is open, look for the Import option. On Windows 10/11, this is typically in the top-right corner of the app window. On Windows 8, you might need to right-click anywhere within the app to reveal the Import option. Click Import, then choose “From a USB device.”
The Photos app will scan your iPhone and display all detected photos and videos. You can then select the specific items you wish to import. The app usually offers options to import all new items or select specific ones. After making your selection, click Import (or Continue then Import on some Windows 10 versions). The transfer process will begin, and once completed, your photos will be stored in your PC’s Pictures folder, automatically organized into subfolders by date, ready for you to explore image inspiration or apply advanced editing styles.
Manual Transfer with File Explorer
The classic File Explorer (or Windows Explorer on Windows 7) provides a direct, no-frills method for copying photos from your iPhone. This method requires no additional software beyond what’s built into Windows and gives you granular control over which files you transfer. It’s ideal for quickly grabbing specific files or entire folders without relying on an application interface.
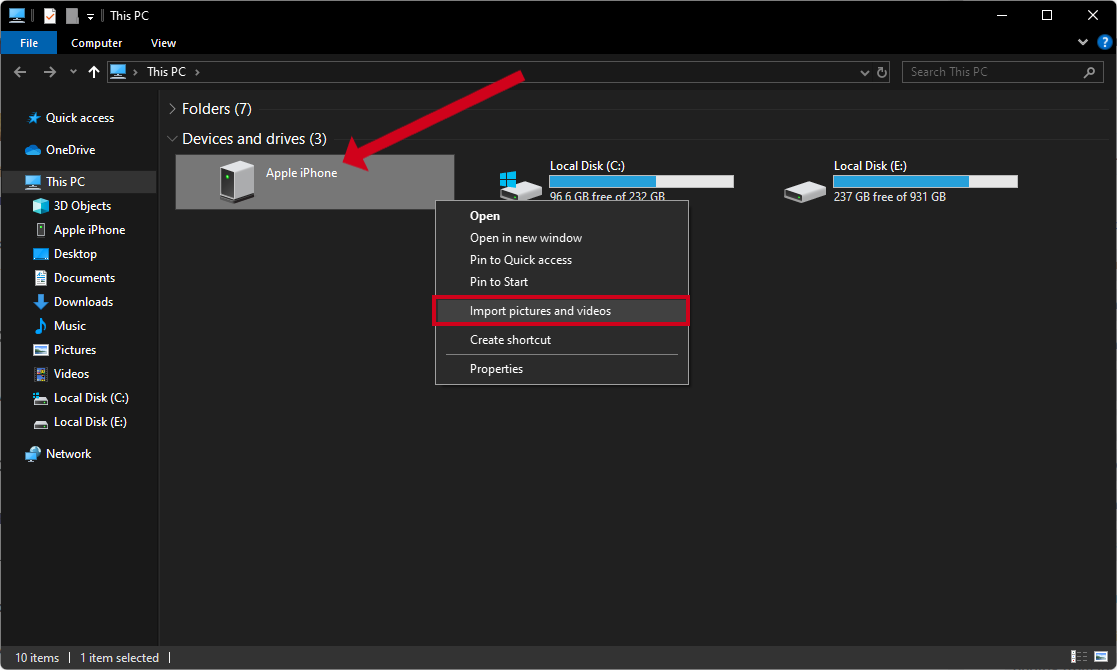
Connect your iPhone to your PC with a USB cable. Again, respond affirmatively to any trust or access prompts on your iPhone and enter your passcode. Once connected, open File Explorer on your Windows 8, 10, or 11 PC (press Windows Key + E). You should see your iPhone listed under This PC as “Apple iPhone.” Double-click on it.
For Windows 7 users, open Windows Explorer and look for “Apple iPhone” under Computer. After double-clicking “Apple iPhone,” navigate to the Internal Storage folder, and then the DCIM folder. Inside DCIM, you’ll find one or more folders, often named sequentially like “100APPLE,” “101APPLE,” “100CLOUD,” etc. These folders contain your photos and videos.
You can now manually copy files:
- To copy all photos: Select all folders within DCIM (click and drag or use
Ctrl+A), right-click, and choose Copy. Then, navigate to your computer’s Pictures folder (or any other desired location), right-click on a blank space, and select Paste. - To copy specific photos: Double-click into a “100APPLE” folder to view thumbnails of your images. Select the photos you want, right-click and Copy, then paste them into your chosen folder on the PC.
This direct method is excellent for maintaining control over file organization and quickly accessing raw images for digital photography projects or creating personalized sad/emotional or aesthetic collections.
Streamlined Transfers for Older Windows Versions (AutoPlay)
For users still operating on Windows 7, the AutoPlay feature provides a built-in solution for importing photos from your iPhone. While not as feature-rich as the Photos app in newer Windows versions, it gets the job done efficiently for camera roll images.
Connect your iPhone to your Windows 7 computer via USB. As with other wired methods, authorize the connection on your iPhone by trusting the computer and entering your passcode. Once the iPhone is recognized, an AutoPlay window should automatically pop up on your screen.
In the AutoPlay window, select the option “Import Pictures and Videos using Windows.” This action will prompt the system to scan your iPhone’s camera roll. Your photos will then be imported and automatically saved into your computer’s Pictures folder, typically organized into subfolders based on the date of import. This simple process helps ensure that even on older systems, your treasured memories and potential visual design elements are backed up and accessible.
Optimizing Your Photo Workflow: Tools, Formats, and Best Practices
Transferring photos is just the beginning. To truly manage and leverage your iPhone imagery for graphic design, stock photos, or personal collections, understanding file formats and utilizing specialized tools is key. Tophinhanhdep.com is dedicated to helping you get the most out of your digital photography.
Harnessing Third-Party Transfer Software
While built-in Windows and Apple solutions are convenient, specialized third-party software offers enhanced features, greater flexibility, and often faster transfer speeds, especially for large libraries. Such tools typically provide a more intuitive interface, advanced filtering options, and capabilities beyond simple photo transfer, like managing other media types.
Many reputable applications are available that integrate smoothly with both Windows and Mac operating systems. These often allow you to:
- Selectively transfer photos and videos, maintaining original album structures.
- Convert HEIC to JPG during transfer, ensuring compatibility (more on HEIC below).
- Backup entire photo libraries with a single click.
- Preview images before transferring, making it easier to pick specific shots for a mood board or a thematic collection.
- Manage photos by date, month, year, or custom folders.
While Tophinhanhdep.com doesn’t endorse specific external products, we encourage you to explore solutions that offer features like high-speed transfer, HEIC conversion, and selective backup to streamline your workflow. Always ensure you download software from official sources to protect your computer. These tools can turn the task of moving photos into an opportunity to organize and prepare your images for anything from an AI upscaler to an in-depth photo manipulation project, elevating your digital photography experience.
Managing HEIC and JPEG Formats
Modern iPhones (running iOS 11 and later) often capture photos in the High Efficiency Image File (HEIF) format, with files ending in .HEIC. This format is superior in terms of storage efficiency, meaning your photos take up less space on your iPhone without sacrificing quality. However, HEIC is not universally compatible, especially with older Windows PCs or some image editing software. This can be a significant hurdle when you’re trying to work with your high-resolution photography on a computer.
To ensure your images are accessible and editable on your PC, you have a couple of options:
- Automatic Conversion on iPhone: Your iPhone can automatically convert HEIC photos to the more widely compatible JPEG format when you transfer them to a computer. To enable this, go to Settings > Photos on your iPhone. Scroll down to the “Transfer To Mac Or PC” section and select “Automatic.” This ensures that any images you transfer via USB cable will be converted to JPEG on the fly, making them immediately usable on your Windows PC.
- Using Third-Party Converters: If you’ve already transferred HEIC files or need to convert them selectively, Tophinhanhdep.com offers insights into various Image Tools, including dedicated HEIC converters. Many third-party transfer software options also include built-in HEIC to JPG conversion capabilities during the transfer process, saving you an extra step. This is invaluable for maintaining a flexible workflow, whether you’re working on aesthetic backgrounds or detailed digital art.
Understanding and managing these file formats is crucial for a smooth digital photography workflow, ensuring your images—from abstract designs to sad/emotional captures—are always ready for use and further enhancements with Tophinhanhdep.com’s resources.
By mastering these transfer techniques, you ensure that your iPhone’s camera roll isn’t just a temporary holding place, but a rich source of content for all your visual projects. Whether it’s for creating stunning wallpapers, compiling image inspiration, or preparing stock photos for professional use, Tophinhanhdep.com is your go-to resource for optimizing every aspect of your image journey. From high-resolution captures to refined digital art, we empower you to transform your visual ideas into reality.