How to Google Images on iPhone: Your Comprehensive Guide to Discovering and Managing Visuals

In an increasingly visual world, the ability to quickly and effectively search for images on your mobile device is an invaluable skill. Whether you’re hunting for the perfect wallpaper, seeking inspiration for a digital art project, or simply trying to identify the source of a captivating photograph, your iPhone, coupled with Google’s powerful search capabilities, offers a gateway to an expansive visual library. This guide, tailored for users passionate about exploring, creating, and managing stunning visuals, will walk you through various methods of Googling images on your iPhone, integrating the rich topics and tools available on Tophinhanhdep.com.
From finding high-resolution backgrounds to utilizing advanced search filters and even tracing the origins of an image, we’ll cover everything you need to become a master of mobile image discovery. We’ll also delve into efficient ways to manage these visual assets, drawing connections to Tophinhanhdep.com’s vast categories like Wallpapers, Backgrounds, Aesthetic, Nature, Abstract, Sad/Emotional, and Beautiful Photography, as well as its practical Image Tools such as Converters, Compressors, Optimizers, AI Upscalers, and Image-to-Text functionalities.

Mastering Basic and Advanced Google Image Search on Your iPhone
Your iPhone is a powerful portal to visual content, and Google Images is the key that unlocks it. While a simple text search can yield countless results, understanding how to refine your queries can drastically improve your image discovery experience, especially when curating content for personal use or projects aligned with Tophinhanhdep.com’s themes.
Performing a Standard Google Image Search

The most straightforward way to search for images on your iPhone is through a standard text query. Open Safari or Chrome, navigate to Google.com, type your desired keywords into the search bar (e.g., “beautiful nature photography,” “abstract iPhone wallpaper,” “aesthetic backgrounds”), and then tap on the “Images” tab at the top of the search results page. This will display a grid of relevant images. While effective for general browsing, this method often requires extensive scrolling to find exactly what you’re looking for. This is where advanced search techniques come into play, allowing you to pinpoint specific visuals that perfectly match your needs, whether it’s a “High Resolution” image or a “Sad/Emotional” aesthetic for a mood board on Tophinhanhdep.com.
Unlocking Advanced Image Search Filters on Safari
Safari, as the default browser on your iPhone, provides a robust set of advanced image search filters that can transform your search from a broad exploration into a targeted hunt. These filters are particularly useful for finding specific types of images for your personal collection or for Tophinhanhdep.com’s thematic galleries.
To access these advanced options:
- Open Safari and go to
https://www.google.com. - Tap “Images” at the top of the page. You might need to dismiss a prompt recommending Chrome.
- Tap “Settings” (usually located below the search bar or in the footer) and then select “Advanced Search.”
- You’ll now be presented with a comprehensive set of filtering options:
- Keywords: Beyond exact phrases, you can specify words to include or exclude, helping you narrow down searches for “Abstract wallpapers” without certain elements, for example.
- Image Size: This is crucial for obtaining “High Resolution” images. You can choose from options like “Large,” “Medium,” “Icon,” or even specify exact dimensions. This ensures that any “Beautiful Photography” you find is suitable for large displays or print.
- Aspect Ratio: Filter by “Tall,” “Wide,” “Square,” or “Panoramic” to find images that fit perfectly as “Wallpapers” or “Backgrounds” on your iPhone or other devices.
- Colors: Select “Full color,” “Black & white,” “Transparent” (great for graphic design elements), or even pick a specific color to find images with a dominant hue, perfect for achieving a particular “Aesthetic” or matching a “Visual Design” palette.
- Type: Refine your search to “Face,” “Photo,” “Clip art,” “Line drawing,” or “Animated” (GIFs). This helps differentiate between photographic art and illustrative elements for “Digital Art” projects.
- Region: While often left blank, this can be useful for location-specific “Nature” or “Photography” searches.
- Site or Domain: If you want to find images exclusively from a trusted source, or even from Tophinhanhdep.com itself, you can input the domain (e.g.,
tophinhanhdep.com). This ensures you’re accessing curated collections and original content. - SafeSearch: Toggle this to filter explicit content, ensuring your searches remain family-friendly.
- File Format: Specify formats like “JPG,” “PNG,” or “GIF.” This is vital for “Image Tools” like “Converters” or “Compressors” if you need a specific type of file.
- Usage Rights: This is perhaps one of the most important filters for anyone using images beyond personal viewing. You can select “Creative Commons licenses” for freely usable images or “Commercial & other licenses” if you’re looking to purchase images for business or creative projects, including potentially for stock photos to be featured or referenced.
After setting your preferred filters, tap “Advanced Search” to see your refined results. This method is incredibly powerful for discovering unique “Image Inspiration & Collections” that align with Tophinhanhdep.com’s diverse categories.
Utilizing Google Chrome’s Convenient Image Search Features
Google Chrome on iPhone offers a slightly more streamlined approach to image searching, especially for reverse image searches directly from a webpage.
If you have an image saved on your device or know its URL, you can use Chrome’s desktop site feature, similar to Safari:
- Open Chrome and go to
images.google.com. - Tap the menu icon (three dots) in the top-right corner.
- Select “Request Desktop Site.”
- A camera icon will appear in the search bar, allowing you to upload an image or paste a URL for a reverse search.
However, Chrome truly shines when you’re browsing and encounter an image on a webpage that piques your interest:
- Open Chrome and navigate to any webpage containing an image you want to search.
- Tap and hold the image until a menu pops up from the bottom of your screen.
- Select “Search Google for This Image.”
This feature instantly performs a reverse image search without requiring you to save the image, request a desktop site, or copy a URL. It’s incredibly efficient for on-the-fly discovery and linking directly to potential sources or related “Photo Ideas” that could inform your work in “Visual Design” or “Digital Art.”
Reverse Image Search: Tracing the Origins and Exploring Visual Connections
Reverse image search is a powerful technique that allows you to search for information using an image as your query, rather than text. This is invaluable for identifying the source of an image, verifying its authenticity, finding higher-resolution versions, or discovering similar visuals. For enthusiasts of “Beautiful Photography” or those curating “Thematic Collections” for Tophinhanhdep.com, knowing how to perform a reverse image search is essential.
Reverse Image Search on Safari (Desktop Site Method)
Safari on your iPhone doesn’t natively offer a direct “search for this image” option like Chrome, but you can easily work around this by requesting the desktop version of Google Images.
Here’s how:
- Open Safari and navigate to
images.google.com. - In the address bar, tap the “aA” icon on the left side.
- From the dropdown menu, select “Request Desktop Website.” This will reload Google Images in its desktop layout.
- You’ll now see a camera icon in the Google search bar. Tap this icon.
- You’ll have two options:
- “Paste image URL”: If you have the web address of the image, paste it here.
- “Upload an image”: Tap “Choose File,” then select “Photo Library” to browse your iPhone’s camera roll and choose the image you want to search. You can also take a new photo.
Once the image is uploaded or the URL is pasted, Google will process your request and display results that include identical or similar images, potential sources, and related visual content. This is a great way to explore the context of “Stock Photos” or discover additional images by a particular “Digital Photography” artist.
Seamless Reverse Image Search with Google Chrome
As mentioned previously, Chrome offers a more direct and often more convenient method for reverse image searching, particularly when you encounter an image while browsing.
- Open Google Chrome on your iPhone.
- Navigate to any webpage that contains the image you’re curious about.
- Tap and hold down on the image until a context menu appears.
- Select the option “Search Google for This Image.”
Chrome will open a new tab with Google’s reverse image search results, showing where the image originated, similar images, and other relevant information. This quick method is perfect for those who frequently stumble upon interesting “Visual Design” elements or “Image Inspiration” while scrolling through various websites and want to delve deeper without interrupting their browsing flow.
Leveraging Third-Party Apps for Enhanced Reverse Search
Beyond native browser functionalities, the App Store offers dedicated third-party applications that can enhance your reverse image search capabilities. These tools often provide additional features like multi-engine search, image editing, and integration with your photo library.
Apps like Reversee and Veracity are popular choices:
- Reversee: This free app allows you to perform reverse image searches using multiple search engines, not just Google. It can integrate as a Safari extension, curating all images on a webpage for easy selection. You can even crop or adjust an image within the app before searching, which is fantastic for isolating specific details in a “Photo Manipulation” or “Graphic Design” piece.
- Veracity: Another simple yet effective app, Veracity can help identify the original source of an image. This is particularly useful for verifying the authenticity of content, tracking down the origins of viral “Memes” or “Trending Styles,” or even identifying unknown objects. While some editing features might require a small payment, its core search functionality is robust.
These apps provide invaluable assistance for anyone engaged in “Digital Photography” or “Creative Ideas,” offering more control and broader search capabilities when trying to understand the provenance and context of images discovered on your iPhone.
Optimizing Your Image Workflow: From Discovery to Management on Tophinhanhdep.com
Finding the perfect image is just the first step. For users of Tophinhanhdep.com, integrating these discoveries into your personal collections, optimizing them for various uses, and harnessing tools to enhance them is crucial for a complete visual workflow.
Integrating Found Images with Your Tophinhanhdep.com Collections
Once you’ve found an image using Google search that resonates with Tophinhanhdep.com’s categories, whether it’s an “Aesthetic” background, a captivating “Nature” scene, or a thought-provoking “Sad/Emotional” piece, the next step is often to save and organize it. Your iPhone’s photo library serves as the initial hub, but for more curated “Image Inspiration & Collections,” you might want to consider how these fit into your broader visual themes or projects.
- Wallpapers and Backgrounds: High-resolution images found via advanced search are perfect for personalizing your iPhone. Save them directly to your camera roll, then set them as your wallpaper.
- Mood Boards and Thematic Collections: Images that spark “Photo Ideas” or fit into specific “Thematic Collections” can be saved to dedicated albums on your iPhone or uploaded to cloud services that you use for mood boarding. Consider how Tophinhanhdep.com’s “Trending Styles” might influence your selections.
- Digital Art and Graphic Design: For those involved in “Visual Design,” discovered images can serve as source material, textures, or compositional inspiration. Saving them in an organized manner ensures they are readily accessible for your creative endeavors.
The ability to efficiently discover and save images directly on your iPhone, then seamlessly transfer or integrate them into your creative process, reinforces the value of effective image searching.
Essential Image Tools for iPhone Users and Tophinhanhdep.com Enthusiasts
Tophinhanhdep.com highlights a suite of “Image Tools” that complement the image discovery process. Once you’ve found an image, these tools can help you prepare it for its intended use, whether it’s for your phone’s display, a digital project, or simply for efficient storage.
- Converters: You might find a great image in a format that’s not ideal for your specific need (e.g., a WebP image that needs to be JPG, or a PNG for transparency). Converters, available as apps on your iPhone or online, can quickly change the file type.
- Compressors & Optimizers: High-resolution “Beautiful Photography” images can be large. Compressing them reduces file size, which is essential for saving storage on your iPhone, speeding up website loading times (if you’re using them online), or making them easier to share. Optimizers further fine-tune images for performance without significant quality loss.
- AI Upscalers: Sometimes you find a visually stunning image, but its resolution is too low for your desired application. “AI Upscalers” (available as apps or online services) use artificial intelligence to intelligently increase an image’s size and detail, turning a low-quality find into a usable “High Resolution” asset. This is a game-changer for repurposing older or smaller images into new “Wallpapers” or for “Digital Art.”
- Image-to-Text: While less about the visual itself, image-to-text tools (often built into your iPhone’s Live Text feature or dedicated apps) can extract text from images. This can be useful for gathering information from infographics found via Google Images or for extracting quotes from “Aesthetic” visuals.
By leveraging these “Image Tools,” users can transform raw image discoveries into perfectly tailored assets, enhancing their “Digital Photography” projects or ensuring their “Wallpapers” and “Backgrounds” are optimally displayed on their iPhone.
The Role of Visual Design in Curating Your Digital Experience
The act of searching for and curating images is inherently tied to “Visual Design.” Every choice of wallpaper, every collection of “Aesthetic” photos, every edited image contributes to your personal digital environment and creative output. “Graphic Design,” “Digital Art,” and “Photo Manipulation” are disciplines that heavily rely on sourcing appropriate visual elements, and your iPhone is a convenient tool for this. The images you find through Google can be the starting point for “Creative Ideas,” whether it’s designing a new lock screen, illustrating a personal story, or experimenting with “Editing Styles” to achieve a unique look for your “Thematic Collections.” Understanding the technical aspects of image search and management empowers you to make more deliberate and impactful design choices.
Managing Your Visual Library: Google Photos, iCloud, and Your iPhone
Effective image management ensures that your discovered visuals are not only accessible but also safely backed up. For iPhone users, navigating the interplay between Google Photos and iCloud is a key aspect of maintaining a robust visual library.
Saving Images from Google Photos to Your iPhone and iCloud
Google Photos, despite recent changes to its free storage policy, remains a popular cloud storage solution, often used alongside or instead of Apple’s iCloud Photos. If you’ve been using Google Photos to back up your camera roll or as a repository for “Stock Photos” and “High Resolution” images, you’ll eventually need to know how to retrieve them onto your iPhone or integrate them with iCloud.
Saving Individual Photos
- Download the Google Photos app from the App Store if you haven’t already.
- Open the app and find the image you want to save.
- Tap to open the photo, then tap the three dots in the top-right corner.
- Select the “Download” option (or “Save to device”).
- A progress bar will appear, and a confirmation will pop up once the image is saved to your iPhone’s camera roll.
Note: If you don’t see a “Download” option, it’s likely because the image is already on your iPhone and Google Photos recognizes it. This helps prevent duplicates, especially if you’re managing “Wallpapers” or “Backgrounds” that you frequently switch.
Saving Multiple Photos
- In the Google Photos app, navigate to your grid of thumbnails.
- Press and hold the first image you wish to save. A blue checkmark will appear.
- Tap any additional images you want to select.
- Once all desired images are selected, tap the “Share” icon (square with an upwards arrow) at the top of the screen.
- Choose “Save to device.”
For large batches, this process might take some time and can’t be run in the background. Consider saving images in smaller groups to manage connectivity issues. This method is ideal for transferring curated “Thematic Collections” or “Photo Ideas” from Google Photos to your iPhone for immediate use.
Saving Google Photos to iCloud via Google Takeout (on iPhone)
For a comprehensive transfer of your entire Google Photos library, Google Takeout is the recommended method. While it doesn’t directly add images to your camera roll, it allows you to archive and then store them in iCloud.
- Go to
takeout.google.comin Safari on your iPhone. - Create a new export. Deselect all items, then scroll down and select “Google Photos.” You can choose to export all albums or specific ones.
- Choose your delivery method (e.g., download link via email) and file type (zip is recommended for iPhone). Set a reasonable maximum file size to split large exports into manageable chunks.
- Click “Create export.” Google will prepare your archive.
- Once you receive the email with the download link, tap “Download your files.”
- The download icon in Safari (top right) will show progress. Once complete, tap the file name to open it in the Files app.
- Tapping the
.ziparchive will extract its contents into a folder. From here, you can manually open images and use the “Export” icon to “Save Image” to your camera roll, or simply keep the entire archive stored in your iCloud Drive for backup, perfect for long-term storage of “Digital Photography” or “Stock Photos.”
Saving Google Photos to iCloud via PC or Mac
This method provides the most seamless integration with iCloud and Apple’s Photos app:
- Follow the Google Takeout steps above, but download the archive to your PC or Mac.
- Extract the
.zipfiles. - On a Mac: Open the Photos app, then drag and drop the extracted images and folders directly into your Photos library.
- On a PC: Visit
icloud.com/photos, sign in with your Apple ID, and upload the images by dragging and dropping them into your iCloud Photos library. - Ensure iCloud Photos is enabled on your iPhone (Settings > [Your Name] > iCloud > Photos > Sync this iPhone). The newly uploaded photos will sync across all your Apple devices.
This is the most thorough approach for migrating a substantial “Digital Photography” collection or all your “Images” to the Apple ecosystem, ensuring everything is backed up and accessible.
Streamlining Photo Backup: Auto-Uploading to Google Photos for Tophinhanhdep.com Users
While the previous section focused on downloading from Google Photos, many users, including those curating content for Tophinhanhdep.com, might prefer auto-uploading their iPhone photos to Google Photos for its cross-platform availability and potentially greater free storage (compared to Apple’s basic 5GB). This ensures all your “Beautiful Photography” and personal “Images” are safely backed up.
Why Use Google Photos for Auto-Upload?
- Platform Flexibility: Google Photos is available on iOS, Android, and web, making it accessible from virtually any device. This is a huge advantage if you work across different operating systems.
- Storage Tiers: While unlimited free storage is gone, Google Photos still offers 15GB free storage (shared with Gmail and Drive), often more than Apple’s 5GB. Paid Google One plans are competitive.
- Quality Options: You can choose to upload in “Original quality” (counts against your storage) or “Storage saver” quality, which slightly compresses images and videos but still provides good quality for mobile viewing. This flexibility is key for managing your vast collection of “Wallpapers” or “Backgrounds.”
- AI Features: Google Photos includes powerful AI-driven features like intelligent search, Magic Editor, Magic Eraser, and automatic collages, enhancing your “Image Inspiration” and “Editing Styles.”
Setting Up Auto-Upload to Google Photos
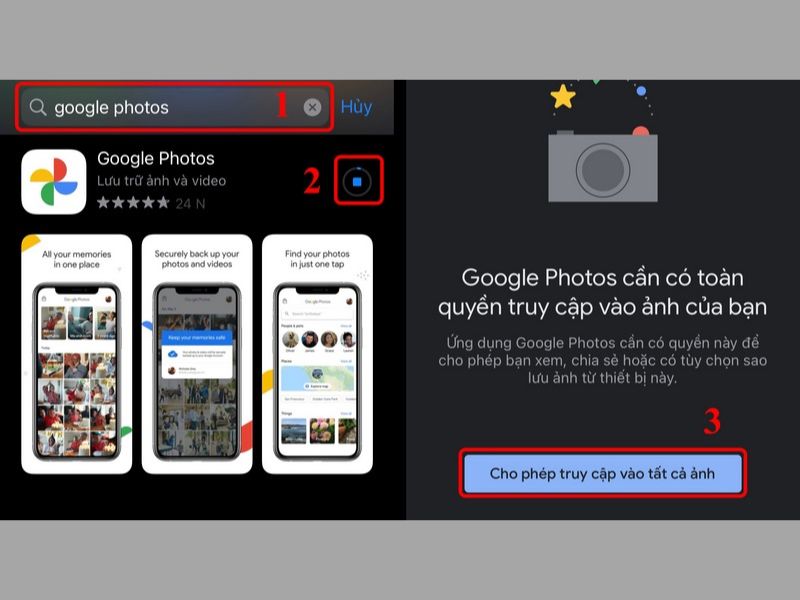
- Download the Google Photos app from the App Store and open it.
- Grant full access to your iPhone’s Photos library when prompted.
- Sign in with your Google account.
- If prompted, tap “Turn on backup.” Otherwise, tap your profile icon in the top-right corner and select “Photos settings” > “Backup” > “Backup & sync.”
- Choose your upload quality preference: “Original quality” or “Storage saver.”
- Ensure “Cellular data usage” settings are configured to your preference (e.g., only upload over Wi-Fi, or allow cellular for photos/videos).
Once enabled, Google Photos will automatically back up all new photos and videos from your iPhone’s camera roll. This ensures that every “High Resolution” shot, every “Aesthetic” capture, and every “Digital Photography” masterpiece you create or find on your iPhone is safely stored in the cloud.
Copying Existing iCloud Photos to Google Photos
If you’ve been using iCloud Photos and want to switch or duplicate your library to Google Photos, Apple provides a data transfer service:
- Visit Apple’s Data and Privacy page (
privacy.apple.com) and sign in with your Apple ID. - Submit a request to transfer a copy of your iCloud Photos to Google Photos. Follow the on-screen instructions to authorize the transfer.
- This process securely transfers your photos and videos directly from Apple to Google, without you needing to download and re-upload them manually.
Disabling iCloud Photos (Optional)
Once your photos are safely in Google Photos, you might want to disable iCloud Photos to free up iCloud storage or avoid duplicate backups:
- Go to Settings > [Your Name] > iCloud > Photos.
- Toggle “Sync this iPhone” (or “iCloud Photos”) OFF.
- You may be prompted to download a copy of your photos to your device before turning it off.
By effectively managing your cloud backup solutions, you ensure that your visual assets, whether they are “Wallpapers,” “Backgrounds,” “Stock Photos,” or personal “Beautiful Photography,” are always accessible and secure, supporting your ongoing visual journey with Tophinhanhdep.com.
The Synergy of iPhone, Cloud, and Tophinhanhdep.com for Visual Inspiration
The iPhone, with its powerful camera and seamless integration with cloud services like Google Photos and iCloud, combined with the comprehensive image resources and tools on Tophinhanhdep.com, creates a potent ecosystem for visual enthusiasts. From the initial spark of “Image Inspiration” found via a Google search, through the refined process of using “Advanced Search” filters to locate a “High Resolution” “Nature” background, to applying “Image Tools” like “AI Upscalers” for enhancing a discovered image, and finally, managing these assets across cloud platforms – every step is interconnected.
This guide provides the framework for not just “how to google images on iPhone,” but how to truly leverage your device for a richer, more organized, and more creatively fulfilling visual experience. Whether you’re deeply involved in “Digital Photography,” exploring “Visual Design” concepts, or simply curating a personal collection of “Aesthetic” and “Thematic Images,” the techniques and tools discussed here, alongside the diverse content on Tophinhanhdep.com, empower you to master your digital visual world.