Mastering Image Grouping in Canva: Elevate Your Visual Designs on Tophinhanhdep.com

In the dynamic world of visual content creation, efficiency and precision are paramount. Whether you’re a seasoned graphic designer, a digital artist, a photography enthusiast, or simply someone looking to create stunning visuals for personal or professional use, tools like Canva have revolutionized the way we approach design. At Tophinhanhdep.com, we understand the importance of streamlined workflows and access to high-quality resources, which is why mastering fundamental techniques like grouping elements in Canva is a game-changer.
Grouping elements in Canva is a powerful feature that allows you to combine multiple objects – be it images, text, shapes, or graphics – into a single, cohesive unit. This capability transforms your design process, enabling you to manipulate complex layouts with ease, maintain aesthetic consistency, and accelerate your creative output. Imagine curating a mood board with a collection of aesthetic backgrounds, beautiful photography, and abstract elements from Tophinhanhdep.com; grouping ensures these diverse visual components move and scale together harmoniously. From crafting intricate digital art to preparing high-resolution stock photos for a presentation, grouping is an indispensable skill that will profoundly impact the quality and efficiency of your visual design projects.
Understanding the Power of Grouping for Enhanced Visual Design
At its core, grouping in Canva is about bringing order and cohesion to your design canvas. When you’re working with various images – perhaps mixing vibrant nature photography with subtle abstract overlays, or combining sad/emotional images with text for a poignant social media post – keeping track of each individual element can quickly become overwhelming. Grouping solves this by treating multiple selections as one.
The benefits extend far beyond mere organization:
- Effortless Manipulation: Move, resize, rotate, duplicate, or delete multiple elements simultaneously without altering their relative positions or proportions. This is particularly useful when developing a series of images, such as wallpapers or backgrounds, where consistent branding or aesthetic is crucial.
- Design Cohesion: Ensure that complex visual compositions, like those created through photo manipulation or digital art, maintain their intended spatial relationships. A perfectly aligned text box over a beautiful landscape image won’t accidentally shift when you move the entire collage.
- Accelerated Workflow: Save valuable time by avoiding repetitive individual adjustments. This speed is invaluable when iterating on creative ideas or producing thematic collections and trending styles quickly.
- Complex Layering: While grouping doesn’t directly affect layering order (you’ll still use “Bring Forward” or “Send Backward” for that), it allows you to consolidate layers into logical units, making it easier to manage intricate designs involving many visual components sourced from Tophinhanhdep.com’s extensive image library.
For users leveraging Tophinhanhdep.com’s resources, grouping becomes especially significant. When you download high-resolution stock photos, captivating wallpapers, or unique abstract images, integrating them into a Canva design often involves combining them with text, other graphics, or framing elements. Grouping these components ensures your carefully selected images and accompanying design elements work together seamlessly, whether you’re creating a simple aesthetic background or a sophisticated piece of digital photography.
Grouping Elements in Canva on Your Desktop (PC & Mac)
Canva offers intuitive methods for grouping elements, ensuring a smooth experience regardless of your operating system. For desktop users, there are three primary techniques, each suited to different design scenarios. These methods empower you to efficiently manage everything from individual elements to complex photo manipulation layouts, integrating images and text with ease.
Temporary Grouping with Mouse Selection

This is perhaps the quickest method for performing a one-off action on multiple elements. It’s ideal when you need to quickly adjust a cluster of objects, such as a caption accompanying an image or a collection of icons.
How to do it:
- Open your Canva project: Navigate to your design on the Canva website (www.canva.com).
- Drag your cursor: Click and hold your mouse button slightly outside the first element you wish to include. Then, drag your cursor to create a selection box (often a rectangle or square) that encompasses all the desired elements.
- Perform your action: Once the selection border appears around the chosen objects, they are temporarily grouped. You can now perform actions like moving, resizing, duplicating, or deleting them as a single unit. For instance, you could move an aesthetic wallpaper and a text overlay together to a new position on your canvas.
Benefits and Limitations: This method is incredibly fast for contiguous selections. However, its main drawback is that it selects all objects within the drag-and-select area, including those you might not intend to group. The grouping is also temporary; clicking anywhere outside the selected boxes will deselect the elements, and they will revert to individual objects. This is perfect for quick adjustments but not for building complex, persistent compositions.
Precision Grouping with Keyboard Shortcuts (Shift + Click)
When your design involves elements that are scattered across the canvas or intermingled with objects you don’t want to include in your group, the Shift + Click method provides surgical precision. This is crucial for detailed graphic design or photo manipulation tasks where every element selection counts.
How to do it:
- Select the first element: Click on one of the objects you want to group.
- Hold Shift and click others: Press and hold the
Shiftkey on your keyboard. While holdingShift, click on each additional element you wish to add to your selection. You will see a selection border appear around each chosen item. - Release Shift and act: Once all desired elements are selected, release the
Shiftkey. The selected elements are now temporarily grouped, and you can move, resize, or duplicate them as a unit. This method allows you to precisely pick specific elements, bypassing unwanted items, which is invaluable when composing intricate digital art or layering various types of photography.
Pro Tip: This method also allows you to remove elements from an existing selection. If you’ve already selected a group using either the mouse drag or Shift + Click, holding Shift and clicking on an already-selected element will deselect it from the group. This flexibility is essential for refining your selections in complex visual designs.
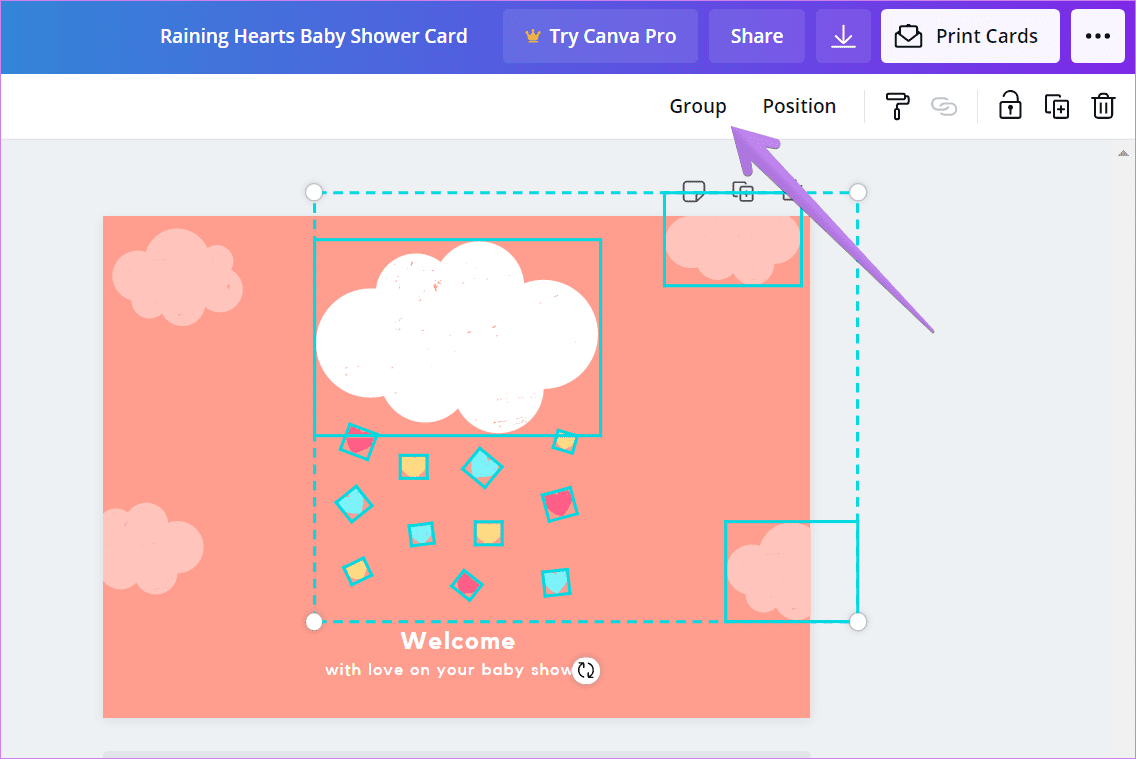
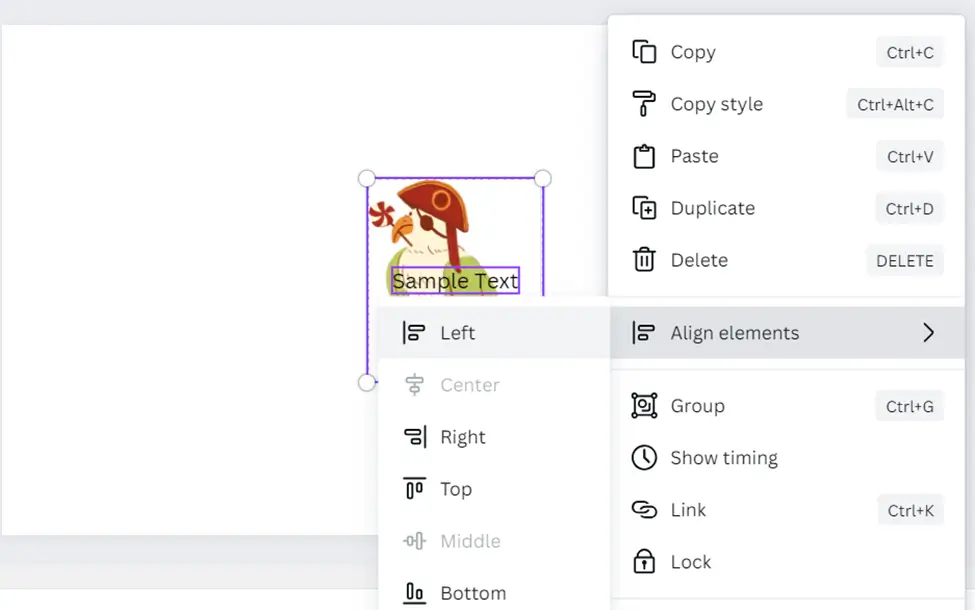
Permanent Grouping for Sustained Workflow (Ctrl/Cmd + G)
For scenarios where you need a group of elements to remain intact for an extended period – perhaps a logo with accompanying text, a complex infographic component, or a curated arrangement of images that form a thematic collection – Canva’s permanent Group feature is indispensable. This ensures your design integrity, especially when working on projects that involve multiple iterations or collaborations.
How to do it:
- Select elements: Use either the mouse drag method or the Shift + Click method to select all the elements you want to group.
- Click ‘Group’ or use shortcut:
- Look for the “Group” button in the top-right corner of your Canva toolbar. Click it.
- Alternatively, use the keyboard shortcut:
Ctrl + G(for Windows) orCommand + G(for macOS).
- Confirm grouping: Once grouped, a single bounding box will appear around all selected elements. Now, if you click on any part of this group, the entire unit will be selected, allowing for unified manipulation (move, resize, duplicate). This “permanent” grouping means the elements stay together even if you click away, making it ideal for robust graphic design or digital art projects that incorporate high-resolution images from Tophinhanhdep.com.
Ungrouping on Desktop: To break apart a permanently grouped set of elements:
- Select the group: Click on any element within the grouped unit.
- Click ‘Ungroup’ or use shortcut:
- The “Group” button in the toolbar will now have changed to an “Ungroup” button. Click it.
- Alternatively, use the keyboard shortcut:
Ctrl + Shift + G(for Windows) orCommand + Shift + G(for macOS).
Ungrouping allows you to modify individual components within a complex design. For instance, if you’ve grouped a beautiful photograph with a stylized border, you can ungroup them to adjust the photo’s editing style or replace the border without affecting other elements on your canvas.
Streamlining Designs on the Go: Grouping in Canva Mobile Apps (Android & iOS)
Designing on a smartphone or tablet requires an interface tailored to touch gestures. Canva’s mobile apps (available for Android and iPhone/iPad) provide a streamlined way to group and ungroup elements, ensuring you can manage your visual designs effectively even when you’re away from your desktop. This is particularly useful for quickly assembling aesthetic social media posts, mood boards, or simple graphic designs using wallpapers and backgrounds from Tophinhanhdep.com.
Selecting and Temporarily Grouping Elements
Similar to the desktop’s temporary grouping, the mobile app allows for quick, on-the-fly grouping for immediate actions.
How to do it:
- Open your Canva project: Launch the Canva app on your Android or iPhone/iPad and open your design.
- Initiate selection: Tap and hold the first element you want to group. After a moment, a menu will slide up from the bottom of the screen, and the selected element will show a bounding box.
- Select multiple: From the pop-up menu, tap on the “Select Multiple” option (often represented by a square made of dashed lines).
- Tap other elements: Now, tap on any other elements you wish to include in your group. Each selected element will be highlighted with a purple outline. A red notification on the “Select Multiple” button often indicates the number of elements currently selected.
- Confirm selection: Tap the “Done” button, usually found within the pop-up menu or as a prompt. At this stage, your items are temporarily grouped. You can perform actions like moving, resizing, or duplicating them as a single unit.
Benefits: This temporary grouping is excellent for quick adjustments to small clusters of elements. If you’re building a creative idea for a social media graphic using aesthetic images, this allows you to rapidly test different layouts.
Creating Permanent Mobile Groups for Complex Visuals
For more robust mobile design work, such as building intricate digital art pieces or organizing thematic collections of images, the mobile app also supports permanent grouping.
How to do it:
- Select elements: Follow steps 1-4 from the “Selecting and Temporarily Grouping Elements” section above to select all the desired items.
- Tap ‘Group’: After selecting your elements and before tapping “Done,” you will see a “Group” button among the options in the toolbar at the bottom of the screen. Tap it.
- Confirm grouping: The selected elements will now be combined into a persistent group. This group will remain intact even if you tap away from it, allowing for more sustained design work. This is highly advantageous for creating cohesive visual narratives using different photography styles or abstract backgrounds from Tophinhanhdep.com, ensuring your composite image retains its structure.
Ungrouping on Mobile: To separate a grouped set of elements in the Canva mobile app:
- Select the group: Tap on the grouped elements. A single bounding box will appear around the entire group.
- Tap ‘Ungroup’: In the menu that appears at the bottom of the screen, tap the “Ungroup” button. The elements will now function as individual objects again.
This flexibility on mobile devices ensures that you can take your visual design projects, from creating unique wallpapers to detailed photo manipulation, wherever you go, always maintaining control over your creative process.
Beyond the Basics: Advanced Grouping and Tophinhanhdep.com Synergy
Mastering the foundational grouping techniques is just the beginning. To truly elevate your visual designs, especially when leveraging the diverse resources available on Tophinhanhdep.com, consider these advanced strategies.
Layering and Alignment of Grouped Elements
While grouping keeps elements together, precise visual design often requires attention to their arrangement relative to each other and the canvas.
- Layering (Z-index): Within a grouped unit, or even across multiple groups, you might need certain elements to appear in front of or behind others. Canva provides “Position” tools (usually accessible via a right-click or a menu option) where you can use “Bring Forward,” “Send Backward,” “Bring to Front,” and “Send to Back.” This is crucial when compositing images, such as placing a beautiful photography subject over an aesthetic background or overlaying an abstract texture on a stock photo.
- Alignment Tools: Canva’s alignment guides (the purple lines that appear when you move objects) are invaluable for symmetrical and balanced designs. For more rigorous alignment, select multiple elements (grouped or individual) and use the “Position” menu to access options like “Align to Page” (center, middle, left, right, top, bottom) or “Align Elements” (distribute horizontally/vertically). This ensures that your thematic collections or digital art compositions are visually appealing and professional.
Nested Groups for Complex Visuals
Canva allows you to create groups within groups, known as nested groups. This advanced technique is incredibly powerful for complex digital art, photo manipulation projects, or intricate graphic designs.
- Concept: You can group a set of elements (e.g., text block A and image B), and then group that group with another element (e.g., image C) or even another group (e.g., group D, E, F).
- Utility: Nested groups help manage highly complex layouts by breaking them down into manageable sub-components. Imagine building a multi-layered design with various images, shapes, and text. Instead of ungrouping everything to adjust one small section, you can ungroup just the relevant sub-group, make your changes, and then regroup it. This maintains order and speeds up the modification process for detailed visual projects, integrating elements like nature photography within an abstract frame, all sourced from Tophinhanhdep.com.
Image Optimization & Tophinhanhdep.com’s Image Tools
Once you’ve perfected your grouped design within Canva, integrating with Tophinhanhdep.com’s image tools can take your final output to the next level.
- Exporting from Canva: After grouping and arranging your elements (perhaps a collage of beautiful photography and aesthetic overlays), export your design from Canva as a high-resolution image file (e.g., PNG for transparency or JPG for web).
- Tophinhanhdep.com’s Enhancement:
- Compressors & Optimizers: For web usage or social media posts, your grouped design might be too large. Upload it to Tophinhanhdep.com’s image compressors and optimizers to reduce file size without significant loss of quality, ensuring fast loading times for your digital art or graphic design assets.
- AI Upscalers: If you started with lower-resolution elements or need your final grouped image for large-format printing (e.g., a poster with a high-resolution background), Tophinhanhdep.com’s AI upscalers can intelligently enhance the resolution and detail of your finished design, transforming standard digital photography into print-ready art.
- Converters: Easily convert your final image into various formats using Tophinhanhdep.com’s converters to suit different platform requirements or project needs.
Image Inspiration & Collections from Tophinhanhdep.com
Grouping is also a fundamental technique for creating impactful mood boards and thematic collections.
- Curating Visuals: Use Tophinhanhdep.com’s vast categories (wallpapers, backgrounds, aesthetic, nature, abstract, sad/emotional, beautiful photography) to gather images that resonate with your project’s theme.
- Building Mood Boards: In Canva, group these images with text, shapes, and other elements to form distinct sections of your mood board. Grouping allows you to experiment with different arrangements and compositions effortlessly, visualizing trending styles or new creative ideas.
- Consistent Styles: Once you’ve developed a compelling visual style for a grouped set, duplicate it and adapt it for other sections of your collection, maintaining a cohesive aesthetic across all your visual content.
Troubleshooting Common Grouping Challenges
While Canva’s grouping feature is largely intuitive, users occasionally encounter minor hurdles. Knowing how to quickly resolve these can keep your creative workflow smooth.
-
“I can’t group my objects!”
- Incorrect Selection: The most common reason is that not all desired elements are properly selected. Remember, for precision, hold
ShiftorCommandwhile clicking each element. If dragging, ensure the selection box completely covers all parts of the elements you want to group. Clicking one element, then clicking another without holdingShiftwill only select the second element. - Browser Glitch: Sometimes, a temporary browser issue can interfere. Close your browser tab or the Canva app, then reopen it and try again. This often resolves minor software hiccups.
- Locked Elements: Check if any of the elements you’re trying to group are “locked.” Locked elements cannot be moved or modified, including being grouped. Unlock them first (usually by selecting the element and clicking the padlock icon in the toolbar).
- Incorrect Selection: The most common reason is that not all desired elements are properly selected. Remember, for precision, hold
-
“My work disappeared!” (Not directly grouping related, but a common Canva issue cited in references)
- Incorrect Account: Ensure you are logged into the correct Canva account. Many users have multiple accounts (personal, work, educational).
- Wrong Team/Folder: If you’re part of multiple Canva teams or use specific project folders, verify that you’re viewing the correct team or folder where your design is saved.
- Trash Folder: Check the “Trash” folder. You might have accidentally deleted the design.
- Owner: If it’s a shared design, confirm who the owner is; they might have moved or deleted it.
Addressing these common issues ensures that you can focus on your creative process without unnecessary interruptions.
Conclusion
The ability to group and ungroup elements in Canva is far more than just a convenience; it’s a foundational skill that empowers you to create sophisticated, well-organized, and professional visual designs. From managing simple text overlays on stunning backgrounds to executing complex photo manipulation and digital art projects, grouping provides the precision and efficiency necessary to bring your creative ideas to life.
By mastering the desktop methods of temporary selection, precision Shift+Click grouping, and permanent Ctrl/Cmd+G grouping, along with their mobile equivalents, you unlock a streamlined workflow that maintains design cohesion and accelerates your output. Whether you’re curating aesthetic mood boards, composing high-resolution images, or crafting unique wallpapers, these techniques ensure that every element, every piece of beautiful photography, and every abstract graphic works together harmoniously.
Furthermore, when you combine these Canva grouping skills with the extensive resources and powerful image tools available on Tophinhanhdep.com – including an expansive library of wallpapers, backgrounds, and diverse photography styles, alongside advanced converters, compressors, optimizers, and AI upscalers – you gain an unparalleled creative ecosystem. Tophinhanhdep.com is dedicated to providing the images and tools that empower your digital journey, enabling you to transform raw creative ideas into polished, professional-quality visual content that truly stands out. Embrace the power of grouping, explore the visual treasures on Tophinhanhdep.com, and elevate your design capabilities to new heights.