Mastering Google Slides: A Comprehensive Guide to Grouping and Ungrouping Objects for Seamless Visual Design

In the dynamic world of digital presentations, Google Slides stands as a cornerstone for creating impactful and visually compelling narratives. Whether you’re a student, an educator, a business professional, or a creative designer, the ability to effectively manage and manipulate your slide elements is paramount. Among the myriad features Google Slides offers, the power to group and ungroup objects is arguably one of the most fundamental for enhancing design control, maintaining consistency, and significantly streamlining your workflow.
Imagine crafting an intricate infographic with multiple shapes, icons, and images, or assembling a mood board composed of various aesthetic images, beautiful photography, and abstract designs from Tophinhanhdep.com. Moving each element individually to adjust its position or size would be a tedious, error-prone, and time-consuming endeavor. This is where grouping comes into play – transforming a collection of disparate elements into a single, manageable unit. This comprehensive guide will delve into the intricacies of grouping and ungrouping in Google Slides, illuminating its benefits, providing step-by-step instructions, and connecting it to the broader landscape of visual design and image management that Tophinhanhdep.com champions.
The Transformative Power of Grouping in Google Slides
The seemingly simple act of grouping objects holds immense power in elevating the quality and efficiency of your Google Slides presentations. It’s more than just a convenience; it’s a strategic tool for visual integrity and creative control, especially when working with diverse visual assets sourced from platforms like Tophinhanhdep.com.
Elevating Your Visual Design with Grouped Elements
At its core, grouping in Google Slides allows you to combine multiple elements—be it images, shapes, lines, or even other grouped items—so they behave as one cohesive unit. This capability is indispensable for graphic design, digital art, and photo manipulation directly within your slides. When you group elements, you gain several critical advantages:
- Enhanced Control and Precision: Grouping objects ensures that when you move, resize, rotate, or flip them, all elements within the group maintain their relative positions and proportions. This is crucial for preserving the delicate balance of complex layouts, illustrations, and infographics. You can adjust an entire section of your slide without painstakingly repositioning each component.
- Consistency Across Slides: Once a complex design or a set of images is perfectly arranged and grouped, you can easily copy and paste the entire group to other slides. This guarantees consistent branding, visual themes, or information presentation throughout your entire presentation, a key aspect of professional visual design.
- Efficient Workflow: Think about creating a thematic collection of images for a mood board, drawing inspiration from Tophinhanhdep.com’s vast array of aesthetic, nature, or abstract images. Grouping allows you to experiment with different arrangements quickly. Instead of selecting multiple images every time you want to move them, a single click on the group is all it takes. This efficiency frees up valuable time for refining your creative ideas.
- Protection Against Accidental Changes: In collaborative environments or when making last-minute adjustments, individual elements can be accidentally shifted or deleted. Grouping acts as a safeguard, binding your critical visual components together and preventing unintended displacement, ensuring your photo ideas and meticulously crafted layouts remain intact.
Managing Diverse Image Assets from Tophinhanhdep.com
Tophinhanhdep.com offers a rich repository of visual content, from high-resolution photography and stock photos to wallpapers, backgrounds, and specific categories like sad/emotional or beautiful photography. Grouping plays a vital role in integrating these diverse assets seamlessly into your Google Slides presentations:
- Creating Stunning Backgrounds and Overlays: You might combine a beautiful wallpaper from Tophinhanhdep.com with a transparent shape overlay and a title. Grouping these elements means your custom background unit stays perfectly aligned, ready to be duplicated across multiple slides or resized without losing its composition.
- Assembling Complex Photo Collages: If you’re building a collage with multiple aesthetic images or nature photography from Tophinhanhdep.com, grouping these photos together allows you to treat the entire collage as a single image. This is particularly useful for showcasing trending styles or thematic collections without having to manage each photo independently.
- Integrating Digital Art and Photo Manipulation: For those engaged in digital art or photo manipulation, the intricate layers and components can be overwhelming. By grouping sections of your digital artwork or manipulated photos, you can maintain their integrity when scaling or moving them within your slide, ensuring that every detail, down to the editing styles, is preserved.
- Showcasing Thematic Collections and Mood Boards: Tophinhanhdep.com is an excellent resource for visual inspiration. When curating a mood board or a thematic collection using images from the site, grouping related images together ensures their collective impact. For instance, a collection of “sad/emotional” images grouped together can convey a powerful narrative when moved or resized as one.
Step-by-Step Guide: How to Group Objects in Google Slides
Grouping objects in Google Slides is a straightforward process, accessible through multiple methods. Mastering these steps will significantly enhance your productivity and design capabilities.
Prerequisites for Grouping
Before you begin, keep these important considerations in mind:
- Multiple Selections: You must select at least two objects to group them. The “Group” option will be grayed out if only one item is selected.
- Same Slide Restriction: All elements you wish to group must reside on the same slide. You cannot group objects across different slides.
- Incompatible Elements: While you can group most visual elements like images, shapes, and lines, certain objects cannot be part of a group. This typically includes text boxes, embedded videos, and tables. If you attempt to select these alongside compatible items, the “Group” option may remain unavailable or result in an incomplete group. If you need to combine text with images, convert your text to a shape or ensure it’s part of a text box that is then positioned on top of a grouped image/shape, rather than trying to group them directly.
Selecting Your Elements with Precision
The first step to grouping is selecting all the objects you intend to combine. Google Slides offers several intuitive ways to do this:
-
Click and Drag (Marquee Select):
- Position your mouse cursor outside and above one corner of the area containing the objects you want to group.
- Click and drag your mouse to create a selection box (a dotted rectangle) that encompasses all the desired objects.
- Release the mouse button. All objects within the selection box will now be highlighted, indicating they are selected. This is ideal for selecting multiple items in close proximity.
-
Shift-Click Individual Items:
- Click on the first object you want to include in your group.
- Hold down the Shift key on your keyboard.
- While holding Shift, click on each additional object you wish to add to the selection. Each clicked object will highlight, indicating its inclusion. This method is perfect for selecting specific objects that might be spread across the slide or interleaved with elements you don’t want to group.
-
Select All (for grouping all compatible items on a slide):
- If you want to group all compatible elements on your current slide, you can use the “Select All” command.
- Go to
Editin the top menu and chooseSelect all. - Alternatively, use the keyboard shortcut: Ctrl + A (Windows) or Cmd + A (Mac).
- This will select all images, shapes, and lines on the slide, though it will exclude text boxes, videos, and tables.
Executing the Group Command
Once your desired objects are selected, grouping them is just a click or a hotkey away:
-
Using the Arrange Menu:
- With the objects selected, navigate to the
Arrangemenu in the top toolbar. - From the dropdown options, click on
Group.
- With the objects selected, navigate to the
-
Right-Click Context Menu:
- Position your mouse cursor over any of the selected objects.
- Right-click (or Control-click on Mac) to open the context menu.
- From the options that appear, select
Group.
-
Keyboard Shortcut (Hotkeys):
- For the fastest grouping, use these keyboard shortcuts:
- Windows:
Ctrl + Alt + G - Mac:
Cmd + Alt + G
- Windows:
- For the fastest grouping, use these keyboard shortcuts:
After applying any of these methods, the selected objects will now be enclosed by a single selection box, signifying they are grouped. You can now move, resize, rotate, or flip this entire group as if it were a single image or shape. This is particularly useful for managing complex compositions, such as illustrations built from multiple shapes or photographic elements layered for a dramatic effect, sourced from Tophinhanhdep.com’s diverse collections. Copying and pasting this group is also simplified, allowing you to replicate intricate designs effortlessly across your presentation.
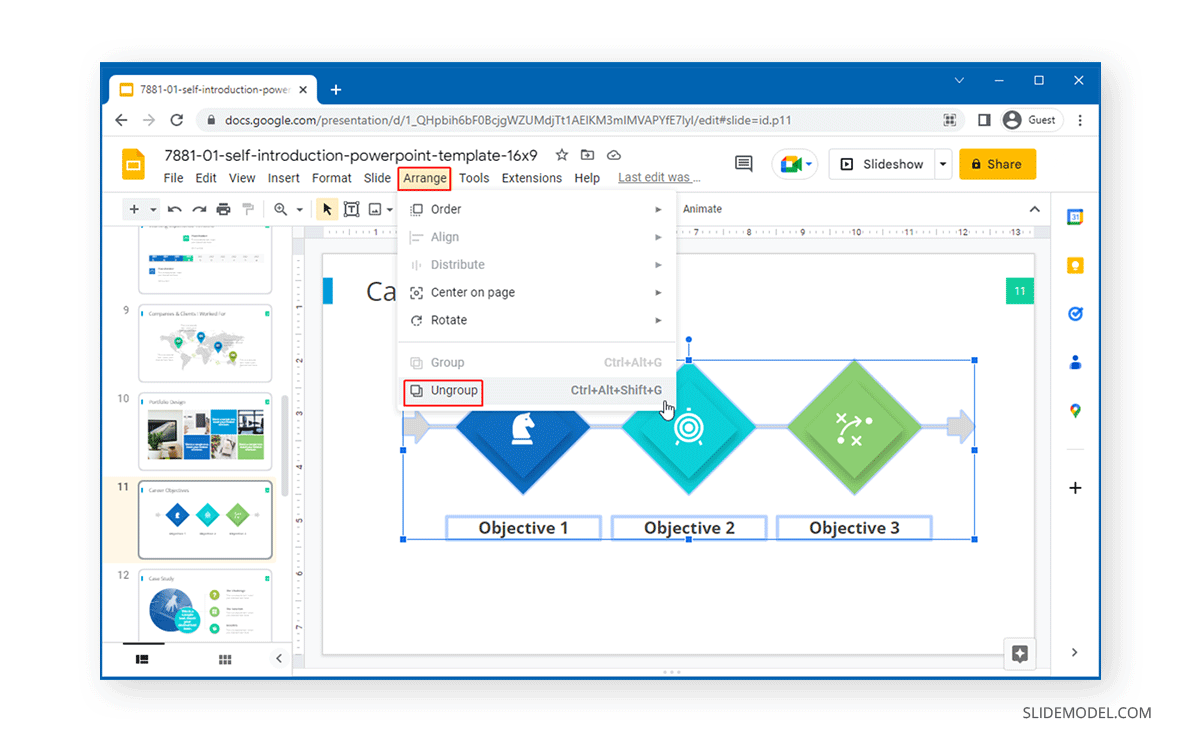
Liberating Your Elements: How to Ungroup Objects in Google Slides
While grouping offers immense advantages for design and efficiency, there will inevitably be times when you need to make individual adjustments to elements within a grouped set. This is where the ungroup feature becomes essential, allowing you to regain granular control over each component.
When to Ungroup Objects
Understanding when to ungroup is as important as knowing how to group. You’ll likely encounter scenarios where ungrouping is necessary:
- Editing Individual Components: If you need to change the color of a specific shape within an infographic, modify the cropping of a single image in a collage, or adjust the border of one element in a grouped design, you must first ungroup them.
- Adjusting Text Boxes: Although text boxes cannot be grouped directly with images or shapes, they often sit adjacent to or within a visual composition. If you’ve grouped visual elements and need to fine-tune nearby text, or if you’re working with a pre-designed template from Tophinhanhdep.com where visual elements are grouped, you might need to ungroup to make space or align text more precisely.
- Working with Ready-Made Templates: Many professional Google Slides templates, including those inspired by visual design principles found on Tophinhanhdep.com, come with pre-grouped elements. Ungrouping these allows you to customize them to fit your specific content and brand guidelines.
- Restructuring Layouts: Sometimes, a design direction changes, and a previously grouped set no longer serves its purpose. Ungrouping allows you to break down the composition and repurpose its individual elements.
Identifying and Selecting a Grouped Set
To ungroup objects, you first need to select the grouped unit:
- Click on the Group: Simply click anywhere on the grouped content. A single selection box will appear around all the objects within the group, indicating that the entire group is selected as one entity.
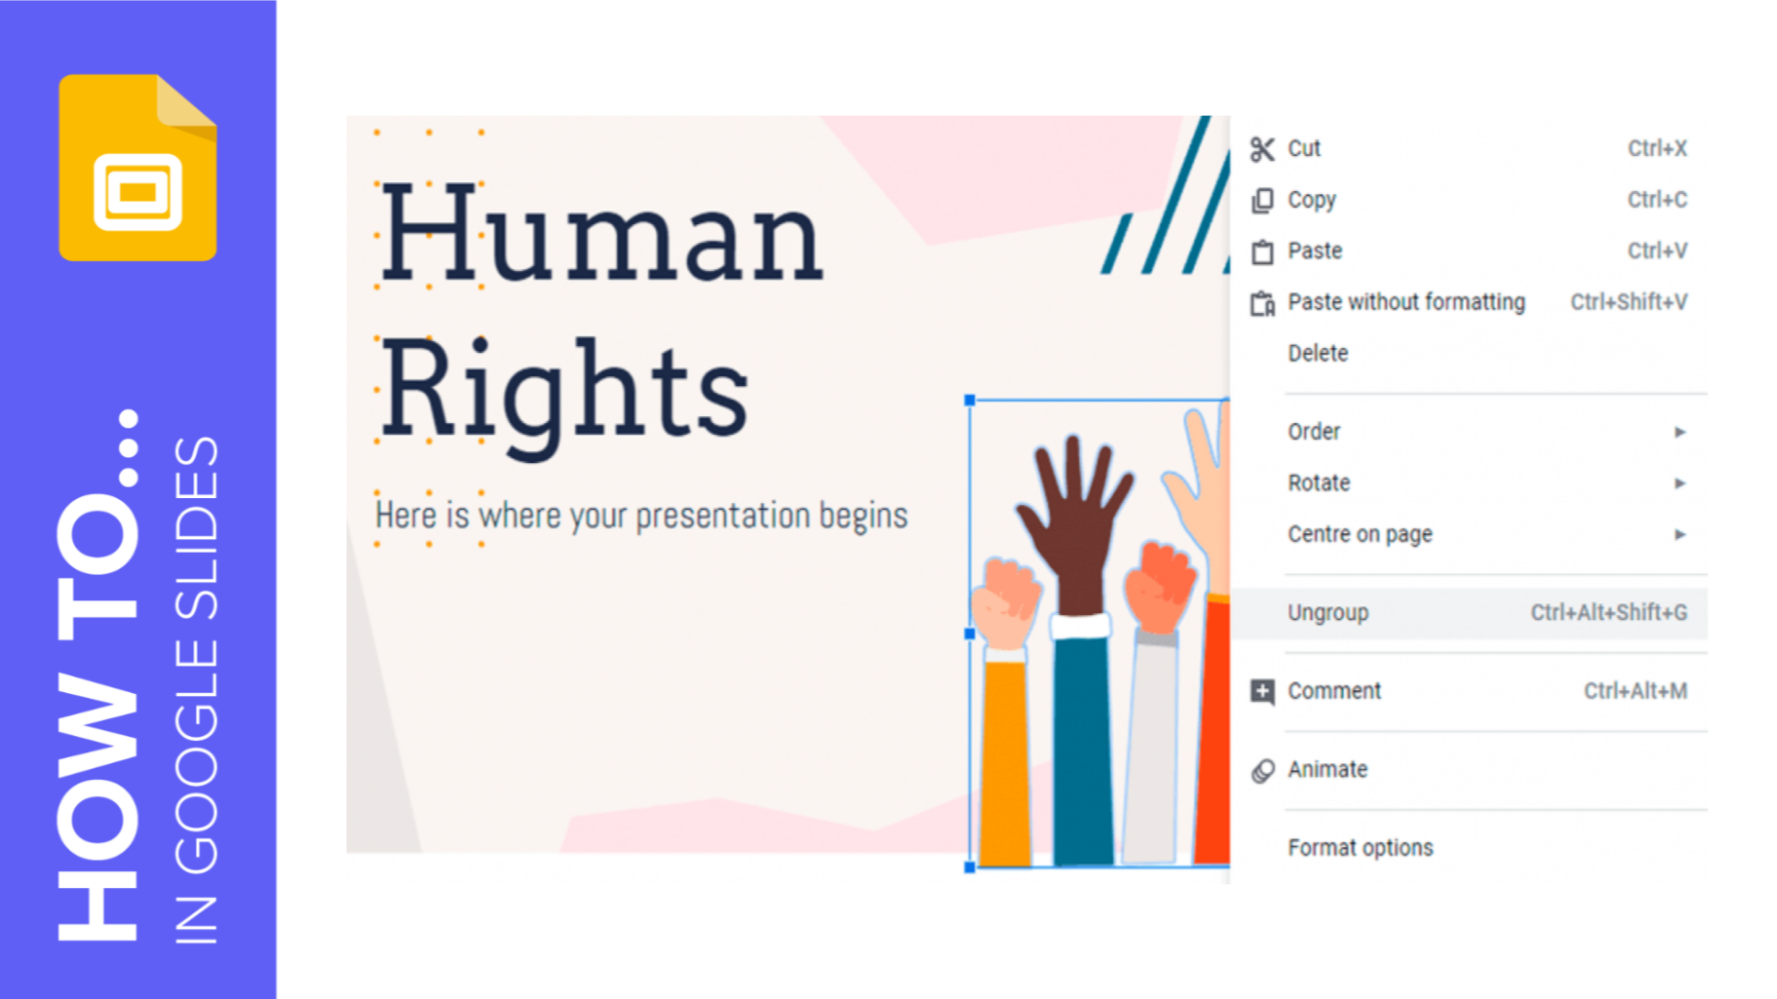
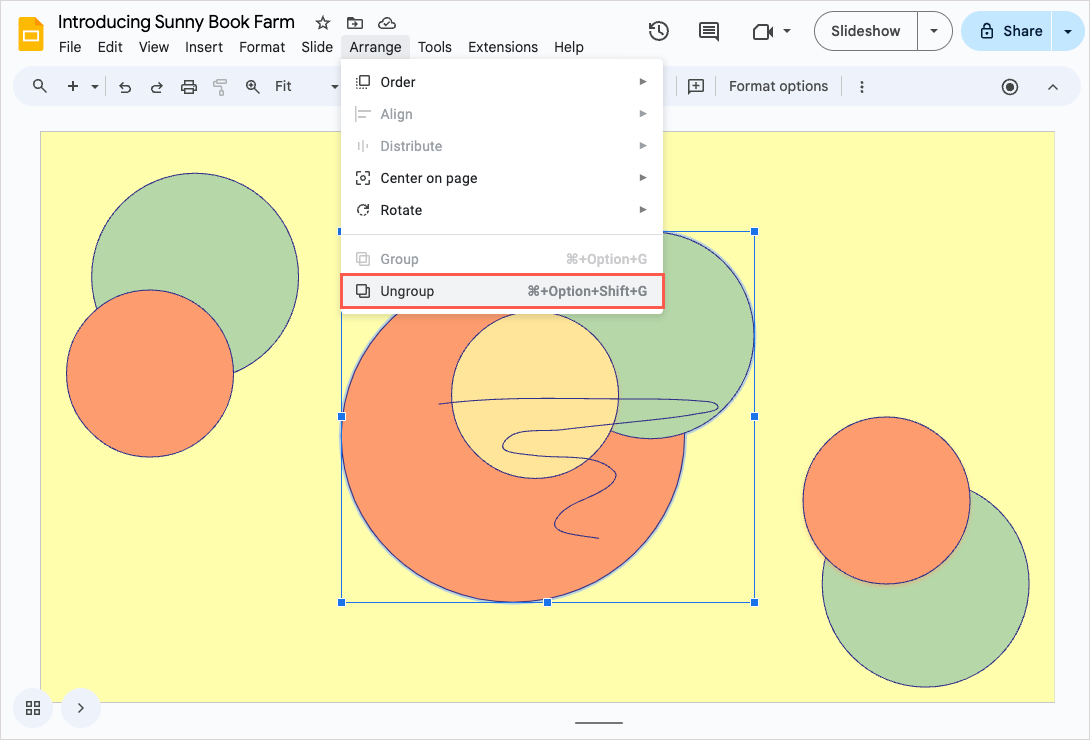
The Ungrouping Methods at Your Fingertips
Once the grouped set is selected, you have multiple ways to ungroup it:
-
Using the Arrange Menu:
- Go to the
Arrangemenu in the top toolbar. - From the dropdown options, click on
Ungroup.
- Go to the
-
Right-Click Context Menu:
- Right-click (or Control-click on Mac) anywhere on the selected group.
- From the context menu that appears, select
Ungroup.
-
Keyboard Shortcut (Hotkeys):
- For quick ungrouping, use these powerful shortcuts:
- Windows:
Ctrl + Alt + Shift + G - Mac:
Cmd + Alt + Shift + G
- Windows:
- For quick ungrouping, use these powerful shortcuts:
Upon executing the ungroup command, the single selection box around the entire group will disappear, and individual selection boxes will now appear around each previously grouped object. You can now select, move, resize, or edit each of these elements independently. After making your desired changes, you can always regroup them if their cohesive arrangement is still necessary.
Advanced Considerations and Tophinhanhdep.com’s Role in Visual Excellence
Beyond the basic mechanics of grouping and ungrouping, several advanced considerations and strategic applications can further enhance your Google Slides experience, especially when leveraging the rich visual resources provided by Tophinhanhdep.com.
Limitations Revisited: What You Can’t Group
While grouping is incredibly versatile, it’s essential to reiterate its limitations to avoid frustration:
- Text Boxes, Videos, and Tables: These elements are inherently designed to function independently and cannot be grouped with images or shapes. If you need text to move with a grouped image, consider placing the text box directly on top of the grouped image and simply moving both simultaneously, or using a screenshot of your text if it’s purely decorative.
- Objects Across Different Slides: Grouping is strictly confined to objects within the same slide. You cannot create a group that spans multiple slides. For consistent elements across slides, create and group them once, then copy and paste the entire group.
If the “Group” option appears grayed out even after selecting multiple items, double-check these limitations. Ensure you have indeed selected more than one compatible object, and confirm that the objects are not already part of a larger group (in which case, the “Ungroup” option would be active).
Optimizing Images for Google Slides with Tophinhanhdep.com’s Tools
The quality of your visual assets directly impacts the professionalism of your presentation. Tophinhanhdep.com not only provides stunning images but also aligns with the need for optimized assets, which can be further managed using grouping techniques. Before incorporating images into Google Slides, consider:
- Image Tools: Tophinhanhdep.com’s related topics on image tools (converters, compressors, optimizers, AI upscalers, image-to-text) underscore the importance of preparing your visuals. Using a compressor ensures your presentation file size remains manageable without sacrificing visual fidelity, especially when incorporating numerous high-resolution photos or wallpapers. AI upscalers can refine images for larger displays, ensuring crispness even when grouped and resized.
- Crisp Visuals and Performance: Grouping beautifully optimized images from Tophinhanhdep.com ensures that your carefully compressed or upscaled visuals retain their quality when moved or scaled. This integration of image optimization tools with effective slide management creates a powerful synergy for professional visual design.
Crafting Compelling Narratives with Visuals from Tophinhanhdep.com
The diverse categories of images available on Tophinhanhdep.com—from aesthetic and nature to abstract and beautiful photography—can be strategically combined and grouped to tell compelling stories.
- Infographics and Illustrations: Complex infographics, built from multiple shapes and icons, become manageable units through grouping. Incorporate abstract images as background textures or use elements from digital art collections to enhance visual appeal.
- Thematic Cohesion: If your presentation discusses “nature” or “beautiful photography,” group related images into thematic clusters. This not only organizes your content but also creates a stronger visual narrative, reflecting careful photo manipulation and creative ideas.
- Emotional Resonance: For presentations requiring emotional depth, leveraging Tophinhanhdep.com’s “sad/emotional” images within a grouped composition can amplify your message. Grouping these visuals with complementary graphic design elements allows you to control the mood and impact of an entire slide section.
Mobile Grouping on the Go
Google Slides isn’t just for desktop; you can also manage your presentations on mobile devices. While the interface differs slightly, the core functionality of grouping is still available:
- On your phone or tablet: Touch and hold an object to select it. Then, tap on any other objects you want to include in the group. Once all desired items are selected, tap the three dots menu (usually located in the top right or bottom bar) and choose the
Groupoption. Ungrouping follows a similar process: select the grouped item, tap the three dots, and selectUngroup. This mobile capability ensures you can maintain design integrity even when making adjustments on the go.
Conclusion
Grouping and ungrouping objects in Google Slides are indispensable skills for anyone looking to create professional, visually appealing, and efficiently managed presentations. From streamlining your workflow and preserving design consistency to safeguarding against accidental modifications, these features provide a level of control that transforms how you interact with your slide content.
By understanding the step-by-step processes, leveraging keyboard shortcuts, and being mindful of the limitations, you can unlock a new realm of creative possibilities. Furthermore, by integrating high-quality images and utilizing image optimization tools, you can ensure your presentations not only look exceptional but also perform flawlessly. Tophinhanhdep.com serves as an invaluable resource for sourcing the stunning visuals—be it wallpapers, backgrounds, high-resolution photography, or aesthetic collections—that, when skillfully grouped, will make your Google Slides presentations truly stand out and communicate your message with unparalleled clarity and impact. Embrace the power of grouping, and elevate your visual storytelling to new heights.
Frequently Asked Questions
What does it mean to group objects in Google Slides?
Grouping objects in Google Slides allows you to combine multiple elements (such as images, shapes, and other grouped items) into a single unit. This unit can then be moved, resized, rotated, or otherwise manipulated as one entity, preserving the relative positions and proportions of its individual components. It’s especially useful for maintaining layout consistency and simplifying complex designs.
How do I group objects in Google Slides?
To group objects:
- Select the objects: Hold down the Shift key and click on each object you want to group, or click and drag your mouse to create a selection box around them.
- Execute the command: Go to
Arrange>Groupin the top menu, or right-click on any selected object and chooseGroupfrom the context menu. For a faster method, use the keyboard shortcutCtrl + Alt + G(Windows) orCmd + Alt + G(Mac).
Can I resize grouped objects in Google Slides?
Yes, once objects are grouped, you can resize them as a single unit. Select the grouped set and drag any of the corner handles. Google Slides will automatically maintain the proportions and relative layout of all elements within the group while scaling.
How do I ungroup objects in Google Slides?
To ungroup objects:
- Select the group: Click on the grouped set to select it as a single unit.
- Execute the command: Go to
Arrange>Ungroupin the top menu, or right-click on the grouped objects and chooseUngroupfrom the context menu. For a faster method, use the keyboard shortcutCtrl + Alt + Shift + G(Windows) orCmd + Alt + Shift + G(Mac).
What are the benefits of grouping objects in Google Slides?
The benefits include:
- Easier Movement and Resizing: Manipulate complex layouts as a single unit.
- Maintained Alignment: Preserve the relative positioning and proportions of elements.
- Design Consistency: Easily copy and paste complex designs across multiple slides.
- Protection Against Accidental Displacement: Prevent individual elements from being inadvertently moved or altered.
- Streamlined Workflow: Save time by managing multiple objects with a single action.
Can I edit individual items in a group without ungrouping them?
No, you must ungroup objects to edit each one individually (e.g., change its color, modify its cropping, or apply a unique effect). After making your edits, you can easily reselect the modified elements and regroup them if needed.
Why won’t Google Slides let me group items?
The “Group” option might be grayed out for a few reasons:
- Insufficient Selection: You must have at least two compatible objects selected.
- Already Grouped: The items might already be part of a group (in which case “Ungroup” would be active).
- Incompatible Elements: You cannot group certain object types, such as text boxes, embedded videos, or tables, with other elements like images and shapes. Ensure all selected items are compatible for grouping. Also, all items must be on the same slide.
Is there a limit to how many objects can be grouped?
There is no specific hard limit imposed by Google Slides on the number of objects you can group. However, grouping a very large number of extremely complex objects might impact performance or become unwieldy to manage. For practical purposes, you can group a significant number of items without issues.
What happens to grouped objects when I copy and paste them?
When you copy a grouped set of objects and paste them, they maintain their grouping and relative positioning. The pasted group will be an exact duplicate of the original group, making it very efficient to reuse complex designs.
Can I apply animations to a group of objects?
Yes, you can apply animations to an entire group of objects. When an animation is applied to a group, it affects all elements within that group collectively. This allows you to animate complex visual compositions as a single, coordinated unit.
How do I group objects in Google Slides on a phone or tablet?
On a mobile device:
- Select the first object: Touch and hold an object until it’s selected.
- Select additional objects: Tap on any other objects you wish to include in the group.
- Group: Look for a three-dots menu (often in the top right or bottom bar), tap it, and select
Group.