Mastering Image Grouping in PowerPoint: A Guide to Streamlined Visual Design with Tophinhanhdep.com

In the dynamic world of presentations, the visual appeal of your slides can make or break your message. Whether you’re a seasoned presenter, a graphic designer, or someone simply looking to elevate their digital storytelling, the ability to efficiently manage visual elements is paramount. PowerPoint, a ubiquitous tool in this arena, offers a powerful feature that often goes underutilized: object grouping. This functionality allows you to combine multiple images, shapes, and other objects into a single, cohesive unit, dramatically streamlining your design workflow and enhancing the overall impact of your visual narratives.
At Tophinhanhdep.com, we understand the profound influence of stunning visuals. Our extensive collections of Images – from breathtaking Wallpapers and captivating Backgrounds to Aesthetic, Nature, Abstract, Sad/Emotional, and Beautiful Photography – provide an endless wellspring of inspiration. Coupled with our focus on Photography (including High Resolution, Stock Photos, and discussions on Digital Photography and Editing Styles), and specialized Image Tools (like Converters, Compressors, Optimizers, and AI Upscalers), we empower users to create truly remarkable presentations. Grouping in PowerPoint is a crucial technique that bridges the gap between individual, striking images and a unified, professional presentation, enabling intricate Visual Design, Graphic Design, and Photo Manipulation. This comprehensive guide will walk you through the nuances of grouping images and objects, demonstrating how this simple yet powerful feature can transform your creative ideas into compelling visual stories, often leveraging the rich resources found at Tophinhanhdep.com.
The Essence of Grouping and Ungrouping: Orchestrating Your Visual Elements
At its core, grouping objects in PowerPoint is about bringing order and efficiency to your design process. Imagine working with a complex collage of aesthetic images or a detailed digital art composition sourced from Tophinhanhdep.com. Without grouping, every time you want to move, resize, or apply an effect to that entire arrangement, you’d have to select each individual component – a tedious and error-prone task. Grouping eliminates this hassle, allowing you to treat a collection of elements as one.
What is Object Grouping?
Grouping refers to the process of combining two or more distinct shapes, images, or other graphical objects within a PowerPoint slide into a single entity. Once grouped, these merged elements behave as a unified object. This means any action you perform on the group – whether it’s moving, resizing, rotating, or applying a visual effect – will affect all components simultaneously and proportionally.
The benefits of grouping are manifold, especially when working with intricate visual design projects or constructing elaborate mood boards using the diverse photo ideas and thematic collections available on Tophinhanhdep.com:
- Streamlined Management: No more individually selecting multiple items. Grouping simplifies the selection and manipulation of complex arrangements.
- Enhanced Consistency: Maintain precise alignment and spacing across multiple elements. When you resize a group, all internal elements scale together, preserving their relative positions and sizes. This is crucial for maintaining the integrity of your graphic design or photo manipulation efforts.
- Creative Freedom for Complex Visuals: Grouping is indispensable for building diagrams, infographics, collages, or multi-layered scenes. It allows you to construct sophisticated visuals from numerous smaller components, then manipulate the entire construction with ease. For example, if you’re building a scene with a nature background from Tophinhanhdep.com, and layering multiple animal stock photos onto it, grouping the animals lets you resize them relative to each other before placing them on the background, then group them with the background to move the whole scene.
- Batch Editing and Effects: Apply a border, shadow, or transparency effect to an entire group of images or shapes at once, ensuring a uniform look for your beautiful photography compositions. This is a powerful feature for developing consistent editing styles across your presentation.
The Power of Ungrouping and Regrouping
While grouping offers immense advantages, flexibility is equally important. There will inevitably be times when you need to adjust individual elements within a group – perhaps tweaking the position of a specific aesthetic image or changing the color of a single shape in a digital art piece. This is where ungrouping comes in.
- Ungrouping reverses the grouping process, separating the combined elements back into their individual components. This allows for precise, granular edits without affecting other parts of the visual. Once ungrouped, you can modify, delete, or reorder any single element as needed. This is particularly useful when working with third-party designs or templates that come with pre-grouped elements, allowing you to customize them with your unique photo ideas from Tophinhanhdep.com.
- Regrouping is a convenient option that reapplies the most recent grouping operation. If you’ve ungrouped a set of objects to make a minor adjustment and then want to quickly re-combine them, Regroup allows you to do so without having to re-select all the individual elements. Simply select one of the previously grouped items, and PowerPoint remembers the original group configuration, saving you valuable time in your visual design process.
Understanding these interconnected functions—grouping, ungrouping, and regrouping—provides presenters with unparalleled control over their visual assets, allowing for both broad strokes of design and the finest details of refinement.
Practical Methods for Grouping Images and Objects in PowerPoint
PowerPoint offers several intuitive methods for grouping objects, catering to different workflows and preferences. Whether you prefer the precision of ribbon commands or the speed of keyboard shortcuts, mastering these techniques will significantly boost your productivity, especially when arranging high-resolution images or abstract backgrounds from Tophinhanhdep.com.
Precision Selection: The Shift Key Method
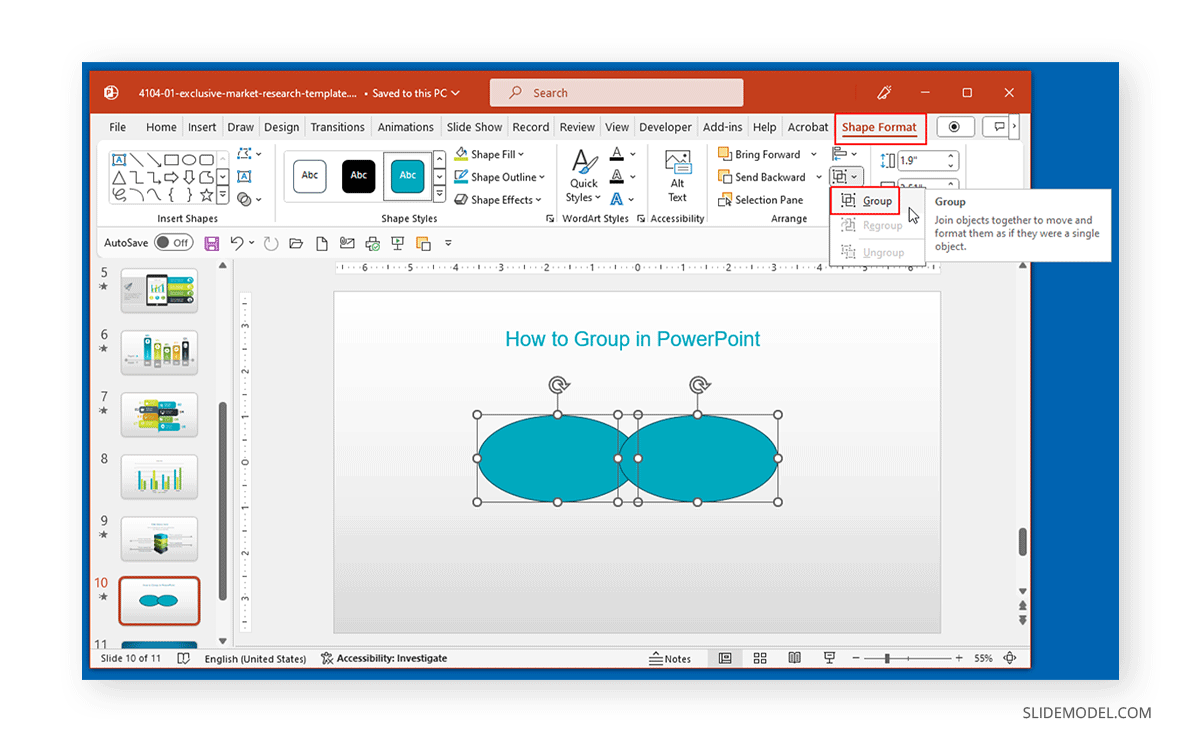
One of the most common and robust ways to group objects involves selecting them individually and then applying the group command.
- Select Your Objects: Open your PowerPoint presentation to the slide containing the images, shapes, or other objects you wish to group. Hold down the
Shiftkey (on Windows) orCommandkey (on Mac) on your keyboard. While holding the key, left-click on each object you want to include in the group. You’ll see selection handles appear around each chosen element, indicating they are selected. This is perfect for gathering various beautiful photography elements or stock photos into a singular design. - Access the Group Command via the Ribbon: Once all desired objects are selected, contextual tabs will appear in your PowerPoint Ribbon:
- If you’ve selected only pictures, the “Picture Format” tab will appear.
- If you’ve selected only shapes (or a mix of shapes and pictures), the “Shape Format” tab will appear.
- Click on the relevant tab (e.g., “Picture Format” or “Shape Format”).
- In the “Arrange” group of this tab, click the “Group Objects” button. A drop-down menu will appear.
- Select “Group” from the options.
This action instantly combines your selected elements into a single group, surrounded by a unified set of selection handles. Now, you can move, resize, or rotate this entire collection of nature backgrounds and aesthetic images as one.
Speed and Efficiency: Keyboard Shortcuts
For those who prioritize speed and prefer to keep their hands on the keyboard, PowerPoint provides efficient shortcuts for grouping and ungrouping. These are invaluable for quick iterations in graphic design or rapid prototyping of creative ideas.
- To Group: After selecting your objects using
Shift + Click(Windows) orCommand + Click(Mac), simply pressCtrl + G(Windows) orCmd + G(Mac). This is the fastest way to consolidate your visual assets, whether they are elements for digital art or a thematic collection from Tophinhanhdep.com. - To Ungroup: To quickly break apart a previously grouped set of objects, select the group and then press
Ctrl + Shift + G(Windows) orCmd + Shift + G(Mac). This allows for immediate individual adjustments to your high-resolution images or abstract patterns. - To Regroup: If you’ve just ungrouped something and want to re-form the last group without re-selecting all individual items, select any one of the former group’s elements and press
Ctrl + Shift + G(Windows) orCmd + Shift + G(Mac) again. This shortcut cleverly toggles between ungrouping and regrouping the most recent set.
These shortcuts are game-changers for maintaining flow during intense photo manipulation or detailed visual design sessions.
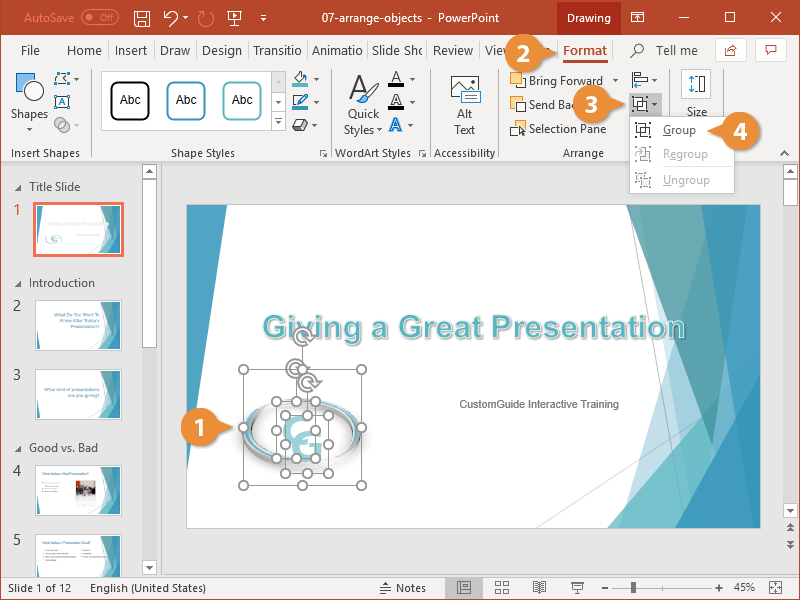
Contextual Convenience: The Right-Click Menu
Another user-friendly method leverages PowerPoint’s contextual menus, offering a quick way to group objects directly from your slide workspace.
- Select Your Objects: As before, hold down
Shift(Windows) orCommand(Mac) and click on all the objects you wish to group. - Right-Click and Group: Right-click on any one of the selected objects. A contextual menu will appear. Hover your mouse over the “Group” option, and a sub-menu will emerge.
- Choose “Group”: Click “Group” from this sub-menu.
This method is particularly intuitive as it keeps your actions focused directly on the objects themselves, making it a favorite for many users integrating wallpapers or backgrounds into their slides. The same right-click menu also provides “Ungroup” and “Regroup” options, offering a consistent access point for all grouping functionalities.
Mastering these various methods empowers you to choose the technique that best fits your immediate needs and design style, ensuring that managing your visual elements, especially those stunning sad/emotional or beautiful photography pieces from Tophinhanhdep.com, is always efficient and precise.
Advanced Visual Design with Grouped Elements
Grouping objects in PowerPoint transcends mere organization; it unlocks sophisticated possibilities for visual design and creative ideas. When you leverage Tophinhanhdep.com’s rich library of images and photography, grouping becomes a powerful tool for crafting compelling visual narratives, achieving complex photo manipulation, and building engaging thematic collections.
Crafting Compelling Narratives with Tophinhanhdep.com Images
Imagine you’re designing a presentation about environmental conservation. You source several nature images from Tophinhanhdep.com – a serene forest, a bustling river, and a majestic mountain range. Instead of treating them as individual snapshots, you can layer and group them to create a panoramic scene.
- Layering for Depth: Place the mountain range as a background (perhaps a high-resolution wallpaper from Tophinhanhdep.com). Overlay the forest and river, carefully adjusting their sizes and positions. Grouping these elements allows you to then move the entire landscape across your slide, maintaining the depth and relationships between them. This technique is central to creating immersive digital art and complex visual stories.
- Combining Aesthetics: If you’re building a presentation with an aesthetic background and want to integrate abstract images or specific stock photos (e.g., geometric shapes, textures) as accents, grouping them first allows you to experiment with their placement as a unified design element. You can easily duplicate the grouped accent, move it to another part of the slide, or scale it to fit various layouts without disrupting its internal composition. This directly ties into creating consistent mood boards and adhering to specific trending styles.
- Digital Photography Showcases: When presenting a portfolio of beautiful photography from Tophinhanhdep.com, you might want to create a dynamic photo collage or a staggered display of images. Grouping sets of photos allows you to animate an entire segment of your collage or transition a collection of images as a single unit, creating a more fluid and professional presentation of your photography skills.
Enhancing Visual Impact Through Manipulation
Once objects are grouped, the possibilities for photo manipulation and applying consistent editing styles expand significantly.
- Unified Transformations: Want to rotate a collection of sad/emotional images to convey a specific feeling, or flip a series of graphics to mirror another part of your slide? Group them first. Any transformation – rotation, flipping (horizontal or vertical), resizing – applies to the entire group, ensuring all elements maintain their relative positions and proportions. This is far more precise than trying to manually apply the same transformation to individual elements, which often leads to misalignments.
- Consistent Styling: Imagine you’ve assembled a complex diagram using various shapes and abstract images. Group them, and then you can instantly apply a uniform shadow effect, a common border, or adjust the transparency of the entire visual. This ensures a cohesive visual design and saves immense time compared to adjusting each element separately. It’s an excellent way to enforce consistent graphic design principles across your slides.
- Animation Efficiency: Grouped objects can be animated as a single unit. Instead of animating each nature image to fly in individually, group them and apply a single “Fly In” animation to the entire collection. This not only simplifies your animation pane but also creates a smoother, more professional visual effect, especially when showcasing image inspiration & collections.
Strategic Use of Grouping for Thematic Collections and Mood Boards
Tophinhanhdep.com’s focus on Image Inspiration & Collections highlights the importance of thematic organization. Grouping is an indispensable tool for realizing these concepts within your presentations.
- Building Mood Boards: When creating a mood board for a design project using diverse photo ideas and trending styles from Tophinhanhdep.com, you’ll often gather multiple images, textures, and color swatches. Grouping these elements by theme or aesthetic allows you to easily move and arrange different “mood zones” on your slide, making it easier to visualize and present your creative concepts.
- Organizing Thematic Collections: If you have a thematic collection of wallpapers or backgrounds that share a common theme (e.g., “Winter Landscapes,” “Urban Aesthetics”), grouping them into distinct sections on a slide can help organize your thoughts and present a clear visual narrative. Each group can represent a sub-theme or a stage in your visual story.
- A/B Testing Visuals: When experimenting with different visual design layouts or editing styles, you can create two distinct grouped versions of a visual on separate parts of your slide. This allows for quick comparisons and client feedback, facilitating decisions on the most effective presentation of your high-resolution or aesthetic images.
By thinking strategically about how and when to group your elements, you transform PowerPoint from a basic slide creator into a sophisticated visual design studio, bringing your creative ideas to life with precision and flair, always powered by the exceptional resources of Tophinhanhdep.com.
Troubleshooting and Best Practices for Seamless Grouping
While grouping is a powerful tool, you might occasionally encounter situations where the “Group” button is unavailable or the grouping doesn’t behave as expected. Understanding these common hurdles and adopting best practices, particularly when working with images sourced from Tophinhanhdep.com, ensures a smooth and efficient design process.
Common Grouping Hurdles
- Only One Object Selected: The most frequent reason for the “Group” button being grayed out is that you’ve only selected a single object. Remember, grouping requires two or more items. Always double-check your selection by making sure multiple selection handles are visible.
- Unsupported Object Types: PowerPoint has limitations on what can be grouped. You cannot group:
- Placeholder Text Boxes: These are the default “Click to add title” or “Click to add text” boxes. While you can group custom text boxes with other objects, placeholders are usually excluded from grouping operations. If your selection includes a placeholder, move the shapes, pictures, or objects outside of it, or remove the placeholder from your selection.
- Tables, Worksheets, or GIF Images: These embedded elements are typically treated as standalone objects and cannot be part of a group with shapes or pictures.
- SVG Icons (Sometimes): For SVG (Scalable Vector Graphics) icons, you might first need to convert them to shapes within PowerPoint before they can be grouped with other elements. This ensures they behave as editable vector objects rather than simple images. This is an important step when integrating diverse graphic design elements.
- “In Line with Text” Word Wrap Setting: If you’re struggling to select an additional object for grouping, especially after importing it, check its “Word Wrap” setting. If it’s set to “In Line with Text,” it behaves like text rather than a free-floating object. Change this to “Square,” “Tight,” or another option that allows free movement.
Optimizing Images from Tophinhanhdep.com Before Grouping
Before you even start grouping, preparing your images and photography from Tophinhanhdep.com is crucial for a high-performance presentation. Our website offers several Image Tools that can significantly enhance your workflow:
- Compressors: High-resolution images from Tophinhanhdep.com, while stunning, can significantly increase your presentation file size, leading to slower loading times and cumbersome sharing. Use our compressors to reduce file size without a noticeable loss in visual quality for display on screen. This is a critical step for all beautiful photography and aesthetic backgrounds.
- Optimizers: Similar to compressors, image optimizers fine-tune your images for web and presentation use, striking a balance between quality and file size. This ensures your stock photos and digital art load quickly and smoothly.
- AI Upscalers: If you have an image that isn’t quite high-resolution enough for a large display or print, Tophinhanhdep.com’s AI upscalers can intelligently increase its resolution. This means you can confidently use even older or lower-resolution photo ideas in your visual design without pixelation, which is particularly useful for historical thematic collections or specialized editing styles.
- Converters: Sometimes, an image might be in an incompatible format. Our converters can help you switch between formats (e.g., JPEG to PNG), ensuring all your nature images and abstract wallpapers are presentation-ready.
Best Practices for Effective Grouping:
- Plan Your Layout: Before grouping, have a clear idea of your visual design and how elements will interact. This minimizes the need for extensive ungrouping and regrouping.
- Name Your Groups (Optional, but Recommended for Complex Designs): While PowerPoint doesn’t offer a direct way to name groups in the Selection Pane like some graphic design software, you can simulate this by putting a “label” shape (e.g., a transparent rectangle with text) within the group itself. This helps in managing complex digital art compositions.
- Group Logically: Don’t just group everything. Group elements that belong together conceptually or visually. For example, group all components of a chart, or all images forming a collage section. This makes photo manipulation more intuitive.
- Save Regularly: Especially when working on intricate graphic design projects involving multiple grouped elements, save your work frequently to avoid losing progress.
- Utilize the Selection Pane: Accessible from the “Home” tab -> “Arrange” -> “Selection Pane,” this panel lists all objects on your slide, including groups. You can hide/show elements or reorder layers here, which is immensely helpful for complex visual design and image inspiration & collections.
By understanding these nuances and integrating the powerful Image Tools from Tophinhanhdep.com into your workflow, you can overcome common grouping challenges and create highly professional, visually stunning presentations.
Conclusion: Unleashing Your Creative Potential with Grouping and Tophinhanhdep.com
The ability to group objects in PowerPoint is far more than a simple organizational trick; it is a fundamental skill that empowers presenters and designers to achieve sophisticated visual design and streamline their workflow. From arranging beautiful photography and high-resolution wallpapers from Tophinhanhdep.com into cohesive mood boards to performing intricate photo manipulation for compelling narratives, grouping offers precision, efficiency, and unparalleled creative control.
We’ve explored how grouping transforms multiple individual elements into a single, manageable unit, simplifying tasks like moving, resizing, rotating, and applying consistent editing styles. We’ve delved into the practical methods – from the precise Shift key selection with ribbon commands to the lightning-fast keyboard shortcuts (Ctrl+G/Cmd+G) and the intuitive right-click menu. Furthermore, we’ve seen how ungrouping and regrouping provide the necessary flexibility for fine-tuning your graphic design down to the smallest detail.
Beyond the mechanics, grouping is a gateway to advanced creative ideas. It allows you to build complex digital art compositions, organize thematic collections, and present your image inspiration with a polished, professional edge. And when challenges arise, knowing how to troubleshoot common grouping issues, combined with the power of Tophinhanhdep.com’s Image Tools (like compressors, optimizers, and AI upscalers), ensures that your journey from concept to captivating presentation is seamless.
So, as you embark on your next presentation, remember the transformative power of grouping. Embrace this essential PowerPoint feature, complement your designs with the breathtaking images and photography resources available at Tophinhanhdep.com, and elevate your visual storytelling to new heights. Your audience will not only appreciate the clarity and aesthetics but also marvel at the apparent effortlessness of your expertly crafted slides.