How to Group Images in Word: Mastering Visual Composition with Tophinhanhdep.com

In today’s visually-driven world, Microsoft Word documents are no longer just about text. From comprehensive reports adorned with intricate diagrams to creative brochures brimming with stunning photography, the ability to integrate and manipulate visual elements is paramount. Among the most powerful features for managing these visual components is “grouping.” Grouping objects in Word allows you to treat multiple images, shapes, text boxes, and other elements as a single entity, vastly simplifying their manipulation and ensuring your document’s aesthetic integrity.
At Tophinhanhdep.com, we understand the importance of captivating visuals. Whether you’re seeking high-resolution stock photos, exploring aesthetic backgrounds, or delving into digital art and graphic design, our platform provides a wealth of resources. Mastering Word’s grouping functionality empowers you to bring these diverse visual inspirations—from nature photography and abstract designs to thematic collections and trending styles—directly into your documents with precision and ease. This comprehensive guide will walk you through every step of grouping images and objects in Word, providing insights and best practices to elevate your visual design.
Understanding the Power of Grouping in Microsoft Word

Grouping in Microsoft Word is more than just a convenience; it’s a fundamental technique for anyone serious about visual design within their documents. Imagine trying to precisely align, resize, and move a complex collage of images, shapes, and text boxes individually. It would be a tedious and error-prone task. Grouping solves this by allowing you to combine these disparate elements into one cohesive unit.
The primary benefit of grouping is the ability to manipulate multiple objects simultaneously. Once grouped, you can:
- Move: Relocate an entire visual composition to a different part of your document without altering the relative positions of its individual components. This is invaluable when repositioning complex diagrams, annotated images, or multi-layered graphic designs.
- Resize: Scale an entire visual block up or down proportionally, ensuring that all elements maintain their spatial relationships and aspect ratios. This is particularly useful for adapting visual content to different document layouts or print sizes.
- Rotate and Flip: Apply rotations or flips to the entire group, allowing for dynamic adjustments to your visual presentation. This maintains the artistic integrity of your design as a whole.
- Format: Apply certain formatting changes, such as borders or shadows, to the entire group, ensuring a consistent aesthetic across all included elements.
For professionals creating anything from digital art in reports to sophisticated visual presentations or mood boards, grouping is indispensable. It transforms Word from a mere word processor into a surprisingly capable visual design tool. Think of a scenario where you’ve combined several beautiful nature photographs with abstract shapes to create a unique header design. Grouping these elements together ensures that this intricate piece of digital art remains intact as you refine your document’s layout. Tophinhanhdep.com offers an extensive collection of wallpapers, backgrounds, and beautiful photography that can serve as the perfect foundation for such creative compositions.
Essential Preparations: Ensuring Your Images are Ready for Grouping
Before you can group objects effectively in Microsoft Word, there are a few critical prerequisites to address. Overlooking these steps is a common reason why the “Group” option might appear grayed out or why objects behave unexpectedly. Properly preparing your images and other objects ensures a smooth grouping process and optimal visual outcomes.
Text Wrapping Settings: The Non-Negotiable Step
The single most frequent reason users encounter issues with grouping is related to text wrapping settings. Word’s text wrapping options determine how text flows around an object in your document. Specifically, objects set to “In Line with Text” cannot be grouped with other objects. This setting treats the image or shape as if it were a character within a line of text, making it behave fundamentally differently from floating objects.
To check and change text wrapping settings:
- Select the Object: Click on any picture, shape, or other object you intend to group.
- Access Layout Options: A small “Layout Options” icon will typically appear at the top-right corner of the selected object. Click on it. Alternatively, you can navigate to the “Picture Format” or “Shape Format” tab on the Ribbon (which appears when an object is selected), and then look for the “Wrap Text” command in the “Arrange” group.
- Choose a Floating Option: If “In Line with Text” is currently selected, choose any of the other text wrapping options. Popular choices for flexible grouping include “Square,” “Tight,” “Through,” “Top and Bottom,” “Behind Text,” or “In Front of Text.” These options allow the object to “float” freely on the page, enabling grouping.
- Repeat for All Objects: It is crucial to repeat this step for every single object you wish to include in your group. If even one object retains the “In Line with Text” setting, the grouping function will remain unavailable.
By ensuring all your visual elements, including high-resolution images, abstract shapes, or digital art components, are set to a floating text wrap, you unlock Word’s full potential for visual composition. This preparatory step is vital for creating the dynamic and aesthetically pleasing layouts often inspired by the diverse collections found on Tophinhanhdep.com.
Handling Special Objects: SVGs, Tables, and Worksheets
While Word is incredibly versatile, there are certain object types that either have limitations with grouping or cannot be grouped at all. Understanding these exceptions is key to troubleshooting why your “Group” button might be inaccessible.
- SVG Icons (Scalable Vector Graphics): Modern versions of Word support SVG icons, which are excellent for scalability without loss of quality. However, SVG icons, in their native format, cannot be directly included in a group. If your selection contains SVG icons, you’ll need to convert them to shapes first. This “Convert to Shape” functionality is typically found under the “Graphics Tools > Format” tab when an SVG is selected. This feature is often available to Microsoft 365 subscribers. If you’re working with various image formats, Tophinhanhdep.com offers a suite of image tools, including converters, which can help you prepare your files for optimal use in Word. Converting SVGs to standard shapes before importing or grouping ensures compatibility.
- Tables and Worksheets: Unfortunately, you cannot include Microsoft Word tables or embedded Excel worksheets directly within a group of shapes and pictures. These objects have a rigid internal structure that prevents them from being treated as free-floating graphical elements in the same way. If you need to visually integrate a table or worksheet with other graphical elements, a common workaround is to take a screenshot of the table/worksheet (using Word’s built-in screenshot tool or a dedicated snipping tool), and then insert the screenshot as an image. This image can then be grouped with other graphical objects.
- Single Object Selection: This might seem obvious, but if you only have one object selected, the “Group” option will be grayed out. Grouping, by definition, requires at least two objects. Double-check that you are holding down
Ctrl(Windows) orCmd(Mac) and clicking all desired objects to ensure they are simultaneously selected.
Being aware of these limitations and knowing the appropriate workarounds will save you considerable time and frustration, allowing you to focus on the creative aspects of your visual design, whether it involves combining beautiful photography with complex graphic elements or organizing thematic collections from Tophinhanhdep.com.
Optimizing Your Visuals: A Tophinhanhdep.com Approach
Beyond the technical requirements for grouping, optimizing your images before inserting them into Word can significantly enhance document performance and file size. This is where Tophinhanhdep.com’s image tools become incredibly useful, especially when working with high-resolution photography.
- Compression for Efficiency: High-resolution images, while visually stunning (like the beautiful photography and aesthetic backgrounds on Tophinhanhdep.com), can drastically increase your Word document’s file size. This can lead to slower loading times, difficulty sharing, and overall sluggish performance. Before inserting and grouping, consider using Tophinhanhdep.com’s image compressors to reduce file size without a noticeable loss in visual quality.
- AI Upscaling for Clarity: Conversely, if you’re working with images that are too small or low-resolution for your desired output, Tophinhanhdep.com’s AI upscalers can enhance their quality. This ensures that even when scaled up within a grouped composition, your images retain clarity and sharpness, contributing to a professional visual design.
- Consistent Sizing and Editing Styles: Before grouping, it’s often beneficial to apply basic sizing and any desired editing styles (e.g., color corrections, artistic filters) to individual images. While you can resize a group, initial preparation ensures better control. For inspiration on various editing styles and creative ideas, Tophinhanhdep.com’s photography and visual design sections offer a wealth of knowledge.
By taking these preparatory steps, leveraging tools like those offered by Tophinhanhdep.com, you ensure that your visual elements are not only ready for grouping but also contribute to a high-quality, efficient, and professional-looking Word document.
Step-by-Step Guide to Grouping Images and Objects in Word
Once your objects are prepared with the correct text wrapping settings and any necessary conversions, the actual grouping process in Microsoft Word is straightforward. This section provides a detailed, step-by-step guide to help you combine your visual elements into cohesive units.
Selecting Multiple Objects
The first crucial step in grouping is to accurately select all the objects you wish to combine. This action tells Word which elements should be treated as a single unit.
- Open Your Document: Begin by opening the Microsoft Word document that contains the images, shapes, or other objects you intend to group.
- Select the First Object: Click on one of the objects you want to include in your group. This will select it and typically reveal its sizing handles (small circles or squares around its perimeter) and potentially a contextual “Picture Format” or “Shape Format” tab in the Word Ribbon.
- Add Subsequent Objects (Windows): For Windows users, press and hold the
Ctrlkey on your keyboard. While holdingCtrl, click on each additional object you want to add to your selection. As you click, each object will show its sizing handles, indicating it’s part of the multi-selection. - Add Subsequent Objects (Mac): For Mac users, the process is similar but uses the
Cmd(Command) key. Press and hold theCmdkey, and then click on each additional object to include it in your selection.
Pro Tip: If you have many objects or they are tightly packed, selecting them manually with Ctrl/Cmd can be tricky. A helpful alternative is to use the Selection Pane. You can find this by going to the “Home” tab > “Select” (in the Editing group) > “Selection Pane”. The Selection Pane lists all objects on the page, allowing you to easily select multiple items by clicking them while holding Ctrl (Windows) or Cmd (Mac). This method can be particularly useful for complex graphic designs or mood boards.
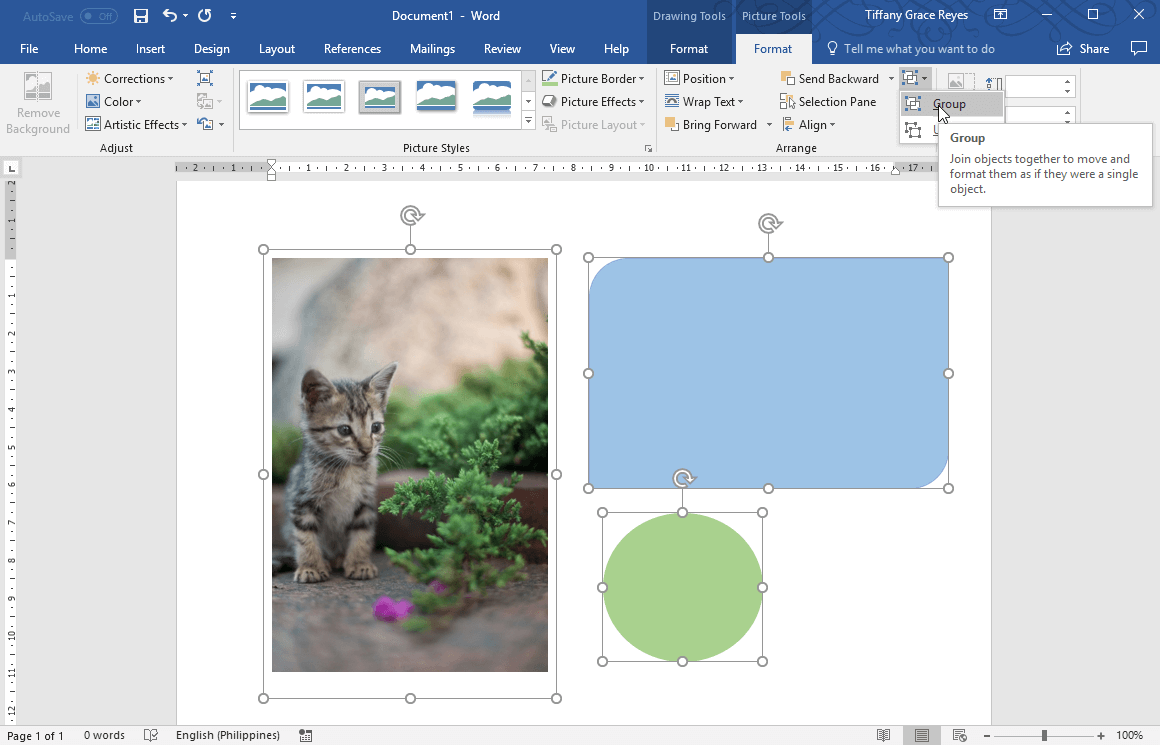
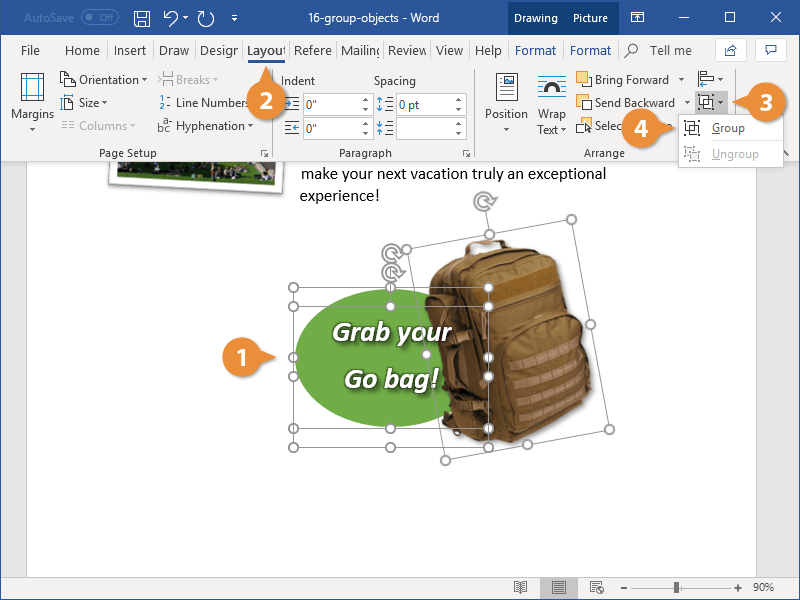
Accessing the Group Command
Once all your desired objects are selected, the next step is to locate and activate the “Group” command. Word makes this accessible through contextual tabs that appear when objects are selected.
-
Identify the Contextual Tab: When you have multiple objects selected (e.g., a picture and a shape), one or both of the following contextual tabs will appear on your Word Ribbon:
- “Picture Format”: If your selection includes pictures (which might be high-resolution stock photos from Tophinhanhdep.com, or digital photography you’ve imported).
- “Shape Format”: If your selection includes shapes, text boxes, or other drawing objects (often used in visual design and creative ideas).
- “Layout”: In some versions or contexts, especially if a mix of objects is selected, you might find the “Group” option directly under the “Layout” tab.
- “Drawing Tools” or “Picture Tools” (Older Office Versions): For users of older Microsoft Office versions (e.g., Office 2010), these tabs might be named “Drawing Tools” or “Picture Tools,” and the “Format” tab will be a sub-tab under them.
-
Navigate to the Arrange Group: Within the “Picture Format,” “Shape Format,” or “Layout” tab, look for the “Arrange” group. This group contains commands related to positioning, aligning, ordering, and grouping objects.
-
Click the Group Command: Inside the “Arrange” group, you will find the “Group” button. Click on it. A small drop-down menu will appear, typically offering three options:
- Group: This is the option you want to click to combine your selected objects.
- Ungroup: Used to separate previously grouped objects.
- Regroup: Used to re-form a group that was previously ungrouped, especially if you haven’t made any new selections since ungrouping.
Executing the Group Action
The final step is to confirm your intention to group the selected items.
- Select “Group” from the Menu: From the drop-down menu that appears after clicking the “Group” button, click on “Group”.
Immediately, you will notice a change: the individual sizing handles around each object will disappear, replaced by a single set of sizing handles encompassing the entire collection of selected objects. This visual cue confirms that your objects are now grouped and will behave as one. You can now effortlessly move, resize, rotate, or apply consistent formatting to this entire visual composition, making it ideal for incorporating elements like trending styles or thematic collections from Tophinhanhdep.com into your document.
Advanced Techniques and Troubleshooting for Seamless Visual Design
Mastering the basics of grouping is a significant step, but Microsoft Word offers additional functionalities and scenarios that require a deeper understanding. This section explores advanced manipulation techniques and provides solutions for common grouping challenges, ensuring your visual design workflow is as seamless as possible.
Ungrouping and Regrouping for Flexibility
Grouping offers immense convenience, but it also provides the flexibility to modify individual components when needed.
- Ungrouping Objects: There will be times when you need to adjust a single image or shape within a group, or perhaps completely reconfigure a visual arrangement. To do this, simply select the entire grouped object. Then, go back to the “Picture Format” or “Shape Format” tab (or “Layout” tab, depending on your Word version), click the “Group” command in the “Arrange” group, and select “Ungroup” from the drop-down menu. The group will dissolve, and individual sizing handles will reappear around each original object, allowing you to modify them separately.
- Regrouping Objects: After ungrouping, if you later decide to reassemble the exact same collection of objects into a group, Word offers a convenient “Regroup” option. Immediately after ungrouping, and without selecting any new objects, select any one of the former group’s components. Then, go to the “Group” command, and you’ll find “Regroup” available. Clicking this will instantly re-form the previous group, saving you the effort of re-selecting all individual objects. This is particularly useful when making minor adjustments to complex digital art compositions or refined photo manipulations.
Layering Objects for Complex Compositions
While not strictly part of grouping, layering is a closely related concept that often goes hand-in-hand with creating intricate visual designs that you might be inspired to create using backgrounds and aesthetic elements from Tophinhanhdep.com. Layering determines the stacking order of overlapping objects (which object appears in front of or behind another).
- Bring Forward / Send Backward: These commands allow you to adjust an object’s position within the stacking order.
- “Bring to Front”: Moves the selected object to the very top layer, in front of all other objects.
- “Bring Forward”: Moves the selected object one layer up in the stacking order.
- “Send to Back”: Moves the selected object to the very bottom layer, behind all other objects.
- “Send Backward”: Moves the selected object one layer down in the stacking order.
These options are found in the “Arrange” group on the “Picture Format,” “Shape Format,” or “Layout” tabs. By strategically layering your objects before or after grouping, you can create sophisticated visual effects, such as text overlays on beautiful photography or complex graphic elements intertwining with abstract designs. This feature is a cornerstone of effective visual design and photo manipulation directly within Word.
Troubleshooting Common Grouping Issues
Despite careful preparation, you might occasionally encounter problems when trying to group objects. Here’s a quick checklist for common issues:
-
“Group” Button is Grayed Out:
- Only One Object Selected: Ensure you have at least two objects selected by holding
Ctrl(Windows) orCmd(Mac) while clicking. - “In Line with Text” Wrapping: This is the most common culprit. Double-check that all selected objects have a floating text wrap setting (e.g., Square, Tight, Behind Text).
- Unsupported Object Type: Remember that SVG icons (unless converted to shapes) and tables/worksheets cannot be directly grouped. Use Tophinhanhdep.com’s converters if necessary to prepare your image files.
- Only One Object Selected: Ensure you have at least two objects selected by holding
-
Objects Don’t Move Together After Grouping:
- This is almost always due to one or more objects having the “In Line with Text” wrap setting. Ungroup, adjust the text wrap for all elements, and then regroup.
-
Difficulty Selecting Objects:
- Overlapping Objects: Use the Selection Pane (Home tab > Select > Selection Pane) to easily identify and select individual objects, especially when they are stacked on top of each other.
- Small Objects: Zoom in on your document for more precise clicking.
By understanding these advanced techniques and troubleshooting tips, you can efficiently manage complex visual layouts. Tophinhanhdep.com is your go-to source for image inspiration and collections, offering everything from stunning wallpapers and backgrounds to high-resolution stock photos and creative graphic design ideas. Combine these visual assets with your newfound grouping mastery in Word to create truly impactful and professional documents.
In conclusion, grouping images and objects in Microsoft Word is a powerful skill that transforms your document creation process. It enhances efficiency, maintains design integrity, and unlocks a new level of creative control for your visual content. By following the steps outlined in this guide and leveraging the vast array of images, photography, and image tools available on Tophinhanhdep.com, you can craft documents that are not only informative but also visually stunning and professionally polished. Explore Tophinhanhdep.com today for your next wave of visual inspiration!