How to Master Image Grouping in Word for Flawless Visual Design

In today’s visually-driven world, a document’s impact extends far beyond its text. Whether you’re crafting a professional report, an engaging presentation, an informative brochure, or a personal project, incorporating compelling images and thoughtful visual layouts can elevate your message and captivate your audience. Microsoft Word, a ubiquitous tool for document creation, offers robust features to integrate and manipulate various objects, including shapes and pictures. One of its most powerful yet often underutilized functionalities is the ability to “group” these elements.
Grouping allows you to combine multiple images, shapes, or other objects into a single, cohesive unit. This seemingly simple action unlocks a new level of control, enabling you to treat a complex arrangement of visual components as if it were one entity. Imagine creating a stunning collage of “Aesthetic” images or a detailed infographic using “Nature” photography from Tophinhanhdep.com; without grouping, adjusting each piece individually would be a tedious, frustrating, and often imprecise task. By grouping them, you can seamlessly resize, rotate, flip, or move them across your document, maintaining their relative positions and proportions with ease. This capability is not just about convenience; it’s a fundamental aspect of efficient visual design and photo manipulation within your Word documents.
At Tophinhanhdep.com, we understand the immense value of high-quality visuals. Our extensive collections, ranging from vibrant “Wallpapers” and “Backgrounds” to intricate “Abstract” art and breathtaking “Beautiful Photography,” provide an endless source of inspiration. We also offer essential “Image Tools” like converters, compressors, optimizers, and AI upscalers to ensure your images are perfectly prepared for any application, including your Word documents. Mastering grouping in Word, complemented by the superior visual resources from Tophinhanhdep.com, will empower you to transform ordinary documents into extraordinary visual experiences.
The Power of Grouping: Enhancing Your Documents with Tophinhanhdep.com Visuals
Grouping objects in Microsoft Word fundamentally changes how you interact with visual elements in your document. Instead of wrestling with individual components, you gain the ability to manipulate them as a unified whole. This dramatically streamlines your workflow, allowing for more precise control and creative freedom in your visual layouts.
What Exactly is Grouping and Why Does It Matter?
At its core, grouping is the act of combining two or more shapes, pictures, or drawing objects into a single object. Once grouped, these individual elements behave as one:
- Unified Movement: You can drag the entire group to a new location on the page without disturbing the relative positions of its constituent parts. This is invaluable when you’re positioning a complex logo, a set of annotated images, or a custom graphic.
- Synchronized Resizing: Need to make a cluster of images smaller or larger? Group them, and then resize the entire group proportionally. This eliminates the headache of resizing each image individually and trying to maintain their visual balance.
- Collective Rotation and Flipping: Rotating an entire diagram or flipping a mirrored image effect is effortless when elements are grouped. This is particularly useful for achieving dynamic “Visual Design” or “Digital Art” effects.
- Consistent Formatting: Apply a border, a shadow effect, or a color overlay to a grouped object, and the effect will be applied uniformly to all elements within that group (where applicable). This ensures visual consistency and saves time on repetitive formatting.

For visual creators and anyone working with rich media, the importance of grouping cannot be overstated. Imagine creating a “Mood Board” in Word, combining various “Aesthetic” images and text boxes to capture a theme. Without grouping, every slight adjustment could throw off your meticulously arranged layout. With grouping, your mood board becomes a movable, resizable unit, allowing you to experiment with placement and scale effortlessly. Similarly, if you’re building a “Thematic Collection” of “Nature” or “Sad/Emotional” images, grouping helps maintain their narrative flow and visual integrity across your document.
Beyond Basic Placement: Grouping for Advanced Visual Design
Grouping isn’t just a utilitarian feature; it’s a tool that supports advanced “Visual Design” principles within Word.
- Graphic Design: For aspiring graphic designers, grouping is fundamental for constructing multi-layered elements like custom icons, diagrams, or branded headers. You can create intricate designs from basic shapes and images, then group them to solidify your creation.
- Digital Art & Photo Manipulation: While Word isn’t a dedicated art studio, its grouping features enable a basic level of digital art and “Photo Manipulation.” By layering images (perhaps “Abstract” backgrounds from Tophinhanhdep.com) and shapes, then grouping them, you can create unique visual compositions that appear as single, sophisticated graphics.
- Creative Ideas: Grouping fosters experimentation. When you can easily manipulate a set of objects as one, you’re more likely to try different layouts, sizes, and rotations, leading to more “Creative Ideas” and innovative document designs. This is especially true when working with high-resolution “Beautiful Photography” where precision is key.
By embracing grouping, you move from merely inserting images to strategically designing with them. It transforms Word from a simple word processor into a powerful platform for visual storytelling, allowing your documents to truly stand out.
Step-by-Step Guide to Grouping Images and Objects in Word
Successfully grouping images and objects in Word requires a few preparatory steps and a clear understanding of the process. This guide will walk you through each stage, ensuring your visuals from Tophinhanhdep.com are perfectly integrated and managed.
Preparing Your Images for Word with Tophinhanhdep.com
Before you even think about grouping, the quality and preparation of your images are paramount. Tophinhanhdep.com is your go-to resource for exceptional visuals and the tools to optimize them.
- Source High-Quality Images: Begin by selecting “High Resolution” images, “Stock Photos,” or stunning examples of “Digital Photography” from Tophinhanhdep.com. High-quality source material ensures your grouped objects look sharp and professional.
- Optimize File Size: Large image files can slow down your Word document. Before inserting, consider using Tophinhanhdep.com’s “Image Tools” such as Compressors and Optimizers. These tools reduce file size without compromising visual quality, leading to smoother document performance.
- Convert Formats if Necessary: If you have images in obscure formats, Tophinhanhdep.com’s “Converters” can help you transform them into universally compatible formats like PNG or JPG, ensuring they integrate seamlessly into Word. While Word handles many formats, ensuring compatibility beforehand can prevent issues.
- AI Upscalers for Detail: If you have smaller images that you wish to use at a larger scale within a group, Tophinhanhdep.com’s “AI Upscalers” can intelligently enhance their resolution, adding detail and sharpness, making them suitable for impactful visual displays.
Once your images are prepared, save them in an accessible location.
Setting the Stage: Crucial Wrap Text Options
One of the most frequent stumbling blocks when trying to group objects in Word is the “Wrap Text” setting. For grouping to work, all selected objects must not have their text wrapping set to “In Line with Text.” This default setting treats images like characters in a text line, making them incompatible with grouping.
Here’s how to check and change the Wrap Text setting for your objects:
- Select an Object: Click on any picture, shape, or object you intend to group.
- Access Layout Options: A small “Layout Options” icon will typically appear near the top-right corner of the selected object. Click on it. Alternatively, with the object selected, go to the Picture Format (or Shape Format) tab on the Ribbon, and then click Wrap Text in the Arrange group.
- Choose a Non-Inline Option: From the dropdown menu, select any option other than “In Line with Text.” Popular choices include:
- Square: Text wraps around the square boundary of the image.
- Tight: Text wraps closely around the actual contours of the image.
- Through: Text fills the empty space within the image boundary.
- Top and Bottom: Text is above and below the image, but not to its sides.
- Behind Text: The image sits behind the text.
- In Front of Text: The image sits on top of the text.
- Repeat for All Objects: Ensure you apply a non-“In Line with Text” wrapping style to every object you plan to include in your group. Failure to do so will result in the “Group” option being grayed out.
The Grouping Process: Windows
Once your images are prepared and their text-wrapping settings adjusted, the actual grouping process is straightforward.
- Open Your Word Document: Launch Microsoft Word and open the document containing the images and objects you wish to group.
- Select Multiple Objects:
- Click on the first object to select it.
- Press and hold the Ctrl key on your keyboard.
- While holding Ctrl, click on each additional object you want to include in the group. You will see selection handles appear around all chosen objects.
- (Remember: The Group button will only become active if two or more objects are selected.)
- Access the Format Tab: With all desired objects selected, context-sensitive tabs will appear in the Ribbon at the top of Word:
- If you selected pictures, look for the Picture Format tab.
- If you selected shapes or drawing objects, look for the Shape Format or Drawing Tools Format tab.
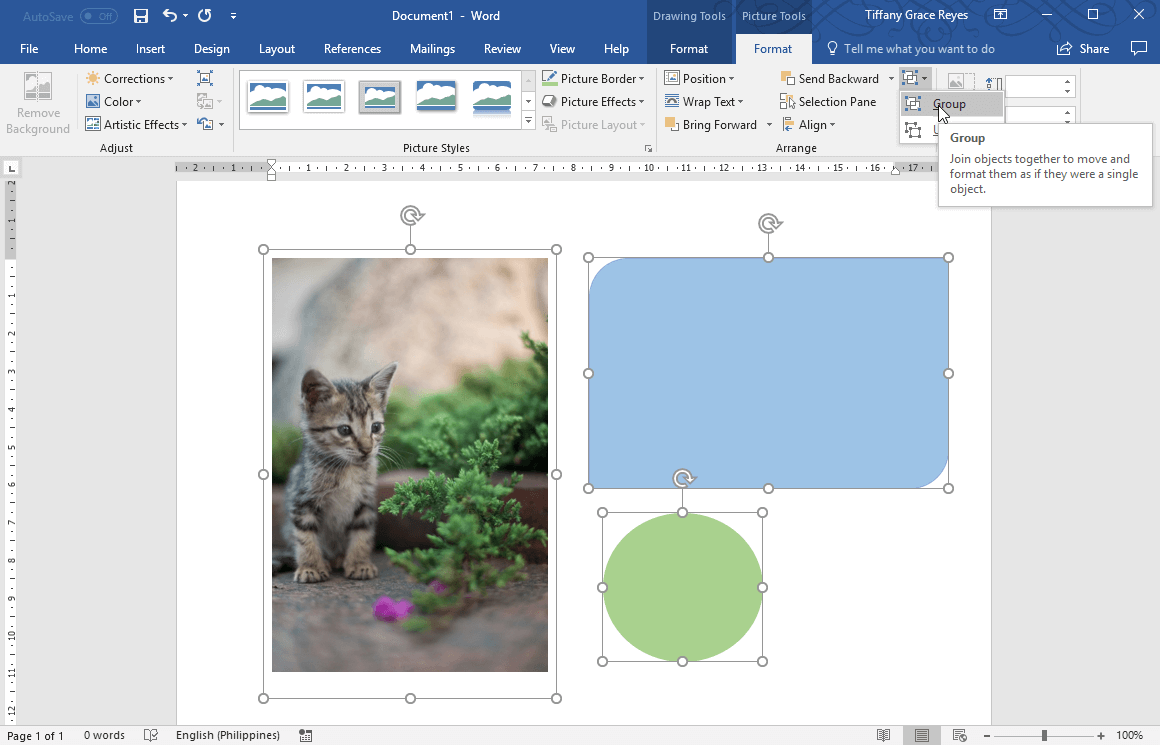
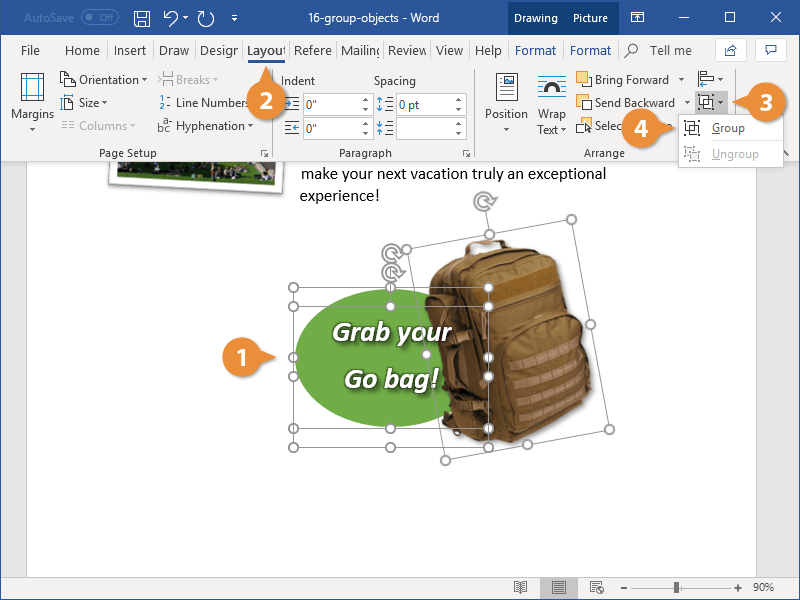
- Click ‘Group’:
- Navigate to the Arrange group within the Picture Format or Shape Format tab.
- Click the Group button (it may appear as “Group Objects” in some versions).
- From the small dropdown menu that appears, select Group again.
- Confirm Grouping: The individual selection handles will disappear, and a single set of handles will appear around the combined boundary of all grouped objects. You can now move, resize, or rotate this single grouped entity.
The Grouping Process: macOS
The steps for grouping on a Mac are very similar, with a slight variation in key press.
- Open Your Word Document: Launch Microsoft Word and open your document.
- Select Multiple Objects:
- Click on the first object to select it.
- Press and hold the Command (Cmd) key on your keyboard.
- While holding Cmd, click on each subsequent object you wish to add to the group.
- (As with Windows, ensure at least two objects are selected for the Group function to be available.)
- Access the Format Tab: With your objects selected, you will see contextual tabs appear on the Ribbon:
- Picture Format (for pictures).
- Shape Format (for shapes/drawing objects).
- Click ‘Group’:
- On the Picture Format or Shape Format tab, locate the Arrange group.
- Click the Group button. If you don’t immediately see “Group,” click the Arrange dropdown button first, and then you’ll find “Group” within that menu.
- Select Group from the dropdown.
- Confirm Grouping: A single set of selection handles will indicate that your objects are now grouped and can be manipulated as one unit.
Troubleshooting Common Grouping Challenges
Even with careful preparation, you might occasionally encounter situations where the “Group” button is grayed out or the grouping process doesn’t work as expected. Understanding these common issues can save you time and frustration.
Why is the ‘Group’ Button Grayed Out?
The inability to group objects is usually a clear sign that one or more prerequisites have not been met. Here are the primary reasons why the “Group” button might be unavailable:
- Only One Object is Selected: This is the most straightforward reason. The “Group” function, by definition, requires at least two objects to combine. If you only have one image or shape selected, Word logically disables the grouping option.
- Solution: Ensure you press and hold Ctrl (Windows) or Command (Mac) while clicking on two or more distinct objects to select them simultaneously.
- Objects are Set to “In Line with Text”: As emphasized earlier, this is a critical barrier to grouping. Objects with “In Line with Text” wrapping behave as characters within the text flow, not as floating objects, making them incompatible with group manipulation.
- Solution: Select each object individually and change its “Wrap Text” setting to anything other than “In Line with Text” (e.g., Square, Tight, Through, In Front of Text, Behind Text). Only after all objects are set to a floating wrap style will the “Group” option become available.
- Incompatible Object Types are Included: Word has limitations on what can be grouped. Certain object types cannot be part of a group:
- SVG Icons (Scalable Vector Graphics): Directly grouping SVG icons is often not supported. While SVG offers crisp, scalable graphics, Word may require them to be converted first.
- Solution: If you are using Microsoft 365 on Windows, you can select the SVG icon, go to the Graphics Tools Format tab, and click Convert to Shape. Once converted, it will behave like a regular shape and can be grouped. For other versions or if this option isn’t available, you might consider converting the SVG to a compatible image format (like PNG) using Tophinhanhdep.com’s “Converters” before inserting it into Word.
- Tables or Worksheets: You cannot include entire tables or embedded Excel worksheets within a group. These are complex objects with their own structural rules.
- Solution: If you need to visually combine a table with images, you might consider taking a screenshot of the table, inserting it as an image, and then grouping that image with other elements. However, this sacrifices the editability of the table.
- SVG Icons (Scalable Vector Graphics): Directly grouping SVG icons is often not supported. While SVG offers crisp, scalable graphics, Word may require them to be converted first.
Always double-check these points if you find the “Group” button grayed out. Addressing these common issues will typically resolve your grouping problem.
Advanced Management: Ungrouping and Regrouping
While grouping is incredibly useful for unified manipulation, there will be times when you need to access or adjust individual components within a group. Microsoft Word provides the flexibility to “ungroup” and “regroup” objects, as well as interact with individual items without fully disbanding the group.
Ungrouping for Individual Adjustments
After you’ve grouped objects, you might realize that one element needs a slight tweak—a color change, a minor repositioning, or a different border. To do this, you’ll need to ungroup the collection.
- Select the Grouped Object: Click anywhere on the combined group of objects to select it.
- Access the Format Tab: The Picture Format or Shape Format tab will appear on the Ribbon.
- Click ‘Ungroup’:
- Navigate to the Arrange group within that tab.
- Click the Group button.
- From the dropdown menu, select Ungroup.
- Manipulate Individually: The group will now separate back into its original individual objects, each with its own selection handles. You can now select and modify any individual item as needed.
Remember, once ungrouped, the objects are independent again. If you move one, the others will not follow.
Regrouping for Efficiency
The good news is that if you ungroup a set of objects and then decide you want them to be a group again (without selecting them all manually from scratch), Word retains memory of the last grouped configuration.
- Select One of the Previously Grouped Objects: Even if they are now separate, selecting just one component of the former group can sometimes reactivate the regrouping option.
- Access the Format Tab: Go to the Picture Format or Shape Format tab.
- Click ‘Regroup’:
- In the Arrange group, click the Group button.
- From the dropdown menu, select Regroup.
- Instant Reassembly: Word will instantly reassemble the objects into their last grouped state, saving you the hassle of re-selecting each one.
This “Regroup” feature is a powerful time-saver, particularly if you’re making temporary adjustments or frequently toggling between individual and group edits.
Working with Individual Items within a Group
Sometimes, you only need to make a minor adjustment to an item within an active group without fully ungrouping everything. Word allows for this nuanced control:
- Select the Group: Click once on the overall grouped object.
- Select the Individual Item: Click again on the specific item within the group that you wish to modify. You’ll see individual selection handles appear around that single item, while the outer group handles remain.
- Make Adjustments: You can now move, resize (within the confines of the group), or apply specific formatting to that individual element. The rest of the group will remain intact.
This method offers the best of both worlds: the efficiency of grouping combined with the precision of individual object control, making complex visual arrangements much more manageable.
Maximizing Visual Impact: Tophinhanhdep.com’s Role in Word Documents
Mastering image grouping in Microsoft Word is a significant step towards creating professional and engaging documents. However, the true potential of your visual content is unlocked when you combine these technical skills with high-quality assets and a strategic approach to design, areas where Tophinhanhdep.com truly shines.
Curating Thematic Collections and Mood Boards
Effective visual communication in a document often relies on a consistent theme and aesthetic. Tophinhanhdep.com offers a vast array of “Image Inspiration & Collections” that can serve as the foundation for your document’s visual narrative.
- Photo Ideas: Explore our “Photo Ideas” to discover unique compositions that resonate with your document’s message.
- Mood Boards: Use our diverse categories—from “Aesthetic” and “Nature” to “Sad/Emotional” and “Abstract”—to create “Mood Boards” within Word. Grouping these inspirational images allows you to easily arrange and present your visual concepts.
- Thematic Collections: Whether your document requires a series of “Beautiful Photography” depicting a specific subject or a collection of “Wallpapers” that convey a particular feeling, Tophinhanhdep.com’s “Thematic Collections” ensure visual coherence. Grouping these collections within Word transforms them into dynamic, unified sections of your document.
- Trending Styles: Stay current with “Trending Styles” by incorporating modern visual elements from Tophinhanhdep.com, grouped strategically to enhance contemporary document designs.
Applying Visual Design Principles with Tophinhanhdep.com Resources
Grouping in Word is a technical skill, but its application is deeply rooted in “Visual Design” principles. Tophinhanhdep.com provides the raw material for these principles to flourish.
- Graphic Design: Use our vast library of “High Resolution” images and “Stock Photos” to implement professional-grade “Graphic Design” elements. Grouping shapes and images allows you to construct logos, banners, or intricate infographics directly in Word, which can then be easily positioned and scaled.
- Digital Art & Photo Manipulation: Explore “Digital Art” techniques by layering images and applying “Editing Styles” from Tophinhanhdep.com. Grouping these layers enables complex “Photo Manipulation” effects, such as combining multiple images to create a composite scene or applying semi-transparent overlays for stylistic impact, all manageable as a single object.
- Creative Ideas: The flexibility offered by grouping encourages “Creative Ideas.” Experiment with unusual juxtapositions of images, text, and shapes, confident that you can manipulate the entire composition effortlessly. For example, you could group a “Beautiful Photography” background with a transparent text box and an illustrative shape to create a unique call-out box that is fully portable.
Beyond Grouping: Leveraging Tophinhanhdep.com’s Image Tools for Comprehensive Preparation
The quality of your grouped images ultimately depends on the quality of the individual images and how they are prepared. Tophinhanhdep.com’s comprehensive suite of “Image Tools” ensures your visuals are always at their best before they even enter your Word document.
- Converters: Ensure compatibility by converting images to desired formats.
- Compressors & Optimizers: Maintain small file sizes for faster document loading without sacrificing visual fidelity. These are crucial for documents rich in “High Resolution” images.
- AI Upscalers: Breathe new life into smaller images by intelligently increasing their resolution, making them suitable for larger displays within your grouped arrangements. This helps maintain the “High Resolution” standard of your document.
- Image-to-Text: For images containing critical information, our “Image-to-Text” tool can extract data, allowing you to incorporate relevant captions or textual descriptions alongside your grouped visuals, ensuring accessibility and context.
By integrating these tools into your workflow, you guarantee that every image, whether it’s a simple “Background” or a complex “Digital Photography” piece, is perfectly optimized for your Word document.
In conclusion, grouping images and objects in Word is a fundamental skill that empowers you to create visually sophisticated and easily manageable documents. By combining this technique with the vast resources, high-quality visuals, and powerful image tools available at Tophinhanhdep.com, you can transform your documents into dynamic, professional, and truly impactful visual communications. Dive into the world of creative possibilities, and let your Word documents reflect the stunning visual standards you uphold.