How to Master Image Trace in Adobe Illustrator for Stunning Visuals

In the dynamic world of digital art and graphic design, the ability to transform a raster image into a versatile vector graphic is an invaluable skill. Whether you’re a seasoned professional crafting intricate designs for Tophinhanhdep.com’s extensive collection of Wallpapers and Backgrounds, or an aspiring artist exploring new avenues in Digital Art, Adobe Illustrator’s Image Trace tool stands as a powerful bridge between pixel-based photography and infinitely scalable vector illustrations. This comprehensive guide will walk you through the nuances of Image Trace, from fundamental concepts to advanced settings, empowering you to vectorize your artwork with precision and creativity.
The core essence of Tophinhanhdep.com revolves around providing high-quality images and robust tools for visual design. Image Trace perfectly aligns with this mission by enabling users to convert any piece of Digital Photography, hand-drawn sketch, or even a detailed Stock Photo into a format that can be resized without any loss of quality – a crucial feature for anything from a website banner to a billboard, or for creating pristine Aesthetic and Nature-themed visuals. This transformation opens up a world of possibilities for Photo Manipulation, allowing you to extract elements, change colors, and integrate them into new Creative Ideas or Thematic Collections, ultimately enriching your visual design workflow and contributing to Tophinhanhdep.com’s diverse Image Inspiration & Collections.
The Fundamental Difference: Raster vs. Vector Images
Before diving into the mechanics of Image Trace, it’s essential to grasp the fundamental distinction between raster and vector images. This understanding forms the bedrock of why vectorization is so critical for many graphic design applications, especially when aiming for High Resolution output across various platforms.
Raster Images: These are what most people encounter daily. Photographs taken with a camera, screenshots, and many images found online (like .jpg, .png, .gif, .psd) are raster files. They are composed of a grid of individual colored squares called pixels. When you zoom in on a raster image, these pixels become visibly blocky, leading to a blurry or “pixelated” appearance. This limitation means raster images are not ideal for designs that need to be scaled significantly, as their quality degrades with enlargement. Imagine trying to use a low-resolution phone photo as a large billboard – the result would be a muddy mess of pixels. For Tophinhanhdep.com, this means while we offer beautiful Photography, converting them into vectors for specific Graphic Design elements allows for unparalleled adaptability.

Vector Images: In contrast, vector images (.ai, .eps, .svg, .pdf) are not made of pixels. Instead, they are constructed from mathematical equations that define points, lines, curves, and shapes. These mathematical descriptions dictate how the image should be rendered, regardless of its size. This means you can scale a vector image from the size of a postage stamp to the side of a building, and its lines will remain perfectly crisp and sharp. They never pixelate. This inherent scalability makes vector graphics the preferred format for logos, illustrations, typography, and any design element that needs to maintain flawless clarity across diverse applications – from a tiny icon in a mobile app to a vast Wallpapers display. For Visual Design and creating adaptable Creative Ideas, vector is king.
The Image Trace tool in Adobe Illustrator serves as an automatic “Image Converter,” bridging the gap between these two formats. It analyzes the pixels of a raster image and interprets them as a series of editable vector paths and shapes, effectively giving your pixel-based art the superpowers of vector graphics. This is particularly useful for taking hand-drawn sketches (often captured as raster images) and transforming them into professional-grade digital assets for Digital Art.
Setting Up and Initiating Image Trace in Illustrator
Getting started with Image Trace is a straightforward process, but preparing your artwork and knowing where to find the tool are the first crucial steps toward successful vectorization. This process transforms your initial image inspiration into a tangible element for Visual Design projects.
Placing Your Artwork for Vectorization
Your journey begins by bringing your raster image into Adobe Illustrator. This could be a scanned sketch, a photograph, or any pixel-based artwork you wish to convert.
- Open a New Document: In Adobe Illustrator, start by creating a new document (File > New). The dimensions can be flexible at this stage, as vector art is scalable.
- Place Your Image: Go to File > Place. Navigate to your desktop or desired folder, select the raster image you want to vectorize, and click “Place.” Click on your artboard to place the image.
- Observe the Raster Nature (Optional but Informative): If you zoom in closely on your placed image, you’ll notice that it quickly becomes blurry and pixelated. This visual confirmation reinforces why vectorization is necessary for crisp, scalable designs, especially for assets intended for Wallpapers or High Resolution display. For example, a beautiful piece of Digital Photography that you want to integrate into a Graphic Design as a clean line art element will clearly show its pixel limitations at high zoom levels.
Accessing the Image Trace Panel
Once your artwork is on the canvas, you need to activate the Image Trace functionality.
- Select Your Image: Click on the raster image with the Selection tool (V). You’ll know it’s selected when a bounding box appears around it. If the image is not selected, the Image Trace options will remain greyed out and inaccessible.
- Open the Image Trace Panel: There are a few ways to do this:
- From the Window Menu: Go to Window > Image Trace. This will open the dedicated Image Trace panel, usually on the right side of your workspace. This is often the most comprehensive way to access all settings.
- From the Properties Panel: If your Properties panel (Window > Properties) is open and your image is selected, you’ll often see an “Image Trace” button or a “Quick Actions” section with Image Trace options. Clicking this will initiate a default trace and often open the panel for further adjustments.
- From the Control Panel: With the image selected, look at the Control panel (usually at the top of the screen, below the menu bar). You might see an “Image Trace” button there as well, which applies a default trace and then lets you open the panel.
Once the Image Trace panel is open and your image is selected, Illustrator will likely apply a default trace, transforming your raster image into a preliminary vector version. Don’t worry if it doesn’t look perfect immediately; this is where the customization begins. This initial trace turns your Photo Idea into a potential Digital Art piece, ready for refinement.
Deep Dive into Image Trace Panel Settings
The true power of Image Trace lies in its customizable settings, which allow you to tailor the vectorization process to achieve a wide array of artistic effects, from precise line art to simplified color illustrations. These settings are crucial for adapting your images for various Visual Design needs, from creating abstract graphics to refining Sad/Emotional art into distinct vector expressions.
Exploring Presets for Quick Results
The Image Trace panel offers a variety of presets designed to give you a quick starting point for different types of artwork. These are excellent for rapidly converting your images or for understanding the range of possibilities without manually adjusting every slider.
- Default: A general-purpose setting that often works well for basic line art.
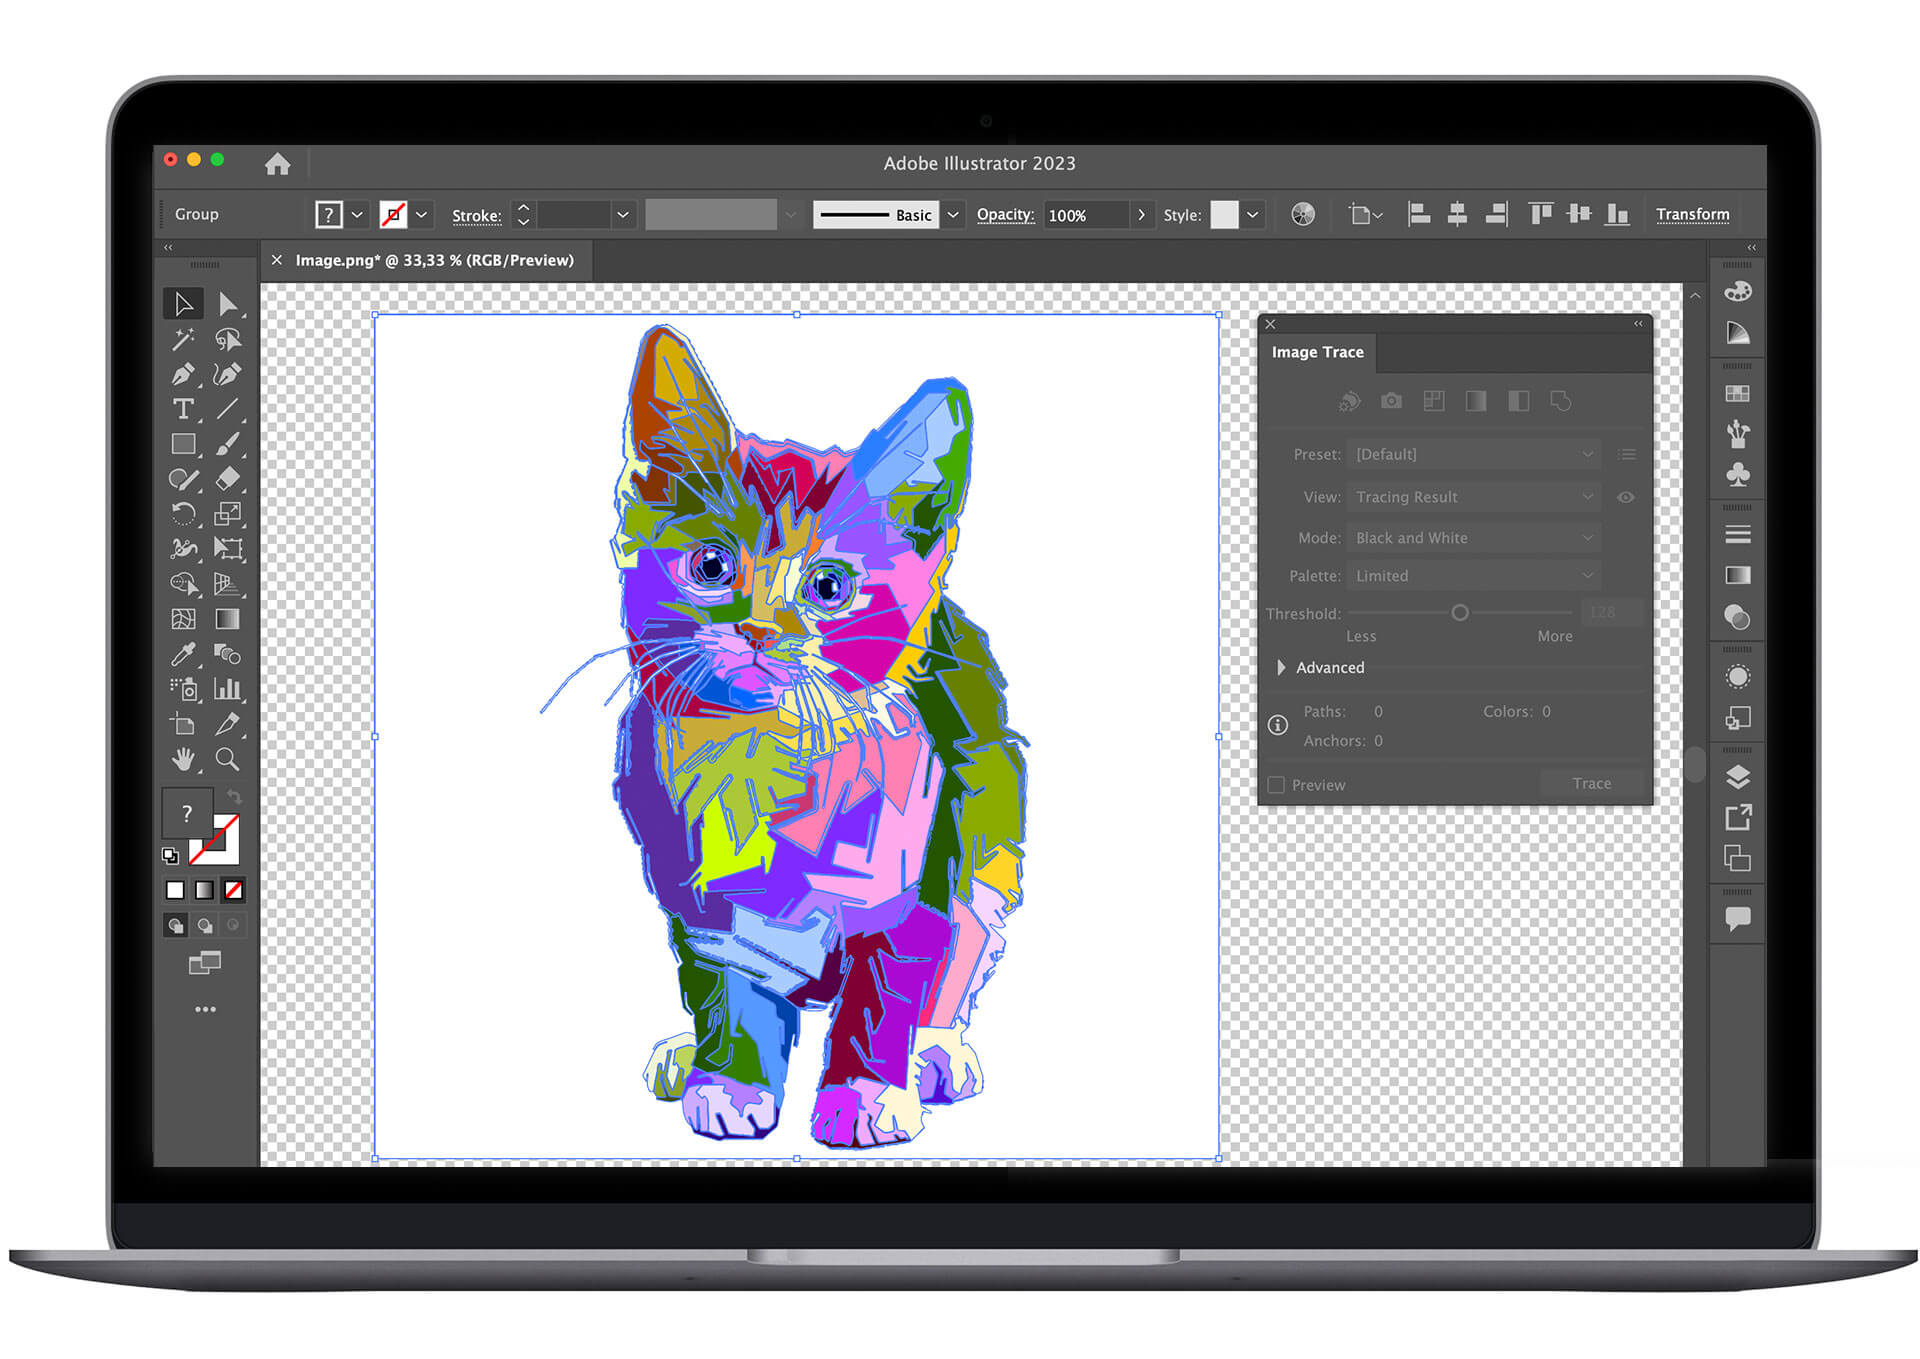
- High Fidelity Photo / Low Fidelity Photo: These are ideal for converting detailed photographs (like those from Tophinhanhdep.com’s Beautiful Photography collections) into a vector style. “High Fidelity” retains more detail and color, resulting in a more complex vector image, while “Low Fidelity” simplifies the image, reducing the number of colors and paths for a more illustrative feel.
- 3 Colors, 6 Colors, 16 Colors: These presets are perfect for simplifying images with a limited color palette, making them useful for logos, icons, or graphic illustrations where a flat, stylized look is desired. They effectively reduce the visual noise and create clean, distinct color areas.
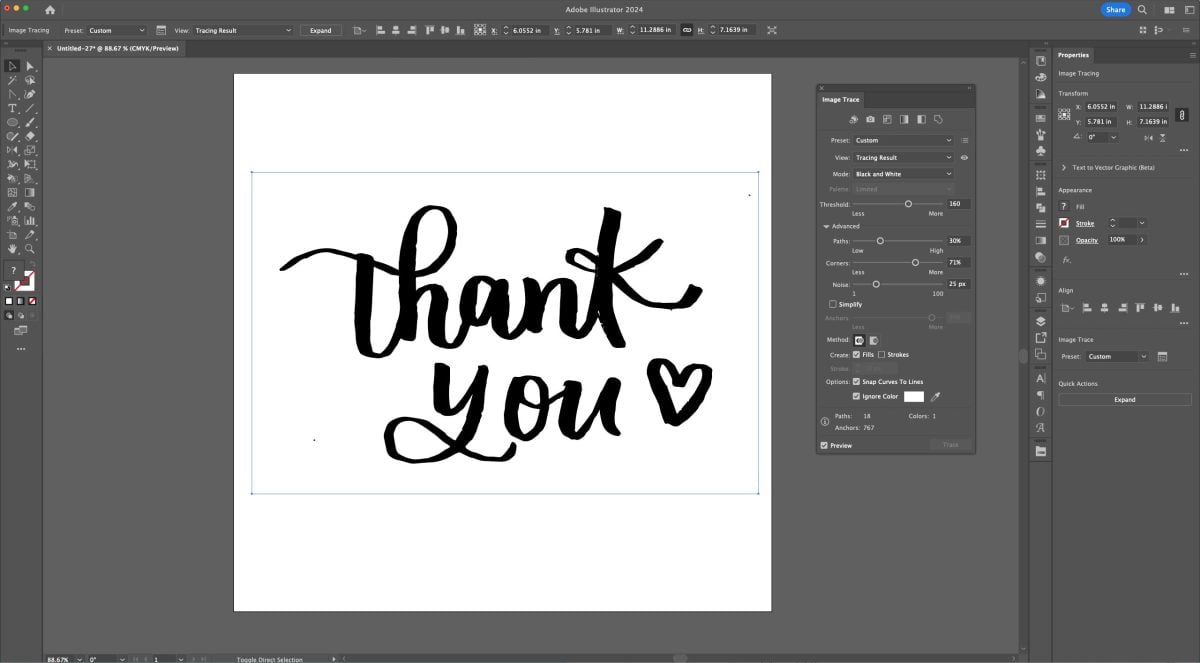
- Grayscale / Black and White: Essential for converting monochrome images, sketches, or illustrations into vector line art. The “Black and White” mode is particularly effective for hand-drawn pen-and-ink artwork.
- Silhouette: Creates a solid black shape from your image, perfect for creating simple outlines or extracting clear forms.
- Sketched Art / Line Art / Technical Drawing: These presets are designed to mimic the appearance of hand-drawn or technical illustrations, emphasizing lines and contours rather than solid color fills. They can transform a Photo Idea into an expressive piece of Digital Art.
When you select a preset, Illustrator automatically applies a set of parameters optimized for that style. It’s always a good practice to experiment with different presets to see which one best captures the essence of your original image and your desired vector output, especially when trying to match specific Creative Ideas or Trending Styles.
Understanding Advanced Sliders: Threshold, Paths, Corners, and Noise
For finer control over the vectorization, delve into the “Advanced” section of the Image Trace panel. Here, you’ll find sliders that allow you to meticulously adjust how Illustrator interprets your image’s details. These adjustments are vital for achieving professional results, especially when optimizing images for Image Tools like Compressors or for creating precise Graphic Design elements.
-
Threshold (Black and White Mode): This slider determines how light or dark a pixel needs to be to be converted into black in a black-and-white trace.
- Higher Threshold: More pixels will be turned black, making lines appear thicker and filling in lighter areas. This can be useful for solidifying weak lines in a sketch or adding boldness.
- Lower Threshold: Only darker pixels will be converted to black, resulting in thinner lines and more white space. This can help to preserve delicate details or create a more airy feel.
- Application: If you have a faint pencil sketch, increasing the threshold can make the lines stronger. For a bold ink drawing, a lower threshold might prevent lines from merging.
-
Paths: This controls the fidelity of the vector paths to the original raster image.
- Higher Percentage: Creates more paths and anchor points, resulting in a more detailed and accurate representation of the original image. This can make the vector image look smoother but also increases file complexity.
- Lower Percentage: Simplifies the paths and reduces the number of anchor points, leading to a smoother, more stylized, or abstract appearance. This is great for simplifying complex shapes or achieving a more graphic aesthetic.
- Application: For intricate illustrations or realistic photographic traces, a higher path value is suitable. For a minimalist logo or an Abstract design, a lower value helps achieve cleaner, flatter shapes.
-
Corners: This slider influences how sharp or rounded the corners in your traced image will be.
- Higher Percentage: Results in sharper, more angular corners, preserving the crispness of the original lines.
- Lower Percentage: Creates softer, more rounded corners.
- Application: If your original design has precise, geometric shapes or sharp angles, a higher corner value is key. For organic, flowing shapes, or a softer Digital Art style, a lower value might be more appropriate.
-
Noise: This setting helps to filter out small, unwanted details or “noise” from the original raster image.
- Higher Value: Ignores smaller details, smoothing out the trace and removing speckles or imperfections. This is useful for cleaning up scanned artwork or removing artifacts from low-quality images.
- Lower Value: Retains more fine details, including any noise present in the original image.
- Application: For a messy scan or a grainy photograph, increasing the noise threshold can significantly clean up the vector output. For artwork with very delicate and intentional small details, keep the noise level low.
Leveraging ‘Ignore White’ and Custom Presets
Two additional powerful features in the Image Trace panel can significantly streamline your workflow:
- Ignore White: When checked, this option instructs Illustrator to treat any white areas in your original raster image as transparent. This is incredibly useful for isolating artwork from a white background, like a hand-drawn sketch on white paper. Instead of tracing the white background as a solid white shape, it will be omitted, leaving you with only the colored (or black) elements of your design. This makes recoloring and layering your vector artwork much easier, perfect for creating dynamic Wallpapers or layered Graphic Design compositions.
- Save as New Preset: Once you’ve fine-tuned the sliders and achieved a desired look, you can save your custom settings as a new preset. This is a massive time-saver for repetitive tasks or for maintaining a consistent style across multiple projects. Simply click the “Manage Presets” icon (often a small menu icon) and choose “Save as New Preset.” Give it a descriptive name, like “Hand-Drawn Sketch” or “Flat Color Logo,” and it will be available in your presets dropdown menu for future use. This is a key aspect of optimizing your workflow for various Image Inspiration & Collections.
Remember to always have the “Preview” box checked in the Image Trace panel while making adjustments. This allows you to see the changes in real-time, helping you to achieve the perfect vector representation of your original artwork.
Expanding, Editing, and Applying Your Vectorized Art
Vectorizing an image is only the first step. To fully leverage the power of your new vector graphic, you need to expand it into editable paths and then manipulate those elements to suit your creative vision. This stage is where your raw vector data transforms into a usable asset for Digital Art and Photo Manipulation.
The Crucial ‘Expand’ Step
After applying Image Trace, your artwork is technically a vector object, but it’s still treated as a single “Image Trace object” by Illustrator. This means you can’t edit individual lines or shapes directly. To unlock its full editing potential, you must “Expand” it.
- Locate the Expand Button: With your traced image still selected, look for the “Expand” button. It often appears in the Control panel at the top of the Illustrator window, or in the Properties panel under “Quick Actions.”
- Click Expand: Clicking “Expand” converts the Image Trace object into a group of editable vector paths and anchor points. You’ll immediately see the bounding box change, and if you zoom in, you’ll notice the distinct anchor points and lines that make up your new vector graphic. This is the moment your raster image truly becomes a scalable, editable vector.
Once expanded, your image is no longer linked to the Image Trace panel settings. It’s now a collection of independent vector shapes, ready for further manipulation. This process is similar to how other Image Tools like AI Upscalers process images, but instead of just increasing pixel density, Image Trace converts the image’s fundamental structure.
Ungrouping and Refining Individual Elements
Often, when you expand a traced image, it becomes a single grouped object. To edit individual parts, you’ll need to ungroup it.
- Ungroup the Image: With the expanded vector image selected, right-click (or Control-click on Mac) and choose “Ungroup.” You might need to do this multiple times if there are nested groups within your traced object, or you can go to Object > Ungroup.
- Delete Unwanted Elements: Now that individual shapes are accessible, you can use the Selection tool (V) or Direct Selection tool (A) to select and delete any unwanted parts, such as stray dots, rough edges, or the white background if “Ignore White” wasn’t used. This is where you clean up your vector art, removing any “noise” that the trace might have picked up.
- Refine Shapes and Colors: With the individual paths, you can:
- Change Colors: Select specific shapes and apply new fill or stroke colors from the Color panel, Swatches panel, or using the Eyedropper tool. This is excellent for recoloring extracted elements from a Stock Photo into a specific Aesthetic.
- Adjust Anchor Points: Use the Direct Selection tool (A) to select and move individual anchor points, allowing you to fine-tune curves, straighten lines, or reshape elements precisely.
- Combine/Divide Shapes: Use Pathfinder tools (Window > Pathfinder) to unite, subtract, or intersect shapes, creating more complex or refined vector forms.
- Simplify Paths: For overly complex vector paths (often a result of high-fidelity traces), you can simplify them by going to Object > Path > Simplify. This reduces the number of anchor points while attempting to maintain the shape, leading to smaller file sizes and smoother curves. This optimization is crucial for efficient Graphic Design.
This stage is where your Artistic Vision truly comes to life. You can take elements from a Beautiful Photography piece, vectorize them, and then combine them with other Digital Art components to create something entirely new for Tophinhanhdep.com’s Image Inspiration & Collections.
Creative Applications for Your Vector Artwork
The applications for vectorized images are vast and directly support the core themes of Tophinhanhdep.com:
- Wallpapers and Backgrounds: Create scalable abstract patterns, stylized nature scenes, or emotional graphics that look sharp on any screen resolution. Vectorized elements can be layered to build unique Aesthetic backgrounds.
- High Resolution Photography & Stock Photos: Transform a photo into a graphic novel style illustration, a pop art piece, or a clean silhouette. This allows you to use photographic content in ways that are inherently scalable, perfect for print or large digital displays without pixelation.
- Digital Art & Graphic Design: Use traced elements as building blocks for logos, icons, illustrations, and typography. Extract figures from images for Photo Manipulation or create unique visual elements for branding. Vector art is the backbone of professional graphic design.
- Creative Ideas & Visual Design: The ability to convert raster to vector unlocks new creative possibilities. You can take a sketch from your Mood Boards, trace it, and then endlessly experiment with colors, textures, and arrangements. This empowers you to iterate quickly and realize your artistic vision, contributing to new Thematic Collections and Trending Styles.
- Image Tools & Optimization: While Image Trace isn’t a Compressor, the resulting vector files are often more efficient for complex illustrations compared to high-resolution raster files, especially when scalability is required. Vector files are inherently “optimized” for resolution independence. They can also be exported to SVG, a web-friendly vector format that loads quickly and scales flawlessly on websites.
Beyond Automatic: Manual Tracing for Precision
While Image Trace is incredibly powerful for automatic conversion, there are instances where manual tracing offers unparalleled precision and artistic control, especially for highly stylized Digital Art or intricate Graphic Design projects.
Manual tracing involves using Illustrator’s drawing tools – primarily the Pen tool (P), Pencil tool (N), Blob Brush tool (Shift + B), or even basic Shape tools – to manually draw over your raster image.
- Prepare Your Raster Guide: Place your raster image on a separate layer and lock it (select the layer in the Layers panel and click the empty box next to the eye icon to show a lock). Reduce its opacity slightly to make it easier to see your new vector lines on top.
- Select Your Drawing Tool:
- Pen Tool (P): Ideal for crisp, precise lines and smooth curves. It allows you to place anchor points and control bezier handles for exact shape creation. This is the choice for intricate logos or precise line art.
- Pencil Tool (N) / Blob Brush Tool (Shift + B): These are great for a more organic, hand-drawn feel, especially if you’re using a drawing tablet (like those compatible with Tophinhanhdep.com’s potential drawing tablet accessories). The Pencil tool creates single paths, while the Blob Brush creates filled shapes.
- Shape Tools: For geometric shapes like circles, rectangles, or polygons, simply draw these directly over the corresponding elements in your raster image.
- Trace and Build: On a new, unlocked layer, meticulously draw over the outlines and distinct color areas of your raster image. Build your vector graphic piece by piece, focusing on creating clean paths and shapes.
- Refine and Color: Once your outlines are complete, you can use the Live Paint Bucket tool (K) to quickly fill in color areas, or manually select shapes and apply fills and strokes. Further refine your paths using the Direct Selection tool.
Manual tracing, though more time-consuming, provides ultimate control over every curve and point. It’s the preferred method when an automatic trace doesn’t quite capture the subtle nuances or specific style you’re aiming for, allowing for a truly custom piece of Digital Art. This method is particularly valued for creating unique character designs, detailed illustrations, or highly personalized elements for Thematic Collections.
In conclusion, Adobe Illustrator’s Image Trace tool is a cornerstone for anyone engaged in visual creation, from optimizing images for Tophinhanhdep.com’s vast selection of Wallpapers to crafting bespoke Graphic Designs. By understanding the distinction between raster and vector, mastering the Image Trace panel’s settings, and knowing when to apply manual tracing techniques, you unlock a realm of creative possibilities. This skill not only enhances your ability to produce High Resolution, scalable artwork but also empowers you to transform inspiration from Photography into versatile, editable Digital Art. Dive in, experiment, and let your creative ideas flourish!