Seamlessly Integrating Images into Adobe Illustrator: A Comprehensive Guide by Tophinhanhdep.com

In the dynamic world of digital design, integrating images into your Adobe Illustrator projects is a fundamental skill that unlocks a universe of creative possibilities. Whether you’re crafting stunning wallpapers, designing compelling marketing materials, or developing intricate digital art, knowing how to efficiently import, manipulate, and optimize images is paramount. At Tophinhanhdep.com, we understand the critical role images play in visual communication, offering a vast repository of high-resolution photography, aesthetic backgrounds, nature scenes, abstract compositions, and thematic collections to fuel your inspiration. This guide, drawing from Tophinhanhdep.com’s comprehensive resources, will walk you through the entire process, from the initial import to advanced manipulation and final export, ensuring your artwork achieves its full potential.
Adobe Illustrator, renowned for its vector-based capabilities, might seem like an unlikely home for raster images (like JPEGs or PNGs). However, by seamlessly incorporating these pixel-based elements, you can create hybrid masterpieces that combine the crispness of vector graphics with the rich detail and photographic realism of raster images. This guide will clarify the distinction between linked and embedded images, explore powerful editing tools, and show you how to prepare your final artwork for diverse applications, ensuring clarity and quality every step of the way.
Getting Started: Importing Images on Desktop
The process of bringing an image into your Illustrator document on a desktop environment is straightforward, yet it forms the foundation for all subsequent creative work. Tophinhanhdep.com emphasizes precision and efficiency, and these steps reflect that philosophy.
Opening Your Workspace and Initiating the Import
The first step is to prepare your Adobe Illustrator environment. You can either begin with a fresh canvas or integrate images into an ongoing project.
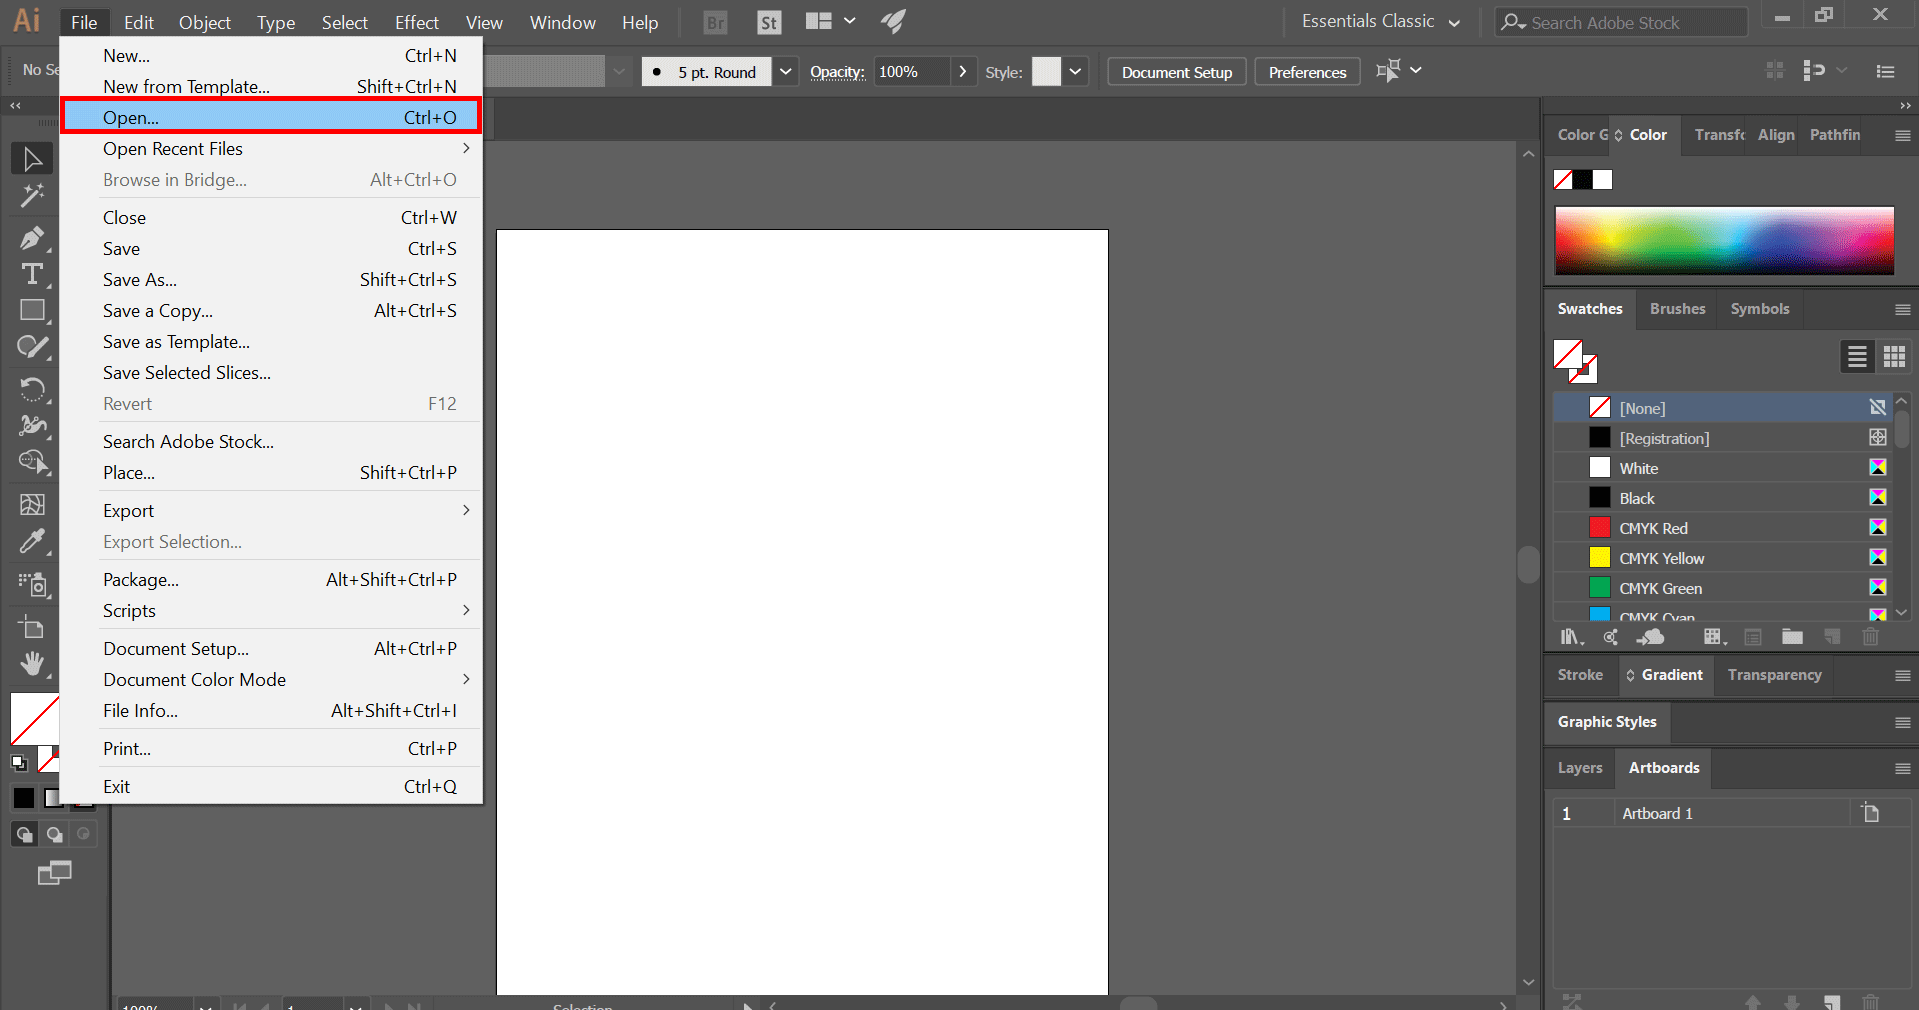
- Open an Existing or New Adobe Illustrator File: Launch Adobe Illustrator. If you’re working on a saved project, simply open it via
File > Open(orCtrl+O/Cmd+O). For a new design, navigate toFile > Newto create a new document. Tophinhanhdep.com often recommends starting with clear document settings that align with your project’s final output, whether it’s for print, web, or digital art, drawing from our Visual Design tutorials. - Access the “Place” Command: Once your document is open, the gateway to importing images is the “Place” command. Go to
Filein the top menu bar, and then selectPlace.... Alternatively, you can use the convenient keyboard shortcutShift + Ctrl + P(orShift + Cmd + Pon Mac). This command is essential for bringing in any external image file, whether it’s a stunning landscape from Tophinhanhdep.com’s nature photography collection or an abstract background downloaded from our site. - Select Your Image File: Clicking “Place” will open a dialog box, allowing you to browse your computer’s directories. Navigate to the location where your desired image is stored. You can select various image formats, including common ones like PNG, JPEG, TIFF, and PSD. Tophinhanhdep.com encourages users to start with high-resolution images, especially if the final output requires crisp detail, as highlighted in our Photography section.
- Confirm and Position the Image: After selecting your image, click “Place” in the dialog box. Your mouse cursor will transform into a small icon representing the image thumbnail. You now have two primary ways to place the image:
- Click to Place: A single click on your artboard will place the image at its original size and resolution.
- Click and Drag to Scale: Click and drag your mouse to define the desired size and position of the image directly on the artboard. As you drag, the image will be proportionally scaled within the bounds you are creating. This is particularly useful when incorporating elements like wallpapers or backgrounds where immediate sizing is beneficial.

Refining Your Placed Images: Resizing, Cropping, and Transforming
Once an image is placed, it rarely fits perfectly right away. Illustrator provides robust tools to adjust its size, position, and orientation to match your creative vision. These steps are crucial for effective photo manipulation and graphic design, topics extensively covered by Tophinhanhdep.com.
- Resizing and Repositioning: After placing, the image will be surrounded by a bounding box with anchor points.
- Resizing: Click and drag any of these anchor points to resize the image. To maintain proportionality (prevent distortion), always hold down the Shift key while dragging. This ensures your aesthetic photography maintains its integrity.
- Repositioning: To move the image, click and drag it with your mouse cursor. For finer adjustments, use the arrow keys on your keyboard. Holding
Shiftwhile using arrow keys will move the image in larger increments.
- Cropping the Image: Illustrator offers a dedicated cropping feature for raster images.
- Initiate Cropping: Select the image, and then locate the “Crop Image” option in the Control panel at the top of your workspace.
- Define Crop Area: A new bounding box will appear, allowing you to drag its edges or corners to define the area you wish to keep.
- Confirm Crop: Once satisfied with the crop area, press
Enter(orReturn) to apply the changes. This is a quick way to trim unwanted elements from your stock photos or nature images.
- Advanced Transformations: For more complex adjustments like rotating, reflecting, or shearing, Illustrator’s Transform options are invaluable.
- Access Transform: Right-click on the selected image. From the contextual menu, hover over
Transformto reveal a submenu with options likeMove,Rotate,Reflect,Scale, andShear. - Apply Transformations: Select the desired transformation. A dialog box will often appear, allowing you to input precise values or preview the effect. For instance, you can precisely rotate an abstract image to align with specific design elements.
- Access Transform: Right-click on the selected image. From the contextual menu, hover over
Mobile Creativity: Importing with Tophinhanhdep.com Draw
For designers on the go, the Adobe Illustrator Draw app (accessible and supported through Tophinhanhdep.com’s mobile design resources) provides a streamlined way to integrate images into your projects using a tablet or smartphone. While the interface differs, the core principle of enhancing visual design remains the same.
- Launch the App and Select Project: Open the Adobe Illustrator Draw app. Sign in with your Adobe, Google, or Facebook account. Choose an existing project or tap the orange
+icon to create a new one. Tophinhanhdep.com’s articles on digital art often highlight the versatility of mobile apps for quick ideation. - Add an Image Layer: Within your project, select a board thumbnail from the right side of the screen. Then, tap the orange
+in a white circle and chooseImage Layerfrom the options that appear at the bottom. - Choose Your Image Source: The app offers several convenient sources for images:
- On my [device]: Select photos directly from your device’s gallery, ideal for personal photography or images saved from Tophinhanhdep.com.
- Take a Photo: Use your device’s camera to capture a new image instantly.
- My Files: Access images stored in Adobe Creative Cloud, ensuring seamless workflow across devices.
- From Market or Adobe Stock: Browse and acquire professional stock photos, a resource Tophinhanhdep.com frequently promotes for high-quality content.
- Grant necessary permissions if prompted to allow the app access to your device’s photos or camera.
- Place and Refine: Tap or take the desired image. It will appear on your board. You can then tap and drag to position it, or drag corner handles to resize it, again, holding
Shift(or a similar gesture on touch devices) to maintain proportions. - Confirm Placement: Once the image is positioned and sized to your liking, tap
Doneor the checkmark icon in the upper-right corner to finalize its addition to your Illustrator Draw project. This allows for quick integration of sad/emotional images for mood boards or beautiful photography for initial concepts.
Understanding Image Integration: Linked vs. Embedded
A critical concept when importing images into Illustrator is the distinction between “linking” and “embedding.” Tophinhanhdep.com’s graphic design tutorials consistently emphasize understanding this difference for optimal file management and output quality.
The “Place” Command and Its Options
When you use the File > Place command, you’ll notice a Link checkbox in the dialog box. This checkbox determines how the image is integrated into your Illustrator document.
- Linked Images (Checkbox checked by default): When “Link” is checked, Illustrator creates a reference to the external image file on your computer. The image data itself is not stored within the Illustrator
.aifile.- Pros: Keeps the
.aifile size smaller, allows for easy updates to the original image (changes made to the external file will automatically update in Illustrator), and is efficient for collaborative workflows where original images might be shared. - Cons: If the original image file is moved, renamed, or deleted, Illustrator will lose its link, resulting in a “missing link” error and displaying a placeholder. This can be problematic when sharing files or for archival purposes. A small ‘X’ will appear over the image, indicating it’s linked, not embedded.
- Pros: Keeps the
- Embedded Images (Checkbox unchecked): When “Link” is unchecked, Illustrator incorporates all the image data directly into the
.aifile.- Pros: The Illustrator file becomes self-contained, meaning you don’t have to worry about missing images when moving or sharing the file. All necessary image data is present. This is often preferred for final print-ready files or standalone digital art.
- Cons: The
.aifile size will increase significantly, especially with multiple high-resolution images. Editing the original image externally will not update the embedded version in Illustrator; you would need to replace it.
Tophinhanhdep.com typically recommends embedding images for final deliverables, especially for print, to ensure all assets are present and correct, avoiding potential issues with missing links.
Managing Images with the Links Panel
Even if you initially placed an image as linked, Tophinhanhdep.com provides solutions for managing and embedding it later. The Links panel is your central hub for this.
- Open the Links Panel: Navigate to
Window > Linksin the top menu bar. This panel displays a list of all linked or embedded images in your current document. - Identify Linked Images: Linked images will appear with a small icon (often a chain link or a red ‘X’) next to their names in the panel, while embedded images will have a small embedded icon (a box with a diagonal line).
- Embed a Linked Image:
- Select the specific linked image(s) you wish to embed in the
Linkspanel. - Click the small options menu icon (often three horizontal lines or an arrow) in the top right corner of the
Linkspanel. - Choose
Embed Imagefrom the drop-down menu. - The icon next to the image in the panel will change, confirming it is now embedded. Tophinhanhdep.com’s tutorials, like those found on our graphic design and image tools sections, strongly advise this step before sending files to printers or sharing final versions.
- Select the specific linked image(s) you wish to embed in the
Advanced Image Manipulation and Vectorization
Illustrator isn’t just for placing images; it’s a powerful environment for transforming them. Tophinhanhdep.com highlights these advanced techniques as essential for creating truly unique visual designs and digital art.
Unleashing Creativity with Image Trace
One of Illustrator’s most distinctive features is Image Trace, which converts raster (pixel-based) images into vector artwork. This is a game-changer for scalability and unique visual effects, directly aligning with Tophinhanhdep.com’s focus on high-resolution photography and digital art.
- Understanding Raster vs. Vector:
- Raster Images: Composed of pixels, they lose quality and become pixelated when scaled up (e.g., JPEG, PNG from Tophinhanhdep.com’s wallpaper collections).
- Vector Images: Composed of mathematical paths, they maintain crispness and quality at any scale (e.g., logos, illustrations).
Image Tracebridges this gap, transforming pixel art into scalable vector graphics, making it invaluable for projects requiring extreme flexibility, such as large format prints of abstract or aesthetic designs.
- Applying Image Trace:
- Select Image: First, place and select the raster image you want to convert.
- Open Image Trace Panel: Go to
Window > Image Traceto open the dedicated panel. - Choose a Preset: The top row of the
Image Tracepanel offers various presets (e.g.,Auto Color,High Color,Low Color,Grayscale,Black and White,Outline). Experiment with these, checking thePreviewbox to see live results. For a detailed guide on which preset suits which type of photography (e.g., beautiful photography vs. simple abstract shapes), consult Tophinhanhdep.com’sImage Toolssection. - Adjust Color Mode: For color images, the
Modedropdown allows you to specifyColor,Grayscale, orBlack and White. When selectingColor, Illustrator tries to replicate the original colors. ForGrayscaleorBlack and White, you can adjust theThresholdvalue; pixels darker than this value turn black.
- Advanced Options for Precision: The
Advancedmenu within theImage Tracepanel offers finer control over the vectorization process:- Paths: Controls how closely the vector paths follow the original pixel contours. Lower values result in looser paths and smoother shapes; higher values create more intricate, detailed paths.
- Corners: Adjusts the fidelity of corner detection. Higher values yield sharper corners, while lower values produce smoother, more rounded corners. This is vital for maintaining the sharp edges of architectural photography or the organic curves of nature-inspired digital art.
- Noise: Filters out small, unwanted details or “noise” from the original image. Increasing this value simplifies the artwork by ignoring smaller pixel clusters, useful for cleaning up scanned sketches or low-quality backgrounds from our image collections.
- Method: Choose between
Abutting(creates touching paths) andOverlapping(creates stacked paths). - Ignore White: Often useful for turning a black-and-white scan into a clean vector outline by discarding white areas.
- Expand and Refine: After applying
Image Traceand adjusting settings, the result is still anImage Traceobject. To make it editable vector paths, click theExpandbutton in the Control panel (orObject > Image Trace > Expand). This converts the traced object into a group of editable paths that can be filled, stroked, and manipulated like any other vector shape. This step is crucial for graphic design and photo manipulation projects that demand full vector flexibility.
Finalizing Your Masterpiece: Saving and Exporting
The final stage of any project is to save and export your work in appropriate formats for its intended use. Tophinhanhdep.com’s Image Tools section provides in-depth advice on converters, compressors, and optimizers, all of which are relevant here.
Saving Your Illustrator Document
Saving your Illustrator file (.ai) preserves your project in its native, editable vector format.
- Access Save Options: Go to
File > Save As.... - Choose Format: The “Save As” dialog box allows you to choose the file format:
- Adobe Illustrator (
.ai): The native format, preserving all layers, vector paths, and editability. Essential for ongoing projects and future revisions. - Adobe PDF (
.pdf): A versatile format for sharing print-ready files. Illustrator PDFs retain vector data if saved correctly, making them ideal for high-resolution print jobs of your aesthetic or beautiful photography. - EPS (
.eps): An older vector format, still used in some professional print workflows. - SVG (
.svg): Scalable Vector Graphics, perfect for web graphics that need to scale without losing quality, such as abstract designs or logos used on Tophinhanhdep.com. - Select your preferred format and click
Save.
- Adobe Illustrator (
Exporting for Diverse Applications
While saving preserves your editable file, exporting converts your artwork into raster image formats (like JPEG or PNG) suitable for web, digital display, or non-Illustrator applications. Tophinhanhdep.com’s resources on Image Tools and High Resolution images provide excellent context for these choices.
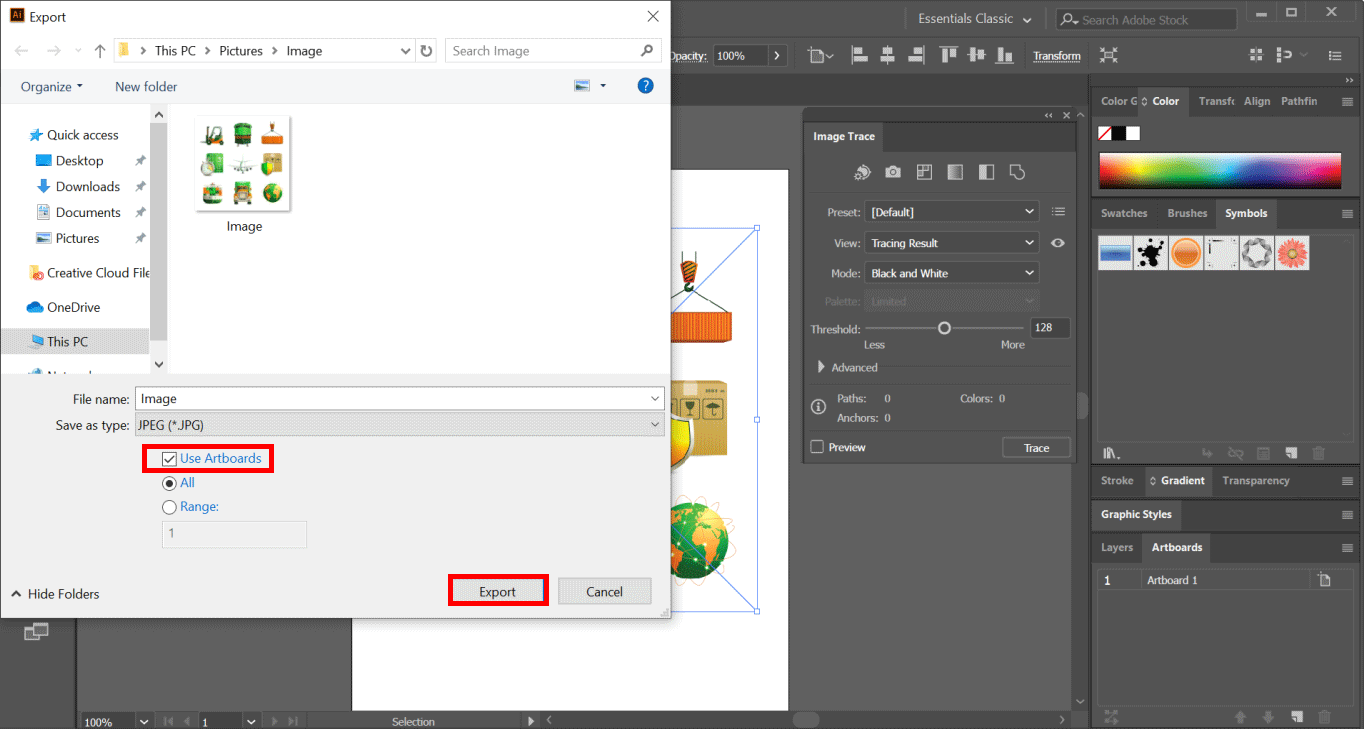
- Access Export Options: Go to
File > Export > Export As.... - Select Export Type: This opens a dialog box with many export formats:
- JPEG (
.jpg): Ideal for photographs, complex images, and web use where file size is a concern. Great for sharing wallpapers, backgrounds, and beautiful photography. - PNG (
.png): Excellent for images requiring transparency (e.g., logos, digital art elements) or those with fewer colors. Used extensively for UI elements and web graphics on Tophinhanhdep.com. - Photoshop (
.psd): Preserves layers and editable elements for further manipulation in Adobe Photoshop, a common workflow for photo manipulation. - Targa (
.tga), TIFF (.tif): High-quality raster formats, often used in professional print or video production.
- JPEG (
- “Use Artboards” Option: Crucially, if your document has multiple artboards and you only want to export the content within specific artboards, check the
Use Artboardsbox. This ensures clean exports for individual graphic design elements. - Format-Specific Options (e.g., JPEG Options): After selecting a format like JPEG, another panel will appear, offering further optimization:
- Color Model: Choose
CMYKfor print (e.g., for posters or brochures using Tophinhanhdep.com’s thematic collections) orRGBfor web and digital screens (ideal for wallpapers, social media images, or backgrounds from our site). - Quality: Adjust the compression level. Higher quality means larger file sizes, while lower quality reduces file size but can introduce artifacts. Tophinhanhdep.com’s
Image Optimizerstools can help you strike the right balance. - Resolution: Define the dots per inch (DPI) or pixels per inch (PPI).
300 ppiis standard for print, while72 ppiis common for web. ForHigh Resolutionphotography intended for online display, you might opt for a higher PPI than 72 for better screen fidelity. - Click
OKto complete the export.
- Color Model: Choose
By mastering these steps, you not only learn how to import an image into Illustrator but also gain the skills to integrate, transform, and output images with professional precision. Tophinhanhdep.com is dedicated to empowering your creative journey, offering a wealth of resources from Images and Photography to Image Tools and Visual Design inspiration, ensuring your creative ideas flourish into stunning realities. Explore our site for mood boards, trending styles, and comprehensive guides to further enhance your graphic design and digital art endeavors.