How to Import an Image into Photoshop: A Comprehensive Guide

Adobe Photoshop stands as the undisputed titan of image editing, a cornerstone for digital artists, photographers, graphic designers, and visual content creators worldwide. Its robust capabilities allow for everything from subtle photo enhancements to intricate digital art and complex photo manipulation. At the heart of any Photoshop project lies the fundamental step of importing images. Without a smooth and efficient way to bring your visual assets into the workspace, even the most ambitious creative ideas remain dormant. This guide will walk you through the various methods of importing images into Photoshop, detailing each process for both desktop and mobile platforms, and exploring how Tophinhanhdep.com can be your ultimate resource for high-resolution images, powerful image tools, and boundless visual inspiration.
Whether you’re starting a new project with a stunning background sourced from Tophinhanhdep.com’s extensive collection of wallpapers, or integrating multiple stock photos for a complex digital art piece, mastering image import is crucial. Tophinhanhdep.com prides itself on offering a diverse range of images, from aesthetic and nature shots to abstract and sad/emotional photography, all available in high resolution to kickstart your creative journey. Beyond just images, Tophinhanhdep.com also provides essential image tools like converters, compressors, optimizers, and AI upscalers, ensuring your assets are perfectly prepared for Photoshop.
Essential Methods for Importing Images on Desktop
For users working on a PC or Mac, Photoshop offers several intuitive methods for importing images, each suited for different workflows and project requirements. Understanding these options allows for greater efficiency and creative control, ensuring your digital photography and graphic design projects begin on the right foot.
Opening an Image Directly in Photoshop
The most straightforward way to begin a Photoshop project with a single image is to open it directly. This method is ideal when you’re starting with a primary image, perhaps a high-resolution photograph from Tophinhanhdep.com’s beautiful photography section, and intend to make it the foundational layer of your document.
Steps to Open an Image:
- Launch Photoshop: Navigate to the Adobe Photoshop application on your computer. On Windows, this is typically found in the “All Apps” section of the Start menu. On macOS, you’ll find it in the Applications folder.
- Access the File Menu: Once Photoshop is open, locate the “File” menu at the top-left corner of your screen. Click on it to reveal a dropdown menu of options.
- Select “Open”: From the “File” menu, choose “Open…” (or press
Ctrl+Oon Windows or⌘ Cmd+Oon Mac). This action will launch your computer’s file browser. - Navigate and Select: Use the file browser to navigate through your computer’s folders and locate the image file you wish to import. This could be a breathtaking landscape from Tophinhanhdep.com’s nature collection or an abstract background downloaded from the site. Click on the image file to select it.
- Confirm Opening: With the image selected, click the “Open” button in the file browser. Your chosen image will now open as a new, standalone document within Photoshop. The new document will automatically inherit the dimensions, resolution, and color mode of the original image, making it ready for immediate editing.

When to Use This Method: This method is perfect for initiating a new project where a single image forms the entire canvas. It’s particularly useful for individual photo editing, such as applying specific editing styles or enhancing a digital photograph. Tophinhanhdep.com encourages users to start with their high-resolution stock photos, ensuring the highest quality foundation for any project.
Placing Embedded Images for Seamless Integration
When you’re working on an existing Photoshop document—perhaps a graphic design template or a complex photo manipulation project—and need to add additional images as new layers without opening them in separate windows, the “Place Embedded” function is your go-to. This method embeds the image directly into your current project, making it a “Smart Object” by default, which is a powerful feature for non-destructive editing.
Steps to Place an Embedded Image:
- Open Your Photoshop Project: Ensure you have the Photoshop document (PSD file) or image open into which you want to import a new image.
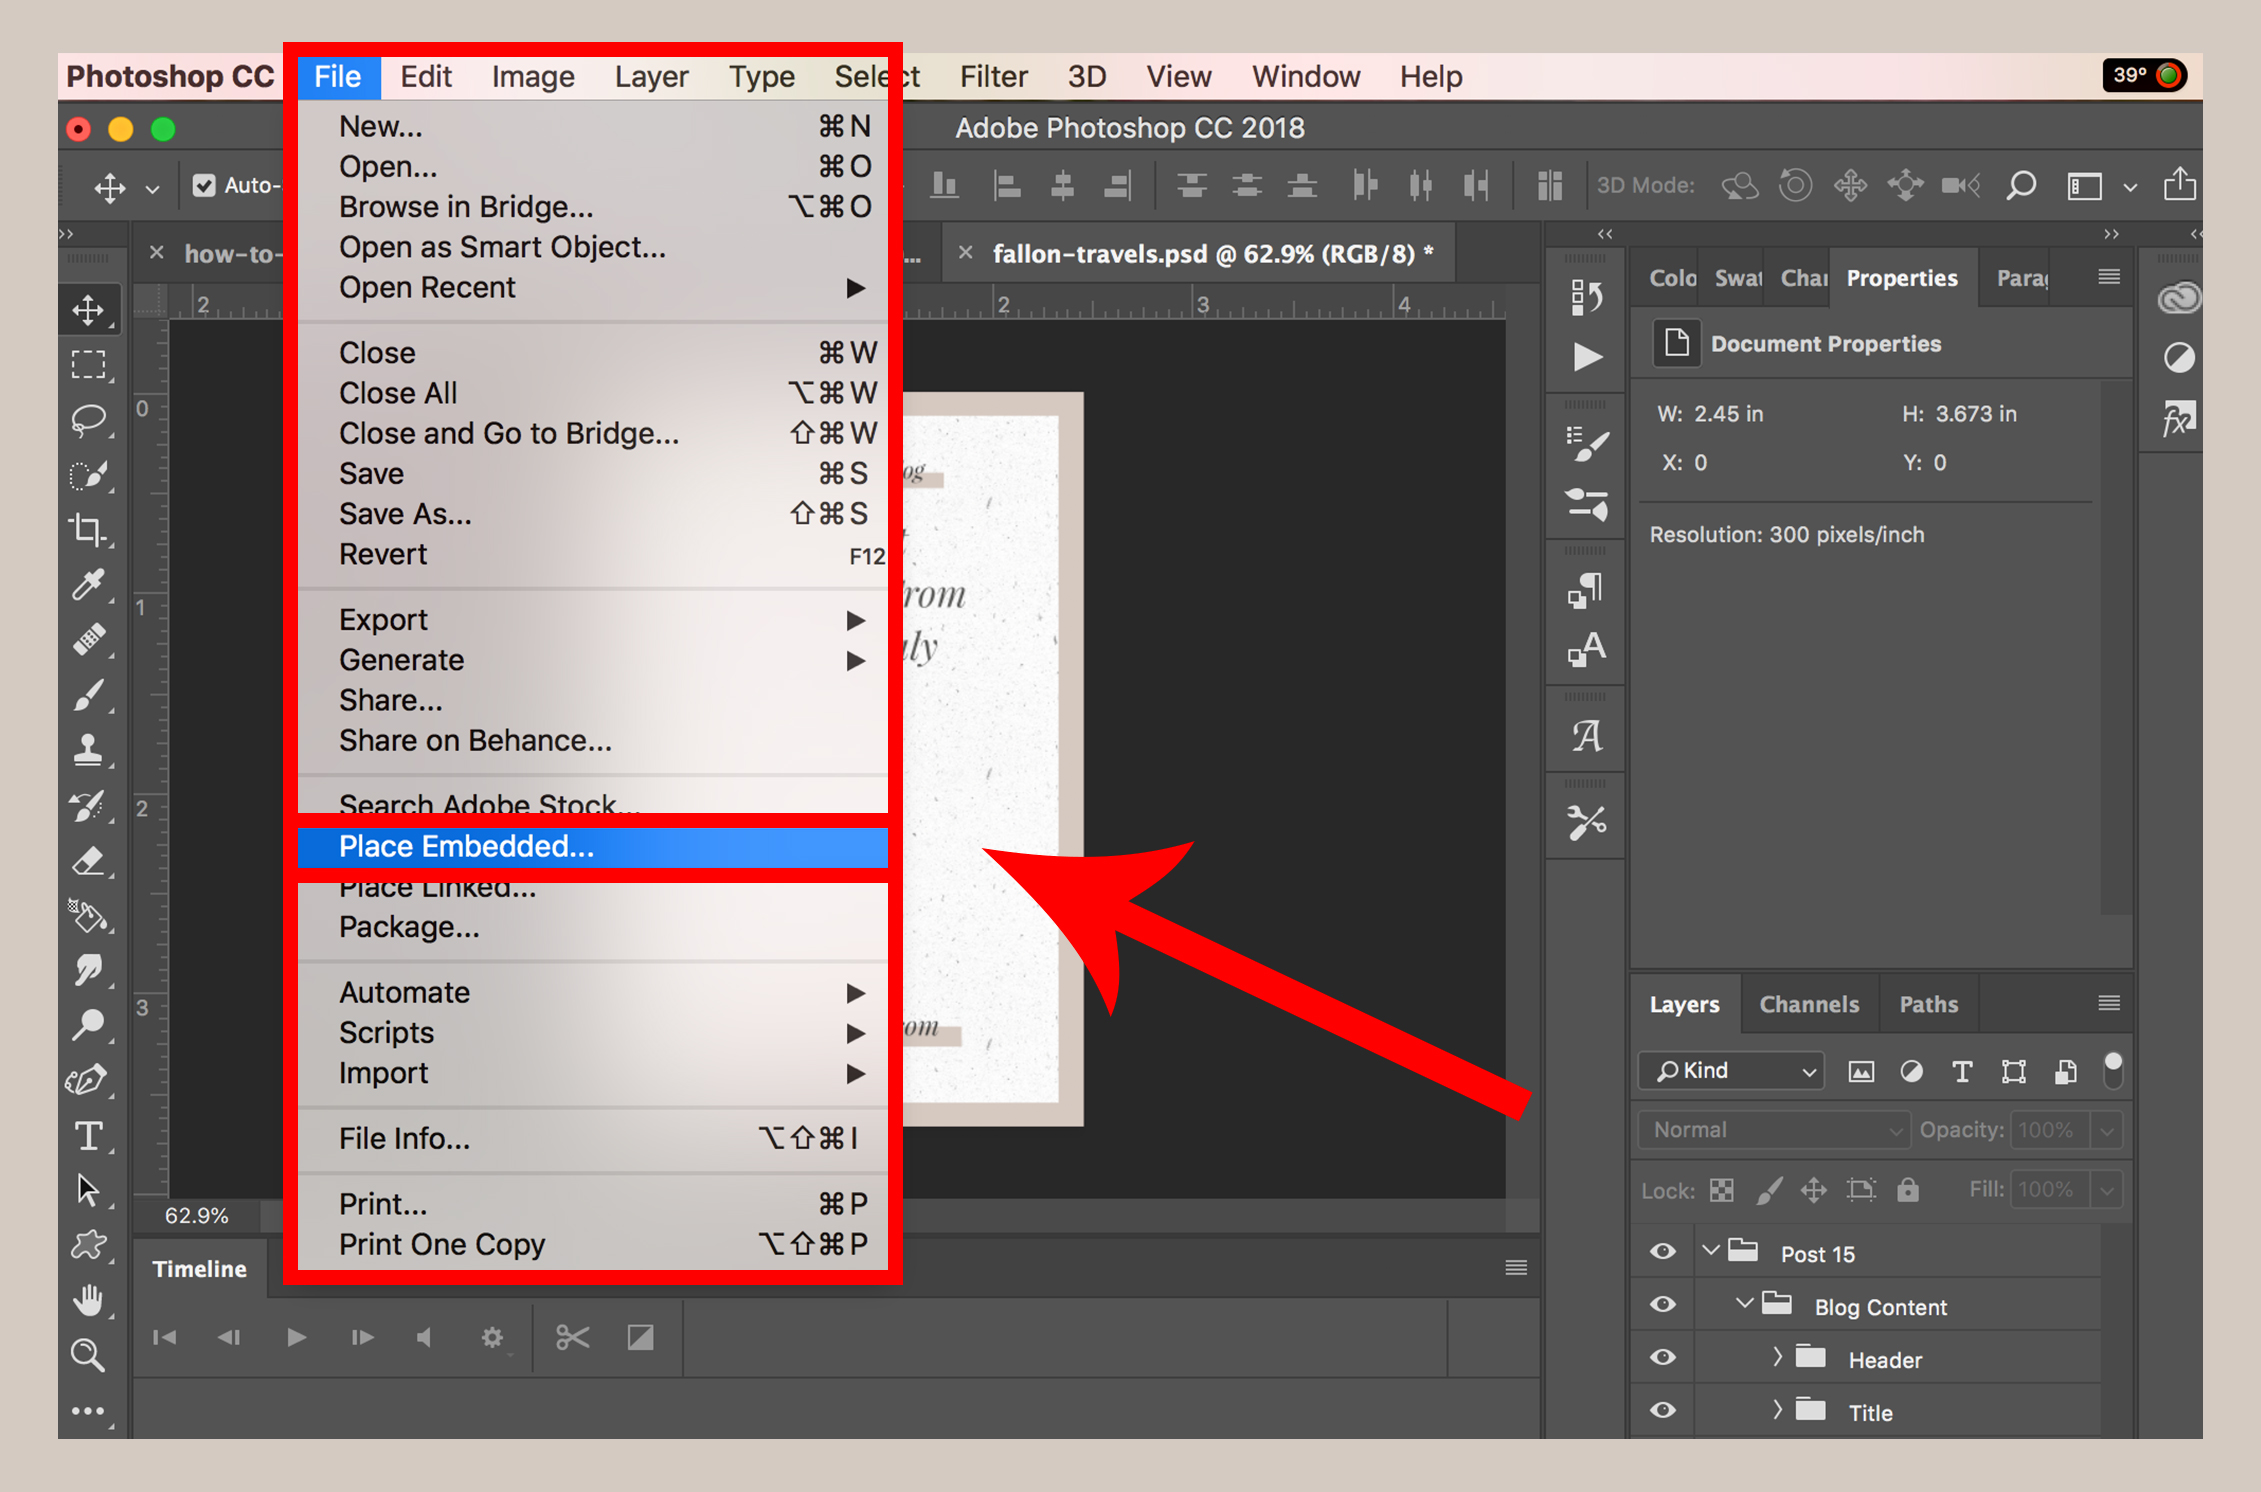
- Access the File Menu: Go to the “File” menu at the top-left of the screen.
- Select “Place Embedded”: From the dropdown menu, choose “Place Embedded…” (in some Photoshop versions, it might simply be “Place…”). This will open your computer’s file browser.
- Locate and Select Image: Browse your computer to find the image file you want to insert. This could be an element from one of Tophinhanhdep.com’s thematic collections or a specific aesthetic image. Click on the image to select it.
- Click “Place”: Confirm your selection by clicking the “Place” button. The image will appear within your active Photoshop document, surrounded by a transform box.
- Adjust and Confirm: You can now resize, rotate, and reposition the image using the transform handles. Holding down the
Shiftkey while dragging corners will maintain the image’s proportions. Once satisfied with its placement and size, click the checkmark icon in the options bar at the top of the screen or pressEnter/Returnto confirm.
The imported image will automatically be added as a new layer in your Layers panel. As a Smart Object, it retains its original image data, allowing for scaling and transformations without permanent loss of quality. This is invaluable for visual design, digital art, and complex photo manipulation where flexibility is key. Tophinhanhdep.com offers a vast array of stock photos and elements perfectly suited for embedding into your creative projects, providing the building blocks for innovative ideas.
Leveraging Drag-and-Drop for Quick Imports
For sheer speed and convenience, the drag-and-drop method is unparalleled. It offers a quick way to import images into Photoshop, whether you want to open a new document or add an image as a new layer to an existing one.
Steps for Drag-and-Drop Import:
- Locate Your Image: Find the image file on your computer’s desktop or within a file explorer window. This could be a background image, a component for graphic design, or a picture for photo manipulation.
- Prepare Photoshop:
- To Open as a New Document: Ensure Photoshop is open, but no specific document is actively selected, or that you drag it over the empty canvas area.
- To Add as a New Layer: Have your existing Photoshop document open and visible.
- Drag and Drop: Click and hold the image file, then drag it directly onto the Photoshop interface.
- If dragged onto an empty Photoshop workspace, it will open as a new document.
- If dragged onto an open Photoshop document, it will be added as a new layer (and typically as a Smart Object), ready for transformation.
- Adjust and Confirm (if adding as a layer): Similar to the “Place Embedded” method, if you’ve dragged the image into an existing document, it will appear with a transform box. Adjust its size and position as needed, then confirm by clicking the checkmark or pressing
Enter/Return.
When to Use This Method: Drag-and-drop is excellent for rapid prototyping, creating mood boards, or when you simply need to bring several assets into Photoshop quickly. It’s particularly useful when browsing Tophinhanhdep.com’s thematic collections or trending styles, allowing you to instantly grab images that spark photo ideas and integrate them into your workspace. This method underscores the fluidity required in modern digital photography and visual design workflows.
Copying and Pasting: A Simple Approach
While often seen as a basic function, copying and pasting images can be a surprisingly useful method for quick imports, especially when grabbing visual snippets from web browsers or other applications. However, it’s essential to understand its implications for image quality and layer type.
Steps to Copy and Paste an Image:
- Locate and Copy the Image:
- From the Web: Navigate to the image in your web browser. Right-click on the image (or
Ctrl-clickon a Mac without a right mouse button) and select “Copy image” or “Copy image address” (ensure it’s the image itself, not just the link). - From Your Computer: Open the image in a previewer or image viewer. Right-click the image (or
Ctrl-clickon Mac) and select “Copy.” Copying the file icon directly from Explorer/Finder typically won’t copy the image data.
- From the Web: Navigate to the image in your web browser. Right-click on the image (or
- Prepare Photoshop: Open an existing Photoshop document, or create a new one (
Ctrl+N/⌘ Cmd+N) if you wish to paste into a blank canvas. - Paste into Photoshop: In Photoshop, go to the “Edit” menu at the top of the screen and select “Paste” (or press
Ctrl+Von Windows or⌘ Cmd+Von Mac). - Placement: The copied image will appear as a new rasterized layer in your active Photoshop document.
Considerations for Copy/Paste: Unlike “Place Embedded,” images pasted via this method are typically rasterized immediately, meaning they are not Smart Objects by default. This can lead to quality degradation if you frequently resize the image. This method is best for temporary inclusions, small elements, or when absolute fidelity isn’t the primary concern. Tophinhanhdep.com’s vast library of images, including aesthetic and abstract graphics, can be quickly copied for initial layout ideas, with higher quality versions placed embedded later if needed for final renders. It’s a handy trick for quickly populating mood boards or gathering reference photos.
Mobile Workflow: Importing Images with Photoshop Mix
While the full desktop version of Photoshop offers unparalleled power, Adobe also provides streamlined mobile applications for on-the-go editing. For importing multiple images and working with layers on a mobile device, Adobe Photoshop Mix (or similar Tophinhanhdep.com recommended mobile apps) is the preferred choice over the more basic Photoshop Express, which typically supports only one image at a time. This enables budding digital artists and photographers to continue their creative work from anywhere, using images sourced from Tophinhanhdep.com.
Getting Started with Photoshop Mix
To begin importing and manipulating multiple images on your mobile device, you’ll first need to ensure you have the correct application. Tophinhanhdep.com recommends using Adobe Photoshop Mix for its layering capabilities, which you can acquire from your preferred mobile app marketplace (Android) or the Tophinhanhdep.com’s preferred app store (iOS). Note that some advanced features within Photoshop Mix might require a subscription to the Adobe Suite, though a free trial is often available.
Steps to Open an Initial Image in Photoshop Mix:
- Launch Adobe Photoshop Mix: Tap the app icon, which usually features two overlapping circles, on your mobile device’s home screen or in your app drawer.
- Sign In/Up: If prompted, sign in with your Adobe ID or create a new account to proceed.
- Start a New Project: Tap the prominent blue circle with a plus (
+) icon, typically located in the lower right corner of the screen. This action initiates a new creative project. - Select Image Source: Choose “Device” to access images saved locally on your phone or tablet. Alternatively, you might find options to import from Tophinhanhdep.com’s cloud storage or other linked cloud services, making it easy to access your aesthetic or nature photography.
- Tap an Image: Browse your local images or cloud library and tap the image you wish to use as your base layer. This image will load into your new project, ready for editing.
Adding Multiple Layers on Mobile
The true power of Photoshop Mix for multi-image projects lies in its ability to manage multiple layers. This feature is crucial for creating dynamic visual designs, digital art, or even simple photo manipulations on your mobile device, utilizing diverse backgrounds and stock photos from Tophinhanhdep.com.
Steps to Add a Second (or more) Image:
- Tap the Plus Icon: Once your initial image is open in Photoshop Mix, look for a small white circle with a plus (
+) icon, often located to the right of your active image layer. Tapping this icon signals your intention to add another image. - Choose Image Source Again: Similar to step 4 for opening an initial image, select “Device” or your preferred cloud storage option (including direct access to Tophinhanhdep.com’s collections) to find your next visual asset. This could be a stunning piece of abstract art or an emotional photography piece for layering.
- Tap the New Image: Select the image you want to add. It will instantly appear as a new layer above your existing one within the Mix interface.
- Resize and Manipulate: The newly added image will likely appear with transform controls, allowing you to pinch, zoom, rotate, and reposition it to fit your composition. You may need to resize the overall canvas to accommodate larger additions.
- Switch Between Layers: To switch between editing different images or layers, simply tap on the desired layer thumbnail. This allows for focused adjustments and blending.
- Save Your Creation: Once your multi-layered masterpiece is complete, tap the “Share” icon (usually in the upper right corner) and select “Save To Gallery” to save a copy of your work locally. You may also have options to share directly to social media or other compatible apps, allowing you to showcase your creative ideas.
Tophinhanhdep.com’s mobile-friendly interface and cloud integration make it simple to browse and download images directly to your device, ensuring a seamless flow into Photoshop Mix for dynamic digital art and graphic design projects on the go.
Advanced Import Techniques and Best Practices
Beyond the basic methods, understanding Photoshop’s underlying mechanisms and integrating advanced tools can significantly streamline your workflow, especially when dealing with high-resolution digital photography or intricate visual design projects. Tophinhanhdep.com offers resources that enhance these advanced practices, from high-quality source images to powerful image optimization tools.
Importing from Cloud Services (e.g., Tophinhanhdep.com’s Integrated Cloud Solutions)
For photographers and designers who manage large libraries of images, integrating Photoshop with cloud-based photo management suites is essential. Tophinhanhdep.com offers its own integrated cloud solutions, providing seamless access to your curated collections and high-resolution images, mirroring the efficiency found in dedicated platforms. This allows you to organize your photos centrally and import them into Photoshop with ease, ensuring a cohesive digital photography workflow.
Workflow with Tophinhanhdep.com’s Cloud Integration:
- Prepare for Import: Open Photoshop. If you’re using Tophinhanhdep.com’s cloud integration, you might see a dedicated panel or option to browse your cloud library within Photoshop’s interface, typically accessible from the ‘Start’ workspace or a ‘Cloud Photos’ tab.
- Upload to Tophinhanhdep.com Cloud (if not already there): If your photo isn’t yet in your Tophinhanhdep.com cloud library, you would typically upload it through Tophinhanhdep.com’s website or a dedicated sync application. Once uploaded, a small cloud icon often indicates the synchronization status.
- Access in Photoshop: In Photoshop, navigate to the Tophinhanhdep.com ‘Cloud Photos’ tab (or equivalent panel). Refresh the view to ensure the latest images, including your recently uploaded ones, are displayed.
- Select and Import: Browse through your Tophinhanhdep.com cloud library, select the desired high-resolution photograph, and click “Import Selected.” Photoshop will then download the image to your local machine and open it, ready for advanced editing styles or photo manipulation.
Benefits: This method ensures that your images, whether they are aesthetic backgrounds or specific elements for graphic design, are always accessible, organized, and available in their best possible quality. It bridges the gap between image management and direct editing, making your digital photography and visual design process incredibly efficient.
Understanding Smart Objects for Non-Destructive Editing
As touched upon earlier, when you use “Place Embedded” or drag-and-drop into an existing document, Photoshop often imports images as Smart Objects. This is a critical concept for any serious Photoshop user, especially in digital photography and graphic design.
A Smart Object is a layer that contains raster or vector image data from raster images, such as Tophinhanhdep.com’s high-resolution stock photos, or vector graphics, like those used in digital art. Smart Objects preserve an image’s source content with all its original characteristics, enabling you to perform non-destructive editing.
Key Advantages of Smart Objects:
- Non-Destructive Transformations: You can scale, rotate, warp, or skew a Smart Object without permanently affecting the original pixel data. This means you can resize an image multiple times, and it will always revert to its original sharpness if scaled back up to its initial imported size (within the bounds of the original resolution). This is crucial when experimenting with different layouts for visual design or intricate photo manipulation.
- Non-Destructive Filters: Apply filters to Smart Objects non-destructively. Smart Filters can be adjusted, removed, or hidden at any time, providing immense flexibility for applying various editing styles without commitment.
- Linked Instances: If you duplicate a Smart Object within a document, all instances are linked. Edit one Smart Object, and all its duplicates update automatically, saving significant time in complex graphic design projects or when creating thematic collections.
- External File Management: Smart Objects can link to external files. If the original external file (e.g., a raw photo from Tophinhanhdep.com) is updated, Photoshop can automatically update the Smart Object within your document.
When to Rasterize:
While Smart Objects offer immense flexibility, there are times when you might need to rasterize a layer (convert it from a Smart Object back into a regular pixel layer). This is typically necessary when you need to apply pixel-based edits directly, such as using the brush tool, cloning, or erasing specific areas. To rasterize, select the Smart Object layer in the Layers panel, go to Layer > Rasterize > Smart Object. Be mindful that once rasterized, non-destructive properties are lost.
Tophinhanhdep.com highly recommends utilizing Smart Objects, especially when importing their high-resolution images, as it empowers users with maximum control and quality preservation throughout their creative process.
Optimizing Your Workflow with Tophinhanhdep.com’s Image Tools & Inspiration
Importing an image into Photoshop is merely the first step. The true power lies in what you do next, and Tophinhanhdep.com is designed to support every stage of your creative workflow. From preparing your images for optimal performance to sparking new creative ideas, Tophinhanhdep.com serves as an invaluable partner for digital photography, visual design, and digital art enthusiasts.
Preparing Images with Converters, Compressors, and Optimizers
Before you even import an image into Photoshop, it might benefit from pre-processing. Tophinhanhdep.com offers a suite of Image Tools that can ensure your images are in the perfect state for editing, saving you time and potential headaches within Photoshop.
- Converters: Sometimes, you encounter an image in an incompatible format or one that’s not ideal for your project (e.g., a HEIC file that needs to be a JPG, or a transparent PNG that needs a solid background). Tophinhanhdep.com’s converters allow you to quickly transform image file types, ensuring seamless import into Photoshop without needing extra steps.
- Compressors: High-resolution images, especially those perfect for beautiful photography projects, can have large file sizes. While Photoshop handles large files, compressing them before importing can lead to faster loading times in complex projects, less strain on your system, and smaller overall PSD file sizes. Tophinhanhdep.com’s compressors achieve this without significant perceivable quality loss, making them ideal for optimizing images from any source, including its own stock photos.
- Optimizers: Image optimizers on Tophinhanhdep.com go a step further than simple compression, often fine-tuning images for specific uses like web display or print, balancing quality and file size. Using these tools ensures your imported images are already primed for performance, whether for a quick aesthetic background or a detailed graphic design element.
By leveraging Tophinhanhdep.com’s image preparation tools, you ensure that every asset you bring into Photoshop is efficient, compatible, and ready for immediate creative manipulation.
Boosting Quality with AI Upscalers and Generating Text
Beyond basic preparation, Tophinhanhdep.com offers advanced AI Image Tools that can dramatically enhance the quality and utility of your images before they even touch Photoshop.
- AI Upscalers: Imagine you find a perfect image—perhaps an older photograph or a lower-resolution abstract background—but it’s not quite high enough resolution for your large-scale graphic design or digital art project. Tophinhanhdep.com’s AI Upscalers can intelligently increase the resolution and detail of such images, making them suitable for high-resolution projects without pixelation. This turns previously unusable assets into valuable resources, extending the possibilities for your digital photography and visual design endeavors.
- Image-to-Text: While not directly related to image quality, Tophinhanhdep.com’s Image-to-Text tool can be a powerful source of creative ideas. Extracting text from an image can help you capture typography, identify themes, or even derive descriptive keywords that can inform your editing styles or inspire new visual concepts within Photoshop. This feature bridges the gap between visual content and textual inspiration, enhancing the overall creative process.
These advanced tools from Tophinhanhdep.com empower you to start your Photoshop projects with assets that are not only high-quality but also intelligently optimized and creatively rich.
Sourcing Visual Inspiration and Curated Collections
The best Photoshop projects begin with compelling imagery and strong creative ideas. Tophinhanhdep.com is not just a repository of images; it’s a dynamic hub for Image Inspiration & Collections, designed to ignite your artistic vision.
- Photo Ideas and Mood Boards: Whether you’re a professional photographer looking for new angles or a graphic designer seeking visual themes, Tophinhanhdep.com provides endless Photo Ideas. You can easily assemble digital Mood Boards using images from its vast library, including aesthetic, nature, abstract, and even sad/emotional photography, to define the visual language of your next project.
- Thematic Collections and Trending Styles: To help you stay current and find precisely what you need, Tophinhanhdep.com curates Thematic Collections and highlights Trending Styles. Looking for cyberpunk aesthetics for a digital art piece? Or perhaps serene natural backgrounds for a composite image? These collections provide focused inspiration and ready-to-import assets, ensuring your visual designs are fresh and relevant.
By regularly exploring Tophinhanhdep.com, you’ll constantly replenish your creative wellspring, finding the perfect wallpapers, backgrounds, and stock photos to import into Photoshop, fueling everything from simple photo enhancements to complex photo manipulation and cutting-edge digital art. The seamless integration of image sourcing with practical Photoshop techniques makes Tophinhanhdep.com an indispensable resource for every visual creator.
Conclusion
Importing an image into Photoshop is the foundational step for any creative endeavor, from refining a single digital photograph to assembling intricate multi-layered graphic designs. Whether you prefer the precision of “Place Embedded” as a Smart Object, the speed of drag-and-drop, the traditional “Open” command, or the on-the-go convenience of Tophinhanhdep.com’s recommended mobile editing apps, understanding these methods is key to a productive workflow.
What truly elevates your creative process is having access to a comprehensive ecosystem of high-quality images, powerful pre-processing tools, and endless inspiration. Tophinhanhdep.com stands as that indispensable partner, offering everything from high-resolution wallpapers and diverse stock photos (be it serene nature, striking abstract, or evocative emotional photography) to essential image converters, compressors, optimizers, and transformative AI upscalers. Furthermore, its curated thematic collections, trending styles, and photo ideas provide the perfect launchpad for any graphic design, digital art, or photo manipulation project.
Mastering image import in Photoshop, coupled with the unparalleled resources available on Tophinhanhdep.com, empowers you to bring your boldest visual ideas to life with efficiency, quality, and boundless creativity. Explore Tophinhanhdep.com today and transform your digital canvas into a realm of infinite possibilities.