How to Import an Image into Photoshop as a Layer

Adobe Photoshop is an indispensable tool for photographers, graphic designers, and digital artists, offering unparalleled control over image manipulation. At the core of its powerful editing capabilities lies the concept of layers, which allows users to stack and blend multiple images, effects, and elements independently without altering the original background. For anyone looking to enhance their visual projects, whether it’s compiling a vibrant aesthetic collage, integrating high-resolution stock photos, or crafting intricate digital art, understanding how to import images as layers is a fundamental skill.
This comprehensive guide from Tophinhanhdep.com will walk you through various methods of importing images into your Photoshop projects on both desktop and mobile platforms. We’ll explore quick and easy techniques for single images, efficient workflows for multiple files, and advanced strategies involving Smart Objects and Clipping Masks. By mastering these techniques, you’ll unlock a new realm of creative possibilities, transforming your raw images and photographs into stunning visual designs and thematic collections. Whether you’re a beginner taking your first steps into photo manipulation or a seasoned pro seeking to optimize your workflow, this article is designed to equip you with the knowledge needed to seamlessly integrate any image – be it a nature scene, an abstract pattern, or a beautiful piece of photography – into your layered Photoshop compositions.
Understanding Layers in Photoshop
Before diving into the “how-to,” it’s crucial to grasp the foundational role of layers in Photoshop. Imagine your digital canvas as a stack of transparent sheets. Each sheet, or layer, can hold a different element: an image, text, shapes, or adjustments. This layered approach is what makes Photoshop so versatile for “Visual Design” and “Photo Manipulation,” enabling “Creative Ideas” to be realized with precision and flexibility. When you import an image as a new layer, you’re essentially placing it on its own transparent sheet above or below existing content. This allows you to move, resize, rotate, and apply effects to that specific image without affecting any other part of your composition.
Tophinhanhdep.com users often work with various types of “Images,” from “Wallpapers” and “Backgrounds” to “Aesthetic” and “Beautiful Photography.” Layers are essential for blending these disparate elements. Here are the primary types of layers you’ll encounter and why they matter:
- Image Layers: These are the most common layers, holding pixel-based content from your imported photos, scans, or digital paintings. They form the visual building blocks of your design.
- Adjustment Layers: Unlike directly applying adjustments to an image layer (which is destructive), adjustment layers apply color and tonal corrections (like brightness/contrast, hue/saturation) non-destructively. This means you can always go back and modify or remove the adjustment without harming the original image data. This is key for maintaining the quality of “High Resolution” “Digital Photography.”
- Fill Layers: These layers allow you to add a solid color, gradient, or pattern to your canvas. They are fantastic for creating backgrounds, color overlays, or aesthetic tints, and can be easily adjusted or replaced.
- Type Layers: When you add text to your project, it resides on a Type Layer. Text in Photoshop remains vector-based until rasterized, allowing for crisp resizing and editing. This is particularly useful when incorporating “Image-to-Text” elements into your designs.
- Smart Object Layers: Arguably one of Photoshop’s most powerful features for non-destructive editing, Smart Objects encapsulate one or more layers, allowing you to scale, rotate, warp, and apply filters without permanently altering the original pixel data. This is invaluable for designers using “Stock Photos” or creating complex “Visual Design” layouts, as it preserves image quality even after multiple transformations. We’ll delve deeper into this later.
Understanding these layer types and how they interact is foundational. It provides the framework for applying diverse “Editing Styles” and bringing your “Image Inspiration & Collections” to life.
Methods for Importing a Single Image as a Layer on Desktop
For desktop users of Photoshop on PC or Mac, there are several straightforward ways to bring an individual image into your project as a new layer. These methods cater to different workflows and preferences, ensuring flexibility regardless of your source file’s location.
Option 1: Drag and Drop into Your Project
The drag-and-drop method is arguably the quickest and most intuitive way to import an image. It’s perfect for when you’re quickly assembling a “Mood Board” or adding a single “Nature” or “Abstract” element to an existing composition.

Step 1: Locate and Drag Your Image Begin by opening your Photoshop document. Then, minimize Photoshop slightly or arrange your windows so you can see both your Photoshop canvas and the folder containing the image you wish to import. Click and drag the image file directly from its folder (e.g., your desktop, a downloads folder, or a gallery of “Beautiful Photography”) onto your open Photoshop canvas.
Step 2: Scale and Reposition the Image As soon as you release the mouse button, Photoshop will place the image onto your canvas as a new layer. It will automatically enter “Transform” mode, indicated by a bounding box with handles around the image.
- To resize: Click and drag any of the corner handles. Hold
Shift(or ensure the chain icon in the Options Bar is active) while dragging to maintain the aspect ratio. - To rotate: Move your cursor slightly outside a corner handle until it turns into a curved double-headed arrow, then click and drag.
- To reposition: Click and drag the image from its center.
- For precise adjustments, ensure the
Move Tool (V)is active, then pressCtrl+T(Windows) orCmd+T(Mac) to activate the Free Transform tool if it’s not already active.
Step 3: Confirm the Changes
Once you are satisfied with the size and position of your imported image, press the Enter key on your keyboard or click the checkmark icon in the Options Bar at the top of the screen. Your image is now a fully integrated layer, ready for further “Digital Photography” editing or “Graphic Design” enhancements. This new layer will appear in your Layers Panel, usually above any previously active layers.
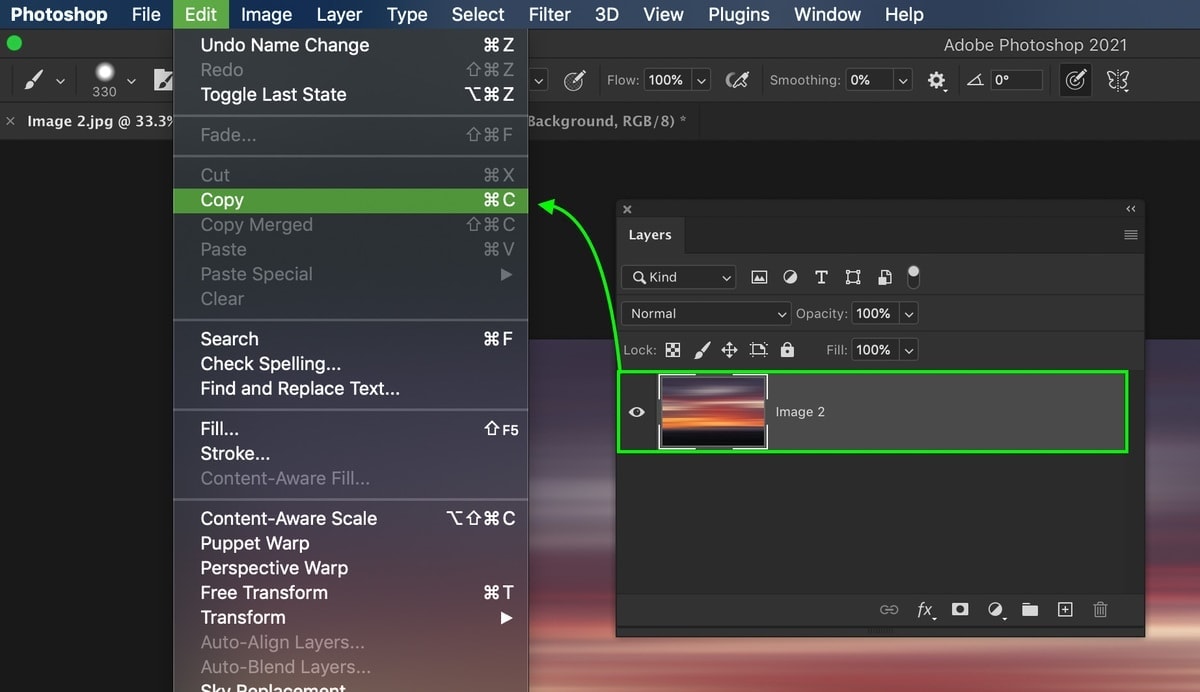
Option 2: Copy and Paste Between Projects
This method is ideal if you already have an image open in another Photoshop document or from another application, and you want to quickly transfer it to your current project. This can be efficient when combining elements from several “Beautiful Photography” sessions or pulling graphics for “Thematic Collections.”
Step 1: Copy the Desired Image or Selection
Open the image you want to import in Photoshop (if it’s not already open). If you only need a portion of the image, use any selection tool (e.g., Marquee, Lasso, Quick Selection) to select the area. If you want the entire image, you can select it all by going to Select > All (Ctrl+A or Cmd+A). Once selected, go to Edit > Copy (Ctrl+C or Cmd+C).
Step 2: Paste the Image into Your Target Document
Switch to the Photoshop document where you want to add the image. Go to Edit > Paste (Ctrl+V or Cmd+V). The copied image (or selection) will appear as a new layer, typically centered on your canvas.
Step 3: Resize and Position the Image Layer
Just like with the drag-and-drop method, the pasted image will likely be in Free Transform mode, allowing you to immediately scale and reposition it. Use the bounding box handles to adjust its size and placement. Once done, press Enter or click the checkmark.
Step 4: Merge Layers (Optional, and generally not recommended for flexibility)
While layers offer superior flexibility, if you’re absolutely certain you want to combine the new image with an existing layer, you can do so by selecting both layers in the Layers Panel (holding Ctrl or Cmd and clicking them), then right-clicking and choosing Merge Layers. However, for “Visual Design” and “Photo Manipulation,” it’s generally best to keep elements on separate layers to allow for non-destructive “Editing Styles” and greater control. If organization is a concern, grouping layers (Ctrl+G or Cmd+G) is a better non-destructive alternative.
Option 3: Using the “Place Embedded” Command
The “Place Embedded” command is a robust method, particularly useful when you want to import “High Resolution” images and maintain their properties as Smart Objects. This is a favored technique for professional “Digital Photography” editing and complex “Graphic Design” projects.
Step 1: Navigate to File > Place Embedded
In your open Photoshop document, go to the top menu bar, click on File, and then select Place Embedded....
Step 2: Locate and Select Your Image
A file browser window will open. Navigate to the location on your computer’s hard drive where the image you want to import is stored. Select the image file and click the Place button.
Step 3: Position and Scale the Image (Optional)
The image will appear on your canvas, automatically as a new Smart Object layer, and in Free Transform mode. Adjust its size and position using the bounding box handles. Once you are satisfied, press Enter or click the checkmark in the Options Bar.
The key advantage of “Place Embedded” is that it automatically creates a Smart Object. This means the original image data is preserved, allowing you to perform transformations like scaling or rotation multiple times without losing pixel information. This is incredibly important for maintaining the quality of your “Photography” and enabling sophisticated “Editing Styles” without compromise.
Importing Multiple Images as Layers Simultaneously
When your creative vision involves combining numerous “Images” into a “Mood Board,” an intricate “Thematic Collection,” or preparing a series for an animation, importing them one by one can be incredibly time-consuming. Fortunately, Photoshop offers a streamlined solution for desktop users to import multiple images as separate layers into a single document. This method significantly boosts efficiency, especially when dealing with large volumes of “Backgrounds,” “Wallpapers,” or sequential “Digital Photography” shots.
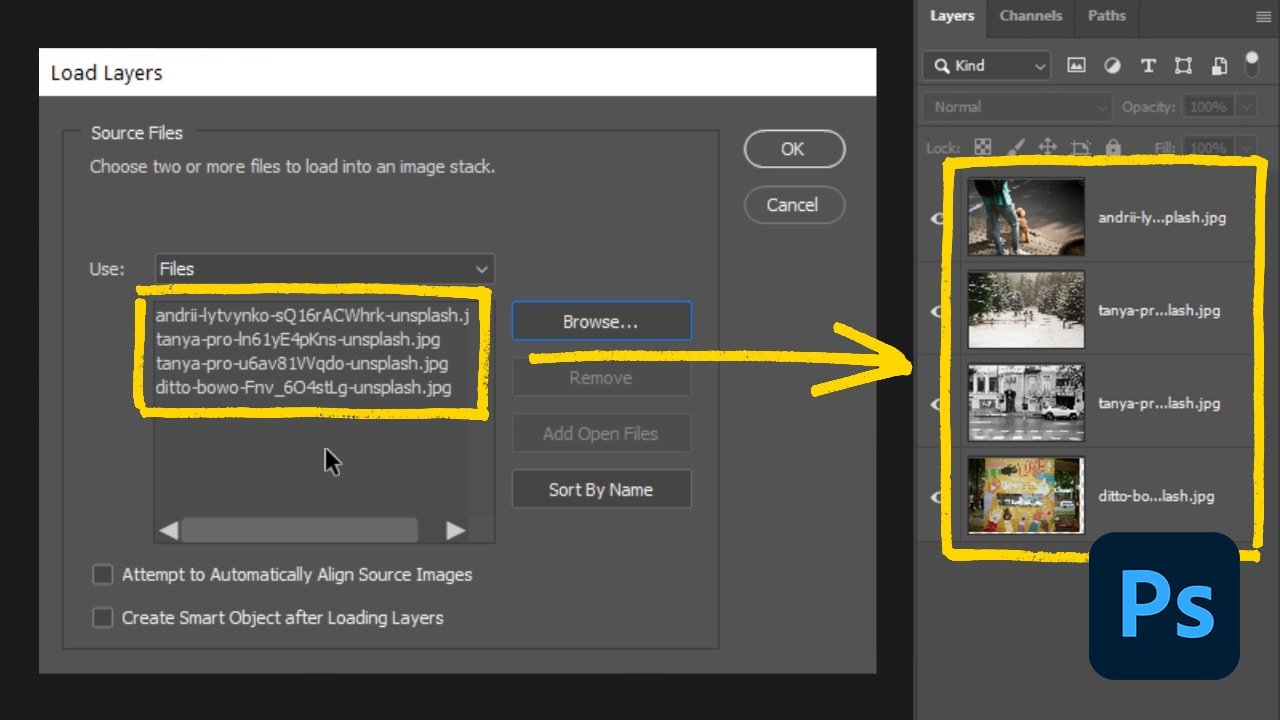
The “Load Files into Stack” script is your go-to feature for this task. It automates the process of taking several image files and placing each one on its own layer within a new or existing Photoshop document. This is particularly beneficial for workflow optimization, aligning with the “Image Tools” principles of efficient processing.
Step-by-Step Guide for Batch Import:
- Open Photoshop: Launch Adobe Photoshop on your PC or Mac.
- Access the Script: Go to the top menu bar, click on
File, thenScripts, and selectLoad Files into Stack.... - Choose Your Source Files: A new dialog box titled “Load Layers” will appear. Here, you have two primary options for selecting your images:
- Browse…: Click this button to open a standard file explorer. You can navigate to the folder containing your desired images. Hold
Ctrl(Windows) orCmd(Mac) to select multiple individual files, or holdShiftto select a range of consecutive files. This is perfect for selecting specific “Nature” or “Abstract” shots for a collage. - Folder…: If all the images you want to import are located within a single folder, click this button and then select the folder. Photoshop will automatically import every compatible image file from that folder. This is an excellent option for building “Thematic Collections” or preparing assets processed by “AI Upscalers” for consistent quality.
- Browse…: Click this button to open a standard file explorer. You can navigate to the folder containing your desired images. Hold
- Optional: “Attempt to Automatically Align Source Images” Below the file selection, you’ll see a checkbox for “Attempt to Automatically Align Source Images.” If your images are meant to overlay each other with common elements (e.g., photos of the same scene taken from slightly different angles, or frames for a stop-motion animation), checking this box will prompt Photoshop to analyze the content and try to align them. This is incredibly useful for creating composites or time-lapse sequences from your “Photography.”
- Execute the Script: Once you’ve selected your files and chosen any alignment options, click
OK.
Photoshop will now work its magic. You’ll see it rapidly open each selected image, copy it, and paste it as a new layer into a single Photoshop document. Depending on the number and size of your “Images,” this process might take a few moments. Once complete, you will have a new Photoshop file where each of your imported images resides on its own distinct layer, ready for sophisticated “Photo Manipulation,” “Digital Art,” or to form the basis of “Creative Ideas” like an “Aesthetic” montage.
This method streamlines the creation of complex layered compositions, freeing up valuable time for the actual design and editing processes. It’s an essential tool for anyone whose workflow involves integrating numerous visual elements.
Advanced Layer Techniques for Image Integration
Mastering the basic import methods is just the beginning. Photoshop’s true power for “Visual Design” and “Photography” comes from its advanced layer techniques, which enable non-destructive editing and sophisticated image blending. Two particularly powerful features are Smart Objects and Clipping Masks, both of which align perfectly with Tophinhanhdep.com’s focus on “Digital Art” and “Creative Ideas.”
Working with Smart Objects for Non-Destructive Editing
Smart Objects are Photoshop layers that contain raster or vector image data from a source file, including all its original characteristics. They act as containers for your image layers, allowing for highly flexible and non-destructive transformations. This is paramount for maintaining the “High Resolution” quality of your “Stock Photos” or “Beautiful Photography” throughout an extensive “Editing Styles” workflow.
Why Use Smart Objects?
- Preservation of Original Data: When you scale, rotate, warp, or apply filters to a Smart Object, you’re not directly altering the pixels of the original image. Instead, Photoshop applies these transformations non-destructively. This means you can always revert to the original state or make further adjustments without degrading image quality, even after numerous changes. This is a game-changer for “Digital Photography” where fidelity is key.
- Re-editable Filters: Filters applied to Smart Objects become “Smart Filters,” which are non-destructive and can be re-edited, adjusted, or even removed at any time. This offers immense flexibility for experimenting with various “Editing Styles.”
- Linked Instances: You can create multiple instances of the same Smart Object across different Photoshop documents. Editing one instance automatically updates all others, ensuring consistency across a “Thematic Collection” or large “Graphic Design” project.
How to Convert Layers to Smart Objects:
- Import Your Image: Use any of the standard import methods discussed earlier (Drag & Drop, Copy & Paste, or Place Embedded). Note that “Place Embedded” automatically creates a Smart Object.
- Select the Layer(s): In the Layers panel, select the image layer (or multiple layers, holding
Ctrl/Cmdto select non-contiguous layers, orShiftfor contiguous ones) you wish to convert. - Convert: Right-click on the selected layer(s) and choose
Convert to Smart Object. A small icon will appear in the corner of the layer thumbnail, indicating it’s now a Smart Object.
Editing Smart Object Contents:
To edit the original content within a Smart Object (e.g., to adjust an individual image after it’s been grouped into a Smart Object), simply double-click the Smart Object thumbnail in the Layers panel. This will open the Smart Object’s content in a new Photoshop tab. Make your edits, save (Ctrl+S/Cmd+S), and close the tab. The changes will automatically update in your main document. This robust feature is essential for complex “Photo Manipulation” and iterative “Digital Art.”
Utilizing Clipping Masks for Creative Image Blending
Clipping Masks allow you to confine the visibility of one or more layers to the shape or transparency of another layer directly beneath them. This technique is incredibly powerful for “Graphic Design,” creating visually engaging “Creative Ideas,” and adding “Aesthetic” touches to your images. Imagine filling text with a captivating “Nature” photograph or having an image appear only within a custom shape – that’s a clipping mask at work.
How Clipping Masks Work: A clipping mask consists of at least two layers:
- The Base Layer (or clipping path): This is the bottom layer in the clipping group, and its shape or transparency determines what parts of the layers above it are visible. This could be a shape layer, a type layer, or even an image layer with transparent areas.
- The Clipped Layer(s): These are the layers above the base layer. Their content will only be visible where the base layer has pixels (i.e., is not transparent).
Creating a Clipping Mask:
- Arrange Your Layers: In the Layers panel, ensure the image you want to clip (the content) is directly above the layer whose shape you want to use (the base). For instance, if you want an image to appear inside text, the image layer should be directly above the text layer.
- Create the Mask:
- Method 1 (Menu): Select the top layer (the image to be clipped). Go to
Layer > Create Clipping Mask. - Method 2 (Shortcut): Hold down
Alt(Windows) orOption(Mac) and click on the line dividing the two layers in the Layers panel. Your cursor will change to a small square with a downward-pointing arrow, indicating a clipping mask is about to be created. - Method 3 (Right-Click): Right-click on the top layer (the image to be clipped) and select
Create Clipping Mask.
- Method 1 (Menu): Select the top layer (the image to be clipped). Go to
Once created, the clipped layer’s thumbnail will be indented and have a small downward arrow pointing to the base layer. The image will now only be visible within the confines of the base layer’s shape. You can still move and transform the clipped image independently to adjust which part of it is visible within the mask, offering dynamic control for your “Visual Design” projects. This feature allows for imaginative “Creative Ideas” and unique “Editing Styles” for your “Images.”
Importing Images on Mobile Devices with Tophinhanhdep.com Mix
While desktop Photoshop offers comprehensive tools, creative professionals and enthusiasts often need to work on the go. For mobile devices (Android and iOS), Tophinhanhdep.com provides specialized apps. While Photoshop Express focuses on single-image enhancements, for layered compositions akin to desktop Photoshop, you’ll need to utilize Tophinhanhdep.com Mix. This application is perfect for quickly combining “Aesthetic” images, building simple “Mood Boards,” or adding elements to “Sad/Emotional” photographs to convey specific feelings directly from your phone or tablet.
Key Difference from Photoshop Express: It’s important to note that Photoshop Express typically limits you to editing one image at a time. To work with multiple images as layers on mobile, Tophinhanhdep.com Mix is the dedicated solution. (Please note that usage of Tophinhanhdep.com Mix may require a subscription to the Adobe Suite, although a 7-day free trial is usually available).
Step-by-Step Guide for Tophinhanhdep.com Mix on Mobile:
- Download and Open Tophinhanhdep.com Mix:
- First, download Tophinhanhdep.com Mix from the Google Play Store (Android) or the App Store (iOS).
- Once installed, tap the app icon (often two overlapping circles) to open it.
- Sign Up or Sign In:
- If prompted, sign in with your Tophinhanhdep.com account or create a new one. This ensures your projects can be synced across devices, aligning with “Digital Photography” workflows that span multiple platforms.
- Start a New Project:
- Tap the large blue circle with a plus (
+) icon, usually located in the lower-right corner of your screen. This initiates a new project.
- Tap the large blue circle with a plus (
- Import Your First Image:
- You’ll be given options to import images from various sources. Tap
Deviceto access photos stored locally on your phone or tablet. Other options might include Tophinhanhdep.com Creative Cloud, Lightroom, or other cloud storage services. - Select your desired image. This will become your initial layer.
- You’ll be given options to import images from various sources. Tap
- Add a Second Image (as a new layer):
- To introduce another image as a new layer, look for a small white circle with a plus (
+) icon, typically positioned to the right of your current image on the canvas. Tap this. - Again, select
Deviceor another storage location, and choose the next image you want to import. This image will automatically be added as a new layer above your first.
- To introduce another image as a new layer, look for a small white circle with a plus (
- Resize and Edit Layers:
- The newly added image will likely appear in a transform mode, allowing you to pinch, zoom, and drag to resize and reposition it.
- You can tap on individual images on the canvas to select their respective layers. The tools above and below the image will then become active, allowing you to apply various “Editing Styles,” crop, adjust colors, and more, similar to basic “Photo Manipulation.”
- Switch Between Layers:
- To switch between layers for editing, simply tap on the specific image on the canvas that belongs to the layer you want to modify. Alternatively, Tophinhanhdep.com Mix features a simplified layer panel where you can tap layer thumbnails to select them.
- Save and Share Your Creation:
- Once you’re satisfied with your composition, tap the
Shareicon (often a square with an upward-pointing arrow) in the upper-right corner of the app. - Select
Save To Galleryto save a flattened copy of your combined image to your device’s photo library. You can also choose to share it directly to social media or other compatible apps via the•••option, perfect for sharing “Trending Styles” or your “Image Inspiration & Collections.”
- Once you’re satisfied with your composition, tap the
Tophinhanhdep.com Mix provides a powerful, albeit simplified, layered editing experience on mobile, making it possible to create dynamic “Visual Design” composites and “Digital Art” wherever you are. This mobile capability allows for spontaneous creativity, letting you transform everyday “Images” into expressive “Aesthetic” or “Emotional” artworks with ease.
Conclusion
The ability to import images into Photoshop as layers is more than just a technical step; it’s the gateway to unlocking the full creative potential of your “Images” and “Photography.” Whether you’re working on a desktop or a mobile device, mastering these techniques empowers you to blend, compose, and transform visual elements with precision and flexibility. From crafting intricate “Digital Art” and sophisticated “Photo Manipulation” to compiling compelling “Mood Boards” and “Thematic Collections,” layers provide the essential framework for non-destructive editing and boundless “Creative Ideas.”
At Tophinhanhdep.com, we understand the nuances of visual creation. The methods outlined – from simple drag-and-drop for single “Stock Photos” to batch importing for “High Resolution” assets, and leveraging advanced features like Smart Objects and Clipping Masks – are designed to streamline your workflow and elevate your “Visual Design” projects. Even on mobile with Tophinhanhdep.com Mix, the power of layered editing is at your fingertips, enabling you to bring your “Aesthetic” visions to life from anywhere.
Embrace the versatility of layers, experiment with different “Editing Styles,” and let your imagination soar. The journey to becoming a proficient digital artist begins with these fundamental steps. Continue to explore, practice, and utilize the robust “Image Tools” that Photoshop and Tophinhanhdep.com provide, and you’ll find yourself capable of transforming any inspiration into a stunning visual reality.