Mastering Image Import in Photoshop: A Comprehensive Guide by Tophinhanhdep.com

Adobe Photoshop stands as the industry standard for image editing, graphic design, and digital art, offering an unparalleled suite of tools for creative expression. At the core of any project, whether you’re crafting stunning wallpapers, designing engaging backgrounds, or embarking on complex photo manipulation, lies the fundamental skill of importing images. Without a seamless way to bring your visual assets into the program, even the most imaginative concepts remain just ideas. This comprehensive guide, brought to you by Tophinhanhdep.com, will walk you through various methods of importing images into Photoshop, ensuring you can integrate everything from high-resolution photography and stock photos to aesthetic and thematic collections into your workflow.
Beyond just the technical steps, we’ll delve into best practices that align with principles of digital photography and visual design, helping you maintain image quality and optimize your assets for various applications. Tophinhanhdep.com is your go-to resource for a vast array of images, including nature, abstract, sad/emotional, and beautiful photography, along with powerful image tools like converters, compressors, optimizers, and AI upscalers. We understand that your creative journey requires both inspiration and efficient execution, and mastering image import in Photoshop is a crucial first step.
Effortless Image Integration: Opening and Placing Single Images on Desktop
For most desktop users, getting an image into Photoshop is a frequent task. Photoshop offers several intuitive methods, each suited for different scenarios, from opening a standalone picture to embedding it within an elaborate design. Understanding these options is key to a smooth workflow, especially when dealing with diverse visual content found on Tophinhanhdep.com, such as high-resolution wallpapers or stunning beautiful photography.
Opening an Image as a New Document
The simplest way to work on a single image in Photoshop is to open it directly. This method treats your selected image as a brand new project, with its own canvas size and resolution matching the original file. This is ideal when your primary goal is to edit or enhance a specific photograph, perhaps one from our curated collections of nature or abstract photography.
Here’s how you can open an image as a new document:

- Directly from Photoshop: Launch Adobe Photoshop. Go to the top menu bar, click on File, then select Open… A file browser window will appear. Navigate to the folder containing your desired image, select it, and click Open. The image will appear in a new tab or window within Photoshop, ready for editing.
- Using your Operating System: Locate the image file on your computer (e.g., in Windows Explorer or macOS Finder). Right-click on the image. From the context menu, choose Open With and then select Adobe Photoshop. Your image will launch directly into Photoshop as a new, editable document.
- Drag and Drop (for new document): Another quick method is to simply drag an image file from your desktop or file explorer directly onto the Photoshop application icon or onto the blank gray workspace area when no other documents are open. Photoshop will automatically open it as a new document.
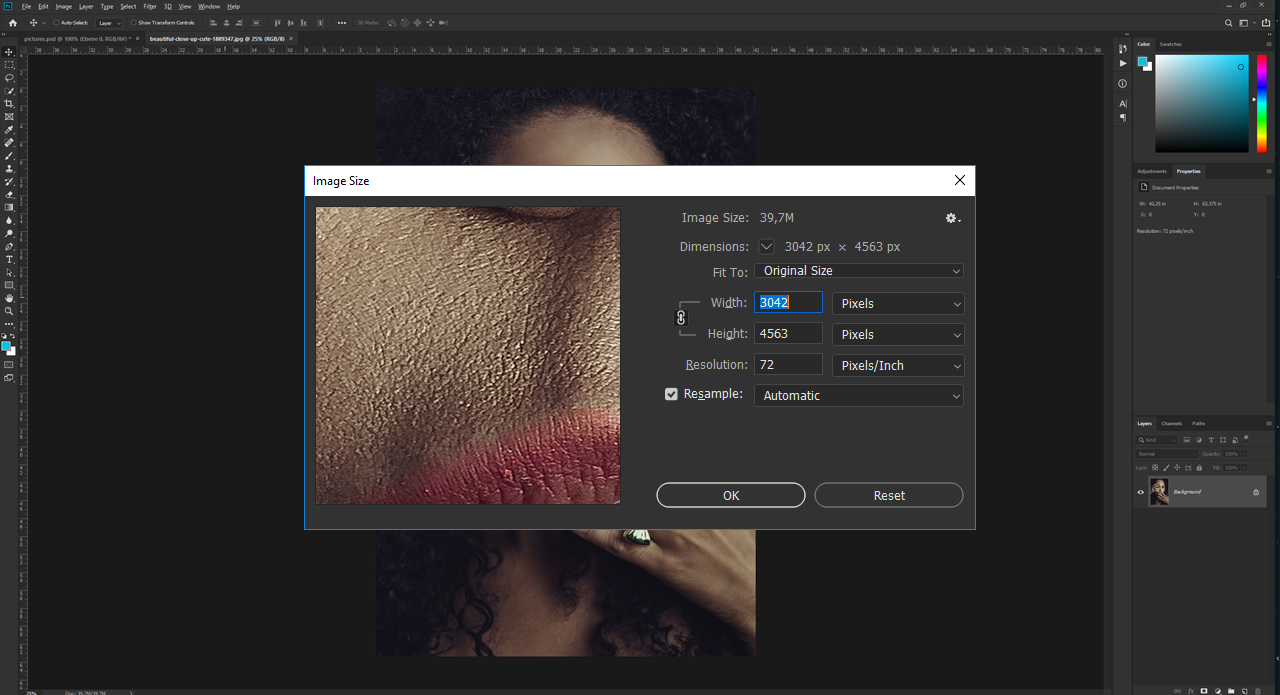
When an image is opened this way, it retains its original dimensions, resolution (e.g., 300 DPI for print, 72 DPI for web), and color profile. To verify these details, you can go to Image > Image Size in the menu bar. This information is vital, particularly when working with high-resolution photography from Tophinhanhdep.com, ensuring that the integrity of the image is maintained from the outset.
Placing an Image into an Existing Document (Smart Objects)
More often than not, you’ll want to add an image to an existing Photoshop document—perhaps a graphic design project, a digital art piece, or a photo manipulation composite. This is where the “Place Embedded” feature, and the concept of “Smart Objects,” become indispensable. Smart Objects are Photoshop layers that contain raster or vector image data from source content, preserving all of the original characteristics of the image. This non-destructive approach is crucial for editing styles that require flexibility and for maintaining the quality of your stock photos or personal beautiful photography.
To place an image as a new layer within an existing document:
- Open your Photoshop Document: Start by opening the
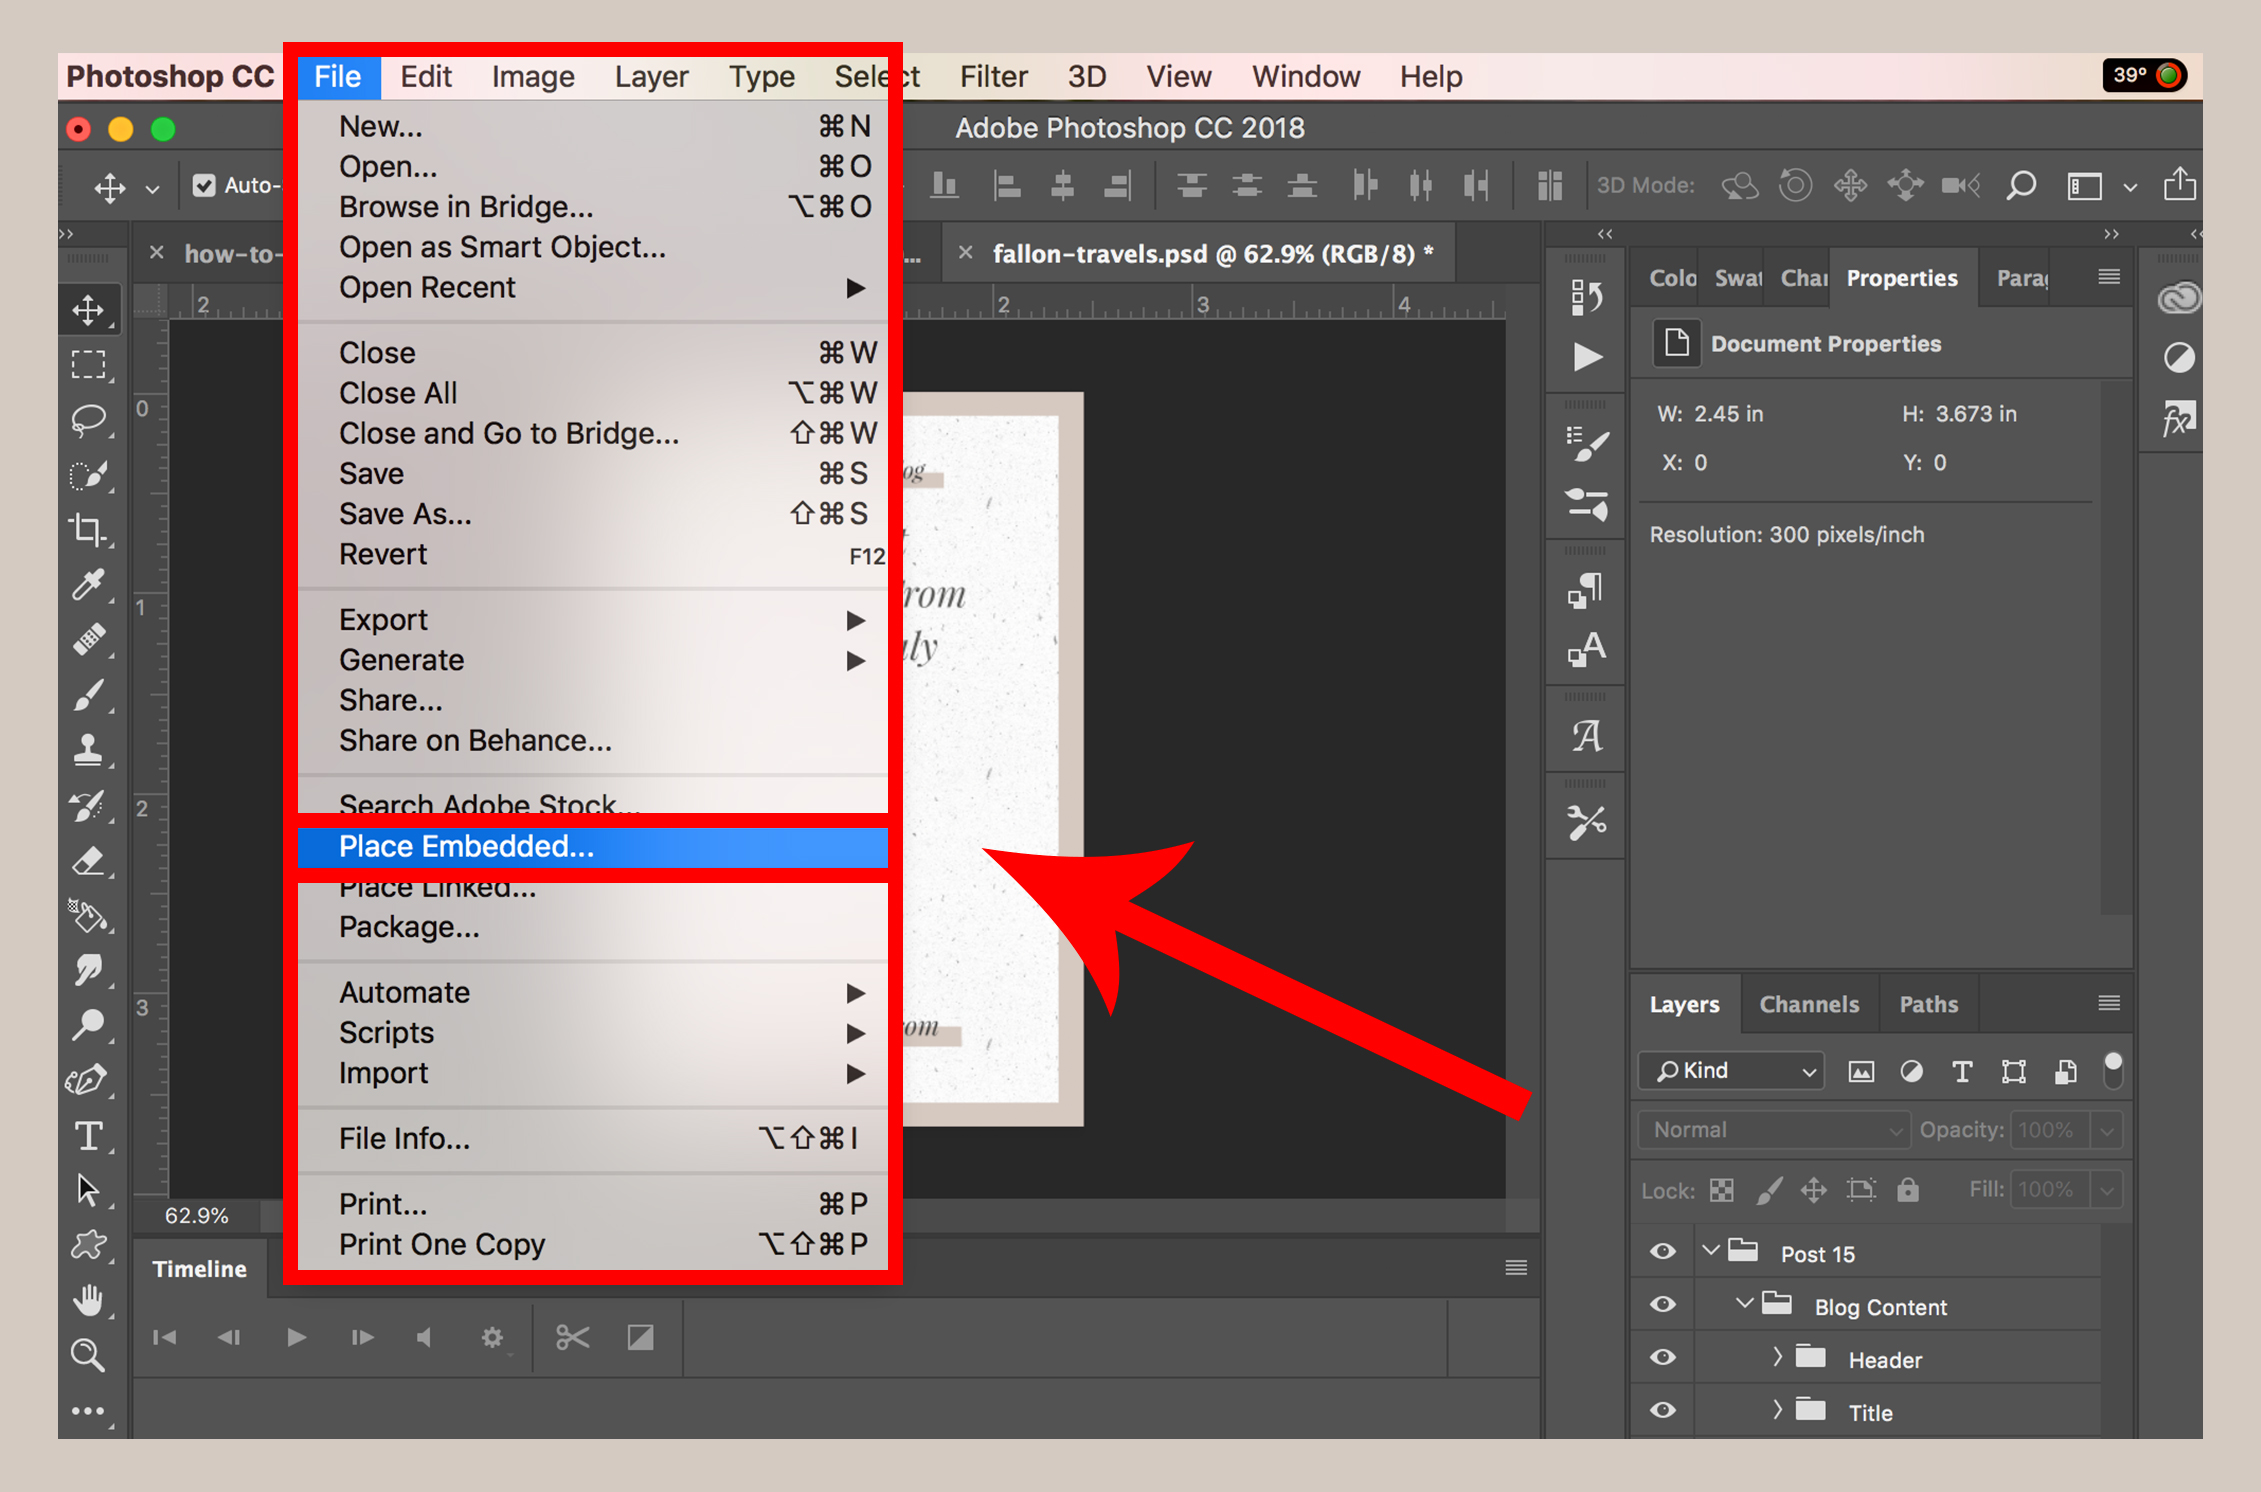
.PSDfile or creating a new document you wish to work on. - Initiate Placement: Go to the top menu bar, click on File, then select Place Embedded… (or Place Linked… depending on your workflow – “Embedded” integrates the file directly, while “Linked” maintains a connection to the external source, updating in Photoshop if the source changes).
- Select Your Image: A file browser will open. Navigate to the location of the image you want to import. Select the image and click Place.
- Position and Scale: The selected image will appear on its own layer within your Photoshop document, usually with a transformation bounding box around it. You can drag to reposition it. To resize, click and drag one of the corner handles. Crucially, hold down the Shift key while dragging a corner to maintain the image’s proportions and prevent distortion.
- Confirm Placement: Once you’re satisfied with the size and position, press Enter (Windows) or Return (Mac) to finalize the placement.
The placed image automatically becomes a Smart Object, indicated by a small icon on the layer thumbnail in the Layers panel. This is a powerful feature: you can scale the Smart Object up or down multiple times without losing the original image quality, making it perfect for experimenting with visual design and digital photography compositions. If, however, you later decide you no longer need the Smart Object’s non-destructive properties and want to reduce file size or apply destructive edits, you can rasterize it by selecting the layer and going to Layer > Rasterize > Smart Object. This converts it into a regular pixel layer.
Copying and Pasting Images
For quick and informal insertions, copying and pasting images is a straightforward method. This is often used for grabbing visuals directly from web browsers or other applications.
- Copy the Image: Locate the image you want to use. If it’s on a webpage, right-click (or Ctrl-click on Mac) the image and select Copy Image. If it’s an image file already open in a previewer, right-click and choose Copy.
- Paste into Photoshop: Switch to your Photoshop document. Go to the Edit menu and select Paste, or use the keyboard shortcut Ctrl+V (Windows) / Cmd+V (Mac). The copied image will appear as a new layer in your Photoshop document. While convenient, be aware that images copied directly from the web might not always be high-resolution and may introduce unwanted artifacts or lower quality. For optimal results, especially with elements like backgrounds or high-resolution photography, it’s generally better to download the image from Tophinhanhdep.com and use the “Place Embedded” method.
Drag and Drop Method
The drag-and-drop method is arguably the most intuitive and fastest way to get images into your Photoshop document.
- Drag and Drop onto an Open Document: Open your Photoshop document. Locate the image file on your desktop or in a file explorer window. Click and drag the image file directly onto the open Photoshop canvas. When you release the mouse button, the image will be placed as a new layer (typically as a Smart Object), complete with a transformation bounding box for immediate resizing and positioning, just like with “Place Embedded.”
This method is incredibly efficient for rapidly building composites or incorporating multiple graphic design elements into your project. Whether you’re importing wallpapers for a desktop background or diverse images for a complex photo manipulation, drag and drop speeds up the initial placement significantly.
Powering Up Your Workflow: Importing Multiple Images as Layers
Creative projects often demand combining numerous images into a single, cohesive document. Think of creating mood boards, thematic collections, or complex digital art pieces. Manually opening each image and dragging it to another document can be a tedious and time-consuming process. Fortunately, Photoshop offers powerful features to streamline the import of multiple images into layers.
Using the ‘Load Files into Stack’ Script
For situations where you need to bring a collection of images into one Photoshop document, each on its own layer, the “Load Files into Stack” script is a game-changer. This is particularly useful for tasks like creating panoramas, focus stacking, or simply organizing a series of images for comparison or composite work related to visual design. Tophinhanhdep.com provides various image collections that can benefit from this streamlined import process, such as thematic collections or photo ideas.
Here’s how to use this powerful script:
- Access the Script: Open Adobe Photoshop. In the top menu bar, go to File > Scripts > Load Files into Stack…
- Select Your Images: A dialog box titled “Load Layers” will appear. You have two main options for selecting files:
- Browse…: Click this button to open a file browser. Navigate to the folder containing your desired images. You can select multiple images by holding down Ctrl (Windows) or Cmd (Mac) and clicking individual files, or by holding Shift to select a contiguous range of files. Once selected, click Open. The chosen images will be listed in the “Load Layers” dialog box.
- Use Open Files: If you already have several image files open in Photoshop as separate documents, you can choose this option to import them into the current active document as layers.
- Optional Settings:
- Attempt to Automatically Align Source Images: This checkbox is incredibly useful for tasks like panoramas or focus stacking, where slight movements between shots need to be corrected. For general layering, you might leave it unchecked if precise alignment isn’t critical.
- Create Smart Object after Loading Layers: Check this box if you want all imported images to be converted into Smart Objects immediately. This is highly recommended for preserving image quality and offering non-destructive editing flexibility, especially when working with high-resolution images or stock photos from Tophinhanhdep.com.
- Execute the Script: Once you’ve selected your files and adjusted any options, click OK. Photoshop will process the images, opening each one and placing it onto a new layer within a single Photoshop document.
This method drastically cuts down on repetitive manual steps, freeing you up to focus on the creative aspects of photo manipulation and digital art. Imagine creating a mood board by loading dozens of aesthetic or inspirational images from Tophinhanhdep.com into one file, then arranging and blending them to spark new creative ideas.
Managing Multiple Layers for Digital Art and Photo Manipulation
Once you have multiple images imported as layers, Photoshop’s robust layer management capabilities come into play. Effective layer organization is fundamental for any complex visual design project, from creating intricate digital art to detailed photo manipulation.
- Layer Panel Navigation: The Layers panel (Window > Layers) is your command center. Each imported image will reside on its own layer, allowing independent control over its visibility, position, and properties.
- Grouping Layers: To maintain order, especially when working with many elements like different backgrounds or thematic images from Tophinhanhdep.com, group related layers. Select multiple layers (Shift-click or Ctrl/Cmd-click), then right-click and choose Group Layers from Layers… or use the folder icon at the bottom of the Layers panel.
- Blending Modes: Experiment with blending modes (dropdown menu at the top of the Layers panel) to create unique interactions between your imported images. Options like Multiply, Screen, Overlay, and Soft Light can produce stunning effects, transforming simple imported images into complex visual narratives.
- Layer Masks: Non-destructively hide or reveal parts of a layer using layer masks. This is essential for seamlessly blending elements from different images, allowing for precise control in photo manipulation without permanently altering the original pixels of your high-resolution photography.
- Smart Filters: When images are imported as Smart Objects, you can apply “Smart Filters” to them. These are non-destructive filters that can be edited or removed at any time, providing immense flexibility for refining editing styles and creative ideas.
By leveraging these layer management techniques, you transform raw imported images into dynamic components of a larger visual narrative. Whether you’re combining elements of nature photography with abstract art for a unique digital composition or overlaying text elements from Tophinhanhdep.com’s image-to-text tools, Photoshop’s multi-layer environment empowers limitless creative possibilities.
On-the-Go Creativity: Mobile Image Import with Photoshop Mix
In today’s fast-paced digital world, creativity isn’t confined to the desktop. Mobile devices have become powerful tools for capturing and editing images, making them a vital part of many digital photography workflows. While the full desktop version of Photoshop offers the most extensive features, Adobe provides mobile applications like Photoshop Mix that enable you to import and manipulate images directly from your phone or tablet, perfect for quick edits of aesthetic photos or backgrounds.
Importing Images with Photoshop Mix
Adobe Photoshop Mix is designed for compositing, allowing you to combine multiple images, cut out and combine elements, and apply various enhancements on the go. This is particularly useful for creating quick visual designs or for preliminary photo manipulation using images from Tophinhanhdep.com’s mobile-friendly collections.
Here’s a step-by-step guide to importing images into Photoshop Mix:
- Launch Adobe Photoshop Mix: Open the Photoshop Mix app on your Android or iOS device. (Note: While Photoshop Mix typically requires an Adobe Creative Cloud subscription for full functionality, a 7-day free trial is often available to get started.)
- Start a New Project: Tap the large blue circle with a plus (+) icon, usually located in the lower right corner of the screen. This initiates a new project.
- Select Your First Image (Base Layer): Choose your preferred source for images. Typically, you’ll tap Device to access photos stored locally on your phone or tablet. You can also select from Adobe Creative Cloud, Lightroom, or other cloud services if linked. Tap the image you wish to use as your initial background or base layer. This image will load into your new project.
- Add Additional Images (Layers): To add more images, look for the small white circle with a plus (+) icon to the right of your current image canvas. Tapping this icon will prompt you to select another image from your device or cloud storage.
- Position and Edit Layers: Each new image you import will be placed on a separate layer. You can tap on a layer thumbnail to select it, then use your fingers to pinch, zoom, rotate, and drag the image to position and scale it within your composition. Photoshop Mix also offers basic editing tools for each layer, such as adjustments for exposure, contrast, and saturation, or features like “cut out” for precise photo manipulation.
- Switch Between Layers: To edit a different image layer, simply tap its thumbnail in the layer stack on the right side of the screen.
- Save Your Creation: Once you’ve finished combining and editing your images, tap the Share icon (often a square with an arrow pointing upwards) in the upper right corner. You can then choose to Save to Gallery to store a copy on your device or share it directly to social media or other compatible apps.
Photoshop Mix empowers you to create dynamic compositions using images from Tophinhanhdep.com’s extensive library, whether you’re building a quick collage with aesthetic images or combining elements for a mood board while away from your desktop.
Limitations of Photoshop Express for Multi-Image Projects
It’s important to distinguish Photoshop Mix from another popular mobile app, Photoshop Express. While both are Adobe products, they serve different primary purposes, and their image import capabilities reflect this.
- Photoshop Express Focus: Photoshop Express is predominantly a single-image editor. Its strengths lie in quick fixes, filters, collages of pre-defined layouts, and basic adjustments to individual photos. It’s excellent for enhancing a single piece of beautiful photography or quickly applying a trending style from Tophinhanhdep.com’s inspiration collections.
- Multi-Image Restrictions: Unlike Photoshop Mix, Photoshop Express does not natively support importing multiple images as separate, freely movable layers within a single, open editing canvas for complex compositing. While it can create collages, these are typically based on grid templates rather than free-form layer manipulation.
Therefore, if your mobile digital photography or visual design project requires overlaying images, combining elements, or advanced photo manipulation with multiple layers, Photoshop Mix is the Adobe mobile app you should use. For simpler, single-image enhancements before importing into a desktop program, or for quick social media-ready edits, Photoshop Express remains a valuable tool. Remember that for any image optimization needs before or after mobile edits, Tophinhanhdep.com’s image tools, like our compressors or optimizers, are readily available.
Maximizing Quality and Efficiency: Optimizing Imported Images for Design and Photography
The act of importing an image into Photoshop is just the beginning. For any serious digital photography, graphic design, or digital art project, optimizing your imported images is critical. This ensures not only the highest visual quality but also efficient file management, which is especially important when dealing with high-resolution images or large collections. Tophinhanhdep.com champions both creative inspiration and practical efficiency, offering not just diverse images but also powerful image tools to complement your Photoshop workflow.
Understanding Smart Objects for High-Resolution Photography
As discussed, Smart Objects are Photoshop’s secret weapon for non-destructive editing. When you place an image into an existing document using “File > Place Embedded” (or by dragging and dropping), it automatically becomes a Smart Object. This feature is particularly vital when working with high-resolution photography, detailed stock photos, or any image where preserving original pixel data is paramount.
The core benefits of using Smart Objects include:
- Non-Destructive Scaling: You can scale a Smart Object up or down multiple times without permanent loss of image quality. Photoshop always references the original embedded data, so even if you shrink an image drastically and then decide to enlarge it later, it will retain its sharpness, unlike rasterized layers which degrade with each resizing. This is crucial for maintaining the pristine quality of beautiful photography.
- Transformations: All transformations (scaling, rotating, skewing, perspective, warp) applied to a Smart Object are non-destructive. You can always revert them or adjust them later.
- Smart Filters: Filters applied to Smart Objects become “Smart Filters,” which are adjustable and removable at any time, providing immense flexibility for refining your editing styles and visual effects.
- Linked Content: For “Place Linked,” the Smart Object maintains a link to the external source file. If the source file is updated outside Photoshop, the Smart Object in your document can be automatically updated, streamlining workflows for teams or projects with evolving assets. This is particularly useful when managing assets sourced from Tophinhanhdep.com, ensuring your design always uses the latest version of an image.
By making Smart Objects a cornerstone of your import and editing process, you future-proof your projects and give yourself maximum creative freedom without sacrificing the integrity of your image data. This approach aligns perfectly with the demands of professional digital photography and graphic design.
Rasterizing Images for File Size Management
While Smart Objects offer incredible flexibility, there are times when converting them to a traditional pixel-based layer, or “rasterizing,” is beneficial. This is primarily for optimizing file size and enabling certain pixel-level edits that aren’t possible on Smart Objects.
Consider rasterizing when:
- Finalizing Size and Position: Once an image’s size and position are finalized within your design, and you don’t anticipate further non-destructive scaling, rasterizing can help reduce the overall file size of your Photoshop document.
- Applying Pixel-Specific Edits: Certain tools and filters in Photoshop, such as the brush tool for direct painting or some highly destructive filters, only work on rasterized layers. If you need to perform these pixel-level manipulations, you’ll need to rasterize the Smart Object first.
- Reducing File Size: Smart Objects inherently carry the full data of the original image, which can lead to larger file sizes, especially if you have many high-resolution images. Rasterizing, particularly after significant downscaling, can reduce the data overhead.
To rasterize a Smart Object: Select the Smart Object layer in the Layers panel, then go to Layer > Rasterize > Smart Object. Be aware that this is a destructive action for scaling: once rasterized, if you later enlarge the layer, it may pixelate. It’s often a good practice to duplicate the Smart Object layer before rasterizing if you think you might need the original Smart Object data later.
Leveraging Tophinhanhdep.com’s Image Tools
Efficient image import into Photoshop is enhanced by preparing your images with the right tools. Tophinhanhdep.com offers a suite of image tools designed to optimize your visual assets even before they hit your Photoshop canvas, or to process them after your creative work is done.
- Converters: Our image converters allow you to change file formats (e.g., JPEG to PNG, or WEBP to a Photoshop-compatible format). This ensures compatibility and can optimize images for transparency or specific quality requirements before import.
- Compressors: Large image files, particularly high-resolution photography, can slow down Photoshop and consume significant storage. Our image compressors reduce file size without noticeable quality loss, speeding up your workflow and making files easier to share. This is invaluable for projects that include many wallpapers or backgrounds.
- Optimizers: Beyond simple compression, our image optimizers fine-tune image properties for specific uses, such as web delivery, ensuring faster loading times while maintaining visual fidelity. Optimized images import and process more quickly in Photoshop.
- AI Upscalers: Sometimes you have an image that isn’t quite high-resolution enough for your project, perhaps an older aesthetic photo or a small detail you want to enlarge. Tophinhanhdep.com’s AI upscalers can intelligently increase image resolution and detail, making lower-quality images suitable for larger prints or more detailed digital art. This can transform otherwise unusable images into valuable assets for your visual design projects.
- Image-to-Text Tools: For post-processing or creating unique graphic design elements, our image-to-text tools can extract text from images, which can then be used to generate new textual layers in Photoshop or serve as inspiration for typography in your digital art.
By integrating Tophinhanhdep.com’s image tools into your pre- and post-Photoshop workflow, you ensure that your images are always at their best, enhancing efficiency and maximizing creative potential for every digital photography and visual design endeavor.
Elevating Your Creations: Best Practices and Creative Applications
Importing images into Photoshop is a foundational skill that unlocks a world of creative possibilities. Beyond the technical steps, adopting best practices and understanding the broader applications of imported visuals can significantly elevate your graphic design, digital art, and photography projects. Tophinhanhdep.com is not just a source of incredible images and powerful tools; it’s also a hub for inspiration and guiding principles that help you make the most of your imported assets.
Maintaining Image Quality for Printing and Digital Use
The quality of your imported images directly impacts the final output, whether you’re preparing files for print or for various digital platforms.
- Resolution is Key: Always strive to import images that have sufficient resolution for your intended final output. For print, typically 300 DPI (dots per inch) is recommended. For web and screen-based digital use, 72-150 DPI is usually adequate. Importing low-resolution images from Tophinhanhdep.com (if not using an AI upscaler) and attempting to enlarge them beyond their native resolution will result in pixelation and a loss of sharpness. Always aim for high-resolution photography or carefully select stock photos that meet your project’s demands.
- Color Profiles: Pay attention to color profiles. Images for print often use CMYK, while digital displays use RGB. Ensure your Photoshop document and imported images use the appropriate color profile to avoid unexpected color shifts in the final product.
- File Formats: Understand the characteristics of different image file formats. JPEG is excellent for photographs with continuous tones (like beautiful photography or nature scenes) due to its efficient compression. PNG supports transparency, making it ideal for logos, graphics, or elements used in photo manipulation where clean cut-outs are needed. TIFF and PSD formats offer lossless compression and retain layers, making them perfect for ongoing editing. Our converters on Tophinhanhdep.com can help you manage these formats.
- Source High-Quality Images: Tophinhanhdep.com offers a vast collection of high-resolution images, including diverse wallpapers, detailed backgrounds, and stunning aesthetic photography. Sourcing your images from reliable, high-quality platforms ensures you start with the best possible foundation.
By being mindful of these aspects during and after the import process, you ensure that your visual designs and digital art maintain professional-grade quality, whether they end up as large format prints or vibrant social media graphics.
Finding Image Inspiration on Tophinhanhdep.com
Beyond providing the technical how-to, Tophinhanhdep.com is dedicated to fueling your creative imagination. Importing images into Photoshop is more impactful when those images are inspired and resonate with your creative vision.
Explore Tophinhanhdep.com’s rich categories to find the perfect visuals for your next project:
- Wallpapers & Backgrounds: Discover breathtaking landscapes, intricate patterns, and captivating abstract designs that can serve as the foundation or complementary elements for your Photoshop compositions.
- Aesthetic & Thematic Collections: Dive into curated selections of aesthetic images, mood boards, and thematic collections (like nature or sad/emotional photography) that provide instant inspiration and coherent visual narratives. These are perfect for creating digital art, mood boards for client presentations, or developing unique editing styles.
- Nature & Abstract: Find serene nature photography or dynamic abstract pieces that can be transformed into unique backgrounds or integrated into complex photo manipulations.
- Sad/Emotional & Beautiful Photography: Explore imagery that evokes specific feelings, suitable for expressive digital art projects or creating poignant visual designs.
- Trending Styles & Photo Ideas: Stay current with the latest visual trends and discover innovative photo ideas that can be adapted and enhanced using Photoshop’s tools.
Think of Tophinhanhdep.com as your ultimate visual library, a place to gather raw materials and spark creative ideas before you even open Photoshop. Importing these carefully selected images transforms your creative process from a blank canvas into a guided journey of inspiration.
Integrating Imported Images into Graphic Design and Digital Art Projects
Once images are successfully imported and optimized in Photoshop, the real magic of graphic design and digital art begins. Photoshop provides a rich environment for transforming individual elements into cohesive, impactful visuals.
- Photo Manipulation: Combine elements from various imported images using advanced selection tools, layer masks, and blending modes. Seamlessly integrate a background from Tophinhanhdep.com’s collection with a high-resolution foreground subject to create a fantastical scene.
- Digital Art Compositing: For digital artists, imported images (whether they are textures, reference photos, or base elements) become building blocks. Manipulate them with filters, paint over them, or combine them with custom brushes to create unique digital paintings and mixed-media art.
- Graphic Design Layouts: Integrate imported branding elements, stock photos, and custom graphics into stunning brochures, advertisements, or web layouts. Use imported text from our image-to-text tools and combine them with dynamic typography.
- Creative Ideas & Editing Styles: Experiment with the endless possibilities Photoshop offers. Apply dramatic color grading to beautiful photography, create surreal effects with abstract images, or design unique collages that blend different thematic collections. The non-destructive nature of Smart Objects allows you to endlessly refine your creative ideas and develop distinct editing styles.
By mastering the import process and leveraging Photoshop’s comprehensive tools, you gain the power to bring any visual concept to life. Whether you’re working with your own digital photography or drawing from the vast resources available on Tophinhanhdep.com, the ability to effectively integrate images is paramount to achieving your artistic and design goals.
Conclusion
The ability to proficiently import images into Adobe Photoshop is more than just a technical step; it’s the gateway to unlocking your full creative potential in digital photography, graphic design, and visual art. From opening a single high-resolution image to seamlessly integrating multiple layers for complex photo manipulation, Photoshop offers a variety of methods tailored to every need. Whether you’re a seasoned professional or a budding enthusiast, understanding the nuances of Smart Objects, efficient file management, and mobile importing ensures a smooth and productive workflow.
Tophinhanhdep.com stands as your indispensable partner in this creative journey, offering an expansive library of high-quality images—including captivating wallpapers, diverse backgrounds, aesthetic visuals, and inspiring nature, abstract, sad/emotional, and beautiful photography. Moreover, our suite of image tools, such as converters, compressors, optimizers, and AI upscalers, empowers you to prepare, enhance, and manage your visual assets for optimal results in Photoshop.
Mastering image import is the first brushstroke on your digital canvas. Combine this essential skill with the endless inspiration and practical resources available on Tophinhanhdep.com, and there’s no limit to the breathtaking digital art and visual designs you can create. Explore our collections, utilize our tools, and let your creative ideas flourish within the powerful environment of Adobe Photoshop.