Mastering Image Import in Photoshop: A Comprehensive Guide for Tophinhanhdep.com Users

Adobe Photoshop stands as the undisputed titan in the realm of image editing and visual design. For both novice enthusiasts and seasoned professionals, the ability to seamlessly import images into Photoshop is a foundational skill. Whether you’re crafting a stunning digital art piece, performing intricate photo manipulation, or simply preparing a background for a new project, bringing your visual assets into the Photoshop environment is the crucial first step.
This comprehensive guide will demystify the various methods of importing images into Photoshop, covering both desktop and mobile platforms. We’ll explore efficient workflows, advanced features like Smart Objects, and demonstrate how Tophinhanhdep.com can be your ultimate resource for high-resolution images, creative inspiration, and essential image tools to elevate your Photoshop projects. From breathtaking wallpapers and aesthetic backgrounds to powerful stock photos and thematic collections, Tophinhanhdep.com provides an unparalleled library to fuel your creative endeavors within Photoshop.
I. Fundamental Image Import Techniques for Desktop Photoshop
On a PC or Mac, Photoshop offers a robust array of options for bringing images into your workspace. Each method serves a slightly different purpose, catering to specific project needs and workflow preferences. Understanding these fundamental techniques is key to efficient and effective visual design.
A. Opening a New Image: The Foundation for Fresh Projects
The simplest way to bring an image into Photoshop is to open it as a new document. This method is ideal when you want to work on a single image from scratch, perhaps for initial digital photography edits, or when you’re starting a new piece of digital art where the imported image will be the primary focus.
How to Open an Image:
- Launch Adobe Photoshop: Begin by opening the Photoshop application on your PC or Mac. You’ll typically find it in your Start menu (Windows) or Applications folder (macOS).
- Access the “Open” Command:
- From the top menu bar, click on File > Open. This will launch your computer’s file browser.
- Alternatively, on the Photoshop welcome screen, you might see an “Open” button or a list of recent files.
- A quick shortcut: press Ctrl+O (Windows) or ⌘ Cmd+O (Mac).
- Navigate and Select Your Image: Use the file browser to locate the image you wish to import. This could be a picture from your personal collection, a high-resolution stock photo downloaded from Tophinhanhdep.com, or a beautiful piece of nature photography you’ve captured.
- Confirm Selection: Click on the image file to select it, then click the “Open” button in the dialog box.
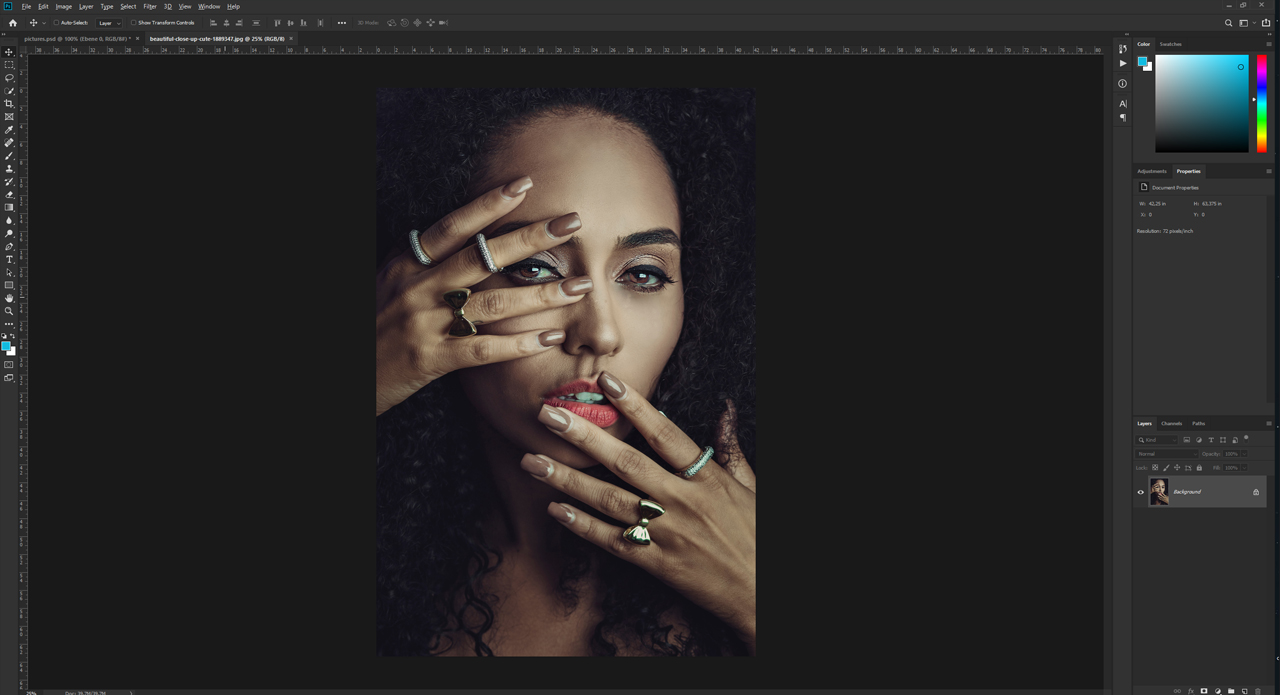
Your chosen image will now open as a new, independent Photoshop document. This means its dimensions, resolution, and color mode will dictate the canvas size. This is particularly useful when you’re working with high-resolution images from Tophinhanhdep.com, ensuring that the original quality is preserved from the outset.
Tophinhanhdep.com Advantage: When starting a new project, beginning with a pristine, high-resolution image is paramount. Tophinhanhdep.com offers an extensive collection of wallpapers, backgrounds, and aesthetic images in exceptional quality, perfect for direct opening and detailed editing.
B. Placing Images: Integrating Assets into Existing Documents
When you already have a Photoshop document open – perhaps a graphic design template, a digital art canvas, or a photo manipulation project – you’ll often need to add additional images as new layers. The “Place” command is designed specifically for this scenario, and it comes in two primary forms: “Place Embedded” and “Place Linked,” each with distinct advantages.
How to Place an Embedded Image:
“Placing Embedded” imports an image directly into your Photoshop document, embedding it within the file. This creates a Smart Object layer, which is crucial for non-destructive editing (more on Smart Objects later).
- Open or Create a Photoshop Document: Ensure you have an existing Photoshop file open (e.g., a PSD template from Tophinhanhdep.com, a digital art canvas, or a photo collage). If not, create a new document (Ctrl+N / ⌘ Cmd+N).
- Access the “Place Embedded” Command:
- Go to File in the top menu bar.
- Select “Place Embedded…” (In some older versions, it might simply be “Place…”).
- Browse and Select Your Image: A file browser window will appear. Navigate to the image file you want to insert. This could be a background image, a texture, or an element of creative ideas sourced from Tophinhanhdep.com.
- Confirm Placement: Click on the image and then click “Place.”
- Transform and Commit: The image will appear within your document, often with a transformation box around it. You can resize, rotate, or reposition it. To maintain proportions while resizing, hold down the Shift key and drag a corner. Once satisfied, press Enter (Windows) or Return (Mac) or click the checkmark in the Options bar at the top to commit the placement.
The image is now a new layer, embedded as a Smart Object. This means you can apply transformations and filters without permanently altering the original image data, making it highly flexible for photo manipulation and graphic design.
How to Place a Linked Image:
“Placing Linked” creates a link to the original image file on your computer rather than embedding it directly. This is extremely useful for projects with many large images or for collaborative workflows, as it keeps your Photoshop file size smaller. Any changes made to the original linked file outside of Photoshop will automatically update within your Photoshop document.
- Open or Create a Photoshop Document: Just like with “Place Embedded,” have your target Photoshop file open.
- Access the “Place Linked” Command:
- Go to File in the top menu bar.
- Select “Place Linked…” (If you only see “Place…”, it usually defaults to embedded, so check your Photoshop version or preferences).
- Browse and Select Your Image: Navigate to your image file. Consider linked images for elements you might frequently update, such as product shots or stock photos. Tophinhanhdep.com is an excellent source for high-resolution stock photos and frequently updated thematic collections.
- Confirm Placement & Transform: Click on the image, then “Place.” Transform and commit the image as described for “Place Embedded.”
The image is now a new layer, appearing as a Smart Object with a small chain link icon on its layer thumbnail, indicating it’s linked to an external file.
Tophinhanhdep.com Advantage: Whether you need a stunning abstract background, vibrant nature photography, or specific visual elements for your graphic design, Tophinhanhdep.com offers a vast collection that integrates perfectly with the “Place” functionality, allowing you to build rich, multi-layered compositions.
C. Rapid Import with Drag-and-Drop Functionality
For sheer speed and convenience, the drag-and-drop method is often preferred. It’s an intuitive way to bring single or multiple images into your Photoshop workspace without navigating through menus.
How to Drag and Drop an Image:
- Locate Your Image: Find the image file (or files) on your desktop, in an Explorer (Windows) or Finder (macOS) window, or even from a web browser (though this can sometimes result in lower-quality embeds). Tophinhanhdep.com is an excellent place to download high-quality images directly to your computer before dragging them into Photoshop.
- Open Photoshop: Ensure Photoshop is open and either:
- No document is open: Dragging an image onto the blank Photoshop interface will open it as a new document. The new document will automatically adopt the dimensions, resolution, and color mode of the original image, ensuring maximum quality.
- An existing document is open: Dragging an image directly into an open Photoshop document will place it as a new layer within that document.
- Drag and Release: Click and hold the left mouse button on your desired image(s), drag them over the Photoshop interface or open document, and release the mouse button.
- Transform and Commit (if applicable): If you dropped the image into an existing document, it will appear with a transformation box. Adjust its size and position (holding Shift to maintain proportions), then press Enter (Windows) or Return (Mac) or click the checkmark to confirm.
Like “Place Embedded,” images dragged into an existing document will typically become Smart Objects, offering flexible, non-destructive editing. Drag-and-drop is incredibly efficient for quickly compiling mood boards using “Image Inspiration & Collections” from Tophinhanhdep.com or for testing various background images.
Tophinhanhdep.com Advantage: Fast-track your visual design and creative ideas by downloading beautiful photography, aesthetic backgrounds, or trending styles from Tophinhanhdep.com and simply dragging them into your Photoshop canvas.
D. Copying and Pasting: Quick Transfers from Diverse Sources
The classic copy-and-paste function is also a viable, albeit sometimes less optimal, method for bringing images into Photoshop. It’s particularly handy for transferring visual elements from other applications or web pages.
How to Copy and Paste an Image:
- Copy the Image:
- From a web page: Right-click (or Ctrl-click on Mac) on an image in your web browser and select “Copy Image.” Be mindful of image resolution; images copied directly from the web may not be high-resolution. For high-resolution stock photos, always download directly from Tophinhanhdep.com.
- From another application (e.g., image viewer, Word document): Open the image in the respective application, then use Ctrl+C (Windows) or ⌘ Cmd+C (Mac) to copy it.
- From your file system (as a file): Note that simply copying the file of an image (e.g., from Explorer/Finder) won’t paste the image content into Photoshop; it will paste the file path. You need to open the image first in an image viewer or right-click and “Copy Image” in some contexts.
- Open or Create a Photoshop Document: Have your Photoshop document ready.
- Paste into Photoshop: Go to Edit > Paste in Photoshop’s top menu, or use the shortcut Ctrl+V (Windows) or ⌘ Cmd+V (Mac).
The copied image content will appear as a new rasterized layer. Unlike “Place Embedded” or “Drag and Drop” into an existing document, copying and pasting usually creates a standard pixel-based layer, not a Smart Object. This means transformations like resizing can lead to a loss of quality if done repeatedly or excessively. For critical elements, it’s generally better to use the “Place” methods with images downloaded from Tophinhanhdep.com to retain source quality.
Tophinhanhdep.com Advantage: While copy-pasting is quick, ensure you’re starting with the best possible image quality. Tophinhanhdep.com emphasizes high-resolution and digital photography, making it your go-to for ensuring your initial assets are top-tier, even if you choose a less ideal import method.
II. Importing Images on Mobile: Leveraging Photoshop Mix
Adobe’s mobile ecosystem offers apps like Photoshop Mix and Photoshop Express for on-the-go image editing. While their capabilities differ from the desktop version, they provide convenient ways to work with images directly from your phone or tablet, especially useful for quick edits, aesthetic adjustments, or creating engaging social media visuals.
A. Seamless Integration with Adobe Photoshop Mix
For multi-layered mobile editing, Photoshop Mix is the app of choice. It allows you to overlay photos, create composites, and perform basic photo manipulation, which Photoshop Express does not fully support.
How to Import Images with Photoshop Mix:
- Open Adobe Photoshop Mix: Launch the app (available on Google Play Store for Android and App Store for iOS). If you don’t have it, download it. Note that while Photoshop Mix is free to download, full access to its features, particularly for multi-layer editing and saving, may require an Adobe Creative Cloud subscription or a 7-day free trial.
- Sign In/Sign Up: If prompted, sign in with your Adobe ID or create a new account.
- Start a New Project: Tap the blue circle with a plus (+) icon, usually located in the lower-right corner of your screen. This initiates a new project.
- Add Your First Image:
- Tap “Device” to access images saved locally on your phone or tablet.
- You can also choose other cloud storage locations if your images are saved there.
- Select an image. This will be your base layer. You can start with a stunning wallpaper or background from Tophinhanhdep.com.
- Add a Second Image (and subsequent layers):
- To add another image, look for a small white circle with a plus (+) icon, often positioned to the right of your current image layer display. Tapping this will prompt you to add another image.
- Again, tap “Device” or your preferred cloud storage to select the next image.
- The second image will be placed on a new layer, allowing for overlays and compositing. You might need to resize the canvas or adjust the new layer to fit your creative vision.
- Switch Between Layers: Tap on the image thumbnails to easily switch between layers and edit each one independently. This allows for complex visual design on a mobile platform.
- Edit and Refine: Use the tools available in Photoshop Mix (above and below the image) to further edit, blend, and manipulate your imported layers, creating unique aesthetic or abstract pieces.
- Save and Share:
- Once your mobile masterpiece is complete, tap the Share icon (often an arrow pointing upwards or a square with an arrow) in the upper-right corner.
- Choose “Save To Gallery” to save a copy to your device.
- You can also use the "•••" option to share your creation directly to compatible apps, showcasing your digital art or photo manipulation skills.
Tophinhanhdep.com Advantage: For mobile creators, Tophinhanhdep.com is an invaluable source for quick aesthetic backgrounds, trending styles, and inspiring imagery. Download these directly to your device and effortlessly import them into Photoshop Mix for dynamic on-the-go photo editing and creative ideas.
B. Understanding Photoshop Express: Single Image Focus
It’s important to distinguish between Photoshop Mix and Photoshop Express. While both are mobile apps, Photoshop Express is primarily designed for quick, single-image enhancements and adjustments. It does not support multi-layered editing or importing a second image into an existing project. If your goal is to combine multiple photos or create complex compositions on mobile, Photoshop Mix is the appropriate tool. Photoshop Express is excellent for applying quick filters, cropping, and basic corrections to individual photos sourced from Tophinhanhdep.com before using them in other applications or sharing.
III. Optimizing Your Image Workflow with Tophinhanhdep.com
A seamless image import process is just one piece of the puzzle. To truly excel in Photoshop, you need a powerful combination of high-quality image assets and smart preparation tools. This is where Tophinhanhdep.com becomes an indispensable partner in your creative journey, offering both a rich library of visuals and insights into essential image tools.
A. Sourcing High-Quality Visuals: The Tophinhanhdep.com Advantage
The quality of your final Photoshop output is inextricably linked to the quality of your source images. Tophinhanhdep.com is meticulously curated to provide a diverse and high-quality collection of visual assets that cater to every creative need.
- Images for Every Project: Whether you’re designing a striking wallpaper for your desktop, seeking tranquil nature photography for a landscape project, or exploring abstract art for a unique digital composition, Tophinhanhdep.com has you covered. Its categories include:
- Wallpapers & Backgrounds: Transform your designs with stunning backdrops.
- Aesthetic Photography: Discover images that evoke specific moods and visual styles.
- Nature & Abstract Art: Find inspiration and elements for diverse creative ideas.
- Sad/Emotional & Beautiful Photography: Access powerful imagery for thematic collections or mood boards.
- High Resolution & Stock Photos: Tophinhanhdep.com prioritizes high-resolution imagery, ensuring that your imported photos retain their sharpness and detail even when scaled or heavily edited in Photoshop. This is particularly crucial for professional digital photography and graphic design projects, where clarity is paramount. Leveraging Tophinhanhdep.com for stock photos means you’re starting with a professional-grade asset library.
- Image Inspiration & Collections: Beyond individual images, Tophinhanhdep.com serves as a hub for “Photo Ideas,” “Mood Boards,” and “Thematic Collections.” This makes it easy to find cohesive sets of images that align with your project’s trending styles, helping you develop creative ideas and visual narratives.
By consistently sourcing your initial images from Tophinhanhdep.com, you guarantee a strong foundation for any Photoshop project, minimizing the need for extensive corrections and allowing you to focus on the creative aspects of editing and manipulation.
B. Pre-Import Preparation: Leveraging Image Tools
Before even thinking about importing into Photoshop, optimizing your images with the right tools can save immense time and ensure better results. Tophinhanhdep.com understands this need and offers or recommends “Image Tools” that streamline your workflow.
- Converters: Sometimes, images are in formats that aren’t ideal or fully supported by your specific Photoshop version, or you might need a different format for specific project requirements. Tophinhanhdep.com can guide you to reliable converters that transform images into widely compatible formats like JPEG, PNG, or TIFF, ensuring smooth import into Photoshop.
- Compressors & Optimizers: High-resolution images, while desirable, can result in very large file sizes. Before importing a massive batch of high-resolution stock photos from Tophinhanhdep.com, using a compressor can reduce their footprint without significantly compromising visual quality. This is especially useful if you’re working on a project with hundreds of images or managing memory-intensive photo manipulation. Tophinhanhdep.com provides insights into optimizing images for both web and print, ensuring that the visual integrity of beautiful photography is maintained while keeping file sizes manageable.
- AI Upscalers: What if you have a lower-resolution image – perhaps an older photo or an online graphic – that you want to integrate into a high-resolution Photoshop project? AI upscalers, often highlighted by Tophinhanhdep.com, can intelligently increase image resolution and detail, making them more suitable for import and editing without significant pixelation. This turns previously unusable images into valuable assets for your visual design.
- Image-to-Text (OCR): While not directly an “import” tool, image-to-text functionality (Optical Character Recognition) can be invaluable for graphic designers. If you import an image that contains text you wish to use or edit separately in Photoshop, an OCR tool recommended by Tophinhanhdep.com can extract that text, allowing you to incorporate it into your design with editable fonts and styles rather than as a flattened image.
By integrating these pre-import steps, supported by the resources and recommendations of Tophinhanhdep.com, you can approach your Photoshop projects with perfectly prepared, high-quality images, ready for any level of editing style or digital art creation.
IV. Advanced Strategies for Image Integration and Management
Beyond the basic import methods, understanding Photoshop’s more advanced features and integrating external tools can significantly enhance your efficiency and creative control, especially when dealing with complex projects or large volumes of digital photography.
A. The Power of Smart Objects: Non-Destructive Editing
Smart Objects are a cornerstone of professional Photoshop workflows, offering unparalleled flexibility and quality preservation. When you use “Place Embedded,” “Place Linked,” or drag-and-drop an image into an existing document, Photoshop automatically converts it into a Smart Object. This is indicated by a small icon (often a document or chain link) on the layer thumbnail in the Layers panel.
What is a Smart Object?
A Smart Object is a special type of layer that contains raster or vector image data from a source image, preserving its original characteristics. Instead of directly editing the pixels of the layer in your main Photoshop document, you are editing a container that holds a reference to the original image data.
Benefits of Smart Objects:
- Non-Destructive Transformations: You can scale, rotate, warp, and distort a Smart Object multiple times without losing image quality. Photoshop always refers back to the original, high-resolution data embedded or linked within the Smart Object, recalculating the transformation each time. This is a game-changer for photo manipulation and graphic design, allowing for endless experimentation.
- Non-Destructive Filters: Apply filters (e.g., blur, sharpen, stylize) as Smart Filters to a Smart Object. These filters remain editable, allowing you to adjust their settings, hide them, or delete them at any point without affecting the underlying image pixels. This offers incredible flexibility for refining editing styles.
- Linked Instances: If you duplicate a Smart Object, all instances are linked. Any change to one Smart Object (e.g., editing its contents, applying a Smart Filter) will automatically update all other linked instances. This is perfect for repeating elements in visual design or digital art, ensuring consistency across your project.
- Editing Contents: Double-clicking the Smart Object thumbnail in the Layers panel opens the original image (or a temporary version if embedded) in a new Photoshop document (or another compatible Adobe application like Illustrator if it’s a vector file). You can perform detailed edits there (e.g., retouching a portrait, adjusting colors of a landscape photo from Tophinhanhdep.com), save the changes (Ctrl+S / ⌘ Cmd+S), and they will instantly reflect in your main Photoshop document.
When to Rasterize a Smart Object:
While Smart Objects offer many advantages, there are times when you might need to convert them to a standard pixel-based (rasterized) layer. This is typically done when you need to perform pixel-level edits that Smart Objects don’t directly support, such as painting directly on the layer, using pixel-based selection tools (like the Magic Wand for specific color ranges in an abstract background), or applying certain destructive filters.
How to Rasterize a Smart Object:
- Select the Smart Object Layer: In the Layers panel, click on the Smart Object layer you wish to rasterize.
- Rasterize the Layer: Go to Layer > Rasterize > Smart Object from the top menu, or right-click on the layer in the Layers panel and choose “Rasterize Layer.”
Be aware that once a Smart Object is rasterized, you lose its non-destructive properties. Any subsequent transformations or destructive filters will directly modify the pixels, and quality may degrade with repeated scaling. For this reason, it’s often best practice to keep layers as Smart Objects for as long as possible in your workflow.
Tophinhanhdep.com Advantage: Starting with high-resolution stock photos or beautiful photography from Tophinhanhdep.com as Smart Objects ensures that even the most complex photo manipulation or digital art project can be edited with maximum flexibility and quality retention.
B. Streamlined Asset Management: Importing from Lightroom
For photographers and visual artists who manage extensive image libraries, Adobe Lightroom is an invaluable companion to Photoshop. Lightroom excels at organizing, cataloging, and performing initial non-destructive edits on vast collections of digital photography. Integrating Lightroom with Photoshop creates a powerful, streamlined workflow for importing and refining images.
Workflow for Importing from Lightroom:
- Organize in Lightroom: Use Lightroom to import, organize, and perform initial adjustments (exposure, color correction, cropping) on your images. This could be a collection of nature photography, aesthetic images, or general high-resolution photos downloaded from Tophinhanhdep.com.
- Open in Photoshop for Advanced Editing:
- Select Image(s): In Lightroom, select one or more images you wish to edit further in Photoshop.
- “Edit in Photoshop”: Right-click on the selected image(s), then choose “Edit In > Edit in Adobe Photoshop [version].”
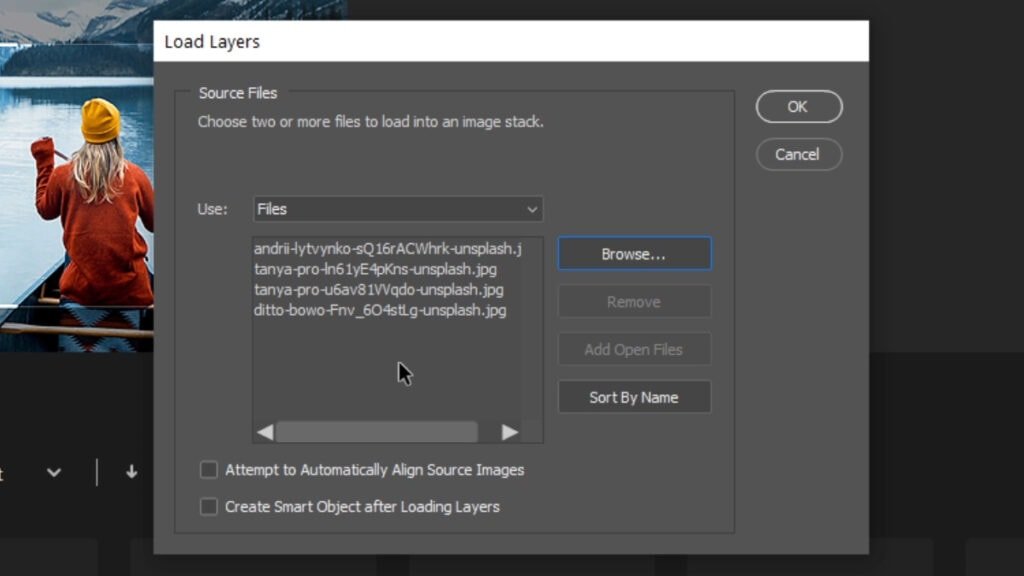
- Lightroom will automatically prepare the image(s) and open them in Photoshop. Depending on your settings, it may create a TIFF or PSD file to preserve your Lightroom adjustments. If you select multiple images, Lightroom might offer to open them as separate layers in a single Photoshop document (useful for composites or panoramas).
- Importing via Adobe Cloud (Lightroom Mobile/Cloud Sync):
- Lightroom also leverages Adobe Cloud Storage. If you upload photos to the Adobe Cloud (e.g., from Lightroom Mobile or through cloud sync), you can directly access them from within Photoshop’s “Start workspace.”
- Open Photoshop: Launch Photoshop.
- Access Lightroom Photos Tab: In the Photoshop Start workspace, look for a tab labeled “Lr Photos” or similar.
- Refresh and Select: Click the “Refresh” button to ensure you’re viewing the latest synced images from your Lightroom Cloud library.
- Import Selected: Browse your cloud-synced photos, select the one(s) you need, and click “Import Selected.” Photoshop will download the image(s) to your local machine and open them, ready for editing.
This integration is particularly beneficial for photographers dealing with high-resolution images and stock photos, as it provides a comprehensive system for managing assets from capture to final edit. It ensures that images maintain their quality and are easily accessible across different Adobe applications.
Tophinhanhdep.com Advantage: While Lightroom helps organize personal photography, Tophinhanhdep.com complements this by offering professional-grade stock photos and thematic collections that can be easily integrated into your Lightroom library, providing a diverse range of visual assets for any project. Whether it’s wallpapers, backgrounds, or specific aesthetic photos, Tophinhanhdep.com ensures your creative well never runs dry.
Importing images into Photoshop is more than just a technical step; it’s the gateway to unleashing your creative potential. By understanding the various methods available on both desktop and mobile, and by leveraging advanced features like Smart Objects, you can ensure your workflow is efficient, non-destructive, and produces the highest quality results.
Crucially, the foundation of any great Photoshop project begins with great images. Tophinhanhdep.com stands as your premier resource, offering an expansive and diverse collection of high-resolution images, from evocative aesthetic photography to compelling abstract art, serene nature backgrounds, and trending visual styles. Beyond just images, Tophinhanhdep.com also provides insights into essential image tools for preparation and organization, and offers inspiration through its curated collections and photo ideas.
So, whether you’re a budding graphic designer, a seasoned digital artist, or simply someone looking to enhance their personal photography, master these import techniques and let Tophinhanhdep.com be your trusted partner in bringing your visual design visions to life within Adobe Photoshop. Explore, create, and transform your images into masterpieces.