Mastering Image Sequences in After Effects: A Comprehensive Guide for Visual Creators

In the dynamic world of visual design, where every frame tells a story, the ability to manipulate and animate visual assets is paramount. For video editors, motion graphics designers, and digital artists, understanding how to import image sequences into leading visual design platforms like After Effects is not just a technicality; it’s a gateway to unlocking immense creative potential. This guide delves deep into the process of working with image sequences, exploring everything from preparation and import techniques to advanced workflows and troubleshooting. Whether you’re crafting a stunning time-lapse, a captivating stop-motion animation, or intricate visual effects, mastering image sequences is fundamental.
At Tophinhanhdep.com, we understand the essence of compelling visuals, offering a vast array of resources including high-resolution images, aesthetic backgrounds, and powerful image tools designed to elevate your creative projects. This article complements our commitment to empowering visual artists by providing detailed insights into managing image sequences, ensuring your digital photography and graphic design efforts result in breathtaking visual art.
Understanding Image Sequences and Their Role in Visual Design

At its core, an image sequence is a collection of individual still images, meticulously ordered and played back in rapid succession to create the illusion of continuous motion. Each image in the sequence acts as a single frame of what will become an animated video or motion graphic. When imported into visual design software, these individual frames are seamlessly transformed into a dynamic clip, offering unparalleled control and precision over every moment of your animation.
What is an Image Sequence?
Imagine flipping through a stack of drawings, each slightly different from the last, to see a character move. That’s precisely how an image sequence functions in the digital realm. It’s a series of discrete images, saved as individual files, typically numbered consecutively (e.g., image001.png, image002.png, image003.png). When these images are displayed quickly, they fuse together in the viewer’s mind, creating fluidity and movement. This technique is a cornerstone for various forms of visual storytelling, from the whimsical charm of stop-motion animation to the grandeur of cinematic visual effects. For photographers and digital artists focused on “Beautiful Photography” or “Abstract” compositions, image sequences open avenues for bringing still shots to life, transforming “Mood Boards” into dynamic visual narratives.
What Image Sequence Formats Does After Effects Support?
After Effects, a staple for professional visual designers, boasts extensive support for a wide array of image sequence formats, catering to diverse project requirements and quality standards. Understanding these formats is crucial for maintaining the integrity of your “High Resolution” images and ensuring seamless integration into your “Digital Art” projects.
- JPEG (JPG): Ideal for image sequences where file size is a concern and minor compression artifacts are acceptable. JPEGs are widely used for general animation, especially when the visual details aren’t excessively intricate. They are a common output format for “Digital Photography” due to their excellent compression ratio.
- PNG: A highly versatile format renowned for its lossless compression and, critically, support for transparency (alpha channels). PNG sequences are indispensable for projects requiring clean overlays, complex compositing, or animations with transparent backgrounds, perfectly aligning with sophisticated “Graphic Design” and “Photo Manipulation” needs. The PNG-24 format is particularly suitable for images with rich colors and complex transparency.
- TIFF (Tagged Image File Format): Often favored for its high fidelity and support for various color depths and compression schemes. TIFF sequences are the go-to choice for preserving the utmost image quality, making them a preferred format for “High Resolution Photography” and archival “Digital Photography.”
- PSD (Photoshop Document): After Effects can import layered Photoshop files as image sequences, allowing designers to maintain the intricate layers and editing capabilities of their “Graphic Design” and “Digital Art” creations directly within the animation workflow. This provides immense flexibility for “Photo Manipulation” and iterative design processes.
Choosing the right format depends on your project’s specific needs, balancing quality, file size, and features like transparency. Tophinhanhdep.com’s “Image Tools,” including converters and optimizers, can help ensure your images are in the most suitable format for your After Effects projects, preparing them for optimal performance.
Preparing Your Image Sequence for Import
Successful image sequence import into After Effects hinges on meticulous preparation. Overlooking these preliminary steps can lead to frustrating errors, delays, and compromised visual quality. Think of this as the foundation for your “Visual Design” project; a strong foundation ensures a smooth creative process.
Essential Preparation Steps
Before you even launch After Effects, your image sequence needs to be organized and formatted correctly. These guidelines are crucial for any “Digital Photography” or “Graphic Design” asset intended for animation.
- File Naming Convention: Consistent and Sequential: This is arguably the most critical step. After Effects relies on a consistent naming pattern to recognize a group of images as a sequence.
- Consistent Naming: All images must share a common base name, followed by a numerical suffix. For example:
myanimation_001.png,myanimation_002.png,myanimation_003.png. - Leading Zeros: Always use leading zeros to ensure proper numerical sorting.
001, 002, 003is correct;1, 2, 3might confuse the software, especially with sequences exceeding nine frames. - No Gaps: Ensure there are no missing numbers in the sequence. A gap will cause the sequence to break, leading to incomplete animation.
- Consistent Naming: All images must share a common base name, followed by a numerical suffix. For example:
- File Format: PNG or Other Supported Formats: As discussed, verify that all images are saved in an After Effects-supported format (e.g., PNG, JPG, TIFF, PSD). Consistency in format across the sequence is also vital. Utilizing Tophinhanhdep.com’s “Image Tools” for conversion can streamline this process.
- Frame Rate: Matching Project Settings: The intended frame rate of your image sequence should ideally match your After Effects project settings. Mismatched frame rates can result in playback issues, jerky motion, or incorrect timing, undermining the “Aesthetic” flow of your animation.
- Color Depth: For Transparency: If your images require transparency, ensure they are saved with an alpha channel (e.g., PNG-24). This preserves the intricate cutouts and overlays essential for dynamic “Photo Manipulation” and “Digital Art” compositions.
- Organization: Dedicated Folder: Place all your image sequence files in a single, clearly labeled folder. This not only prevents confusion but also simplifies the navigation process within After Effects.
- Remove Unnecessary Files: Keep the sequence folder clean. Remove any extraneous images, unrelated files, or duplicates to avoid clutter and potential import errors.
- Sequence Check: Pre-Import Verification: Before attempting to import, quickly preview your image files to visually confirm the sequence, check for any missing frames, or naming inconsistencies. This simple step can avert significant headaches later.
The Importance of Proper Preparation
Why invest so much time in preparing your image sequence? The benefits extend far beyond simply avoiding errors, directly contributing to the efficiency and quality of your “Visual Design” workflow.
- Avoid Errors and Delays: Correct file naming, format, and frame rate eliminate common import failures. This proactive approach saves you from debugging issues after import, ensuring a smoother creative flow, especially important when working on tight deadlines for “Thematic Collections” or “Trending Styles.”
- Save Time: Addressing preparation issues upfront is significantly less time-consuming than troubleshooting a broken sequence within a complex After Effects composition. Pre-empting problems means more time for creative “Photo Manipulation” and “Creative Ideas.”
- Smooth Playback: A properly prepared image sequence guarantees fluid and accurate playback within After Effects. This is crucial for precise animation timing, seamless transitions, and achieving the desired visual rhythm in your “Digital Art” and “Motion Graphics.”
Importing Image Sequences into After Effects
Once your image sequence is meticulously prepared, importing it into After Effects is a straightforward process. This is where your still “Photography” transforms into vibrant “Digital Art.”
Step-by-Step Import of JPEG or PNG Sequences
Follow these steps to bring your prepared image sequence into After Effects:
- Open After Effects: Launch the application on your computer.
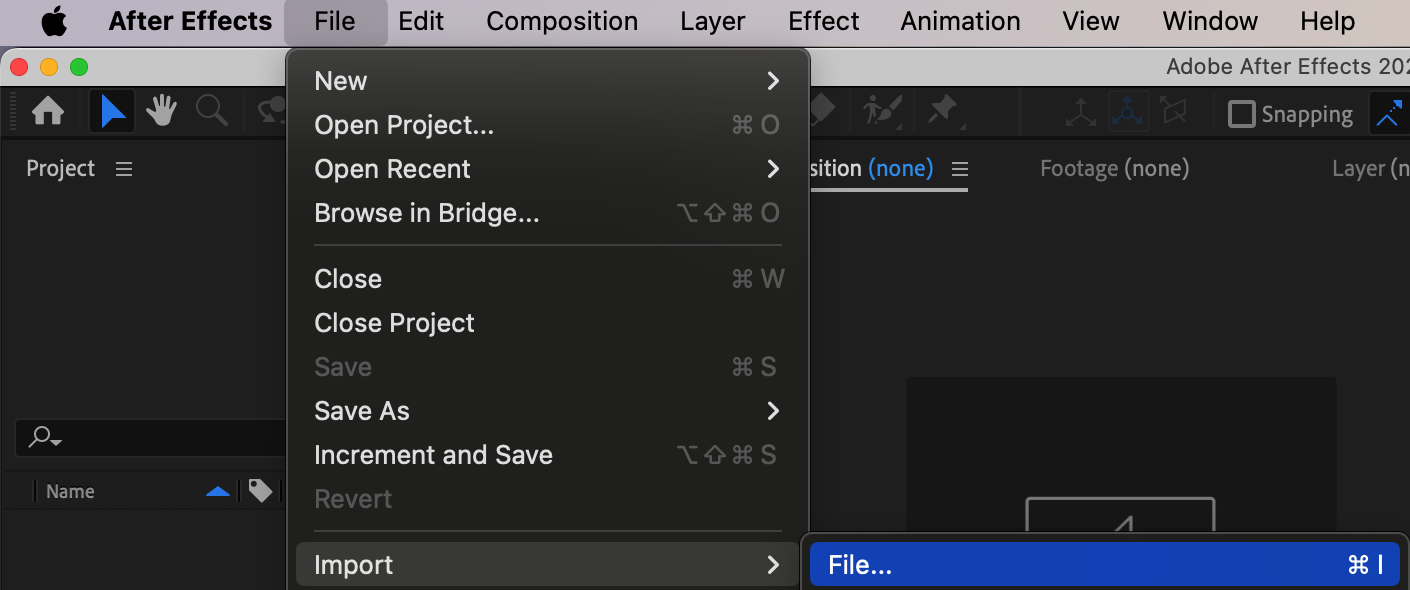
- Initiate Import: There are a few ways to do this:
- Double-click anywhere in the Project panel (the asset area).
- Go to
File > Import > File...in the top menu bar.
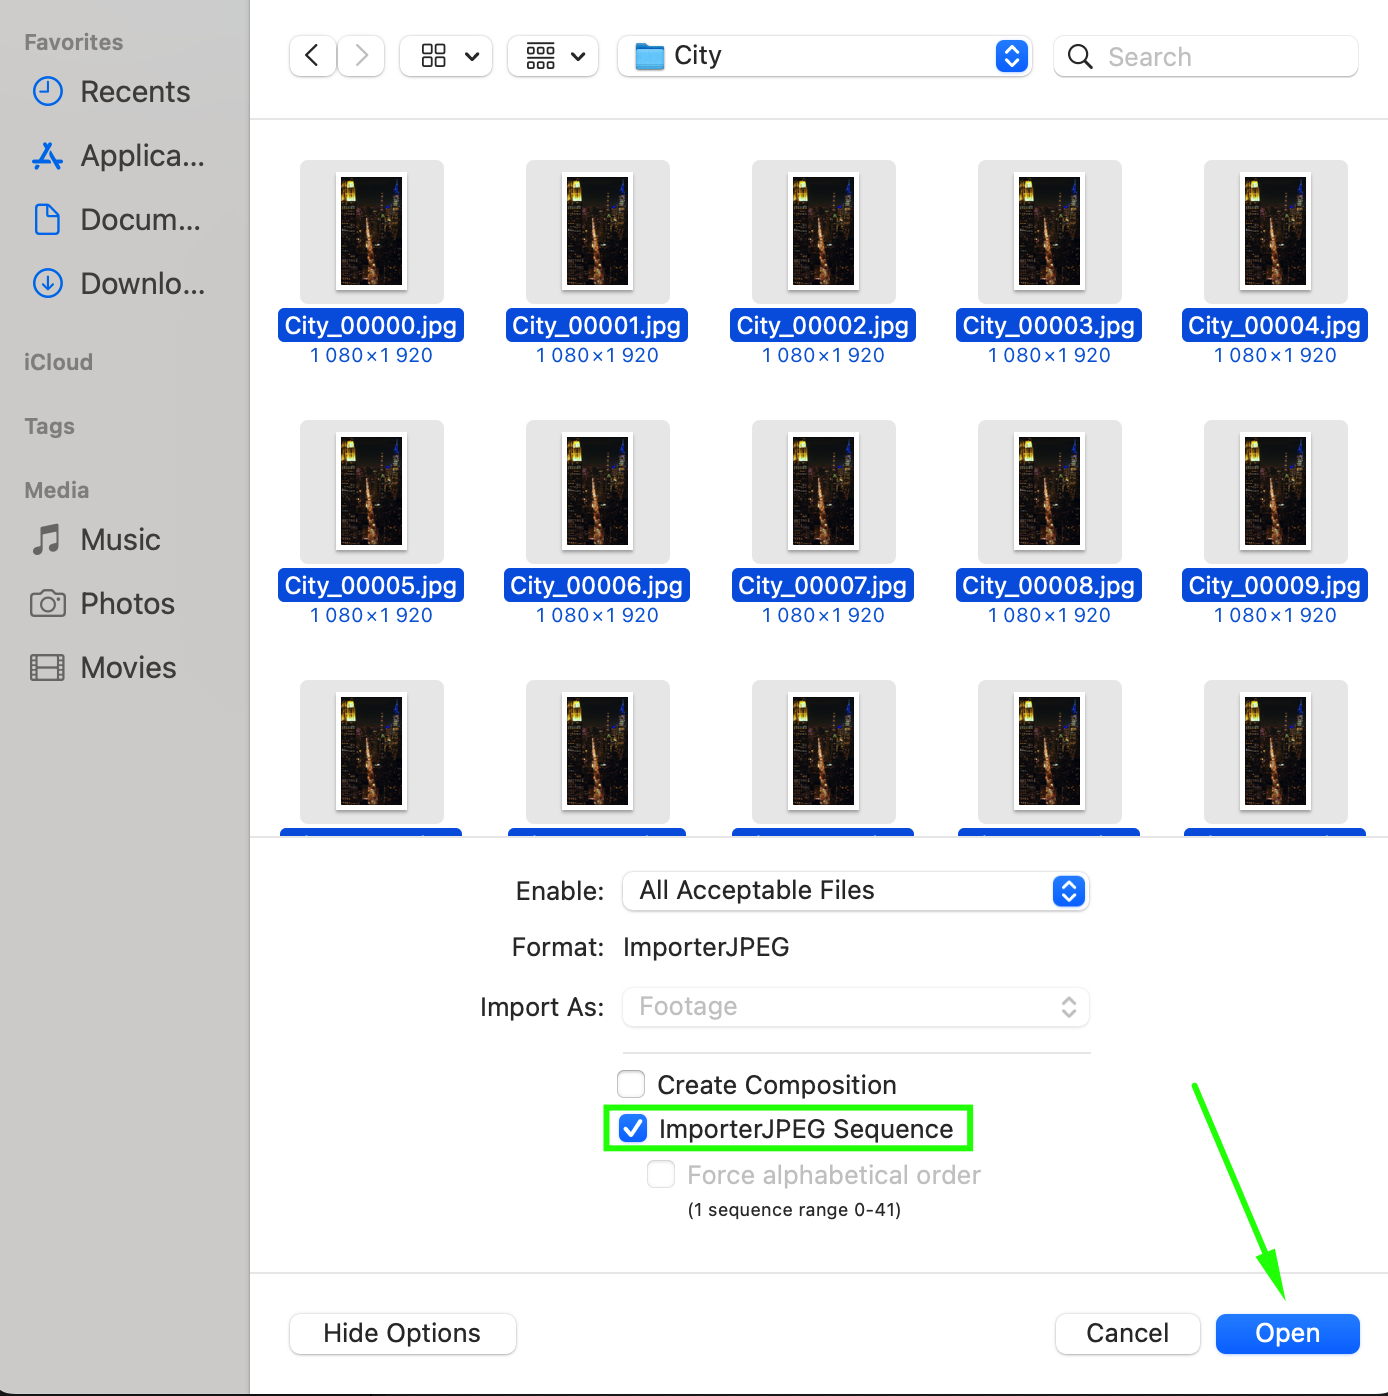
- Navigate to Your Sequence: In the import dialog box, browse to the dedicated folder where you stored your image sequence.
- Select the First Image: Click on the first image file in your sequence (e.g.,
myanimation_001.png). - Enable “Image Sequence” Option: Crucially, look for a checkbox typically labeled “PNG Sequence,” “JPEG Sequence,” or “[Format] Sequence” (depending on your file type) in the import dialog box. Check this box. This tells After Effects to treat the numbered files as a single sequence rather than individual images.
- Click “Open”: After Effects will now import all the images in that sequence as a single footage item in your Project panel. It will appear as one clip, ready to be dragged onto your timeline for editing.
Converting Video to Image Sequence in After Effects
Sometimes, you might need to reverse the process: extracting individual frames from an existing video to create an image sequence. This is invaluable for detailed “Photo Manipulation,” frame-by-frame analysis, or creating new “Digital Art” from video footage.
- Import Your Video: Start by importing the video file into After Effects (
File > Import > File...). - Drag to Timeline: Drag the imported video clip from the Project panel to a new composition on the timeline.
- Select Desired Segment (Optional): If you only need a portion of the video, trim the composition to the desired length using the work area bar.
- Add to Render Queue: Go to
Composition > Add to Render Queue. This opens the Render Queue panel. - Configure Output Module: In the Render Queue, click on the dropdown next to “Output Module” (usually says “Lossless”). In the Output Module Settings dialog box:
- Format: Choose your desired image sequence format, such as “PNG Sequence” or “JPEG Sequence.”
- Channels: For transparency, select “RGB + Alpha” if using PNG; otherwise, “RGB.”
- Depth: Set to “Millions of Colors+” for best quality.
- Options (for JPEG): Adjust quality settings as needed.
- Specify Output Location: Click on the “Output To” text (usually a file path) to choose a destination folder and give your sequence a base name.
- Click “Render”: Click the “Render” button in the Render Queue panel. After Effects will now process your video, saving each frame as a separate image file in your chosen location.
Troubleshooting Common Import Issues
Even with careful preparation, issues can arise. Understanding why an image sequence might fail to import or behave unexpectedly in After Effects is key to quickly resolving problems and keeping your “Visual Design” projects on track.
- Inconsistent Naming or Missing Frames: This is the most frequent culprit. Any deviation from the sequential naming convention (e.g.,
myphoto_001.jpg,myphoto_003.jpg– missingmyphoto_002.jpg) will cause After Effects to either import only a partial sequence or treat the files as individual images. Large, disorganized folders can exacerbate this. - Incorrect Image Format: Attempting to import an image sequence with files in a format not supported by After Effects (e.g., certain obscure RAW formats or unsupported web image types) will result in a failure. Ensure all images are in compatible formats like PNG, JPEG, TIFF, or PSD.
- Color Profile Mismatches: Inconsistent color profiles across images in a sequence or between the images and your After Effects project can lead to unexpected color shifts or rendering issues. While less common, it’s worth checking if you notice color discrepancies.
- Mismatched Frame Rate: If the assumed frame rate of your imported image sequence doesn’t align with your composition’s frame rate, you might experience jerky playback or frames being skipped/duplicated. You can adjust the “Interpret Footage” settings for the image sequence in After Effects to correct this.
Enhancing Your Workflow with Tophinhanhdep.com
While After Effects offers powerful capabilities for image sequences, platforms like Tophinhanhdep.com provide an alternative, often more streamlined, approach for importing, converting, and creating videos from image sequences. Tophinhanhdep.com serves as a versatile hub for all your “Image Tools” and “Visual Design” needs, complementing professional software with user-friendly features.
Tophinhanhdep.com’s Key Features for Image Sequences
Tophinhanhdep.com is designed with the modern visual creator in mind, offering features that simplify complex tasks and enhance creative output. Its image sequence capabilities are particularly noteworthy:
- Seamless Importing: Tophinhanhdep.com intelligently detects image sequences when importing. By selecting the first image, the platform often automatically recognizes and groups the rest, significantly simplifying the import process for formats like JPEG and JPG. This convenience makes working with “Aesthetic” and “Nature” sequences effortless.
- Flexible Editing Options: Once imported, Tophinhanhdep.com provides a robust suite of editing tools. Users can adjust the duration of individual frames, apply dynamic transitions between shots, incorporate a wide array of visual effects, and integrate audio tracks to create a rich multimedia experience. This is perfect for transforming “Beautiful Photography” into compelling narratives.
- AI-Enhanced Image Effects: Leverage artificial intelligence to automatically refine colors, lighting, and details in your image sequences. This is invaluable for achieving a consistent “Editing Style” and professional look across all frames, especially when dealing with diverse “Stock Photos” or “Digital Photography.”
- Advanced Color Correction: Fine-tune brightness, contrast, saturation, and other color parameters with precision. This ensures your images achieve the perfect visual balance and mood, crucial for conveying “Sad/Emotional” or “Vibrant” aesthetics.
- Instant Background Removal: For complex “Photo Manipulation” or composite shots, Tophinhanhdep.com’s background removal tool can instantly isolate subjects, replacing blurry or unwanted backdrops with clean, professional visuals. This is a game-changer for “Graphic Design” and creating dynamic “Wallpapers” from sequences.
- Custom Font Integration: Add personalized text styling to your images and videos, ensuring your captions or titles perfectly match your project’s theme and “Visual Design.”
- Versatile Export Options: After crafting your video from the image sequence, Tophinhanhdep.com allows you to export it in various formats (MP4, MOV, AVI, WMV, etc.), making it suitable for different platforms and uses, from social media “Trending Styles” to high-quality presentations.
Step-by-Step Guide to Importing and Creating Videos with Tophinhanhdep.com
Creating stunning videos from image sequences is intuitive with Tophinhanhdep.com. Here’s a simplified workflow:
How to Import Image Sequences to Tophinhanhdep.com?
- Initiate Import: Click on
File > Import Media. - Navigate to Folder: Browse to the folder containing your image sequence.
- Select First Image: Click the first image of the sequence. Tophinhanhdep.com will often automatically detect the rest if properly named. Ensure the “Image Sequence” checkbox is enabled if available.
How to Convert Image Sequences to a Video in Tophinhanhdep.com?
- Import with Sequence Recognition: During import, if prompted, ensure the “Image Sequence” box is checked. When you select the first image, Tophinhanhdep.com will automatically import the entire sequence as a single video clip.
- Customize Frame Rate: Right-click on the imported image sequence file in the media library, then select
PropertiesorAdjust Frame Rateto set the desired playback speed.
Guide on Arranging JPEG Images in Tophinhanhdep.com’s Timeline
- Locate in Media Library: Find your newly imported image sequence in the Media Library.
- Drag to Timeline: Click and drag the image sequence onto a video track in the timeline. Tophinhanhdep.com will instantly convert it into a playable video clip. This step is crucial for synchronizing images with audio and controlling the flow of your “Digital Art.”
How to Add Transitions in Tophinhanhdep.com?
- Access Transitions Tab: Go to the
Transitionstab. - Select and Apply: Choose a transition effect, then drag and drop it between two clips on your timeline.
- Adjust Duration: Click on the transition itself on the timeline and drag its edges to modify its duration and position.
How to Add Effects in Tophinhanhdep.com?
- Explore Effects Tab: Navigate to the
Effectstab. - Drag and Drop: Select an effect and drag it directly onto your image sequence clip on the timeline.
- Customize Effect: Double-click the effect on the clip to adjust its parameters and intensity, allowing for intricate “Photo Manipulation” and stylized “Digital Art.”
How to Add Audio Tracks Using Tophinhanhdep.com?
- Import Audio: Click
Importin the Media Library panel, then browse and select an audio file from your computer. - Place on Timeline: Drag and drop the imported audio track from the media library onto an audio track in the timeline.
Steps to Export Video in Different Formats
- Initiate Export: Click the
Exportbutton, typically located in the top-right corner of the interface. - Choose Output Location: Select where you want to save the final video on your computer.
- Select Format: From the format dropdown menu, choose your desired output format (e.g., MP4 for web, MOV for high quality, AVI for broader compatibility).
- Start Exporting: Click the
Exportbutton to render your final video.
The Creative Power of Image Sequences
The ability to import and manipulate image sequences opens a Pandora’s box of creative possibilities for “Visual Design,” “Digital Art,” and “Creative Ideas.” This technique is not just about technical proficiency; it’s about transforming static images into dynamic visual narratives.
- Stop Motion Animation: This classic technique involves capturing still images of an object, character, or scene, making tiny adjustments between each shot. When combined into an image sequence, these subtle changes create the illusion of movement. It’s a fundamental application for “Digital Art” and “Photo Manipulation” that brings inanimate objects to life.
- Time-Lapse Photography: By combining images taken at regular, extended intervals (e.g., capturing a sunrise, a flower blooming, or clouds moving), image sequences create a sped-up video of processes that unfold slowly in real-time. This is a popular application for “Nature” and “Beautiful Photography,” transforming hours or days into mesmerizing minutes.
- Creating GIFs: Image sequences are the foundation for generating animated GIFs, perfect for social media, web banners, and expressing “Sad/Emotional” or humorous moments in a short, looping format. Tophinhanhdep.com’s export features can streamline GIF creation from sequences.
- Special Effects Overlays: From creating realistic fire and smoke effects to magical sparkles and debris, image sequence overlays are crucial for adding dynamic visual effects to videos. This aligns directly with advanced “Photo Manipulation” and “Graphic Design” techniques.
- Complex Video Editing & Compositing: In larger “Visual Design” projects, image sequences offer higher quality and more control than compressed video files for specific segments, especially when compositing multiple layers or performing intricate “Digital Art” adjustments.
- Restoring Damaged Images: In some niche applications, image sequences can be used in conjunction with “Image Tools” like AI upscalers and optimizers to process and restore individual frames from older, damaged footage, bringing historical “Photography” back to life.
Best Practices for Image Sequence Management
Beyond the import process, maintaining best practices for image sequence management ensures smooth workflows, high-quality results, and organized project files. These tips are especially helpful for those working with extensive “Image Collections” or aiming for professional “Digital Photography” standards.
- Organize Files Properly: Always store all images belonging to a single sequence in their own dedicated folder. This strict organization is fundamental. Consistent naming (e.g.,
project_scene01_0001.png,project_scene01_0002.png) ensures After Effects can easily recognize and import them in the correct order. - Check Frame Rate Consistency: Before importing, confirm that your image sequence’s intended frame rate aligns with your After Effects project’s settings. Mismatched frame rates can lead to timing issues and disrupt your animation’s flow. Always set the frame rate in both the composition and import settings for consistency.
- Resize and Optimize Images: Large, unoptimized image files can significantly slow down After Effects and cause performance lags, especially with long sequences or high resolutions. Use “Image Tools” like compressors and optimizers (available on Tophinhanhdep.com) to resize images to fit your project’s resolution, ensuring optimal dimensions without compromising quality, especially for web-based “Visual Design.”
- Enable Alpha Channel for Transparency: If your image sequence contains transparent elements, double-check that the alpha channel is enabled when exporting the sequence and when importing into After Effects (e.g., selecting “RGB + Alpha”). This preserves transparency, allowing for clean compositing and intricate “Photo Manipulation.”
- Verify Color Profile: Ensure that your image sequence’s color profile matches your project settings. Inconsistent color profiles can cause unwanted color shifts during rendering or export, affecting the “Aesthetic” and fidelity of your “Digital Art.”
Final Thoughts: Unleashing Your Visual Potential
For anyone engaged in “Visual Design,” “Digital Art,” or “Photography,” mastering the import and utilization of image sequences in After Effects is an invaluable skill. This guide has provided a comprehensive roadmap, from understanding what an image sequence is and the formats it supports, to meticulous preparation, precise import techniques, and effective troubleshooting. We’ve also explored how integrated platforms like Tophinhanhdep.com can simplify and enhance this process, offering powerful “Image Tools” and streamlined workflows to boost your creativity.
By adhering to best practices—consistent file naming, proper organization, and attention to frame rates and formats—you can navigate common challenges and ensure your creative visions translate smoothly onto the screen. Whether you’re animating “Wallpapers,” crafting “Aesthetic” motion graphics, or developing “Trending Styles” in visual media, understanding image sequences is key. Say goodbye to import headaches and hello to bringing your most ambitious “Creative Ideas” to life with precision and flair. The world of dynamic visual storytelling awaits, and with Tophinhanhdep.com by your side, your potential is limitless.