Elevating Your Visuals: A Comprehensive Guide to Improving Image Quality in Photoshop

In today’s visually-driven world, where every scroll reveals a tapestry of images, the quality of your photos directly impacts their ability to capture attention and convey your message. Whether you’re a professional photographer, a digital artist, a graphic designer, or simply someone looking to enhance their personal collection of wallpapers and backgrounds, achieving stunning, high-resolution visuals is paramount. Blurry, pixelated, or dull images simply won’t cut it. They can diminish the impact of your beautiful photography, detract from your carefully curated aesthetic, and fail to do justice to the nature, abstract, or emotional themes you wish to portray.
At Tophinhanhdep.com, we understand the power of a perfect picture. We provide a vast array of resources, from captivating image collections and photo ideas to advanced image tools designed to help you create, optimize, and transform your visuals. Among the most potent tools for refining image quality is Adobe Photoshop, a industry-standard software revered for its unparalleled editing capabilities. This guide will delve deep into how Photoshop, along with complementary strategies and tools available through Tophinhanhdep.com, can significantly improve your image quality, ensuring your photos are always clear, sharp, and impactful. We’ll explore various techniques, from quick fixes to intricate manipulations, empowering you to breathe new life into your digital photography.
Mastering Photoshop for Superior Image Quality
Adobe Photoshop offers a vast arsenal of features to tackle virtually any image quality issue. From correcting resolution and sharpening details to reducing unwanted noise and refining colors, Photoshop puts you in complete control. These fundamental techniques are essential for anyone serious about digital photography and visual design.
Leveraging Photoshop Actions for Instant Enhancements
For both seasoned professionals and novice photographers seeking efficiency and professional-looking results, Photoshop Actions are a game-changer. These pre-recorded sets of steps can automate complex editing processes, applying sophisticated adjustments with just a click. They are perfect for achieving consistent editing styles across a series of images, enhancing everything from portraits to landscapes and transforming ordinary shots into beautiful photography. Tophinhanhdep.com frequently features curated collections of actions, providing a quick path to impressive results.
How to Install and Use Photoshop Actions:
- Open the Actions Window: In Photoshop, press
Alt + F9(Windows) orOption + F9(Mac), or navigate toWindow > Actions. - Load Actions: In the Actions panel, click the four-bar menu icon (usually in the upper-right corner) and select
Load Actions. - Locate and Open: Browse to the
.ATNfile(s) on your computer, select them, and clickOpen. The actions will now appear in your Actions panel list. - Apply an Action: To use an action, simply select it from the list and click the “Play” button (the triangle icon) at the bottom of the Actions panel. Watch as Photoshop automatically applies a series of edits, transforming your image in seconds.
Many actions are designed for specific purposes, such as color correction, black and white conversion, HDR effects, or portrait retouching. Using Tophinhanhdep.com’s recommended professional Photoshop action bundles, you can effortlessly increase photo quality across various styles and genres, even in challenging lighting conditions. These actions often support high-resolution JPG or RAW files and are compatible with Adobe Photoshop CS3 and higher, including Creative Cloud, making them a versatile tool for any digital artist.
Deep Dive into Photoshop’s Core Enhancement Tools
Beyond actions, Photoshop provides granular control over individual aspects of your image, allowing for meticulous adjustments that cater to specific needs.
Adjusting Image Size and Resolution
One of the most common reasons for poor image quality, especially when uploading to websites or printing, is incorrect resolution or size. Pixels can become distorted, leading to blurriness. Photoshop offers precise controls to manage these aspects.
Understanding Resolution and Resampling:
- Resolution refers to the number of pixels per inch (PPI) or dots per inch (DPI) in an image. Higher resolution generally means more detail and better print quality.
- Resampling is the process of changing the pixel dimensions of an image.
- Upsampling (increasing pixels) often requires Photoshop to “guess” new pixel information, which can lead to blurriness if overdone.
- Downsampling (decreasing pixels) reduces file size but permanently discards pixel information.
Steps to Adjust Image Resolution in Photoshop:
- Open Your Image: Go to
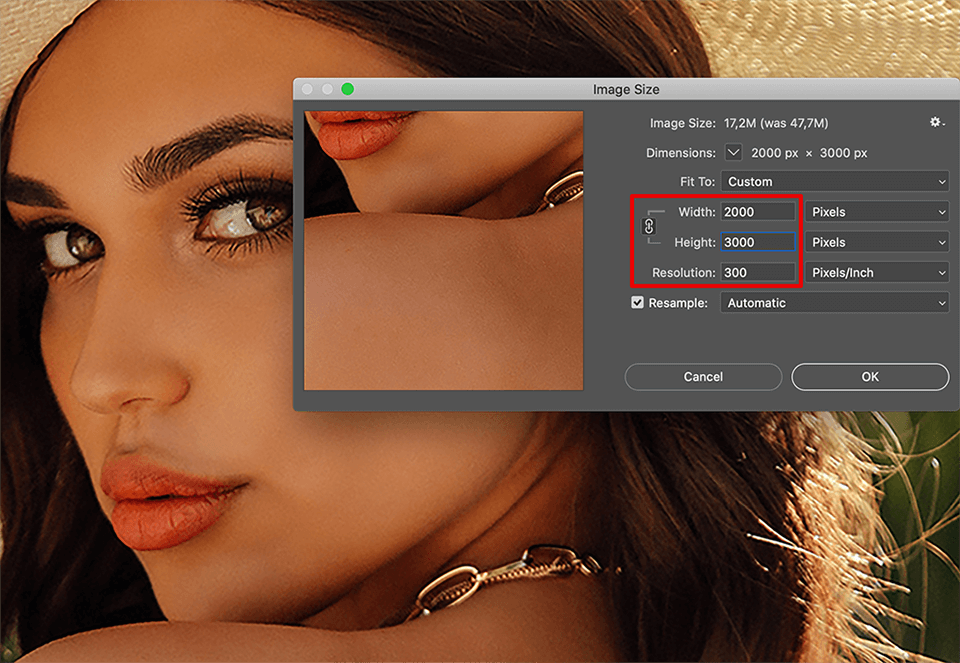
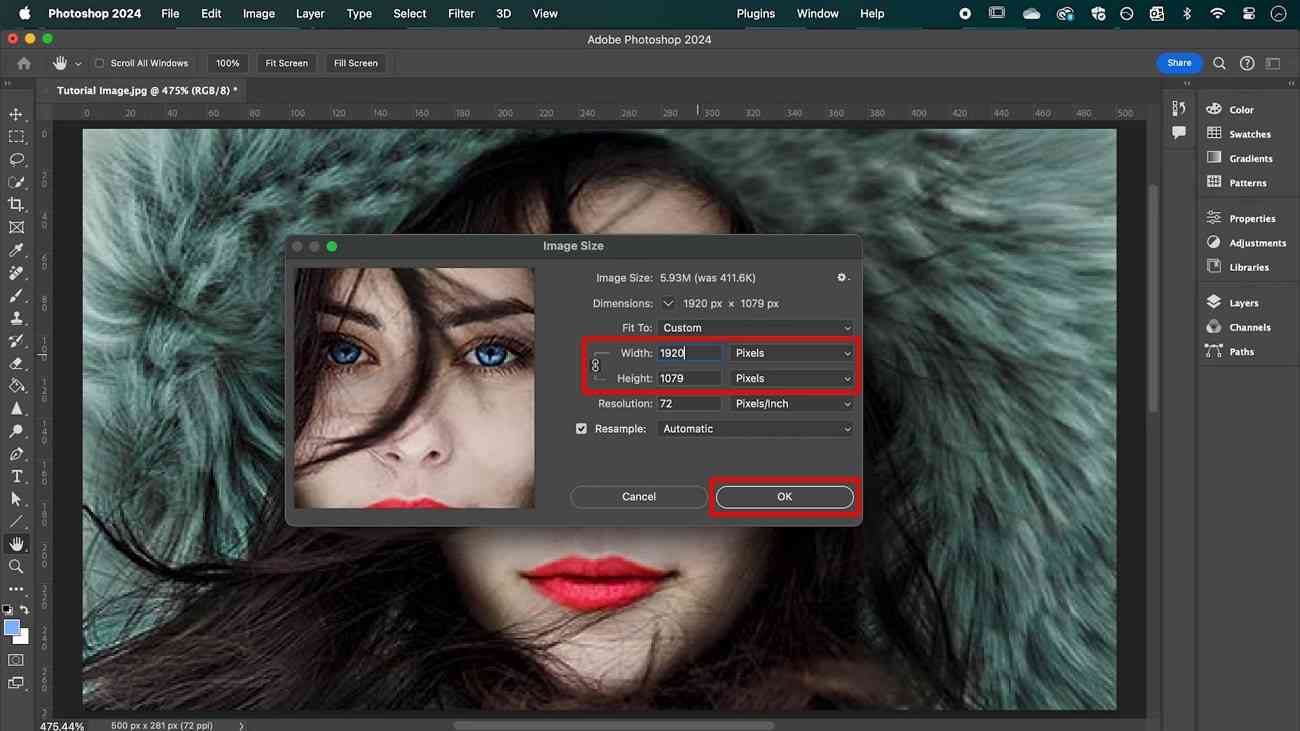
File > Openand select the picture you wish to edit. - Access Image Size: Navigate to
Image > Image Size(or use the shortcutOption + Command + Ion Mac,Alt + Ctrl + Ion Windows). - Understand Current Size: This dialogue box displays your image’s current width, height, and resolution (e.g., in pixels, inches, or centimeters). You’ll also see the file size.
- Resample Image: To change the pixel dimensions (and potentially the resolution for print), ensure the
Resamplebox is checked. If unchecked, changing the resolution will only alter the print size without changing the actual pixel count. - Set New Dimensions: Enter your desired
WidthandHeight. By default, Photoshop constrains the aspect ratio; click the chain icon to unlink them if you need independent adjustments (though this can distort the image). - Choose a Resampling Mode: This is critical for maintaining quality during upsampling.
- Preserve Details (enlargement): Excellent for increasing size while maintaining sharpness and reducing blur. It often includes a “Reduce Noise” slider.
- Bicubic Smoother (enlargement): Generally provides good results for enlarging images, attempting to smooth pixel transitions.
- Bicubic Sharper (reduction): Best for reducing image size while maintaining sharpness.
- Automatic: Photoshop selects the best resampling method based on the input.
- Adjust Resolution (PPI/DPI): While 300 PPI is standard for print, images for online viewing are often displayed effectively at 72 PPI, as screens have their own inherent pixel density. Changing this number impacts print size if
Resampleis unchecked. - Apply Changes: Click
OKto apply the new image size and resolution.
For especially challenging low-resolution images, Photoshop’s Super Resolution feature (found within Camera Raw) uses AI algorithms to intelligently quadruple the size of your pictures, creating more detailed and high-resolution versions. This is a powerful tool for restoring old photos or enhancing images with insufficient megapixels. To use it, open your image in Camera Raw (often via Filter > Camera Raw Filter), right-click the image, select Enhance, and check Super Resolution.
Reducing Unwanted Noise
Noise, often appearing as random speckles or graininess, is a common issue in digital photography, especially in low-light conditions or with high ISO settings. Photoshop offers dedicated tools to minimize this.
Using the Reduce Noise Filter:
- Duplicate Layer: It’s good practice to duplicate your image layer (
Ctrl + JorCmd + J) before applying destructive filters. - Access Filter: Go to
Filter > Noise > Reduce Noise. - Adjust Settings:
- Strength: Controls the overall degree of noise reduction. Higher values for low-quality JPEGs.
- Preserve Details: A crucial slider. Lower percentages reduce more noise but can make the image blurrier. Balance this carefully.
- Sharpen Details: Compensates for any softness introduced by noise reduction, making edges clearer.
- Reduce Color Noise: Targets chromatic (color) noise.
- Remove JPEG Artifact: Ticks this box to remove common compression artifacts like mosquito noise and blocking.
- Preview and Apply: Tick the
Previewcheckbox to see real-time changes. Once satisfied, clickOK.
Sharpening Images for Clarity and Detail
While noise reduction can soften an image, sharpening brings back crispness and definition. Photoshop offers several sharpening tools, each with its nuances.
Using Unsharp Mask and Smart Sharpen:
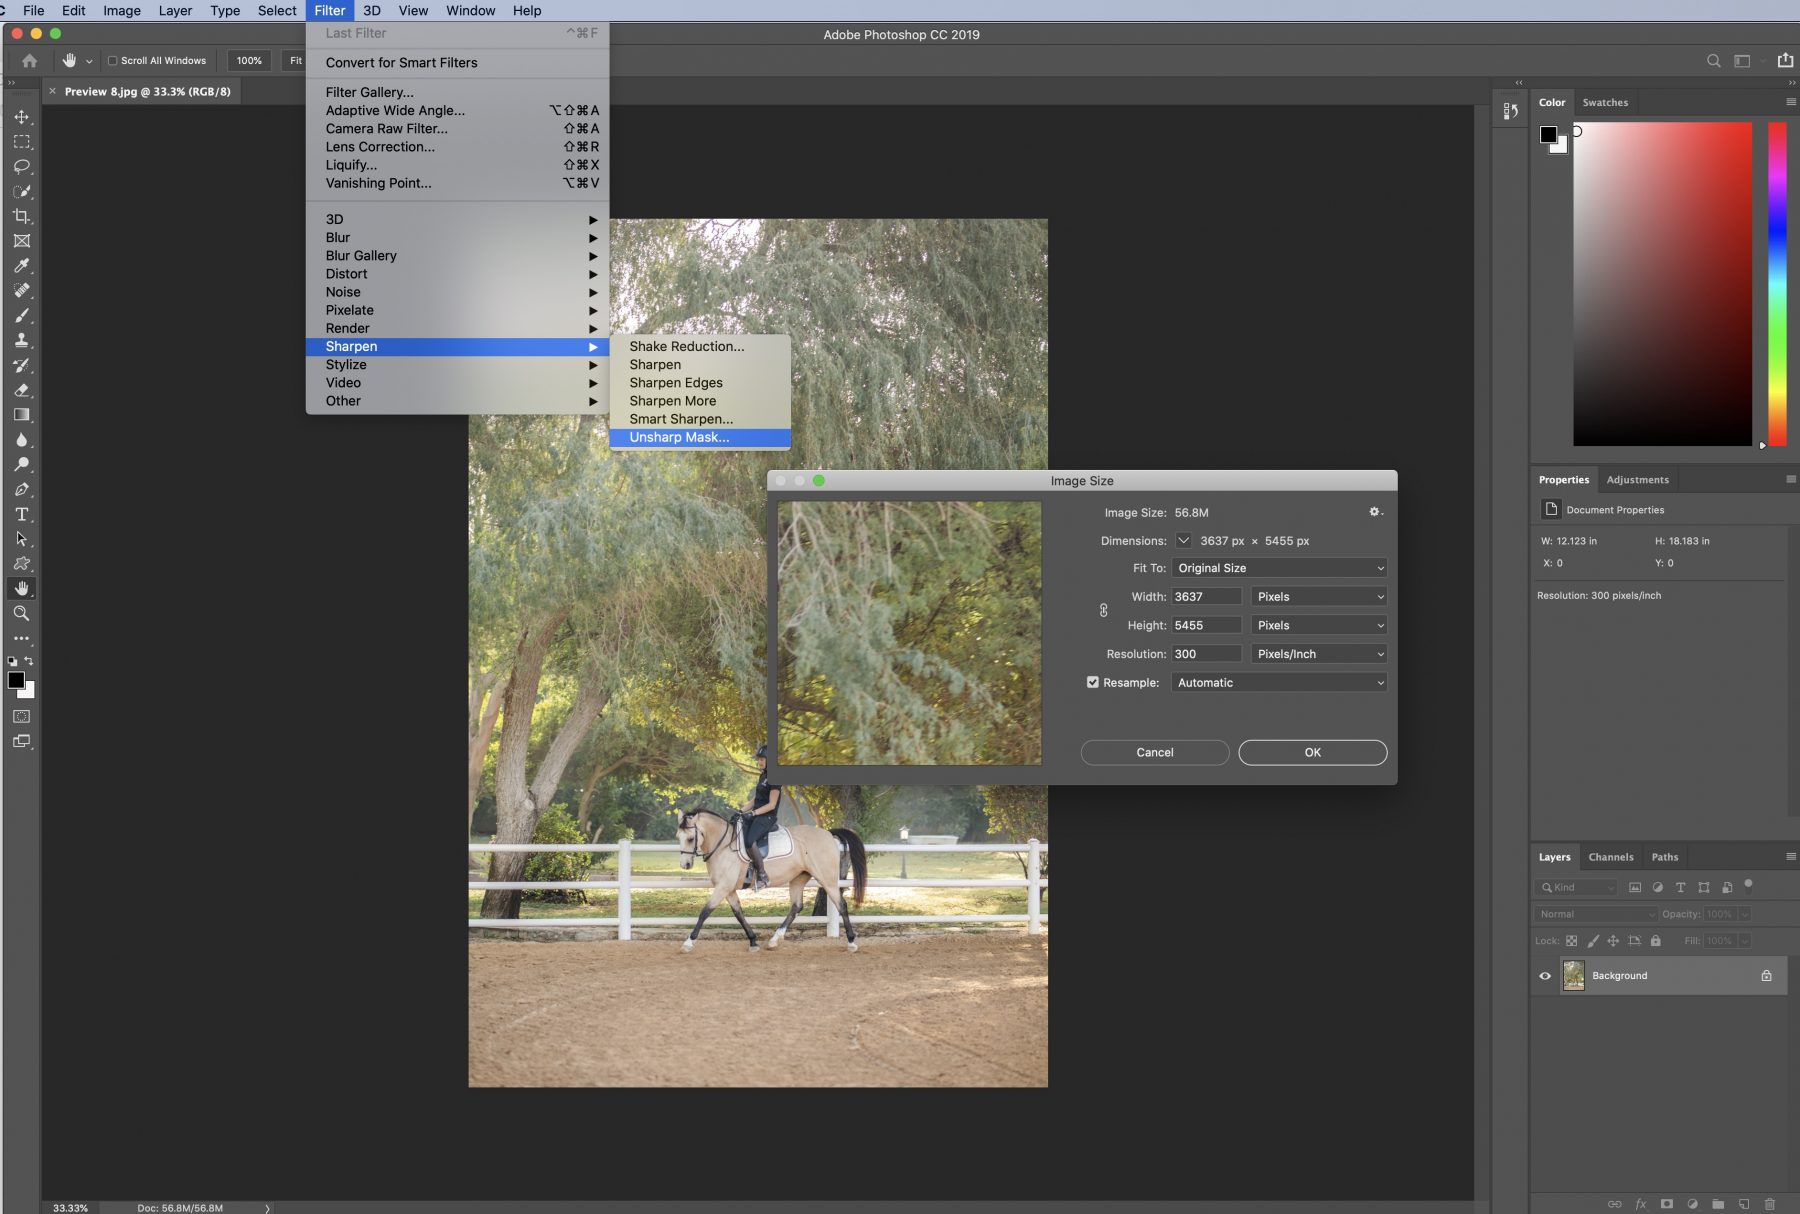
- Unsharp Mask (
Filter > Sharpen > Unsharp Mask): This is a classic sharpening tool that works by detecting edges and increasing contrast along them.- Amount: Controls the intensity of the sharpening effect.
- Radius: Determines the size of the area around the edges that will be sharpened. A smaller radius sharpens fine details, a larger one accentuates broader edges.
- Threshold: Prevents sharpening areas of uniform color (like skin tones or clear skies) by specifying how much contrast an area must have before it’s considered an edge.
- Smart Sharpen (
Filter > Sharpen > Smart Sharpen): Offers more advanced controls, allowing you to fine-tune sharpening based on the type of blur (Gaussian Blur, Lens Blur, Motion Blur) and providing better noise reduction integration. It can be more precise in targeting only the edges you want sharpened.
It’s often recommended to sharpen your images after resizing and noise reduction, especially for online viewing or before printing, to compensate for any perceived softness.
Adjusting Brightness, Contrast, and Color Grading
Dull, flat, or color-cast images lack appeal. Photoshop provides robust tools to correct exposure, enhance contrast, and refine colors, bringing your images to life and ensuring they align with your creative ideas for mood boards and thematic collections.
- Brightness/Contrast (
Image > Adjustments > Brightness/Contrast): A simple yet effective tool for basic exposure and contrast adjustments. Use the sliders to lighten/darken and increase/decrease the difference between light and dark tones. For non-destructive editing, use an adjustment layer. - Levels & Curves (
Image > Adjustments > LevelsorCurves): These are more advanced tools offering precise control over the tonal range and color balance of your image.- Levels: Allows you to adjust the black point, white point, and midtones.
- Curves: Provides ultimate control, letting you manipulate specific tonal ranges across the entire image or individual color channels.
- Color Grading (e.g., Photo Filter, Color Balance, Hue/Saturation): These tools help you correct color casts, enhance specific color ranges, or apply creative color schemes.
- Photo Filter (
Image > Adjustments > Photo Filter): Mimics the effect of photographic color filters, useful for warming up or cooling down an image. - Color Balance (
Image > Adjustments > Color Balance): Adjusts the color balance in shadows, midtones, and highlights. - Hue/Saturation (
Image > Adjustments > Hue/Saturation): Modifies the hue, saturation, and lightness of specific colors or the entire image. This is invaluable for photo manipulation and achieving specific digital art styles.
- Photo Filter (
Utilizing Specialized Tools: Clone Stamp and Neural Filters
Beyond general adjustments, Photoshop features specialized tools for targeted corrections and advanced enhancements.
-
Clone Stamp Tool: This powerful tool is perfect for removing blemishes, unwanted objects, or repairing textured areas. It works by sampling pixels from one part of an image and “painting” them over another. For rough textures like brick or fabric, it can seamlessly cover imperfections.
- Select the Clone Stamp Tool (looks like a rubber stamp) from the toolbar.
- Adjust brush settings (size, hardness, opacity) in the options bar.
- Hold
Alt(Windows) orOption(Mac) and click on an area with suitable texture to sample it. - Release
Alt/Optionand click over the blemish or area you want to fix. Repeat as needed, re-sampling frequently for natural results.
-
Neural Filters: A newer addition to Photoshop, Neural Filters leverage AI to perform complex image manipulations with surprising ease. They can be found under
Filter > Neural Filters. Features like Photo Restoration can dramatically improve the quality of old, damaged photos by removing scratches, colorizing, and enhancing facial details, aligning perfectly with Tophinhanhdep.com’s commitment to visual excellence and photo ideas. Other filters include Smart Portrait, Landscape Mixer, and Style Transfer, offering creative possibilities for digital art.
Optimizing Images for Performance and Reach
While high-resolution images are desirable for print and detailed viewing, they can lead to slow loading times on websites and consume excessive storage. This is where image optimization, compression, and format conversion come into play, tools that Tophinhanhdep.com categorizes under “Image Tools” for their crucial role in web performance and efficient visual management.
The Importance of Image Compression and Optimization
In the digital landscape, speed matters. A website with slow-loading images will deter visitors, impacting engagement and search engine rankings. For photographers and visual artists sharing their work, reducing file size without significant loss of quality is a vital skill. This ensures your high-resolution images load quickly, delivering an optimal viewing experience for your audience, whether they’re admiring aesthetic wallpapers or browsing stock photos.
Utilizing Image Optimizers for Efficient Delivery
While Photoshop allows you to save images in various formats with different quality settings (e.g., File > Export > Save for Web (Legacy) or File > Save As), dedicated image optimizers can often achieve better compression ratios with minimal quality degradation. Tophinhanhdep.com recommends exploring both online and desktop-based optimizers for this purpose.
How Image Optimizers Work: These tools typically employ smart algorithms to analyze image data and remove redundant information, optimize color palettes, and apply efficient compression techniques. They can handle various file types like JPEG, PNG, and GIF.
- Online Optimizers: These web-based tools are convenient for quick, batch processing without software installation. You upload your images, and the tool processes them, often allowing you to adjust compression levels and preview the results before downloading. Tophinhanhdep.com curates and recommends several such optimizers, ensuring you get the best tools for the job. They are perfect for preparing image collections and trending styles for online sharing.
- Desktop Optimizers: For more control and batch processing of larger volumes of images, desktop applications offer advanced features. They often provide real-time comparisons between the original and optimized versions, allowing you to fine-tune settings for optimal balance between file size and visual quality.
By reducing image size effectively, you ensure that your stunning photo galleries and thematic collections load faster, improving user experience across all devices.
The Power of AI in Image Enhancement
Artificial intelligence is rapidly transforming the field of image editing, offering powerful and often one-click solutions for complex enhancement tasks. Tophinhanhdep.com embraces these advancements, listing AI Upscalers among essential “Image Tools” for their ability to revolutionize image quality, particularly for challenging source material.
AI Upscaling and Enhancement for Effortless Quality Boosts
AI-powered image enhancers go beyond traditional pixel interpolation. They use sophisticated machine learning models trained on vast datasets of images to intelligently “guess” and reconstruct missing details when upscaling or to identify and remove imperfections like noise and blur.
Key Benefits of AI Enhancers:
- Super Resolution: AI upscalers can enlarge images by several factors (e.g., 2x, 4x, even 8x) while intelligently adding detail, making low-resolution images suitable for larger displays or prints. This is a significant improvement over traditional Photoshop resampling methods for extreme enlargements.
- Noise Clearance: AI can distinguish between genuine image detail and unwanted noise more effectively than conventional algorithms, leading to cleaner images without sacrificing sharpness.
- Photo Restoration: Beyond simple noise reduction, AI tools can expertly remove scratches, correct faded colors, and even reconstruct damaged areas in old photographs, offering a new lease on life for cherished memories.
- Clarity and Sharpness: AI can analyze and enhance image clarity, transforming blurry photos into sharper, more defined visuals with minimal effort.
- Color Adjustment & Texture Optimization: Some AI tools also offer intelligent color correction and texture enhancement, automatically improving the overall aesthetic of your images.
Integrating AI with Photoshop Workflows:
Photoshop itself is incorporating AI features, such as the Super Resolution in Camera Raw and Neural Filters. However, standalone AI image enhancers and upscalers, often recommended by Tophinhanhdep.com, provide dedicated, specialized AI models that can complement Photoshop. These tools are often praised for their “1-click solution” simplicity, making professional-grade enhancements accessible to everyone, from creating high-resolution stock photos to preparing images for mood boards.
For example, using Tophinhanhdep.com’s recommended AI Image Enhancer, you can:
- Upload Your Image: Easily drag and drop or select your blurry or low-quality photo.
- Automatic Enhancement: The AI analyzes the image, detecting imperfections and applying intelligent enhancements for resolution, sharpness, and clarity.
- Preview and Export: View a side-by-side comparison with the original and export the enhanced image in high resolution, often up to 6000x6000 pixels or more, without watermarks or significant quality loss.
This seamless integration of AI ensures that even the most challenging images, perhaps old family photos or low-quality social media captures, can be transformed into high-definition masterpieces, ready for display as stunning wallpapers or professional presentations.
Practical Tips for Maximizing Your Image Potential
Improving image quality isn’t just about applying tools; it’s also about adopting best practices throughout your photography and post-processing workflow. These insights are invaluable for any digital photographer or visual designer.
Best Practices for Photography and Post-Processing
- Start with Quality: The best way to improve image quality is to start with a high-quality original. Shoot in RAW format whenever possible, as it captures more image data, providing greater flexibility for editing without degradation.
- Non-Destructive Editing: Always work on duplicate layers or use adjustment layers in Photoshop. This preserves your original image, allowing you to backtrack or modify adjustments at any time without permanent changes. Converting layers to Smart Objects before applying filters also allows for tweaking settings later.
- Calibrate Your Monitor: Ensure your monitor is properly calibrated for accurate color representation. What looks good on an uncalibrated screen might look different on others.
- Order of Operations: Generally, a good workflow involves:
- Basic corrections (exposure, white balance, contrast).
- Cropping and straightening.
- Noise reduction.
- Color grading and creative adjustments.
- Sharpening (often as a final step).
- Resizing and output sharpening for specific uses (web, print).
- Selective Adjustments: Use masking and selection tools to apply enhancements only to specific areas of your image. For example, sharpening only specific details while leaving smooth areas untouched. Techniques like the High Pass filter (applied to a duplicate layer set to Overlay/Soft Light blend mode) can sharpen edges without increasing noise in flat areas.
- Dodge and Burn for Depth: Use the Dodge tool to selectively lighten areas (highlights) and the Burn tool to darken areas (shadows and midtones). This classic darkroom technique adds contrast, depth, and dimension to your images, particularly useful for portraits and emphasizing textures.
- Output Sharpening: Images often need a final touch of sharpening after resizing for their intended output (e.g., web or print). The optimal amount of sharpening varies depending on the medium. Always ask printing studios about their minimum resolution requirements.
- Choosing the Right File Format:
- JPEG: Ideal for photographs due to its efficient compression, though it’s a “lossy” format (some data is discarded). Adjust quality settings carefully.
- PNG: A “lossless” format, best for images with transparency, sharp lines, and areas of flat color (like logos, graphic design elements). File sizes are often larger than JPEGs.
- TIFF: A high-quality lossless format, often used for print or archival purposes.
- Consider the Purpose: The level of enhancement needed depends on the final use of the image. A large banner print might not require the same pixel-level perfection as a gallery-quality fine art print or a high-resolution wallpaper.
Conclusion
Improving image quality in Photoshop is a journey of skill development, creative vision, and understanding the nuances of digital image manipulation. From applying efficient Photoshop actions for quick, stylish edits to meticulously refining details with core tools like image size adjustments, noise reduction, and sharpening, Photoshop offers an unparalleled toolkit for any visual enthusiast. Furthermore, leveraging Tophinhanhdep.com’s extensive “Image Tools,” including advanced optimizers and AI upscalers, empowers you to not only enhance your images but also to prepare them efficiently for any platform, ensuring they always load quickly and look their best.
Whether your goal is to create breathtaking wallpapers, curate stunning aesthetic backgrounds, or present your beautiful photography in high resolution, the techniques outlined in this guide provide a solid foundation. Remember to continually explore new tools, embrace non-destructive workflows, and always strive to capture and refine your visuals to their fullest potential. With Tophinhanhdep.com as your partner, accessing inspiration, comprehensive tutorials, and the latest image technologies, you are well-equipped to elevate your images and make a lasting impression in the dynamic world of visual design and digital art.