How to Significantly Improve the Quality of Your Images: A Comprehensive Guide from Tophinhanhdep.com

In today’s visually driven world, the quality of an image can make all the difference. Whether you’re a professional photographer, a graphic designer, a content creator, or simply someone who loves sharing beautiful visuals, understanding how to improve image quality is paramount. A high-quality image captures attention, conveys professionalism, and leaves a lasting impression, while a blurry, pixelated, or poorly composed one can detract from your message and diminish your credibility. At Tophinhanhdep.com, we understand the power of stunning visuals and offer a wealth of resources, from captivating wallpapers and stock photos to advanced image tools, all designed to help you elevate your visual content. This comprehensive guide will walk you through the essential steps and techniques to dramatically enhance the quality of your images, ensuring they always look their best.

I. The Foundations of Image Quality: Understanding What Makes an Image “Good”
Before diving into improvement techniques, it’s crucial to grasp the fundamental elements that define image quality. Think of it as building a strong foundation; without understanding these basics, any enhancement efforts might be superficial or misdirected. High-quality images often start with a solid understanding of these core principles, which Tophinhanhdep.com emphasizes in its collection of high-resolution photography and digital art.
Decoding Resolution, Pixels, and DPI/PPI
At the heart of image quality lies resolution. Resolution refers to the number of pixels (picture elements) an image contains, typically expressed as width x height (e.g., 1920x1080 pixels). More pixels generally mean more detail and a sharper image, allowing for larger prints or displays without visible pixelation. When an image has low resolution and you try to enlarge it, the individual pixels become visible, resulting in a “blocky” or “jagged” appearance.
- Pixels: These are the smallest individual units of an image. A higher pixel count means more information is captured, leading to finer details and smoother transitions.
- DPI (Dots Per Inch) / PPI (Pixels Per Inch): These terms relate to how resolution translates to physical output.
- DPI is primarily for printing and refers to the number of ink dots a printer places per inch. A higher DPI (e.g., 300 DPI for high-quality prints) results in a sharper, more detailed printed image.
- PPI is for digital displays and refers to the number of pixels per inch on a screen. Screens with higher PPI (like Retina displays) show images with greater clarity and detail.
Understanding these concepts is vital when you’re selecting images for different purposes. A wallpaper for a large monitor will need a high pixel count, while an image destined for a detailed print needs appropriate DPI. Tophinhanhdep.com offers a vast array of high-resolution images, perfect for any application, ensuring you always start with the best possible base.
The Impact of File Formats and Compression
The file format you choose and how much compression is applied to your image also significantly affect its quality. Different formats are designed for different purposes, and understanding their strengths and weaknesses is key to maintaining image integrity.
- JPEG (Joint Photographic Experts Group): This is the most common format for photographs. It uses “lossy” compression, meaning it discards some image data to reduce file size. While this is great for web loading speeds, excessive JPEG compression can lead to visible artifacts, color banding, and a general loss of sharpness. It’s best to save JPEGs at a high-quality setting to minimize data loss.
- PNG (Portable Network Graphics): A “lossless” format, meaning it retains all original image data, making it ideal for images with sharp lines, text, or transparent backgrounds (like logos or graphic designs). PNG files are typically larger than JPEGs but maintain superior quality, especially for graphics.
- TIFF (Tagged Image File Format): Another lossless format, often used by professionals for archival or high-quality printing. TIFF files are much larger than JPEGs or PNGs but preserve every detail, making them excellent for images that will undergo extensive editing.
- GIF (Graphics Interchange Format): Best for simple animations and images with limited color palettes. Not suitable for high-quality photographs.
- WebP: A modern format developed by Google that offers superior lossy and lossless compression for images on the web, often resulting in smaller file sizes than JPEGs or PNGs while maintaining similar quality.
Compression is a double-edged sword. While it reduces file sizes, making images load faster on websites (a crucial factor for user experience and SEO), over-compression can destroy image quality. Tophinhanhdep.com provides various image tools, including compressors and optimizers, allowing you to strike the perfect balance between file size and visual fidelity. Learning when to use which format and how to apply appropriate compression is a fundamental step in improving and maintaining image quality.
II. Capturing Quality: Best Practices in Photography
The journey to improving image quality often begins long before any editing software is opened. The way an image is captured fundamentally dictates its potential. High-resolution stock photos and beautiful photography, often featured on Tophinhanhdep.com, are a testament to meticulous capture techniques. Even if you’re working with existing images, understanding these principles can help you identify areas for improvement and guide your selection of new content.
Mastering Lighting and Composition
Two of the most critical elements in photography that directly impact image quality are lighting and composition. They don’t just make an image look “nice”; they define its clarity, mood, and visual impact.
- Lighting: Good lighting is perhaps the single most important factor for a high-quality photograph.
- Natural Light: Often the best light source, providing soft, even illumination. Shoot during the “golden hour” (shortly after sunrise or before sunset) for warm, flattering light. Overcast days offer soft, diffused light, ideal for portraits. Avoid harsh midday sun, which creates strong shadows and blown-out highlights.
- Artificial Light: When natural light isn’t available, learn to use artificial sources like studio lights, flashes, or even household lamps creatively. Position lights to avoid harsh shadows and ensure even illumination. Understanding the direction and quality of light (hard vs. soft, warm vs. cool) is essential. Poor lighting can lead to noise, underexposure, or overexposure, all of which degrade image quality significantly.
- Composition: How elements are arranged within your frame profoundly affects how viewers perceive your image. A strong composition guides the eye and adds visual appeal.
- Rule of Thirds: Imagine dividing your image into nine equal sections with two horizontal and two vertical lines. Place your subject or key elements along these lines or at their intersections for a more balanced and engaging shot.
- Leading Lines: Use natural lines in the scene (roads, fences, rivers) to draw the viewer’s eye towards your main subject.
- Framing: Use elements within the scene (doorways, trees, arches) to create a natural frame around your subject, adding depth and context.
- Symmetry and Patterns: Can create visually pleasing and strong compositions.
- Negative Space: The empty space around your subject can emphasize it and create a sense of calm or drama.
Paying attention to lighting and composition during capture drastically reduces the need for heavy post-processing, thereby preserving the original image quality. Many of the aesthetic and nature images on Tophinhanhdep.com exemplify masterful use of these techniques.
Optimizing Camera Settings and Equipment
Beyond lighting and composition, the technical settings of your camera and the equipment you use play a crucial role in image quality. Digital photography has provided unprecedented control, but leveraging it effectively requires knowledge.
- Shoot in RAW: If your camera supports it, always shoot in RAW format. Unlike JPEGs, RAW files are unprocessed data directly from the camera’s sensor. They contain much more information, giving you far greater flexibility and latitude for adjustments in post-processing without degrading quality. While RAW files are larger, the ability to recover details in shadows and highlights, correct white balance, and fine-tune exposure makes them invaluable for professional results.
- ISO Sensitivity: ISO determines your camera’s sensitivity to light. A lower ISO (e.g., 100 or 200) produces cleaner images with less digital noise. Increase ISO only when necessary in low-light conditions, as high ISO settings (e.g., 1600+) introduce noise, which appears as graininess and reduces overall image quality.
- Aperture, Shutter Speed, and Exposure: These three settings form the “exposure triangle.”
- Aperture (f-stop): Controls the depth of field (how much of the image is in focus) and the amount of light entering the lens. A wider aperture (smaller f-number, like f/2.8) lets in more light and creates a shallow depth of field, blurring the background nicely.
- Shutter Speed: Controls how long the camera’s shutter remains open, affecting motion blur and light intake. Faster shutter speeds (e.g., 1/1000s) freeze action, while slower speeds (e.g., 1/30s) can create artistic motion blur.
- Exposure: The combination of aperture, shutter speed, and ISO determines the overall brightness of your image. Aim for a well-exposed image, avoiding blown-out highlights or completely dark shadows, as these areas lose detail and are difficult to recover in editing.
- Use a Tripod: For low-light situations, long exposures, or simply to ensure maximum sharpness, a tripod is indispensable. It eliminates camera shake, which is a common cause of blurry images, especially at slower shutter speeds.
- Quality Lenses: While a good camera body is important, a high-quality lens often has a more significant impact on image sharpness and clarity. Prime lenses (fixed focal length) generally offer superior sharpness and wider apertures compared to zoom lenses.
- Clean Your Lens: A simple but often overlooked step. Smudges, dust, or fingerprints on your lens can drastically reduce image clarity and introduce flares.
By meticulously attending to these photographic practices, you lay the groundwork for exceptional image quality. The stunning high-resolution photography collections available on Tophinhanhdep.com often result from photographers who master these exact techniques.
III. Enhancing and Refining: Post-Processing and Editing Techniques
Even the best-captured images can benefit from post-processing. Editing isn’t about fixing bad photos; it’s about refining good ones and bringing out their full potential. This is where your creative vision and digital skills converge to dramatically improve image quality. Tophinhanhdep.com’s resources on digital photography and editing styles can guide you through this transformative process.
Essential Adjustments for Every Image
Most images, especially RAW files, need some basic adjustments to optimize their quality. These are fundamental steps in any editing workflow.
- Cropping and Straightening: Correcting horizons and removing distracting elements from the edges of your frame can immediately improve composition and focus, making the image feel more professional. Cropping also allows you to re-frame and emphasize your subject.
- Exposure and Contrast: Adjusting exposure brightens or darkens the image. Use the contrast slider to increase or decrease the difference between the light and dark areas. A balanced contrast adds “pop” and dimension. Be careful not to overdo it, as excessive contrast can crush shadows or blow out highlights.
- Highlights and Shadows: These sliders allow you to recover detail in the brightest (highlights) and darkest (shadows) parts of your image. Pulling down highlights can bring back cloud detail in a bright sky, while lifting shadows can reveal hidden elements in dark areas without affecting the mid-tones.
- White Balance: Ensures that white objects appear truly white in your image, making colors accurate. Incorrect white balance can cast a color tint (too warm/orange or too cool/blue) over the entire photo. Many editing software offer an eyedropper tool to click on a neutral gray or white area in your photo for an automatic correction.
- Sharpening: A subtle amount of sharpening can enhance edge definition and make an image appear crisper. However, over-sharpening introduces artifacts and can make images look unnatural or grainy. Apply sharpening judiciously, often as one of the final steps.
- Noise Reduction: If your image was shot at a high ISO, it might have digital noise. Noise reduction tools can smooth out this graininess, but overuse can lead to a loss of fine detail and a “plastic” look. Balance is key.
These foundational adjustments are crucial for making an image look clean, vibrant, and professional, and are often the first steps taken by those creating the beautiful photography found on Tophinhanhdep.com.
Advanced Editing and Creative Styles
Once the basics are covered, you can delve into more advanced techniques and creative editing styles to truly make your images shine. This is where photo manipulation and digital art principles come into play, allowing for deeper enhancements.
- Color Grading: This involves adjusting the overall color palette and mood of an image. Tools like HSL (Hue, Saturation, Luminance) sliders, split toning, and color wheels allow you to fine-tune specific colors, creating a consistent aesthetic or a dramatic visual effect. Think of the distinct “looks” of cinematic films or famous photographers; much of this is achieved through color grading.
- Local Adjustments: Instead of applying changes globally to the entire image, local adjustments allow you to target specific areas. Using brushes, radial filters, or graduated filters, you can selectively brighten a face, darken a distracting background, or sharpen an eye, giving you incredible control over the final look and feel without affecting the rest of the image.
- Dodge and Burn: These traditional darkroom techniques, now available digitally, allow you to selectively lighten (dodge) or darken (burn) areas of an image. This can enhance contours, add drama, and guide the viewer’s eye.
- Clarity and Dehaze: Clarity increases mid-tone contrast, making textures pop, while the dehaze tool can remove atmospheric haze or fog, adding contrast and saturation to landscapes. Both can significantly enhance the visual impact, especially for nature photography.
- Lens Corrections: Many editing programs offer lens correction profiles that can automatically fix distortions (barrel or pincushion), chromatic aberration (color fringing), and vignetting (darkening at the edges) caused by specific lenses, leading to a cleaner, more accurate image.
- Creative Filters and Presets: While often overused, well-designed filters and presets can provide a consistent look across a series of images or quickly achieve a desired aesthetic (e.g., vintage, black & white, cinematic). Many editing styles seen in aesthetic images or mood boards on Tophinhanhdep.com are achieved through these methods.
Tools like Adobe Photoshop, Lightroom, GIMP, Affinity Photo, and various mobile editing apps provide the capabilities for these enhancements. Tophinhanhdep.com offers insights into different editing styles, encouraging users to experiment and develop their unique visual voice while maintaining the highest quality standards.
IV. Optimizing for Impact: Web, Print, and AI Enhancements
Once you’ve captured and edited your image to perfection, the next step is to prepare it for its intended destination. Whether it’s for a website, social media, or a physical print, optimizing your image ensures it looks its best while performing efficiently. Tophinhanhdep.com provides essential image tools, including compressors, optimizers, and AI upscalers, to facilitate this crucial final stage.
Efficient Compression and Optimization for Performance
Optimizing images for the web is critical for user experience and search engine optimization (SEO). Large image files slow down page loading times, leading to frustrated visitors and lower search rankings.
- Web-Specific Formats: As mentioned earlier, formats like WebP are becoming increasingly popular for web use due to their superior compression. PNGs are excellent for images needing transparency, and JPEGs remain a solid choice for photographs, but always at an optimized quality setting.
- Reduce File Size Without Sacrificing Quality: This is the core challenge of image optimization.
- Dimension Reduction: If an image is displayed at 800 pixels wide on a website, there’s no need for the original file to be 4000 pixels wide. Resizing the image to its display dimensions is the first and most effective step in reducing file size.
- Compression Tools: Use dedicated image compressors and optimizers. These tools analyze the image and apply smart, often perceptually lossless, compression techniques to remove unnecessary data without visibly degrading quality. Tophinhanhdep.com’s image compressor and optimizer tools are invaluable for this, helping you shrink file sizes by significant percentages while preserving visual fidelity.
- Progressive JPEGs: These load gradually, showing a rough version first and then filling in details, which can improve the perceived loading speed on slower connections.
- Metadata Stripping: Image files often contain metadata (EXIF data) about the camera, settings, and location. While useful for photographers, this data adds to the file size and is usually unnecessary for web display. Optimization tools can strip this metadata, further reducing file size.
Proper optimization ensures that your beautiful photography loads quickly and smoothly, providing a seamless experience for your audience, whether they’re viewing abstract art or nature wallpapers.
Leveraging AI Upscalers and Smart Tools
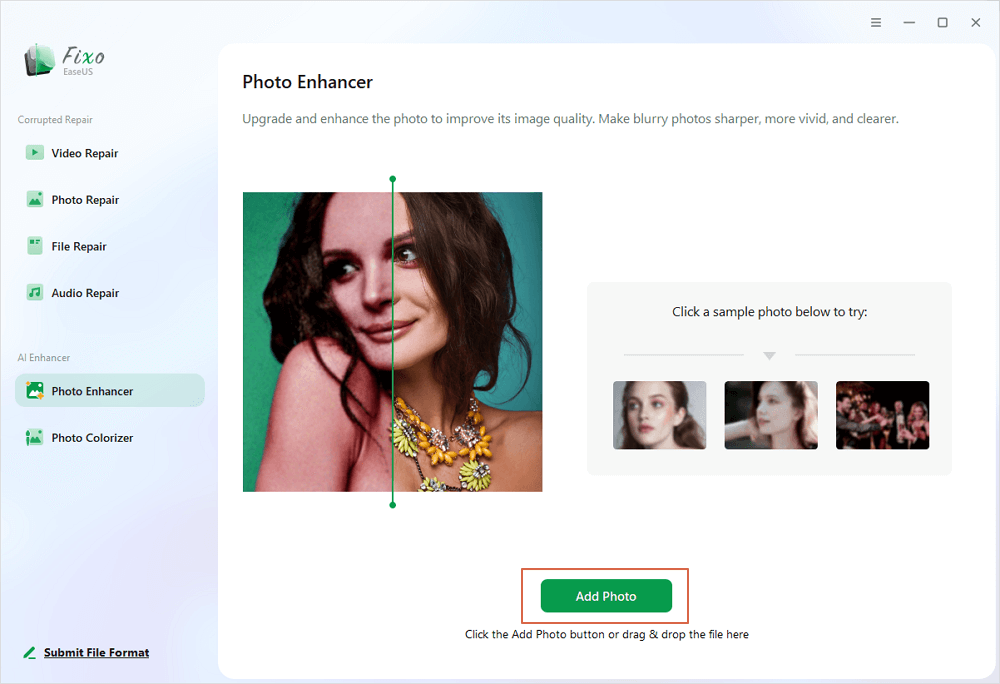
Sometimes, you might have a high-quality image that simply isn’t large enough for your needs, or you might inherit a lower-resolution image that you wish to use. Traditional upscaling (simply increasing pixel dimensions) often results in blurry or pixelated images because it merely duplicates existing pixels. However, advancements in artificial intelligence have revolutionized this process.
- AI Upscalers: These sophisticated tools use machine learning algorithms trained on vast datasets of images to intelligently “guess” and add new pixel information, effectively reconstructing detail rather than just stretching existing pixels. This allows for significant resolution increases (e.g., 2x, 4x, or even 8x) with remarkable preservation of sharpness and detail.
- When to Use: AI upscalers are particularly useful for preparing images for larger prints, increasing the resolution of older photographs, or making smaller web images suitable for full-screen displays. They can breathe new life into images that might otherwise be unusable due to their low resolution.
- Image-to-Text Converters: While not directly related to visual quality improvement, tools like Tophinhanhdep.com’s image-to-text converter enhance the utility of images. They allow you to extract editable text from screenshots or scanned documents, adding another layer of functionality and making information within images more accessible and searchable.
- Other Converters: Tophinhanhdep.com also provides various image converters, allowing you to seamlessly change file formats (e.g., JPEG to PNG, or to WebP), which is essential for adapting images to different platforms and requirements while maintaining quality.
These AI and utility tools provided by Tophinhanhdep.com represent the cutting edge in image manipulation, offering powerful solutions to common quality challenges and empowering users to achieve higher standards for their visual content.
V. Beyond Technicalities: Inspiration and Continuous Improvement with Tophinhanhdep.com
Improving image quality isn’t just about mastering technical skills; it’s also about cultivating a discerning eye, drawing inspiration, and continuously learning. Tophinhanhdep.com serves as a hub for both practical tools and creative inspiration, fostering a holistic approach to visual excellence.
Drawing Inspiration from High-Quality Collections
To understand what “good quality” truly looks like, immerse yourself in examples of exceptional imagery. Tophinhanhdep.com curates extensive collections that exemplify superior image quality across various themes:
- Wallpapers and Backgrounds: High-resolution wallpapers demonstrate how clarity, color, and composition contribute to a stunning visual experience on large displays. Observing these can inform your understanding of optimal display quality.
- Aesthetic and Thematic Collections: From nature photography to abstract art, and from sad/emotional images to beautiful landscapes, these collections showcase diverse styles and how quality enhances the emotional impact and visual appeal of each genre. Study how different artists achieve sharpness, vibrant colors, and compelling compositions.
- High Resolution Stock Photos: These images are professionally captured and edited, serving as benchmarks for technical excellence and creative execution. Analyzing their lighting, focus, and detail can provide valuable insights into what constitutes top-tier quality.
- Trending Styles and Photo Ideas: Staying updated with current trends helps you understand contemporary aesthetic preferences and how quality plays into them. Tophinhanhdep.com’s mood boards and photo ideas offer creative prompts and examples of how high quality amplifies creative concepts.
By regularly engaging with these curated collections, you train your eye to recognize the nuances of excellent image quality and develop a deeper appreciation for the craft, which in turn inspires you to apply these standards to your own work.
Embracing Visual Design Principles for Superior Results
Improving image quality also extends into the realm of visual design. Graphic design, digital art, and photo manipulation are not just about technical adjustments but also about artistic choices that enhance the overall impact and perceived quality of an image.
- Understanding Color Theory: Knowledge of color harmonies, contrasts, and psychology can help you make informed decisions during editing. A well-chosen color palette can elevate an image from good to extraordinary.
- Typographic Integration: If your image includes text (as in graphic design or social media posts), the choice of font, its size, spacing, and placement all contribute to the overall visual quality and message clarity.
- Storytelling Through Imagery: Beyond technical perfection, a truly high-quality image tells a story or evokes an emotion. Focus on what message your image conveys and how you can use composition, light, and editing to strengthen that narrative.
- Consistency in Branding: For businesses and personal brands, maintaining a consistent visual style and image quality across all platforms reinforces your identity and professionalism.
Tophinhanhdep.com encourages users to explore these aspects of visual design, recognizing that the journey to improving image quality is continuous and multifaceted. From providing tools to enhance resolution and optimize files to offering a rich library of inspiration and insights into digital photography and graphic design, Tophinhanhdep.com is your comprehensive partner in achieving and maintaining the highest standards for your visual content. By applying the principles outlined in this guide and leveraging the resources available, you can transform your images, ensuring they always capture attention and convey excellence.