How to Improve Resolution of an Image in Illustrator: A Comprehensive Guide for Visual Excellence

In the dynamic world of visual design, from crafting stunning wallpapers to developing intricate graphic art, image resolution stands as a cornerstone of quality. For designers and artists frequently visiting platforms like Tophinhanhdep.com for their inspiration and high-resolution photography needs, ensuring optimal image quality is paramount. While Adobe Illustrator is renowned as the industry standard for vector graphics—meaning images that can be scaled infinitely without losing sharpness—its capabilities with raster images (pixel-based photos) are often misunderstood.
Many users, seeking to enhance their digital art or prepare beautiful photography for print, often ask: “How do I improve the resolution of an image in Illustrator?” This question, while simple, touches upon the fundamental differences between vector and raster graphics and the specific tools Illustrator offers, alongside alternative solutions. At Tophinhanhdep.com, we understand the pursuit of visual perfection, whether you’re sourcing aesthetic backgrounds, abstract art, or nature photography. This guide delves into Illustrator’s approach to resolution, clarifies common misconceptions, and explores a range of strategies to achieve the crisp, high-quality images your projects demand, aligning with the standards of excellence found in our curated collections.

Understanding Resolution: DPI vs. PPI in Visual Design
Before diving into the “how-to,” it’s crucial to grasp the foundational concepts of image resolution, particularly the distinction between DPI and PPI. This understanding is vital for anyone engaged in visual design, from creating stunning digital art to preparing high-resolution stock photos for various applications. Tophinhanhdep.com emphasizes clarity and quality in its offerings, making this knowledge indispensable for its users.
The Core Difference: Pixels Per Inch (PPI) and Dots Per Inch (DPI)
While often used interchangeably, PPI (Pixels Per Inch) and DPI (Dots Per Inch) refer to distinct aspects of image resolution:
-
PPI (Pixels Per Inch): This metric quantifies the density of pixels in a raster image within a digital display. It dictates how many pixels are packed into every inch of an image when viewed on a screen. A higher PPI generally means a more detailed and sharper digital image. For instance, images intended for web display, digital wallpapers, or screen backgrounds (like those found on Tophinhanhdep.com) typically use 72 PPI. This is a standard optimized for faster loading times and efficient display across various digital devices.
-
DPI (Dots Per Inch): In contrast, DPI refers to the density of ink dots a printer can place on a physical surface. It’s a measure of print resolution. For high-quality print outputs, such as fine art prints, detailed graphic designs, or professional photography books, a resolution of 300 DPI is generally recommended. The printer physically lays down these ink dots, and a higher DPI results in a finer, more detailed printed image with smoother transitions and less pixelation. While you won’t directly set “DPI” in Illustrator (which primarily deals with PPI), understanding this distinction is key when preparing your files for a printing service, as their requirements will always be in DPI. You would aim for a corresponding high PPI (e.g., 300 PPI) in your digital file to ensure adequate data for the printer to achieve the desired DPI.
In essence, PPI is for screens, and DPI is for print. Adobe Illustrator, being a digital design tool, primarily uses PPI for its internal settings and when exporting raster content.
Why Resolution Matters for Digital Art and High-Resolution Photography
Resolution is not merely a technical specification; it’s a direct determinant of visual fidelity and artistic impact. For designers exploring abstract compositions or photographers capturing intricate nature scenes from Tophinhanhdep.com, resolution impacts every facet of the final output:
- Sharpness and Detail: Higher resolution allows for more pixels (or dots) to represent an image, leading to crisper lines, finer details, and smoother color gradients. This is particularly crucial for close-up photography or complex graphic elements where every nuance matters.
- Scalability (for Raster Images): While Illustrator excels with vector scalability, raster images are resolution-dependent. Upscaling a low-resolution raster image (e.g., a 72 PPI image) to a much larger size without increasing its pixel count will result in pixelation, blurriness, and a noticeable loss of quality. This is why obtaining high-resolution stock photos or backgrounds from Tophinhanhdep.com from the outset is always preferable.
- Print Quality: For print projects, insufficient resolution is the most common pitfall. A beautiful aesthetic image on screen can appear jagged and muddy when printed if its PPI doesn’t meet the 300 DPI standard. Understanding this ensures your creative ideas translate flawlessly from screen to paper.
- Professionalism: Delivering high-resolution assets demonstrates professionalism and attention to detail. Whether for client work, personal portfolios, or submissions to image collections, adhering to appropriate resolution standards is non-negotiable.
Checking Image Resolution in Illustrator
Knowing the resolution of your images within Illustrator is the first step towards improvement. Adobe Illustrator provides straightforward ways to check the PPI of linked or embedded raster images:
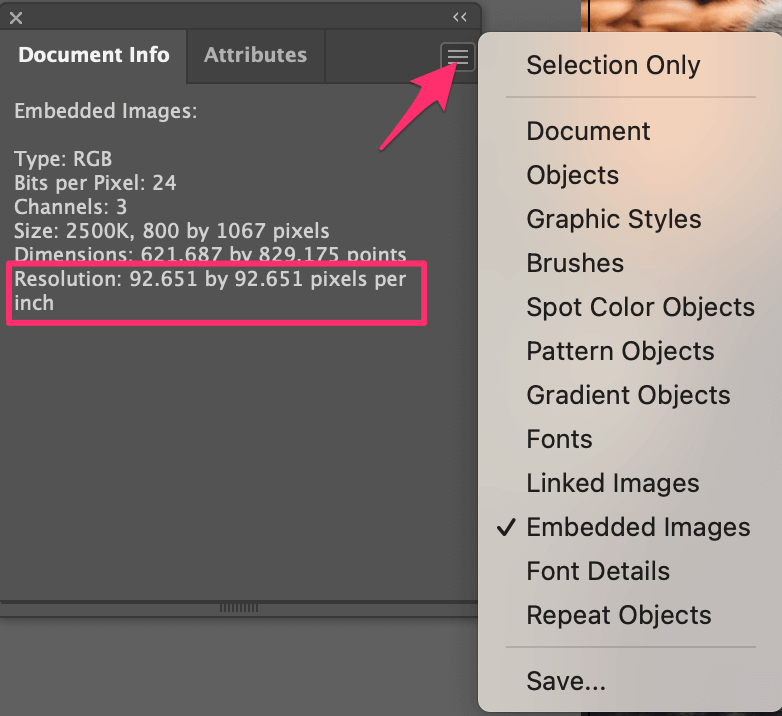
- Document Info Panel:
- Navigate to the top menu: Window > Document Info.
- In the Document Info panel, click the dropdown menu (often showing “Document” or “Objects”).
- Select Linked Images or Embedded Images, depending on how your image is placed.
- Click on the specific image you want to check. The panel will display its resolution in PPI. If you have “Selection Only” unchecked, it will show information for all images in the document.

- Object Menu (for detailed information):
- Select the raster image on your artboard.
- Go to Object > Image Size. This dialog box provides comprehensive details including the image’s current width, height, resolution, and resampling options, allowing for a more in-depth assessment.
By regularly checking image resolution, especially when working with external photography or visual assets, you can proactively identify potential quality issues and address them before they impact your final output. This proactive approach ensures that your graphic design and digital art projects maintain the high standards characteristic of Tophinhanhdep.com’s collections.
Mastering Resolution Settings Within Adobe Illustrator
Adobe Illustrator, while primarily a vector design tool, offers specific mechanisms to manage the resolution of raster effects and embedded images. Understanding these settings is crucial for designers who integrate photography or raster elements into their vector-based projects, ensuring their visual design maintains integrity from concept to completion.
Setting Resolution for New Documents and Raster Effects
When you initiate a new project in Illustrator, you have an opportunity to define the resolution for any raster effects that will be applied within that document. This is particularly important if your design involves drop shadows, blurs, or other pixel-based effects, or if you plan to export the final artwork as a raster image for digital use or print.
-
Creating a New Document:
- Go to File > New or use the shortcut Command + N (Mac) / Ctrl + N (Windows).
- In the “New Document” dialog box, you’ll see various presets. To access resolution settings, look for Advanced Options and expand it if necessary.
- Under Raster Effects, you’ll find a dropdown menu with common PPI options: Screen (72 ppi), Medium (150 ppi), and High (300 ppi).
- Choose the appropriate setting based on your output: 72 ppi for web/digital (like beautiful photography for online backgrounds), and 300 ppi for print (e.g., high-resolution stock photos for commercial printing). This initial setting applies to any raster effects you introduce later.
-
Changing Resolution for Existing Documents (Document Raster Effects Settings):
- If you’re working on an existing document and need to adjust the resolution for its raster effects, navigate to the top menu: Effect > Document Raster Effects Settings.
- A dialog box will appear, allowing you to select your desired resolution (e.g., High 300 ppi for print-ready graphic design, or a custom value). You can also select Other and manually input a specific PPI value, providing flexibility for niche applications.
- Click OK to apply the changes. This setting directly influences how Illustrator renders pixel-based effects and how it handles rasterization of vector art for export.
It’s important to remember that changing this setting does not magically increase the resolution of a low-resolution raster image already placed in your document. It only affects how Illustrator processes its own raster effects and how it will export the entire document if saved in a raster format.
Adjusting Resolution for Existing Documents: The Rasterize Effect
While “Document Raster Effects Settings” primarily influences Illustrator’s internal rendering of effects, the Rasterize effect offers a more direct way to convert selected vector artwork (or even placed raster images, though with limitations) into a pixel-based format at a specified resolution. This method can be particularly useful when you need pixel-perfect results for specific components of your design, perhaps for icons or elements intended for screens with varying PPI.
- Selecting Artwork: Choose the specific vector artwork or placed raster image you wish to rasterize.
- Applying the Effect: Go to Effect > Rasterize.
- Resolution Options: In the Rasterize dialog box, you can choose from default PPI options (72, 150, 300 ppi) or enter a custom value. You can also define the color model and background.
- Managing with Appearance Panel: After applying, the Rasterize effect will appear in the Appearance panel (Window > Appearance). From here, you can toggle its visibility (eye icon), delete it (bin icon), or click on the “Rasterize” entry to modify its settings, including the PPI, allowing for iterative adjustments.
This approach provides a “preview of the pixels” within Illustrator, helping designers ensure elements look as intended when eventually exported as raster images. However, rasterizing vector art converts it from scalable paths to fixed pixels, meaning it will lose its infinite scalability. Exercise caution and consider saving a vector version before rasterizing.
Optimizing Resolution During Export for Tophinhanhdep.com Collections
One of the most frequent points of interaction with image resolution in Illustrator comes during the export process. This is where your vector designs or integrated raster images are converted into final pixel-based files suitable for various uses, including uploading to image collections or using as high-resolution wallpapers from Tophinhanhdep.com.
-
Export As (File > Export > Export As):
- This is a common method for exporting various raster formats (PNG, JPEG, TIFF, etc.).
- After choosing your file format and location, click Export.
- A format-specific options dialog will appear. For PNG, you’ll find a Resolution dropdown menu where you can select 72 ppi (for web, backgrounds, digital art), 150 ppi, 300 ppi (for print-ready graphic design), or Other for custom values.
- For JPEG, the options are similar but often include quality settings (compression) alongside resolution.
- Always select 300 ppi for print and 72 ppi for web to optimize file size and quality.
-
Save for Web (Legacy) (File > Export > Save for Web (Legacy)):
- Though labeled “Legacy,” this feature remains powerful for web-optimized images, such as aesthetic wallpapers or abstract backgrounds for Tophinhanhdep.com.
- It offers a live preview of the image quality and file size at different settings.
- You can adjust Preset quality, Image Size (width/height), and crucially, Resolution. While often defaulting to 72 ppi, you can ensure your web assets are properly optimized.
By diligently managing resolution during export, you ensure that your creations maintain their intended quality, whether they are destined to be high-resolution stock photos, beautiful photography for a portfolio, or engaging digital art for Tophinhanhdep.com’s diverse collections.
Changing Document Size and Orientation
While not directly about improving resolution, the document size and orientation are fundamental aspects of preparing your artwork, especially when resolution is a concern. The Artboard Tool in Illustrator provides flexible control:
- Selecting the Artboard Tool: Located in the left sidebar, this tool (shortcut
Shift + O) allows you to manipulate your artboards. - Adjusting Dimensions:
- You can directly drag the corners of the artboard to visually resize it.
- For precise control, use the Control panel at the top. Here, you can enter exact Width (W) and Height (H) values in your preferred units (pixels, inches, etc.).
- Changing Orientation: The Control panel also offers buttons to quickly toggle between Portrait and Landscape orientations, swapping the width and height values.
This flexibility ensures your canvas matches the intended output, whether for a specific screen aspect ratio (e.g., wallpapers from Tophinhanhdep.com) or a print dimension, allowing you to correctly scale your work and apply appropriate resolution settings.
Beyond Illustrator: Enhancing Image Quality with External Tools
While Adobe Illustrator provides robust features for working with vector graphics and managing raster effects, it’s not primarily an image editing or enhancement tool. For truly “improving” the resolution and overall quality of existing low-resolution raster images, dedicated solutions often prove more effective. This is where the realms of Photography, Image Tools, and Visual Design converge, aligning perfectly with the comprehensive resources offered by Tophinhanhdep.com.
Photoshop as a Dedicated Image Enhancement Solution
Adobe Photoshop is the undisputed king of raster image manipulation, offering a suite of powerful tools specifically designed for editing, enhancing, and upscaling pixel-based images. If you have a low-resolution photo (be it a nature shot, an aesthetic background, or a piece of beautiful photography) that needs significant quality improvement, Photoshop is your go-to.
Here’s a simplified approach to increasing image resolution in Photoshop:
- Open Image in Photoshop: Launch Photoshop and open your desired image file.
- Access Image Size: Go to Image > Image Size from the top menu.
- Adjust Resolution:
- In the Image Size dialog box, you’ll see the current Width, Height, and Resolution (in PPI).
- Increase the Resolution value to your target (e.g., 300 PPI for print, or a higher value for large digital displays).
- Crucially, ensure Resample is checked. This tells Photoshop to add new pixels to the image.
- From the Resample dropdown, select a suitable method:
- Preserve Details 2.0: Generally the best option for upscaling, as it uses advanced algorithms to maintain detail and reduce artifacts.
- Bicubic Smoother (enlargement): A good general-purpose option that smooths transitions.
- You can preview the changes in the dialog window. Keep an eye on the estimated file size.
- Refine and Save: After adjusting, click OK. You might then use Photoshop’s sharpening tools (Filter > Sharpen) to further define edges, or noise reduction tools (Filter > Noise > Reduce Noise) to clean up any artifacts introduced during upscaling. Finally, save your enhanced image.
Photoshop’s sophisticated resampling algorithms and comprehensive editing capabilities make it ideal for transforming low-resolution images into high-resolution assets suitable for print or large digital displays, providing the high-quality stock photos and backgrounds that Tophinhanhdep.com users seek.
The Power of AI Upscalers for Ultra-High Resolution Images
In recent years, advancements in artificial intelligence have revolutionized image enhancement, particularly in the realm of upscaling. AI Upscalers, available as standalone software or online tools, represent a cutting-edge category of Image Tools that can dramatically increase image resolution and quality, often with superior results compared to traditional methods. These tools are perfect for transforming standard images into 4K or even 8K resolution, making them invaluable for creating stunning wallpapers or preparing high-resolution assets for Visual Design and Digital Art projects.
How AI Upscalers work:
- Intelligent Pixel Generation: Unlike conventional resampling, which simply interpolates (guesses) new pixels based on neighboring ones, AI upscalers use deep learning models trained on vast datasets of images. They “understand” image content and intelligently generate new pixels, filling in details and reducing blurriness and pixelation.
- Artifact Removal and Sharpening: Many AI upscalers also incorporate features to automatically sharpen blurry edges, remove background noise, and improve overall clarity, breathing new life into older or lower-quality images.
Popular AI Upscaling Tools (as referenced in sources and aligning with Tophinhanhdep.com’s focus on Image Tools):
- Aiseesoft AI Photo Editor / Free Image Upscaler Online: This tool exemplifies AI upscaling, offering options to enlarge images by 2x, 4x, 6x, or 8x. It supports various formats (JPEG, PNG, WEBP, etc.) and uses AI to sharpen edges and reduce noise. The online version provides a quick, convenient way to achieve higher resolutions, including 300 DPI for print.
- VanceAI Image Upscaler, Topaz Labs Gigapixel AI: These are other prominent AI-powered solutions known for their ability to deliver impressive results in image upscaling and quality enhancement.
For users of Tophinhanhdep.com who might have aesthetic images or wallpapers at a lower resolution and wish to upscale them for larger displays or print, these AI tools offer a powerful and often more effective alternative to manual manipulation in traditional editing software.
Integrating Enhanced Images into Your Tophinhanhdep.com Projects
Once you’ve used Photoshop or an AI Upscaler to achieve the desired high resolution and quality for your raster images, integrating them into your Illustrator projects becomes seamless. Illustrator is excellent for combining these high-resolution raster elements with its native vector graphics, allowing for complex and visually rich designs.
- Placing the Enhanced Image:
- Go to File > Place… in Illustrator.
- Navigate to your newly enhanced, high-resolution image and click Place.
- Choose to Embed the image if you want it to be part of the Illustrator file, or Link it if you prefer to keep the file size down and have external control over the original image.
- Combining with Vector Elements: Now, your high-resolution photography or background can serve as the foundation or an integral part of your Graphic Design or Digital Art project. You can add vector overlays, text, logos, and other creative ideas, knowing that the raster component maintains its crispness.
- Final Export for Tophinhanhdep.com: When exporting your final design from Illustrator, whether for a website banner, a print ad, or a submission to a thematic collection on Tophinhanhdep.com, ensure you use the appropriate resolution settings discussed earlier. For example, export a 300 ppi JPEG for print materials or a 72 ppi PNG for web-optimized images, ensuring the ultimate quality matches the source.
By leveraging the strengths of Illustrator for vector creation, Photoshop for detailed raster editing, and AI upscalers for transformative resolution enhancements, designers can produce visual content that truly stands out, reflecting the high standards of Tophinhanhdep.com’s rich offerings.
Conclusion
Improving the resolution of an image in Adobe Illustrator is a nuanced topic that bridges the gap between vector and raster graphics. While Illustrator primarily excels in the infinitely scalable world of vectors, it offers essential tools to manage and export raster components with precision. For designers at Tophinhanhdep.com, whether you’re crafting stunning wallpapers, intricate graphic designs, or curating thematic collections of beautiful photography, understanding these distinctions and workflows is crucial for achieving visual excellence.
We’ve explored how Illustrator handles resolution through its Document Raster Effects Settings, the Rasterize effect, and precise export options, allowing you to tailor your output for both digital displays (72 ppi) and high-quality print (300 ppi). Furthermore, we’ve highlighted that true resolution enhancement for existing low-quality raster images often extends beyond Illustrator’s core capabilities. Dedicated tools like Adobe Photoshop and innovative AI Upscalers are indispensable for transforming pixel-deficient images into high-resolution masterpieces, ensuring your stock photos, backgrounds, or aesthetic images meet the highest standards.
By combining Illustrator’s vector prowess with specialized image enhancement tools, you can seamlessly integrate high-resolution photography into your digital art and visual design projects. This comprehensive approach empowers you to maintain fidelity across all your creative endeavors, ensuring that every image, every background, and every piece of graphic art you produce reflects the professional quality and inspiring creativity found across Tophinhanhdep.com. Embrace these techniques to elevate your visual content and bring your creative ideas to life with unparalleled clarity and impact.