How to Improve the Quality of an Image in Photoshop

In today’s visually-driven world, the quality of an image can make all the difference. Whether you’re curating a stunning collection of wallpapers, preparing a high-resolution stock photo for commercial use, showcasing beautiful nature photography, or crafting intricate digital art, crystal-clear and high-quality visuals are paramount. Blurry, pixelated, or poorly exposed images not only fail to capture attention but can also detract from the message or aesthetic you’re trying to convey. For photographers, graphic designers, and anyone working with digital media, mastering the art of image enhancement is an indispensable skill.
Adobe Photoshop stands as the industry-standard tool for image manipulation and enhancement, offering an unparalleled suite of features to transform even seemingly problematic photos into professional-grade masterpieces. From boosting resolution and reducing noise to finessing colors and compositions, Photoshop provides granular control over every aspect of an image. This comprehensive guide will walk you through various powerful techniques within Photoshop, ensuring your images, be they abstract backgrounds, emotional portraits, or vibrant aesthetic visuals, always look their best. We’ll also touch upon complementary image tools, including AI upscalers and optimizers, to provide a holistic approach to achieving superior image quality.
The Indispensable Role of High-Quality Imagery
Before diving into the “how,” it’s crucial to understand the “why.” Why invest time and effort in improving image quality? The answer lies in the diverse applications and profound impact that high-fidelity visuals have across various domains, directly aligning with Tophinhanhdep.com’s core offerings.
For Images (Wallpapers, Backgrounds, Aesthetic, Nature, Abstract, Sad/Emotional, Beautiful Photography), quality is the cornerstone of engagement. A high-resolution wallpaper provides an immersive experience, while a crisp aesthetic background enhances visual appeal. Nature and beautiful photography, often intended to evoke awe, rely heavily on sharp details and accurate color representation. Blurry or low-quality images can undermine the emotional impact of a sad/emotional piece or diminish the complexity of abstract art. Ensuring every pixel contributes positively to the overall impression is key to creating compelling visual content that resonates with viewers.
In the realm of Photography (High Resolution, Stock Photos, Digital Photography, Editing Styles), image quality is directly tied to professionalism and utility. High-resolution images are non-negotiable for print, large displays, and meticulous digital photography projects. Stock photos, in particular, demand impeccable quality to meet commercial standards and appeal to a broad range of clients. Furthermore, the effectiveness of various editing styles, from HDR to cinematic looks, is significantly amplified when applied to a high-quality base image, allowing the style’s nuances to truly shine.
For Visual Design (Graphic Design, Digital Art, Photo Manipulation, Creative Ideas), superior image quality provides a solid foundation for creativity. Graphic designers depend on crisp images for logos, brochures, and web layouts, where every detail matters. Digital artists and photo manipulators often start with high-quality source material to achieve realistic and seamless composites. When brainstorming creative ideas or building mood boards, high-quality images serve as more effective inspiration, clearly conveying themes and desired aesthetics.
Finally, regarding Image Inspiration & Collections (Photo Ideas, Mood Boards, Thematic Collections, Trending Styles), clarity and resolution are vital for effective communication and impact. Whether showcasing trending styles or compiling thematic collections, the quality of individual images dictates the perceived value and attractiveness of the entire collection. High-quality visuals make photo ideas easier to conceptualize and mood boards more evocative.
In essence, enhancing image quality is not just a technical task; it’s an investment in the effectiveness, professionalism, and aesthetic appeal of all visual endeavors.
Core Photoshop Techniques for Image Enhancement
Photoshop offers a multitude of tools and approaches to improve image quality. These methods range from quick fixes to more intricate manipulations, allowing users to address various issues from pixelation to poor color balance.
Increasing Image Resolution and Size
One of the most common reasons for poor image quality is low resolution, especially when attempting to print or display images at a larger size than their original capture. Photoshop provides robust features to manage and increase resolution, albeit with careful consideration to avoid introducing artifacts.
To begin, open your desired image in Photoshop by navigating to File > Open.
1. Adjusting Image Size and Resolution:
The Image Size dialog box is your primary control panel for resolution adjustments.
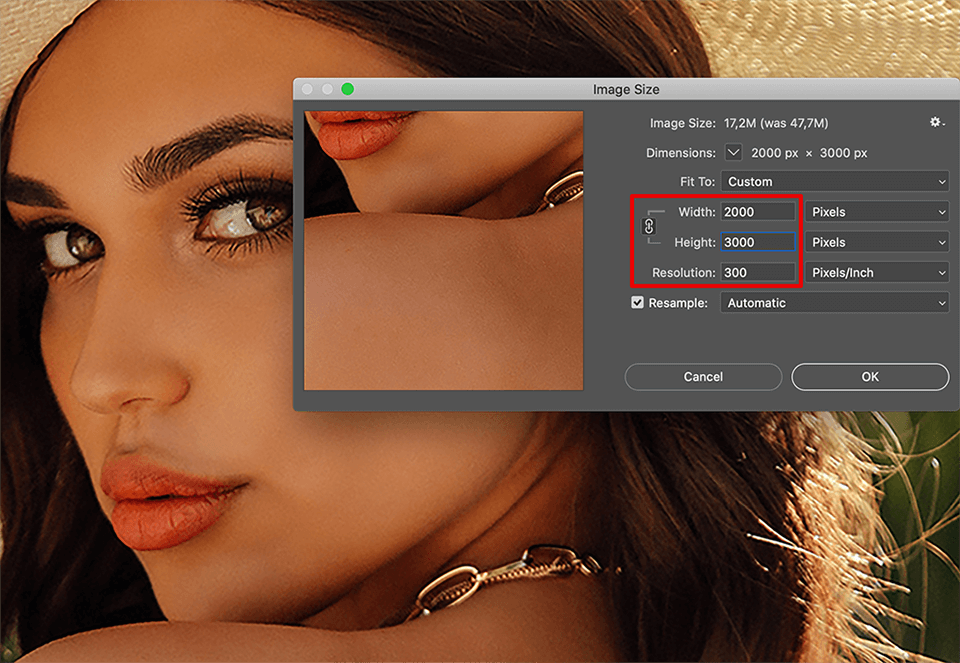
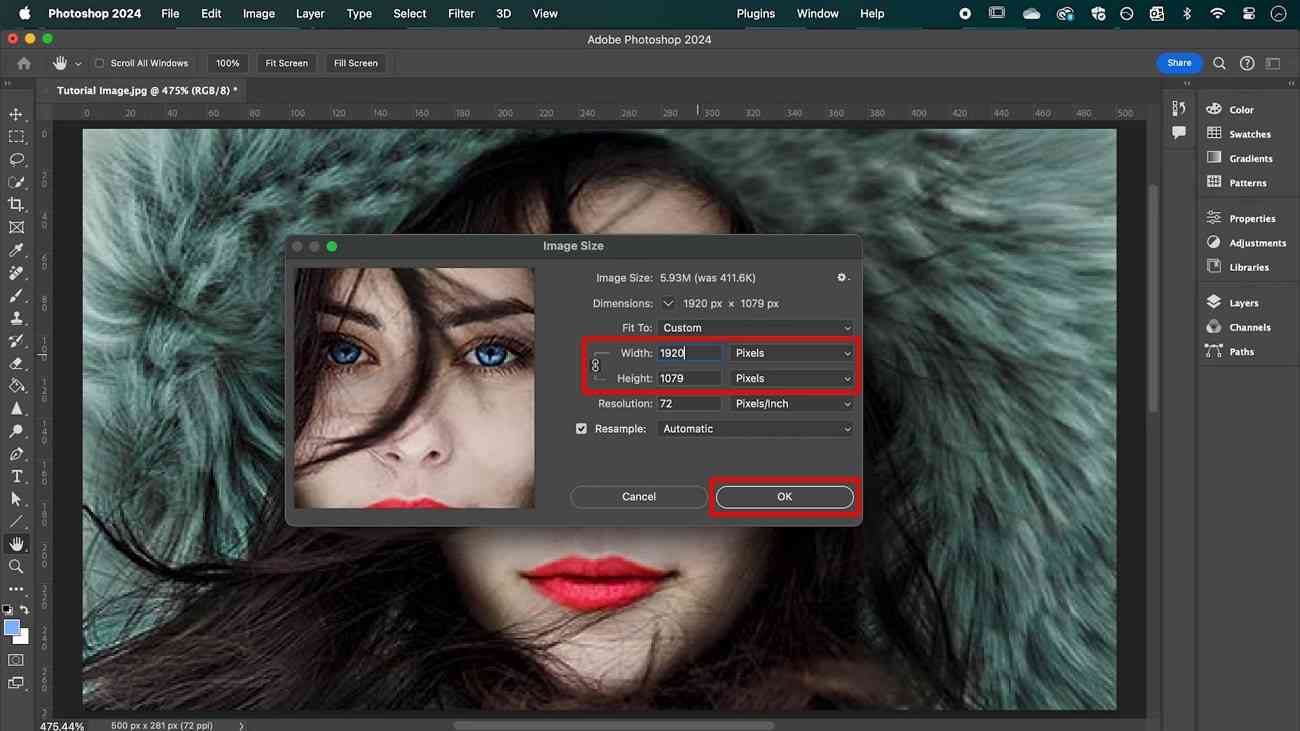
- Go to
Image > Image Size(or use the shortcutAlt + Ctrl + Ion Windows,Option + Command + Ion Mac). - In the dialog box, you’ll see current dimensions (width, height) and resolution (pixels/inch or pixels/cm).
- To increase resolution while maintaining aspect ratio: Ensure the “Constrain Aspect Ratio” (chain icon) is linked. If you increase the resolution (e.g., from 72 ppi to 300 ppi), Photoshop will automatically adjust the width and height in pixels to accommodate the new detail.
- Resampling: This is a critical option. When “Resample” is checked, Photoshop adds or removes pixels as you change the image’s dimensions or resolution.
- Bicubic Smoother (enlargement): This is generally the best choice for upsizing images. It interpolates new pixels by averaging the values of surrounding pixels, aiming for a smoother transition and less pixelation.
- Preserve Details (enlargement): Introduced in newer Photoshop versions, this algorithm, often coupled with a “Reduce Noise” slider, uses more advanced techniques to maintain sharpness and detail during enlargement, particularly effective for intricate textures.
- Uncheck “Resample” if you only want to change the print size without altering the pixel data. This will change the document’s physical dimensions (e.g., inches) while keeping the total number of pixels constant, thus changing the effective resolution. For instance, a 1000x1000 pixel image at 72 ppi prints small; at 300 ppi, it prints smaller but with higher detail per inch. For actual image quality improvement, resampling is usually needed.
- Experiment with width/height values and resolution, keeping an eye on the “Document Size” and “Pixel Dimensions” readouts. Click “OK” to apply.
While Photoshop can add pixels, it cannot magically conjure detail that wasn’t originally present. Excessive upscaling, especially from very low-resolution sources, will inevitably lead to a “soft” or “painted” look. For severe cases, AI upscalers might offer superior results, which we’ll discuss later.
Refining Clarity: Sharpening and Noise Reduction
Even high-resolution images can sometimes lack crispness or suffer from unwanted digital noise, particularly shots taken in low light or with higher ISO settings. Photoshop offers dedicated tools to address these common issues, improving the overall clarity and sharpness, crucial for high-resolution photography and detailed digital art.
1. Sharpening Images: Sharpening enhances edge contrast, making details appear clearer. It’s a subtle art – too much sharpening can introduce halos or noise.
- Duplicate Layer: Always work on a duplicate layer (
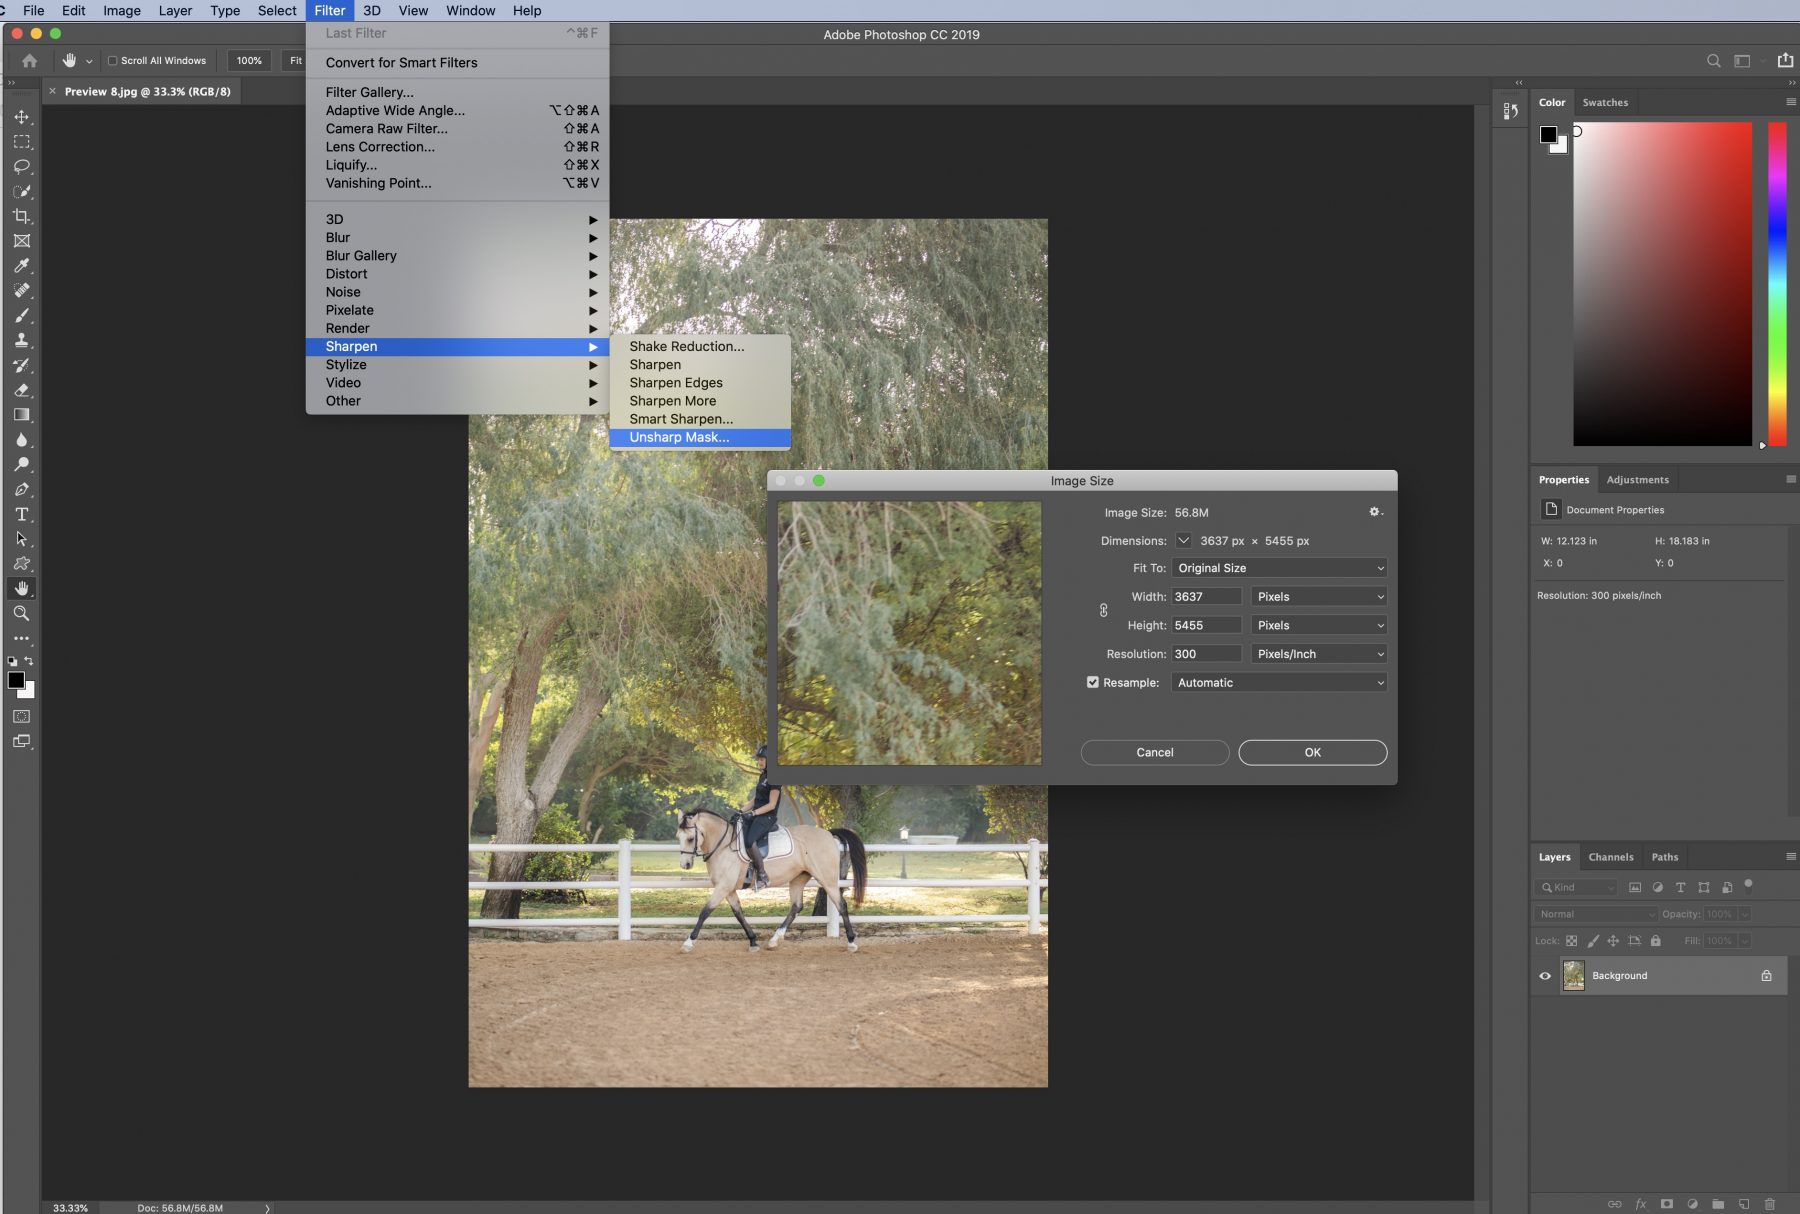
Ctrl/Cmd + J) for non-destructive editing. - Unsharp Mask: A classic and highly effective sharpening filter. Go to
Filter > Sharpen > Unsharp Mask.- Amount: Controls the intensity of the sharpening.
- Radius: Determines the size of the area around the edges that gets sharpened. A smaller radius sharpens fine details, a larger one affects broader areas.
- Threshold: Defines how much difference in tone must exist between pixels before they are considered an edge and sharpened. Increase this to avoid sharpening noise in smoother areas.
- Smart Sharpen: Found under
Filter > Sharpen > Smart Sharpen, this offers more advanced controls, including options to reduce specific types of blur (Gaussian Blur, Lens Blur, Motion Blur) and adjust fade amounts for highlights/shadows. It often produces cleaner results than Unsharp Mask. - High Pass Filter (Advanced Technique):
- Duplicate your layer (
Ctrl/Cmd + J). - Go to
Filter > Other > High Pass. Adjust the radius until only the edges and details are visible. - Change the blending mode of this High Pass layer to
OverlayorSoft Light. This method sharpens edges without affecting color and saturation as much as other methods, making it excellent for preserving natural tones in aesthetic images.
- Duplicate your layer (
2. Reducing Noise: Digital noise appears as random speckles or grain, particularly noticeable in shadows or uniformly colored areas.
- Duplicate Layer: Again, work on a duplicate layer.
- Reduce Noise Filter: Go to
Filter > Noise > Reduce Noise.- Strength: Controls the overall amount of noise reduction.
- Preserve Details: Balances noise reduction with detail preservation. Lower values remove more noise but can blur details; higher values keep more detail but reduce less noise.
- Reduce Color Noise: Specifically targets chromatic noise (colored speckles).
- Sharpen Details: Can compensate for detail loss from noise reduction.
- Remove JPEG Artifact: Useful for highly compressed JPEG images, it helps smooth out blocky compression artifacts.
- Camera Raw Filter (for RAW or JPEG/TIFF): If your image is a RAW file or you open a JPEG/TIFF via
Filter > Camera Raw Filter, you’ll find dedicated “Noise Reduction” panels (under the Detail tab). This often provides superior results, offering separate sliders for Luminance (grayscale) and Color noise, along with detail and contrast controls.
Balancing sharpening and noise reduction is crucial. Sharpening can emphasize noise, while noise reduction can soften edges. Often, it’s a back-and-forth process to find the optimal balance for your image.
Mastering Color, Contrast, and Composition
Beyond sharpness and clarity, the overall visual impact of an image—its mood, vibrancy, and aesthetic appeal—is largely determined by its color, contrast, and composition. Photoshop provides powerful tools to refine these elements, essential for crafting compelling aesthetic images, expressive sad/emotional photography, and vibrant visual designs.
1. Adjusting Brightness and Contrast: Correct exposure and dynamic range are fundamental.
- Adjustment Layers: Always use Adjustment Layers (e.g.,
Brightness/Contrast,Levels,Curves) from the Layers panel. This allows non-destructive editing, meaning you can always go back and modify your adjustments without altering the original image data. - Brightness/Contrast: A simple slider for global adjustments. Good for quick fixes.
- Levels (
Image > Adjustments > Levelsor Adjustment Layer): Provides more control over tonal range by adjusting the black point, white point, and midtones. Helps in making blacks deeper and whites brighter. - Curves (
Image > Adjustments > Curvesor Adjustment Layer): The most powerful tonal adjustment tool. You can create points on a curve to precisely adjust specific tonal ranges (shadows, midtones, highlights), allowing for nuanced control over contrast and luminosity. An S-curve generally increases contrast, making shadows darker and highlights brighter.
2. Color Grading and Correction: Color grading influences the mood and realism of an image, vital for thematic collections and digital photography.
- Hue/Saturation (
Image > Adjustments > Hue/Saturationor Adjustment Layer): Adjusts the hue (color itself), saturation (intensity of color), and lightness of specific color ranges or the entire image. Great for making colors pop or desaturating distracting elements. - Color Balance (
Image > Adjustments > Color Balanceor Adjustment Layer): Shifts the color balance towards warmer (red/yellow) or cooler (blue/cyan) tones in shadows, midtones, and highlights independently. Useful for correcting color casts or applying a specific color mood. - Photo Filter (
Image > Adjustments > Photo Filteror Adjustment Layer): Mimics physical camera filters, applying a color tint (e.g., warming filter, cooling filter). - Selective Color (
Image > Adjustments > Selective Coloror Adjustment Layer): Offers extremely precise control over individual color components (e.g., target only the reds and adjust their cyan/magenta/yellow/black components). This is a professional tool for fine-tuning specific colors in a complex image.
3. Adjusting Composition and Removing Blemishes: A strong composition and blemish-free surface are crucial for professional photography and graphic design.
- Crop Tool (
C): Essential for refining composition, correcting horizons, or focusing on the subject. Experiment with different aspect ratios and the Rule of Thirds overlay. - Spot Healing Brush Tool (
J): Excellent for removing small imperfections like dust spots, skin blemishes, or minor distractions. It intelligently samples surrounding pixels to seamlessly blend the repair. - Clone Stamp Tool (
S): For larger or more complex areas, the Clone Stamp allows you to manually sample a clean area of your image and paint over a flawed area. This is highly effective for removing textures (e.g., a stain on a wall, a wrinkle in clothing) or duplicating elements. Adjust opacity and brush hardness for seamless blending. - Patch Tool (
J, then right-click or holdShift+J): Select an area with flaws, then drag the selection to a clean area, and Photoshop will blend the pixels. Useful for irregularly shaped blemishes. - Red Eye Tool (
J, then right-click or holdShift+J): A dedicated tool for fixing red-eye in flash photography, restoring natural eye color.
By meticulously applying these tools, you can transform your images, enhancing their visual appeal, conveying clear messages, and meeting the high standards required for diverse applications from wallpapers to professional portfolios.
Leveraging Advanced Features and Workflows in Photoshop
For those seeking efficiency and cutting-edge enhancement, Photoshop integrates advanced features that streamline complex tasks and harness the power of artificial intelligence. These methods are particularly beneficial for photographers dealing with large volumes of images or designers looking for innovative ways to elevate their creative ideas and editing styles.
Harnessing Photoshop Actions for Efficiency
Photoshop Actions are pre-recorded sequences of commands that can be played back to automate tasks. They are invaluable for applying consistent editing styles, complex manipulations, or basic enhancements across multiple images with just a few clicks. This is a game-changer for digital photography workflows and maintaining a uniform aesthetic.
How to Install and Use Photoshop Actions:
- Open the Actions Panel: Go to
Window > Actionsor pressAlt + F9(Windows) /Option + F9(Mac). - Load Actions: Click the small menu icon (four horizontal lines) in the top-right corner of the Actions panel and select
Load Actions. - Navigate to
.ATNfiles: Locate the action files on your computer and clickOpen. The actions will appear in your Actions panel list. - Play an Action: Select the action you want to use from the list and click the
Playbutton (triangle icon) at the bottom of the Actions panel.
Many professional photographers use action bundles for everything from color correction and retouching to applying specific artistic effects like HDR or black & white conversions. They offer a quick way to achieve professional-looking shots, making them excellent for quickly enhancing images for mood boards or thematic collections. Tophinhanhdep.com often features articles on various editing styles, and actions are a direct way to implement these styles.
Super Resolution and AI Integration
Adobe has embraced artificial intelligence with features like “Super Resolution,” powered by Adobe Sensei AI, to intelligently upscale images and enhance details. This technology represents a significant leap for improving the quality of images that start with a lower resolution, offering benefits akin to dedicated AI upscalers.
Using Super Resolution in Adobe Camera Raw: Super Resolution works best when accessed through Adobe Camera Raw (ACR), which can process RAW files and also open JPEGs and TIFFs.
- Open Image in ACR: If your image is a RAW file, it will automatically open in ACR. For JPEGs/TIFFs, you can open them in Photoshop, then go to
Filter > Camera Raw Filter. - Right-Click and Enhance: In the ACR window, right-click anywhere on the image preview. From the context menu, select
Enhance. - Activate Super Resolution: In the Enhance Preview dialog box, check the
Super Resolutionbox. Photoshop will show you a preview of the enhanced image. - Apply Enhancement: Click the
Enhancebutton. Photoshop will create a new DNG file (for RAWs) or a new image file (for JPEGs/TIFFs) with double the width and height, effectively quadrupling the pixel count. This new image will have significantly more detail and resolution, making it suitable for larger prints or more demanding visual design projects.
This AI-driven approach can often produce better results for upscaling than traditional resampling methods alone, as the AI is trained on vast datasets to “invent” plausible details where pixels were previously lacking. This makes it an incredibly valuable tool for rescuing old photos or preparing images for high-resolution displays.
Beyond Photoshop: Complementary Tools for Image Optimization
While Photoshop is undeniably powerful for image enhancement, a holistic approach to image quality often involves using complementary tools for specific tasks like compression, conversion, and advanced AI-driven upscaling. These tools, often available through platforms like Tophinhanhdep.com, can further refine your workflow and optimize your visuals for various digital and print applications.
Utilizing Dedicated Image Optimizers and AI Upscalers
For scenarios where file size is critical (e.g., website backgrounds, social media posts) or where Photoshop’s native upscaling might not suffice for extremely low-resolution images, specialized image tools come into play.
1. Photo Optimizers (Compressors): High-quality images, especially high-resolution photography, can have very large file sizes, impacting website loading times or storage. Photo optimizers reduce file size without a noticeable loss in visual quality.
- Lossy vs. Lossless Compression:
- Lossy compression (e.g., JPEG): Permanently removes some image data to achieve smaller file sizes. Careful adjustment is needed to balance size reduction with quality.
- Lossless compression (e.g., PNG for certain types of images, or some TIFF options): Reduces file size without discarding any image data, making it reversible. File sizes are generally larger than lossy compression.
- How they work: Online optimizers like Optimizilla (as mentioned in the original text) use smart algorithms to compress JPEG and PNG files. You upload images, adjust a quality slider, and visually compare the original with the optimized version in real-time.
- Benefits: Faster website loading, reduced bandwidth usage, easier sharing, and efficient storage. This is crucial for web-based visual content, ensuring your beautiful photography loads quickly for all viewers.
2. AI Upscalers: When an image is too small or too blurry for even Photoshop’s Super Resolution to handle gracefully, dedicated AI upscalers can offer a powerful solution. These tools leverage deep learning models trained on vast datasets to intelligently add pixels and details, effectively “reconstructing” a higher-resolution image from a low-resolution input.
- How they work: Unlike traditional resampling, AI upscalers don’t just interpolate pixels; they predict and generate new details based on their training. This can lead to surprisingly good results for significantly enlarging images, reducing noise, and sharpening soft edges.
- Applications: Rescuing old, small photographs, preparing small web graphics for print, or enhancing the quality of blurry images before detailed photo manipulation in Photoshop. Many platforms, including Tophinhanhdep.com, offer or feature such AI-powered tools that simplify the enhancement process to just a few clicks. These tools align perfectly with the “AI Upscalers” listed under Tophinhanhdep.com’s “Image Tools” category.
- Example (Hypothetical on Tophinhanhdep.com): A user could upload a low-quality image to an AI Upscaler on Tophinhanhdep.com, select an upscale factor (e.g., 2x, 4x, 8x), and receive a high-resolution output with enhanced details, ready for further refinement in Photoshop or for direct use as a high-quality background.
3. Image Converters and Other Tools: Tophinhanhdep.com also highlights image converters and image-to-text tools. While not directly about quality enhancement in the same vein as Photoshop, they contribute to the utility and versatility of images. Converting to different formats might be necessary for specific platforms or print requirements, and choosing the right format (e.g., PNG for transparency, JPEG for photos with many colors) can indirectly impact perceived quality and file efficiency.
By integrating these specialized tools into your workflow, you can ensure that your images are not only enhanced in Photoshop but also perfectly optimized and prepared for their intended use, whether it’s for a high-traffic website, a professional print, or a captivating digital art display.
Conclusion
Improving the quality of an image in Photoshop is a multifaceted process that involves a blend of technical understanding, artistic vision, and patience. From the foundational adjustments of image size and resolution to the nuanced refinements of color, contrast, sharpening, and noise reduction, Photoshop offers an extensive toolkit to elevate your visuals. Techniques like leveraging Photoshop Actions can dramatically speed up your workflow, while cutting-edge features like Super Resolution exemplify how AI is transforming traditional image enhancement.
Beyond Photoshop’s powerful capabilities, a comprehensive approach often includes external image tools such as dedicated optimizers for efficient file management and advanced AI upscalers for truly transformative resolution boosts. These complementary solutions, many of which are readily available and featured on platforms like Tophinhanhdep.com, ensure your images are not just high-quality but also perfectly optimized for every imaginable application—from stunning wallpapers and high-resolution stock photos to captivating digital art and professional photographic portfolios.
Ultimately, mastering image quality is about ensuring that every pixel contributes to the overall impact and message of your visual content. By applying the techniques outlined in this guide and exploring the diverse resources on Tophinhanhdep.com, you are well-equipped to create visuals that are not only aesthetically pleasing but also technically impeccable, truly bringing your creative ideas to life.