How to Increase Image Dimension While Preserving Quality

The ability to increase an image’s dimensions, whether it’s for print, a high-resolution display, or specific online platform requirements, is a common necessity for photographers, designers, and casual users alike. However, the process isn’t always straightforward. Simply “stretching” a small image often leads to pixelation, blurriness, and a noticeable loss of quality, rendering the enlarged image unusable. At Tophinhanhdep.com, we understand the critical balance between size and quality. This comprehensive guide will delve into the various methods and tools available to effectively increase image dimensions and resolution without compromising the visual integrity of your photographs and digital art. We’ll explore everything from advanced AI-powered upscalers to professional desktop software and the quick built-in options on your operating system, ensuring you have the knowledge and resources to achieve stunning, high-definition results.
Understanding Image Dimensions and Quality
Before diving into the “how-to,” it’s essential to grasp the fundamental concepts of image dimensions and quality. This understanding will equip you to make informed decisions and choose the most appropriate enlargement method for your specific needs.
Pixels, Resolution, and Physical Size
An image is composed of tiny squares called pixels. The dimensions of an image typically refer to its width and height, measured in pixels (e.g., 1920x1080 pixels). Resolution, on the other hand, describes the density of these pixels, often expressed as pixels per inch (PPI) or dots per inch (DPI) for print. A higher PPI/DPI means more pixels are packed into each inch, resulting in a sharper and more detailed image, especially when viewed up close or printed large. The physical size refers to how large the image will appear when printed or displayed, determined by its pixel dimensions and resolution. For instance, a 300 PPI image will look much sharper when printed at 8x10 inches than a 72 PPI image of the same pixel dimensions.

Why Enlarging Images Can Be Tricky
When you increase the dimensions of a raster image (most common photo formats like JPG, PNG), you are essentially asking the software to create new pixels where none existed before. This process is called interpolation. Traditional interpolation methods (like Bicubic or Bilinear) estimate the color and value of these new pixels based on their surrounding neighbors. While this works reasonably well for minor enlargements, significant increases often result in:
- Pixelation: Jagged edges and blocky appearances as individual pixels become visible.
- Blurriness: A lack of sharpness and detail, making the image look soft or out of focus.
- Artifacts: Unwanted visual distortions introduced by the interpolation algorithm.
This is why advanced techniques, particularly those utilizing artificial intelligence, have become game-changers in the field of image enlargement.
When to Increase Image Dimensions
There are numerous scenarios where increasing image dimensions becomes necessary:
- Printing: To create large prints, posters, or banners from smaller originals without sacrificing quality. Tophinhanhdep.com offers many beautiful photography and abstract images that might be desired in large formats.
- High-Resolution Displays: To ensure images look crisp and clear on modern 4K or 8K monitors and televisions.
- Website & Social Media Requirements: Many platforms have minimum image dimension requirements for optimal display or certain features.
- Graphic Design & Digital Art: Designers often need to incorporate images into larger canvases or incorporate them into digital art projects. Tophinhanhdep.com’s resources on visual design and creative ideas can inspire how high-quality, enlarged images are used.
- Stock Photography: To meet the stringent quality and resolution standards of stock photo platforms. Our collection of high-resolution stock photos at Tophinhanhdep.com demonstrates the standard.
- Cropping: If you need to heavily crop a photo, enlarging the remaining section can help retain usable detail.
The Core Methods to Increase Image Dimensions Without Losing Quality
Fortunately, technological advancements have provided several effective methods to enlarge images while preserving or even enhancing their quality. Here, we explore the most impactful approaches.
Leveraging AI Upscaling Technology
Artificial Intelligence (AI) upscalers represent the cutting edge in image enlargement. Unlike traditional interpolation, AI algorithms are trained on vast datasets of high-resolution and low-resolution image pairs. This allows them to “learn” how to intelligently add new pixels, often inferring missing details and textures rather than just estimating them.
- How it works: AI upscalers use deep learning, often convolutional neural networks (CNNs), to analyze the image content. They can identify objects, textures, and patterns, then intelligently reconstruct higher-resolution versions, minimizing blur and pixelation while restoring fine details.
- Benefits: This method delivers significantly superior results compared to older techniques, capable of increasing image dimensions by hundreds or even thousands of percent without a noticeable loss in quality. They are particularly effective for photography (nature, portraits, aesthetic images) and digital art where intricate details are crucial.
- Tophinhanhdep.com’s Solutions: Tophinhanhdep.com provides advanced AI Upscalers, an integral part of our Image Tools suite, designed to offer one-click enlargement up to 400% or even 1000% while maintaining crispness and clarity. These tools are incredibly user-friendly, making professional-grade enlargement accessible to everyone.
Utilizing Professional Photo Editing Software
Industry-standard software like Adobe Photoshop offers powerful features for image enlargement, especially when combined with careful manual adjustments. While not as automated as dedicated AI tools, these programs provide granular control over the process.
- Photoshop’s Preserve Details 2.0: This feature is a significant improvement over older resampling methods. Found under
Image > Image Size, by selecting “Resample” and choosing “Preserve Details 2.0” (or similar intelligent resampling options in newer versions), Photoshop uses a more sophisticated algorithm to maintain sharpness. You can then fine-tune the “Reduce Noise” slider to mitigate any artifacts that may arise. - Other Software: Programs like GIMP (free and open-source) and Affinity Photo also offer various resampling methods and tools to manually enhance details post-enlargement, such as sharpening and noise reduction filters. Tophinhanhdep.com’s guides on photo editing delve into these techniques.
- Considerations: These methods require a deeper understanding of image manipulation and often benefit from a multi-step workflow involving initial enlargement, sharpening, and noise reduction.
Employing Vectorization for Graphics and Illustrations
For certain types of images, especially logos, illustrations, or graphics with clean lines and solid colors, vectorization is the ultimate method for resolution-independent scaling.
- Raster vs. Vector: Unlike raster images (pixel-based), vector images are made up of mathematical paths. This means they can be scaled to any size—from a business card to a billboard—without losing any quality or becoming pixelated.
- How it works: Software like Adobe Illustrator, CorelDRAW, or Inkscape can “trace” a raster image to convert its outlines and colors into vector paths. For simpler graphics, this can be largely automated; for complex images, manual tracing might be required.
- Best Use Cases: Ideal for visual design elements, digital art, and graphic design where crispness at any scale is paramount. Tophinhanhdep.com’s resources on graphic design highlight the importance of vector assets.
- Limitations: This method is generally not suitable for complex photographic images, as converting realistic gradients and fine details into vectors is either impossible or results in a highly stylized, non-photographic look.
Practical Guides: How to Enlarge Your Images Step-by-Step
Let’s walk through the practical application of these methods, focusing on Tophinhanhdep.com’s recommended tools and general best practices.
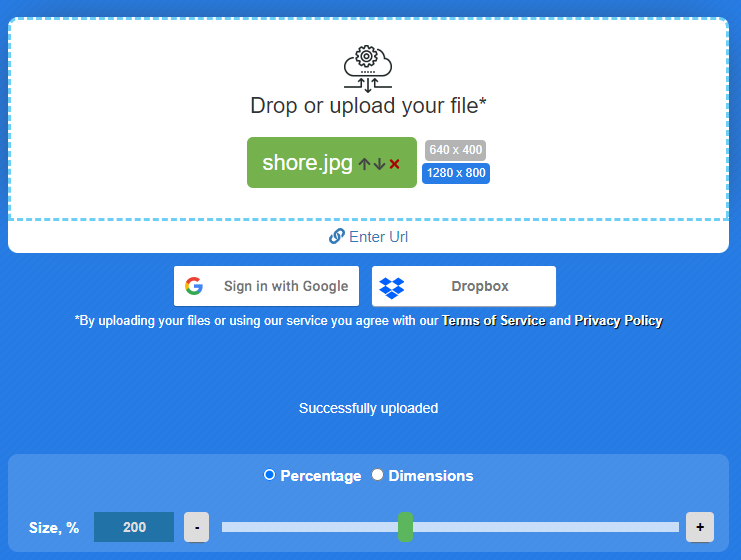
Using Tophinhanhdep.com’s Online Tools
Tophinhanhdep.com’s Image Tools are designed for ease of use and professional results, especially our AI Upscaler.
Step-by-Step with Tophinhanhdep.com’s AI Upscaler:
- Access the Tool: Navigate to the “Image Tools” section on Tophinhanhdep.com and select “AI Upscalers” or “Enlarge Image.”
- Upload Your Image: Click the “Upload Photo” button or drag and drop your image onto the designated area. The tool supports common formats like PNG, JPG, BMP, TIFF.
- Choose Enlargement Factor: Once uploaded, Tophinhanhdep.com’s AI will automatically process your image or present options for magnification (e.g., 2x, 4x, 6x, 8x, or up to 1000%). Choose the desired factor.
- Preview and Download: The tool will display a preview of the enlarged image, showcasing the enhanced details and quality. Once satisfied, click the “Save” or “Download” button to save the high-dimension image to your device.
This method is ideal for users who need quick, high-quality enlargement without the complexity of desktop software. It’s perfect for preparing images for wallpapers, backgrounds, or social media uploads.
Increasing Image Size with Desktop Software
For those who prefer desktop applications or require more advanced control, professional software provides robust solutions.
Step-by-Step with Adobe Photoshop (or similar):
- Open Image: Launch Photoshop and open your image (
File > Open). - Access Image Size: Go to
Image > Image Size(or pressCtrl+Alt+Ion Windows,Cmd+Option+Ion Mac). - Configure Settings:
- Ensure “Constrain Proportions” (or “Link” icon between width/height) is checked to maintain the aspect ratio.
- Under “Resample,” select the most advanced interpolation method available, such as “Preserve Details 2.0” (Photoshop CC and later) or “Bicubic Smoother” for older versions.
- Adjust the “Width” or “Height” (e.g., in pixels, inches, or percentage) to your desired dimensions. If using “Preserve Details 2.0,” adjust the “Reduce Noise” slider carefully to remove any slight artifacts.
- You can also adjust “Resolution” (DPI/PPI) here, which affects print size. For screen display, pixel dimensions are more critical.
- Apply and Refine: Click “OK.” Your image will be enlarged. You may then apply subtle sharpening (
Filter > Sharpen > Unsharp Mask) to restore any perceived softness. Be careful not to over-sharpen. - Save Image: Save your enlarged image (
File > Save As) in a suitable format like PNG or TIFF for maximum quality, or JPEG with high quality settings if file size is a concern.
Quick Resizing on Built-in OS Tools
For basic adjustments, your operating system’s native tools can be surprisingly handy.
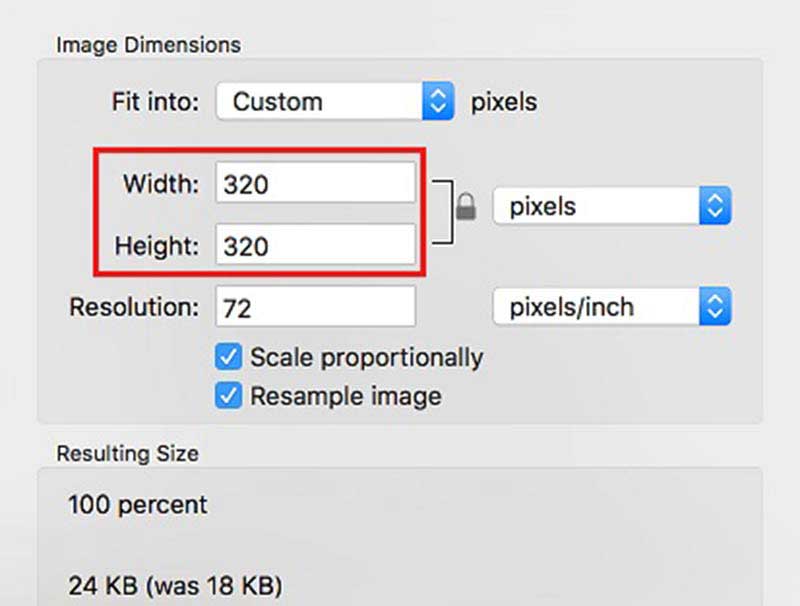
Step-by-Step on Mac (using Preview):
- Open Image: Double-click your image to open it in Preview.
- Access Adjust Size: Go to
Tools > Adjust Size.... - Set Dimensions: In the dialog box, ensure “Scale proportionally” is checked. Change the “Width” or “Height” to your desired pixel dimensions or select a preset. You can also change the “Resolution” (PPI).
- Confirm and Save: Click “OK” and then save the file (
File > SaveorFile > Save As).
Step-by-Step on Windows (using Paint):
- Open Image: Right-click the image, select
Open with > Paint. - Access Resize: Click the “Resize” button in the “Image” section of the Home tab.
- Set Dimensions: In the Resize and Skew dialog, select “Pixels.” Ensure “Maintain aspect ratio” is checked. Enter your desired “Horizontal” or “Vertical” pixel dimension.
- Confirm and Save: Click “OK,” and then save the file (
File > SaveorFile > Save as).
While convenient, remember these methods use simpler algorithms and may not yield the best results for significant enlargements or critical quality requirements.
Best Practices for High-Quality Image Enlargement
Achieving excellent results when increasing image dimensions goes beyond just clicking a button. Following these best practices will significantly improve your outcome.
Starting with the Best Possible Original
The quality of your original image is the most crucial factor. A low-resolution, blurry source image will only produce a larger, blurrier version, regardless of the tools you use.
- High-Resolution Photography: Always aim to start with the highest resolution and best quality image available. Professional digital photography often yields excellent base files.
- Minimal Compression: Avoid heavily compressed JPEG files if possible, as they contain compression artifacts that become more visible upon enlargement. TIFF or high-quality PNGs are preferable.
- Optimal Lighting and Focus: Images that are well-lit and in sharp focus from the outset will naturally enlarge better. Tophinhanhdep.com offers inspiration and tips for capturing beautiful photography.
The Role of Sharpening and Noise Reduction
After enlarging an image, it might appear slightly soft due to the interpolation process.
- Subtle Sharpening: A light application of a sharpening filter (like “Unsharp Mask” in Photoshop) can help restore crispness. Apply sparingly and zoom in to 100% to monitor the effect, avoiding over-sharpening which creates halos or artificial textures.
- Noise Reduction: Enlarging can sometimes exaggerate image noise (graininess), especially in darker areas. Noise reduction tools can help, but aggressive use can smooth out important details. Balance is key.
Exporting and Saving Your Enlarged Images
The final step is saving your high-dimension image correctly.
- Lossless Formats for Quality: For maximum quality, especially for print or further editing, save in lossless formats like TIFF or PNG. These retain all image data.
- JPEG for Web with Care: If saving as JPEG for web use (e.g., for wallpapers, backgrounds, or social media uploads), choose a high-quality setting (e.g., 80-90% or higher) to minimize compression artifacts. Tophinhanhdep.com’s image compressors and optimizers can help manage file size without sacrificing too much quality.
- Specific Requirements: Always refer to the target platform’s specifications (e.g., minimum pixel dimensions, maximum file size in KB or MB) when saving images for online forms or specific websites. Tophinhanhdep.com’s converters are useful here.
Tophinhanhdep.com’s Comprehensive Solutions for Image Enhancement
At Tophinhanhdep.com, we are dedicated to providing a holistic experience for all your image and photography needs. Our platform is more than just a tool; it’s a hub for creativity, inspiration, and practical solutions.
Explore Our Image Tools and Converters
Our suite of Image Tools is designed to empower you with professional-grade capabilities. Beyond our powerful AI Upscalers for increasing image dimensions, you’ll find:
- Image Converters: Easily switch between various formats (JPG to PNG, HEIC to JPG, Images to PDF, etc.) to meet specific project or platform requirements.
- Compressors & Optimizers: Reduce file sizes for faster loading web pages or storage efficiency, crucial for managing collections of high-resolution images.
- Image-to-Text: Extract text from images, adding another layer of utility for both personal and business needs.
- Background Removers and Editors: Tools for creative photo manipulation, helping you prepare images for visual design projects.
These tools ensure that once you’ve increased your image dimensions, you can further refine, convert, or optimize them as needed, making Tophinhanhdep.com a one-stop-shop for digital imagery.
Discover High-Resolution Photography and Visual Design Resources
Tophinhanhdep.com is also a treasure trove of inspiration and practical knowledge.
- Photography: Explore our curated collections of high-resolution stock photos, learn about digital photography techniques, and discover various editing styles. Our “Images” categories feature stunning wallpapers, aesthetic backgrounds, nature scenes, abstract art, and beautiful photography, many of which benefit from or demonstrate excellent image dimensions.
- Visual Design: Dive into graphic design principles, digital art tutorials, and photo manipulation guides. Understanding these aspects helps you utilize your enlarged images effectively in creative projects. Our “Creative Ideas” section is packed with insights to spark your imagination.
Get Inspiration from Our Curated Image Collections
Looking for ideas on how to use your newly enlarged, high-quality images? Tophinhanhdep.com’s “Image Inspiration & Collections” section is your go-to resource. Browse through photo ideas, mood boards, thematic collections, and trending styles to see how stunning visuals are crafted and presented. Whether you’re enhancing an emotional sad image for a personal project or a vibrant nature shot for a commercial print, our collections demonstrate the impact of high-dimension, quality imagery.
In conclusion, while increasing image dimensions once posed significant challenges to quality, today’s advanced tools and techniques offer robust solutions. By understanding the principles of resolution, leveraging AI upscalers, employing professional software judiciously, and following best practices, you can confidently enlarge your images to achieve stunning, high-quality results. Tophinhanhdep.com is here to support you every step of the way, providing the tools, resources, and inspiration you need to elevate your visual content.