Master the Art of Image Enlargement: Increase Dimensions Without Losing Quality

In our visually-driven world, images are more than just pictures; they are powerful tools for communication, expression, and engagement. From stunning wallpapers and aesthetic backgrounds to professional stock photos and captivating digital art, the quality and dimensions of an image play a pivotal role in its impact. Whether you’re a professional photographer, a graphic designer, a content creator, or simply someone looking to enhance their personal photo collection, the need to increase image dimensions and resolution without compromising quality is a frequently encountered challenge.
At Tophinhanhdep.com, we understand the critical role high-resolution images play across various domains, from inspiring nature and abstract art to conveying deep emotions through beautiful photography. Our platform is dedicated to empowering users with the knowledge and tools necessary to achieve exceptional visual results. This comprehensive guide will delve into the intricacies of increasing image dimensions, exploring both the underlying principles and the most effective methods available today.
The Importance of Image Dimensions and Resolution

Before diving into the “how-to,” it’s crucial to grasp the fundamental concepts of image dimensions and resolution, and why mastering them is essential.
Image Dimensions refer to the physical width and height of an image, typically measured in pixels (for digital displays) or inches/centimeters (for print). A larger dimension means more pixels across the width and height, resulting in a physically larger image.
Image Resolution, on the other hand, describes the density of these pixels, often expressed in pixels per inch (PPI) for screens or dots per inch (DPI) for print. A higher resolution means more pixels are packed into each inch, leading to a sharper, more detailed image, especially when viewed up close or printed at a large scale.
The demand for increasing image dimensions arises from a myriad of scenarios:
- Printing: Enlarge a cherished photograph for a wall print, poster, or banner without it appearing pixelated or blurry.
- Web & Social Media: Meet specific platform requirements for high-definition visuals, ensuring your uploaded content (like wallpapers or backgrounds) looks crisp on various screen sizes, from mobile devices to large monitors.
- Digital Art & Graphic Design: Provide a larger canvas for creative manipulation, allowing for intricate detailing and flexible scaling in design projects.
- Stock Photography: Deliver high-resolution assets that cater to diverse client needs, whether for web use or commercial printing.
- Visual Inspiration: Create mood boards or thematic collections with uniformly high-quality images, reflecting trending styles or specific aesthetic visions.
Often, images start out smaller or with lower resolution due to various factors: a lower-megapixel camera, accidental compression, or simply downloading a web-optimized thumbnail. The goal, then, is not just to make the image bigger, but to do so intelligently, adding information rather than merely stretching existing pixels, which can lead to undesirable blurriness and pixilation. This is where advanced tools and techniques come into play, helping you transform a modest image into a high-resolution masterpiece suitable for any purpose.
Powerful Methods to Increase Image Dimensions Effectively
The digital age has blessed us with an array of tools and techniques to tackle the challenge of image enlargement. From sophisticated AI algorithms to robust professional software and convenient online utilities, there’s a solution for every skill level and requirement.

Leveraging AI Upscaling Technology
Artificial Intelligence (AI) has revolutionized image processing, offering a groundbreaking approach to increasing image dimensions without noticeable loss in quality. AI upscalers are trained on vast datasets of images, learning to intelligently “invent” new pixels and details that seamlessly integrate with the existing image data. Unlike traditional resizing methods that merely interpolate (average) surrounding pixels, AI algorithms can predict and generate intricate textures, sharper edges, and finer details, transforming a low-resolution image into a high-resolution one that often looks as good, if not better, than the original larger version.
Tophinhanhdep.com’s AI Upscaler stands at the forefront of this technology. Our tool utilizes advanced machine learning to analyze your image, understand its content, and reconstruct it at larger dimensions with remarkable precision.
- Smart Detail Generation: Instead of just stretching pixels, our AI intelligently adds new pixel data, enhancing sharpness and clarity.
- Noise Reduction: Simultaneously, the AI can often reduce image noise and remove artifacts that might become more prominent with traditional enlargement.
- Face Refinement: For portraits, specialized algorithms can enhance facial features without introducing artificial smoothness or distortion.
- User-Friendly Experience: Despite the complex technology under the hood, Tophinhanhdep.com’s AI Upscaler offers a simple, intuitive interface, making professional-grade enlargement accessible to everyone.
This method is particularly powerful for significant enlargements (e.g., 200% up to 1000% or more) where traditional methods would fall short, making it ideal for creating high-resolution versions of stock photos, wallpapers, or images for large-format printing.
Mastering Image Resizing with Professional Software
For those who demand granular control and possess a deeper understanding of image editing, professional desktop software remains an invaluable asset. Tools like Adobe Photoshop have long been the industry standard, offering a comprehensive suite of features for photo manipulation, including sophisticated image resizing capabilities.
The key to successful enlargement in professional software lies in understanding resampling methods. When you increase an image’s pixel dimensions, the software must “resample” or add new pixels. Different resampling algorithms produce varying results:
- Bicubic Smoother (for enlargement): This is often the go-to method in Photoshop for increasing image size, as it interpolates pixels based on the weighted average of surrounding pixels, producing smoother transitions.
- Preserve Details (2.0): Newer versions of Photoshop include advanced resampling options like “Preserve Details 2.0,” which uses more intelligent algorithms to maintain sharpness and texture during enlargement, akin to some AI techniques but within a manual workflow.
- Vectorization: For images composed of solid shapes and lines (like logos or illustrations), converting them to vector graphics (using software like Adobe Illustrator) is the ultimate way to achieve resolution-independent scaling. Vector images are defined by mathematical paths, meaning they can be scaled to any size without pixilation.
While offering unparalleled control, mastering these tools requires a learning curve. Users need to understand concepts like pixel density (DPI/PPI), aspect ratios, and the nuances of various resampling algorithms to achieve optimal results. For complex photo manipulation or artistic digital art, these programs provide the flexibility needed to integrate enlargement seamlessly into a broader creative workflow.
Online Tools for Quick Image Dimension Increase
Not every enlargement task requires a powerful desktop application or deep technical knowledge. For quick, straightforward adjustments, especially for web-specific needs, online image tools provide immense convenience. These web-based platforms allow you to upload an image, specify your desired dimensions or file size, and download the enlarged result, often within seconds.
Tophinhanhdep.com offers a range of online tools designed for efficiency and ease of use. Whether you need to increase an image’s size in kilobytes (KB) to meet a specific upload requirement for an online form, or simply want to scale up an image for social media without much fuss, our online utilities streamline the process.
- Simplicity: No software installation is required; simply visit the website, upload, adjust, and download.
- Accessibility: Accessible from any device with an internet connection, including Mac, Windows, and even mobile platforms.
- Specific File Size Control: Many online tools allow you to specify an output file size in KB, which is invaluable for platform-specific uploads that have strict size limits.
- Batch Processing: Some advanced online tools, including those offered by Tophinhanhdep.com, support batch processing, allowing you to enlarge multiple images simultaneously with consistent settings.
While generally effective for moderate enlargements and web-focused applications, it’s worth noting that purely online tools might not always achieve the same level of detail preservation as dedicated AI upscalers or professional desktop software, especially for very significant scaling factors. However, for everyday needs and when speed is a priority, they are an excellent choice.
Practical Steps for Increasing Image Size
Now that we’ve explored the various methods, let’s look at the practical steps involved in increasing image dimensions using different approaches.
Increasing Image Size on Desktop (Windows/Mac)
For desktop users, whether you’re working on a Windows PC or a Mac, there are distinct approaches to increasing image size and resolution.
Using Tophinhanhdep.com’s Image Editor (Windows)
Our desktop image editor, available for Windows, offers a powerful yet intuitive way to enlarge your photos:
- Install and Launch: Download and install the Tophinhanhdep.com Image Editor on your Windows computer. Once installed, launch the application.
- Import Image: Click on the “Open” button or simply drag and drop your image into the editor’s interface. You can import various image formats including JPEG, PNG, and TIFF.
- Access Enlargement Module: Within the editor, navigate to the specific “Maximizer” or “Enlarge” module. This is where the magic happens.
- Adjust Dimensions: You’ll typically find options to adjust the image’s width and height, either by entering pixel values, percentage, or selecting predefined print sizes. For optimal quality, ensure the aspect ratio is locked to prevent distortion.
- Choose Quality Settings: This is crucial. Our editor provides advanced settings, often including AI-powered options, to ensure that as you increase the dimensions, the software intelligently fills in new pixel data without blur or pixilation. You might be able to select an “Ultra Zoom” feature to scale up to 1000% while preserving original detail.
- Enhance Details (Optional): Some tools allow for additional enhancements like sharpness adjustments or low-light corrections, further improving the output quality.
- Save Changes: Once satisfied with the preview, click the “Save” or “Export” button. Choose your desired output format (e.g., high-quality JPEG, PNG, or TIFF) and select a destination folder.
This process ensures that you’re not just making the image bigger, but also making it a high-resolution photo suitable for demanding applications like printing or intricate digital photography projects.
Increasing Image Size Using Preview on Mac
Mac users have a convenient built-in tool called “Preview” for basic image adjustments, including resizing. While it doesn’t offer AI upscaling, it’s perfect for simple dimension increases.
- Open Image with Preview: Locate your image file in Finder, right-click (or Control-click) it, select “Open With,” and then choose “Preview.”
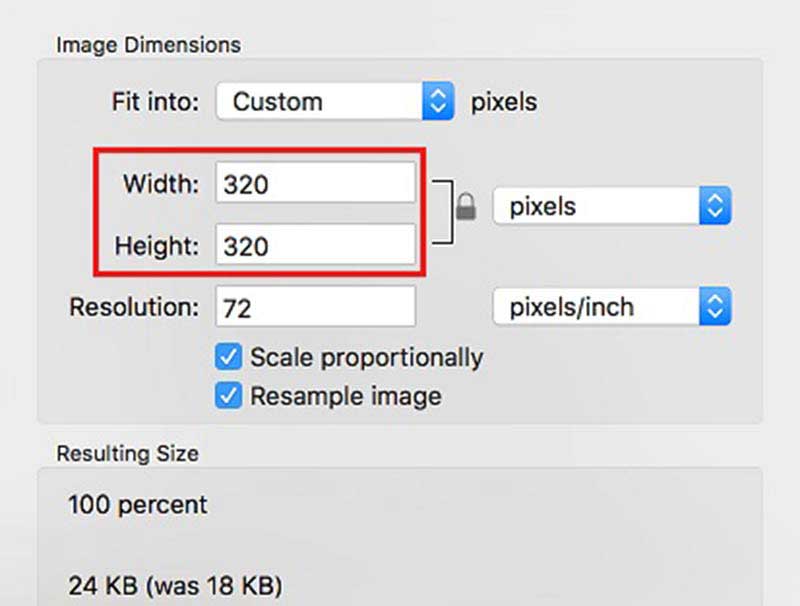
- Access Adjust Size: Once the image is open in Preview, go to the menu bar at the top of your screen, click “Tools,” and then select “Adjust Size…”.
- Modify Dimensions: A dialog box will appear showing the current dimensions and resolution. Ensure the “Scale proportionally” checkbox is ticked to maintain the aspect ratio. You can then enter new values for Width, Height, or Resolution (DPI/PPI). Changing the DPI will affect the print size without changing the pixel dimensions, while changing Width/Height will add or remove pixels.
- Confirm and Save: After entering your desired values, click “OK.” Then, go to “File” > “Save As…” (or “Export…”) to save the resized image as a new file, preserving your original.
Preview is excellent for quick adjustments for web use or reducing image dimensions, but for significant enlargements where quality preservation is paramount, Tophinhanhdep.com’s AI Upscaler or a dedicated desktop editor would be more effective.
Expanding Images for Specific Platforms (Web & Print)
Different platforms and end-uses have distinct requirements for image dimensions and resolution. Understanding these helps you tailor your enlargement strategy.
For Web and Social Media
Online platforms are generally optimized for faster loading times, meaning file size (in KB or MB) often takes precedence over extreme resolution. However, users still expect clear, crisp images.
- Pixel Dimensions: Most social media platforms specify recommended pixel dimensions for profile pictures, cover photos, and feed images. Enlarging your images to these dimensions (e.g., 1080px wide for Instagram) ensures they fill the display area without being stretched.
- File Size (KB/MB): Many websites, especially those with forms for job applications or government portals, have strict limits on file size (e.g., “image must be between 50KB and 200KB”). Tophinhanhdep.com’s online tools are perfect for this, allowing you to specify a target KB size during enlargement. While increasing dimensions, these tools cleverly balance the file size, often by optimizing compression.
- Image Optimization: After increasing dimensions, consider using an image optimizer (also available on Tophinhanhdep.com) to reduce the file size further without significantly impacting visual quality. This ensures fast loading times while maintaining visual appeal.
For Print Projects
Printing requires significantly higher resolution than digital displays to avoid a pixelated appearance.
- DPI (Dots Per Inch): For high-quality prints, a resolution of 300 DPI is standard. Large format prints like banners might accept lower DPI (e.g., 150-200 DPI) because they are viewed from a distance.
- Physical Dimensions: If you want a 20x30 inch print at 300 DPI, your image needs to be 6000x9000 pixels. A small web image of 800x600 pixels would look extremely blurry at this print size.
- AI Upscaling is Key: This is where Tophinhanhdep.com’s AI Upscaler truly shines. It can take a smaller, low-DPI image and intelligently expand its pixel count and resolution to meet print-quality standards, making it possible to print beautiful photography on a grand scale, even from initially smaller source material.
Beyond Enlargement: Maintaining and Enhancing Image Quality
Increasing image dimensions is often just one step in a larger visual design workflow. At Tophinhanhdep.com, we emphasize a holistic approach to image quality.
Start with Quality: The best way to achieve a high-resolution image is to start with one. Whenever possible, capture images at the highest possible resolution your camera allows. If using stock photos, always download the highest available resolution.
Complementary Tools: Our suite of Image Tools extends beyond simple enlargement.
- Image Converters: Convert formats (e.g., PNG to JPEG, HEIC to JPG) to optimize for specific needs.
- Image Compressors: Reduce file size without compromising visual integrity, vital for web performance.
- Image Optimizers: Further refine images for faster loading and better display across devices.
- Image-to-Text: Extract textual information from images, aiding in content management.
Visual Design and Creative Vision: Beyond the technical aspects, image enlargement serves your creative ideas. A larger, high-resolution canvas allows for more sophisticated photo manipulation and the creation of stunning digital art. It ensures that your aesthetic backgrounds, abstract compositions, or sad/emotional photographs retain their impactful details, whether viewed on a screen or as a physical print. Our platform aims to be a source of Image Inspiration & Collections, providing photo ideas, mood boards, and thematic collections that encourage users to push the boundaries of visual expression. High-resolution images are the foundation upon which these creative endeavors are built.
Conclusion
The ability to increase image dimensions and resolution without sacrificing quality is a crucial skill in today’s visual landscape. Whether you’re a beginner needing a quick online fix or a professional requiring advanced AI-driven enlargement, the tools and techniques exist to transform your images.
From leveraging the intelligent power of Tophinhanhdep.com’s AI Upscaler for dramatic quality retention during enlargement, to mastering the precise controls of professional desktop software, or utilizing the convenience of online tools for everyday needs, the path to high-resolution images is more accessible than ever. By understanding the ‘why’ behind dimensions and resolution, and employing the ‘how’ through the right tools, you can ensure your images always leave a lasting, crystal-clear impression. Explore Tophinhanhdep.com today and unlock the full potential of your visual content.