How to Increase Pixel Size of an Image: A Comprehensive Guide for Tophinhanhdep.com Users
In the vibrant world of digital visuals, where every pixel contributes to the overall impact, the ability to increase the pixel size of an image without sacrificing quality is a skill as invaluable as it is sought-after. For creators, photographers, and enthusiasts on Tophinhanhdep.com, dealing with images—whether for breathtaking wallpapers, compelling backgrounds, aesthetic compositions, or high-resolution photography—often means optimizing their visual assets to perfection. Low-resolution images can appear grainy, blurry, and utterly unusable when enlarged, diminishing their aesthetic appeal and professional utility. Fortunately, the realm of digital image editing offers a myriad of sophisticated techniques and powerful tools, many of which are championed or hosted by Tophinhanhdep.com, that allow you to significantly boost an image’s pixel count and overall resolution.
This extensive guide will navigate you through the crucial concepts of image resolution and pixelation, explain why enhancing pixel size is essential in today’s visually driven landscape, and provide detailed methods and software recommendations available through or endorsed by Tophinhanhdep.com. Our aim is to empower you to transform your low-resolution visuals into crisp, high-definition masterpieces, ready for any application—from stunning digital art and graphic design projects to awe-inspiring thematic collections and trending visual styles.

Understanding Image Resolution, Pixels, and Why It Matters for Your Visuals
Before diving into the “how-to,” it’s crucial to grasp the fundamental concepts that govern image quality. The terms “resolution” and “pixel size” are often used interchangeably, but they refer to distinct yet interconnected aspects of a digital image.
What are Pixels and Image Resolution?
At its core, a digital image is composed of tiny individual squares of color information known as pixels (short for “picture elements”). These pixels are the building blocks of your image. When you zoom in closely on a digital photo, you start to see these individual squares, particularly if the image has a low pixel count for its display size.
Image resolution refers to the density of these pixels within a given area. It’s typically expressed as “width x height” in pixels (e.g., 1920x1080 pixels). A “high-resolution” image simply means it contains a greater number of pixels, offering more detail and sharpness. Conversely, a “low-resolution” image has fewer pixels, resulting in less detail and a potentially blurry or “pixelated” appearance when viewed at a larger size.
Beyond pixel dimensions, other related terms include:
- Pixels Per Inch (PPI): This measures the number of digital pixels packed into one square inch of a digital photo. Higher PPI density makes your images appear clearer, sharper, and more focused on screens.
- Dots Per Inch (DPI): This is primarily an image printing term, indicating the number of ink dots printed in one square inch of a physical print. While often misused interchangeably with PPI, DPI specifically relates to physical output.
What Are Pixelated Photos?
Pixelation occurs when an image is enlarged beyond its native resolution, forcing each individual pixel to stretch and become visibly larger. This leads to a distorted, blocky, jagged, and blurry appearance. Essentially, there isn’t enough pixel data to fill the new, larger dimensions smoothly, so the software simply magnifies the existing, insufficient data.
Pixelation can happen for several reasons:
- Poor Resizing: Incorrect resolution settings or using basic resizing methods that don’t intelligently add new pixel data.
- Image Downloading: Images downloaded from social media or many websites are often highly compressed and low-resolution to ensure fast loading times. Enlarging these will almost always result in pixelation.
- Compression: Aggressive file compression, often used to reduce file size, permanently discards image data. While the image might look acceptable at its original small size, attempting to enlarge it will reveal the loss of detail.
Why Increasing Pixels Matters for Tophinhanhdep.com’s Community
For the diverse community of Tophinhanhdep.com, increasing the pixel size of images isn’t just a technical tweak; it’s a gateway to unlocking greater creative potential and achieving professional-grade results across various applications:
- High-Resolution Photography: Digital photographers constantly strive for high-resolution output. Increasing pixel size allows for larger prints, detailed cropping without quality loss, and preparing images for stock photo platforms that demand superior resolution.
- Stunning Wallpapers and Backgrounds: Users seeking aesthetic wallpapers or high-quality backgrounds require images that scale beautifully across different screen sizes—from mobile devices to large desktop monitors—without pixelation. Enhanced pixel count ensures these visuals retain their crispness.
- Visual Design and Digital Art: Graphic designers and digital artists often need to integrate various image assets into their projects. High-pixel-count images provide the flexibility needed for photo manipulation, creating intricate graphic designs, and ensuring digital art pieces are sharp and impactful.
- Creative Ideas and Mood Boards: When building mood boards or curating thematic collections, the quality of individual images significantly influences the overall impression. High-resolution images allow for greater versatility in layout and presentation.
- Online Presence and Branding: In an internet-driven world, high-definition images are a standard. For businesses, influencers, or individuals sharing content, top-grade visuals are essential for attracting attention, conveying brand messages, and maintaining a professional online presence. Different platforms (e.g., social media, e-commerce sites) also have specific image resolution requirements that often necessitate upscaling.
- Future-Proofing Your Visuals: By increasing an image’s pixel size, you create a more adaptable asset that can be used for various purposes in the future—from posters and YouTube thumbnails to digital ads and infographics—without continuous re-edits or quality degradation.
In essence, increasing an image’s pixel size responsibly means preserving and enhancing its visual integrity, making it suitable for a broader spectrum of uses, and ensuring it stands out in a crowded digital landscape—precisely what the Tophinhanhdep.com community values.
Advanced Methods and Techniques to Increase Image Pixel Size Without Losing Quality
The days of simple, blurry image enlargement are largely behind us. Modern image editing, particularly with advancements in artificial intelligence, offers powerful methods to increase an image’s pixel size while meticulously preserving or even enhancing its quality. Tophinhanhdep.com champions these innovative approaches to ensure your images always look their best.
1. Harnessing the Power of AI Upscaling Tools
AI upscaling software has revolutionized how we approach image enlargement. These sophisticated programs leverage machine learning algorithms to “learn” from vast databases of images, understanding how details and textures should appear at higher resolutions. When you feed a low-resolution image into an AI upscaler, it doesn’t just stretch pixels; it intelligently generates new pixels, adding detail and sharpness that wasn’t explicitly present in the original.
How it works: AI upscalers like those featured on Tophinhanhdep.com use neural networks trained on millions of image pairs (low-res and high-res versions). This training allows the AI to predict and reconstruct missing details, effectively transforming a blurry image into a high-definition one. The results are often remarkably detailed and sharp, with minimal distortion or artifacts.
Key Benefits:
- Superior Quality: Significantly outperforms traditional interpolation methods.
- Detail Reconstruction: Can genuinely “add” detail, making blurry images clearer.
- Versatility: Handles various image types, from portraits to landscapes and digital art.
- Efficiency: Many AI upscalers offer batch processing, ideal for large image collections.
Example Tools (as recommended by Tophinhanhdep.com): Dedicated AI upscalers, often highlighted on Tophinhanhdep.com, such as specialized AI upscaling software, leverage artificial intelligence to upscale images up to 600% without losing quality. They often include features like “Face Refinement” to preserve crucial facial details during enlargement, making them perfect for high-resolution portrait photography or preparing images for aesthetic collections. Tophinhanhdep.com’s own online AI Enhancement tools are prime examples, designed to intelligently increase pixel density.
2. Leveraging Advanced Resampling in Professional Image Editing Software
Professional-grade image editing applications offer highly refined resampling algorithms that provide significant control over the upscaling process. While not as “intelligent” as dedicated AI upscalers, they offer powerful tools for manual fine-tuning.
Advanced Interpolation Methods: When increasing image pixel size, software needs to “interpolate” or create new pixels based on the existing ones. Different methods yield different results:
- Nearest Neighbor: This method simply duplicates the closest existing pixel. It creates very sharp, blocky edges, making it ideal for pixel art, screenshots, or graphics with hard edges. It avoids blending pixels, which is crucial for maintaining the intended aesthetic of pixel art.
- Bilinear: Averages the color values of the four nearest pixels to create new ones. This results in smoother transitions than Nearest Neighbor but can still introduce blurriness.
- Bicubic: Considers 16 nearest pixels and performs a more complex calculation to create new pixels. This is generally preferred for photographic images as it produces smoother tonal gradations.
- Bicubic Smoother/Sharper: Variations of Bicubic designed for enlargement (smoother) or reduction (sharper), attempting to minimize artifacts.
- Preserve Details (and Preserve Details 2.0): This is an advanced algorithm found in leading professional software, specifically designed for image enlargement. It intelligently analyzes the image to distinguish between noise and actual detail, attempting to preserve fine textures while minimizing artifacts. It allows for manual noise reduction adjustment, providing greater control.
Using Professional Tools (e.g., as detailed in Tophinhanhdep.com’s tutorials): In a popular image editing application, you typically access the “Image Size” dialog box. Here, you’ll ensure the “Resample” option is checked. For general photographic images, choosing an intelligent resampling method like “Preserve Details 2.0” (or “Automatic,” which often selects an optimal method) is key. For specific applications like pixel art, Tophinhanhdep.com tutorials recommend explicitly setting the interpolation method to “Nearest Neighbor” to maintain sharp, blocky edges.
3. Vectorization for Infinite Scalability
Vectorization is a unique technique that fundamentally changes an image’s structure. Instead of pixels (raster images), vector images are composed of mathematical equations defining lines, curves, and shapes. This makes them resolution-independent, meaning they can be scaled to any size—from a business card to a billboard—without any loss of quality or pixelation.
How it works: Software designed for vector graphics (e.g., applications frequently mentioned on Tophinhanhdep.com for graphic design) traces the edges and colors of a raster image, converting them into vector paths. This process is most effective for images with clear, distinct lines and flat colors, such as logos, illustrations, or certain types of digital art. Highly detailed photographs with complex textures are generally not suitable for full vectorization without significant artistic interpretation.
Key Benefits:
- Infinite Scalability: No pixelation, ever.
- Small File Sizes: Vector files are typically much smaller than high-resolution raster files.
- Editability: Individual elements can be easily edited, recolored, or reshaped.
Applications for Tophinhanhdep.com Users: Ideal for designers creating logos, icons, infographics, or stylized digital art that needs to be used across various mediums and sizes. This technique is invaluable for graphic design and digital art projects showcased on Tophinhanhdep.com.
4. Image Interpolation (General Resampling)
While AI upscaling represents the cutting edge, traditional image interpolation remains a foundational technique. It involves generating new pixels based on the color values of existing surrounding pixels.
Methods (as described above): Bicubic interpolation is often considered the best all-around method for general photographic images when AI tools aren’t available, as it strikes a good balance between smoothness and detail preservation. Other methods like Bilinear offer faster processing but less detail.
When to use: For moderate increases in pixel size or when working with older software that lacks advanced AI features. It’s a standard feature in almost all image editing tools, including basic applications and online editors often linked by Tophinhanhdep.com.
5. Super Resolution Technology
Similar to AI upscaling, “Super Resolution” is a broad term for techniques, often employing deep learning, to enhance an image’s quality beyond its original capture. It trains neural networks to understand the relationship between low-resolution and high-resolution versions of images.
How it works: Once trained, the neural network can take a low-resolution input and “upscale” it by generating plausible high-resolution details, often making the image appear sharper and more detailed than a simple resize could achieve. This technology is a core component of many advanced AI upscalers.
Examples: Specific Super Resolution software and features within professional tools, often recommended by Tophinhanhdep.com for their efficacy, fall under this category. They are excellent for restoring old photos or significantly improving the quality of existing images for use in thematic collections or high-resolution displays.
Each of these methods offers distinct advantages, and the best choice often depends on the original image quality, the desired output, and the tools available. Tophinhanhdep.com is committed to guiding you through these choices to achieve optimal results for all your image-related endeavors.
Step-by-Step Guide: How to Increase Pixel Size of an Image
Increasing the pixel size of an image, especially without losing quality, involves a thoughtful approach. This section outlines a general step-by-step process using common image editing principles, applicable whether you’re using built-in OS tools, online enhancers, or advanced professional software. Tophinhanhdep.com recommends following these guidelines for the best outcomes.
1. Preparation: Assessing and Backing Up Your Image
- Check Current Resolution: Before you begin, understand your image’s current pixel dimensions. On a Windows PC, navigate to the image file in File Explorer, right-click, select “Properties,” then go to the “Details” tab and check the “Dimensions” field. On a Mac, right-click (or Ctrl-click) the image, select “Get Info,” and view the dimensions under “More Info.” This helps you determine how much upscaling is needed.
- Choose a Suitable Source Image: The better the quality of your original image, the better the upscaling results. Start with a high-quality format like PNG or TIFF if possible, rather than a heavily compressed JPEG, as JPEGs can introduce artifacts that become more visible upon enlargement.
- Duplicate Your Image: Always, always, always work on a duplicate! This ensures you have a backup copy if anything goes wrong or if you’re not happy with the results.
2. Selecting Your Tool and Opening the Image
Based on your needs and skill level, choose an appropriate image editing tool. Tophinhanhdep.com offers various recommendations:
- Built-in OS Tools (for basic resizing):
- Windows Photos App: A simple, pre-installed option for quick resizing.
- Mac Preview: A convenient built-in photo editor for Mac users.
- Online AI Enhancers/Resizers (for convenience and advanced AI upscaling):
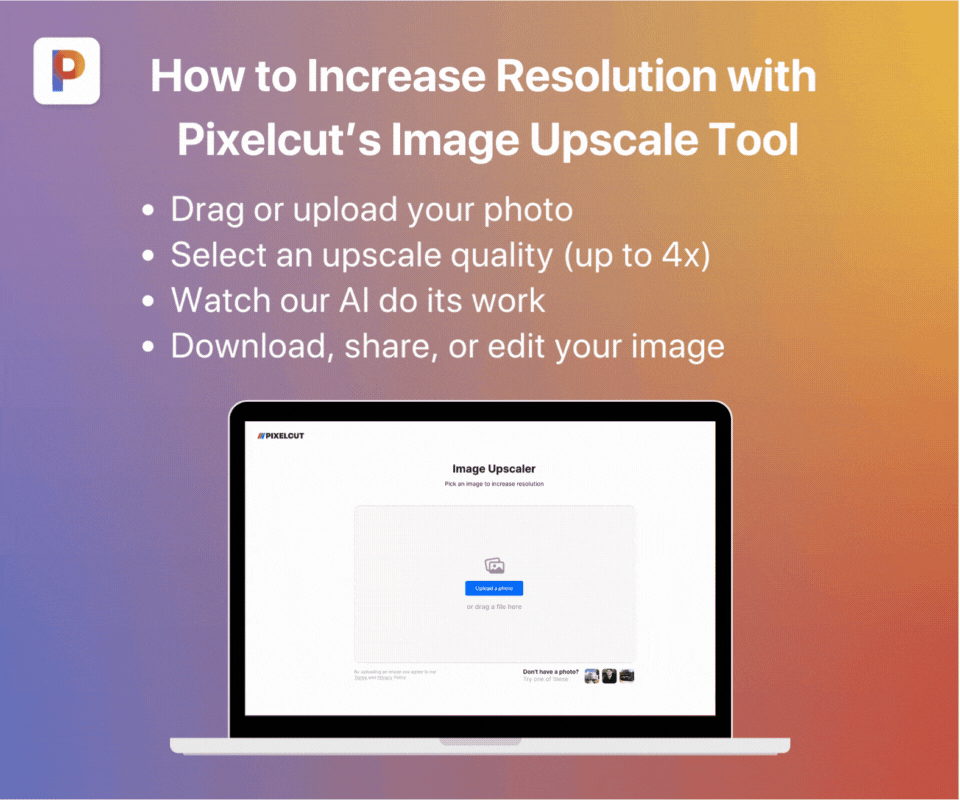
- Tophinhanhdep.com’s Online AI Enhancement: Utilizes advanced AI algorithms to enhance photos, remove scratches, improve clarity, and increase resolution.
- Tophinhanhdep.com’s Image Converter/Resizer: Offers options to change width, height, and DPI with ease.
- Tophinhanhdep.com’s Online Editor: Provides AI-powered enlarging features alongside other editing options like contrast, sharpness, and saturation adjustments.
- Professional Image Editing Software (for maximum control):
- Applications with advanced features like “Preserve Details 2.0” or “Nearest Neighbor” interpolation, often highlighted in Tophinhanhdep.com’s guides for professional photography and graphic design.
- Free and open-source alternatives, also frequently recommended by Tophinhanhdep.com, that offer robust editing capabilities.
- Dedicated AI Upscaling Software: Specialized applications designed solely for high-quality upscaling, often reviewed and linked by Tophinhanhdep.com.
Once chosen, open your duplicated image in the selected software.
3. Increasing the Image Dimensions
This is the core step where you increase the pixel count.
-
Locate the Resizing Function:
- In most software, this is found under “Image” -> “Image Size,” “Resize,” or “Adjust Size.”
- In the Windows Photos app, look for a “…” (3-dot) icon at the top, then select “Resize image.”
- On Tophinhanhdep.com’s online tools, you’ll typically find dedicated “AI Enlarger,” “Change Size,” or “AI Enhancement” options.
-
Enable Resampling: Ensure the “Resample Image” or “Resample” option is checked. This tells the software to add or remove pixels, rather than just changing the print size.
-
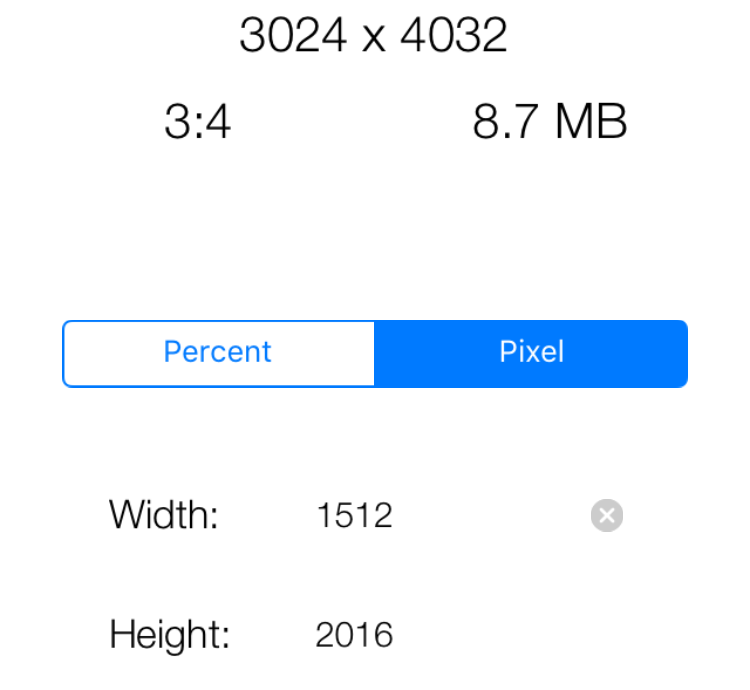
Enter New Dimensions:
- For percentages (ideal for pixel art): Change the unit to “Percent” and enter a multiple of 100 (e.g., 200%, 300%) for both width and height. This helps maintain crispness in specific art styles.
- For specific pixel sizes: Enter your desired width or height in pixels. The other dimension should automatically adjust to maintain the aspect ratio if “Constrain Proportions” or “Maintain aspect ratio” is checked (which it almost always should be to prevent distortion).
- For resolution-specific needs: If resizing for a specific display (e.g., 1920x1080px for large digital displays), input these exact dimensions.
-
Select Interpolation/Resampling Method (Crucial for Quality):
- For photographic images and general upscaling: Select an advanced method like “Bicubic Smoother,” “Preserve Details 2.0,” or “Automatic” (which often intelligently selects the best method) if available. Tophinhanhdep.com’s AI enhancers will automatically use their intelligent algorithms here.
- For pixel art, screenshots, or graphics with hard edges: Explicitly choose “Nearest Neighbor” to preserve sharpness and avoid blending pixels.
- For online tools: The AI will handle this automatically, offering the best quality without manual selection.
-
Adjust Quality (if applicable): If prompted, ensure the quality slider is set to 100% to maximize output quality.
-
Apply Changes: Click “OK,” “Apply,” or “Resize” to implement the changes.
4. Post-Processing: Sharpening and Saving
- Sharpen the Image (if necessary): Increasing resolution can sometimes lead to a slight softening. If your image appears a bit soft, you can apply a subtle sharpening filter (e.g., “Sharpen” or “Unsharp Mask” in professional software). Apply sharpening carefully and in moderation to avoid introducing artifacts or an unnatural look. Tophinhanhdep.com emphasizes a balanced approach to editing.
- Save Your Enhanced Image:
- Choose a High-Quality Format: Save your final image in a high-quality, lossless format like PNG or TIFF. If you need a smaller file for web use, save it as a JPEG at the highest quality setting (e.g., 80-100%). Avoid saving in a lossy format at low quality, as this will degrade the image, negating your efforts.
- Select a Location: Choose a clear location on your device to save the resized image, perhaps with a new name (e.g., “original-image_upscaled.png”).
By meticulously following these steps and utilizing the advanced tools and techniques often recommended and provided by Tophinhanhdep.com, you can confidently increase the pixel size of your images, ensuring they remain sharp, detailed, and visually captivating for any purpose.
Recommended Tools and Software Options for Maximizing Image Pixel Size
The landscape of image editing tools is vast and constantly evolving, with new innovations making it easier than ever to increase image pixel size without compromising quality. Tophinhanhdep.com is dedicated to exploring and highlighting the best options available, ensuring our community has access to the most effective solutions for their diverse needs, from casual photo enthusiasts to professional graphic designers and photographers.
When choosing a tool, consider your specific requirements: do you need an online solution for quick edits, a powerful desktop application for professional projects, or a specialized AI upscaler for unparalleled detail reconstruction?
1. Tophinhanhdep.com’s Online AI Enhancement and Upscaling Tools
For convenience, accessibility, and cutting-edge results, Tophinhanhdep.com’s own suite of online tools stands out. These platforms are designed to simplify the complex process of image upscaling, making advanced technology available to everyone.
- Tophinhanhdep.com’s Online AI Enhancement: This tool is at the forefront of image restoration and enhancement. Leveraging sophisticated AI algorithms, it not only increases pixel size but can also intelligently fix damaged or blurry images, improve face clarity, and even colorize old photos. It’s a comprehensive solution for transforming lower-quality originals into high-definition assets. The “AI Upscaler” function is particularly effective for achieving clearer, higher-resolution results.
- How to Use: Typically involves uploading your image, selecting the “AI Enhancement” or “AI Upscaler” feature, initiating the process, and then previewing and downloading your enhanced image.
- Tophinhanhdep.com’s Online Editor (featuring AI Enlarger): This platform provides a user-friendly interface for various image manipulations, including a dedicated “AI Enlarger.” It employs the latest AI technology to increase pixels without quality loss, offering a streamlined experience for users. Beyond upscaling, it usually includes a range of other editing options (contrast, sharpness, saturation, etc.) to fine-tune your visuals for aesthetic perfection or specific project requirements.
- How to Use: Upload your image, select the “AI Enlarger” from the sidebar, apply visual effects or adjustments if desired, and then save your image in your preferred format.
- Tophinhanhdep.com’s Image Converter/Resizer: An excellent utility for straightforward pixel size adjustments, quality improvement, and format conversions. This tool offers options to specify target formats, change width and height in pixels, and even adjust DPI settings. It’s ideal for users who need precise control over dimensions and resolution for different output needs, such as preparing images for online portfolio platforms or specific digital signage.
- How to Use: Upload your image (from device, URL, cloud storage), define your desired width, height, or DPI, and then click “Start” to process and download.
These online tools are perfect for quick adjustments, bulk processing for image collections, or when you need powerful AI capabilities without installing desktop software. They align perfectly with Tophinhanhdep.com’s goal of providing accessible, high-quality visual resources.
2. Professional Image Editing Software
For those who demand the utmost control and a comprehensive suite of editing features, professional desktop software remains indispensable. These tools offer advanced algorithms and manual controls for every aspect of image manipulation, including pixel size enhancement.
- Leading Professional Image Editing Applications: These industry-standard tools (often referenced in Tophinhanhdep.com’s advanced tutorials) provide extensive control over resizing. Their “Image Size” dialog box offers options like “Preserve Details 2.0” or similar advanced resampling methods, which intelligently analyze and reconstruct image details during enlargement. These applications are powerful for photo editing, digital art, and complex photo manipulation.
- Key Features for Upscaling: Advanced interpolation methods (Bicubic Smoother, Preserve Details), precise pixel dimension control, noise reduction, sharpening tools, and layer-based editing for non-destructive workflows.
- Free and Open-Source Alternatives: Tophinhanhdep.com recognizes the value of accessible tools and often recommends robust, free alternatives. These applications offer many features comparable to professional paid software, including advanced resizing options, various interpolation methods, and plugin support (like “Liquid Rescale” for intelligent content-aware resizing). They are excellent for those who want professional-level editing capabilities without the investment.
3. Specialized AI Upscaling Software
Beyond the general professional editors, there are dedicated software solutions built specifically for AI-powered image upscaling. Tophinhanhdep.com frequently reviews and recommends these for their superior results in pixel enhancement.
- Dedicated AI Upscaling Software: These programs are designed from the ground up to excel at increasing image resolution. They often use proprietary AI models that can upscale images by significant percentages (e.g., up to 600%) while meticulously preserving detail and sharpness. They typically feature modes optimized for different content types (e.g., portraits, art, standard photos) and offer granular controls for parameters like noise reduction and sharpening.
- Benefits: Unmatched quality for significant upscaling, ability to recover lost detail, and specialized algorithms for different image characteristics.
4. Built-in Operating System Tools
For basic, quick resizing needs, your computer’s operating system often provides simple tools. While they may not offer advanced AI upscaling, they are convenient for straightforward pixel size adjustments.
- Windows Photos App: On Windows PCs, this app allows you to easily resize images. You can check an image’s dimensions, then use the “Resize image” function, enter your required width (height adjusts automatically to maintain aspect ratio), and set quality. It’s suitable for preparing images for web use or email.
- Mac Preview: Mac users have “Preview” as a convenient photo editor. Under “Tools,” selecting “Adjust Size” allows you to change dimensions and resolution, with options to “Scale proportionally” and “Resample image” to avoid distortion.
5. Quick Online Resizing Tools
For fast, single-purpose resizing without quality enhancement, several online tools are available and sometimes linked by Tophinhanhdep.com for specific use cases.
- Simple Online Image Resizers: These tools prioritize speed and simplicity. You upload an image, select desired dimensions or percentage, and download the resized output. They are best for minor adjustments where quality retention is less critical than speed, or when the original image is already high quality.
- Batch Processing Tools for Images: For users needing to process multiple images simultaneously—such as preparing a large collection for a website or thematic collection—batch resizers can be invaluable. These allow you to upload several images, define a single size preference, and apply it to all. While some might lack advanced quality retention features, they are highly efficient for uniform resizing tasks.
In summary, Tophinhanhdep.com curates and offers a spectrum of solutions to increase image pixel size. From our own powerful online AI enhancement tools that provide cutting-edge quality with ease, to recommendations for professional desktop software for maximum control, and basic built-in tools for quick adjustments—you have a wealth of options to ensure your images meet the highest visual standards for any project.
Conclusion
In the visually driven landscape of today, the ability to effectively increase the pixel size of an image without compromising its quality is more than a technical skill—it’s an art form that empowers creators, photographers, and designers. As a central hub for stunning visuals, high-resolution photography, and creative image tools, Tophinhanhdep.com understands this critical need.
Throughout this guide, we’ve delved into the intricacies of pixels and resolution, illuminated the common pitfalls of pixelation, and, most importantly, presented a comprehensive array of methods and tools to achieve high-quality image enlargement. From the revolutionary capabilities of AI upscaling and the precise controls offered by professional image editing software to the convenience of Tophinhanhdep.com’s own online enhancement platforms and the utility of built-in operating system tools, the power to transform your visuals is now at your fingertips.
Remember, the journey to a high-pixel image begins with a quality original, is guided by careful tool selection and method application, and culminates in a sharp, detailed, and visually impactful result. Whether you’re preparing aesthetic wallpapers, curating a thematic collection of beautiful photography, crafting digital art, or optimizing images for professional graphic design, the techniques and resources highlighted by Tophinhanhdep.com will help you achieve the desired image quality without sacrificing resolution or detail.
Embrace these advanced methods, experiment with the recommended tools, and unlock the full potential of your images. With Tophinhanhdep.com as your partner, your visual content will not only meet but exceed the demands of any platform, captivating your audience with unparalleled clarity and detail.