How to Increase the Quality of an Image: A Comprehensive Guide

In the dynamic world of visual content, image quality isn’t just a preference—it’s a necessity. From breathtaking wallpapers and aesthetic backgrounds to professional stock photos and intricate digital art, the clarity, detail, and resolution of an image fundamentally determine its impact and utility. A low-quality image can undermine a powerful message, diminish visual appeal, and even render content unusable for certain applications like large prints or intricate graphic design.
At Tophinhanhdep.com, we understand the paramount importance of high-resolution imagery across all facets of visual creativity. Our platform, dedicated to providing a vast array of beautiful photography, digital art, and essential image tools, regularly fields questions on how to transform mediocre visuals into stunning, high-quality assets. This guide delves deep into the art and science of increasing image quality, exploring both traditional and cutting-edge methods to ensure your visuals always stand out. Whether you’re a professional photographer aiming for pixel-perfect prints, a graphic designer needing pristine elements, or simply an enthusiast looking to enhance personal photos, mastering image quality enhancement is a game-changer.
Understanding Image Quality and Resolution: The Foundation of Visual Excellence
Before we dive into the “how,” it’s crucial to grasp the “what.” What exactly constitutes image quality, and why is resolution such a central component? A clear understanding of these foundational concepts will empower you to make informed decisions throughout the enhancement process, ensuring that every effort yields tangible improvements rather than mere alterations.

What Defines Image Resolution?
At its core, image resolution refers to the amount of detail an image holds. This detail is quantified by the number of pixels, or “picture elements,” that make up the image. Pixels are the tiny individual squares that form a grid to display an image. The more pixels an image contains, particularly per unit of measurement (like pixels per inch, or PPI, for digital displays, or dots per inch, DPI, for print), the higher its resolution.
Consider an image with dimensions of 8000 x 6000 pixels. This means it has 8000 pixels across its width and 6000 pixels along its height. Multiplying these figures gives us a total of 48 million pixels, or 48 megapixels (MP). A higher pixel count directly translates to more visual information, allowing for greater detail, smoother color transitions, and the ability to view or print the image at larger sizes without noticeable degradation, such as pixelation (where individual pixels become visible, making the image appear blocky).
Beyond pixel dimensions, other factors also influence perceived image quality:
- Sharpness: How well-defined the edges and details are within an image.
- Noise: Random variations in brightness or color information that create a grainy appearance.
- Color Accuracy: How faithfully the colors in the image represent the original scene or artistic intent.
- Dynamic Range: The spectrum of light and shadow captured, from the darkest blacks to the brightest whites.
- Compression: The process of reducing file size, often at the cost of some image data (e.g., JPEG is a “lossy” compression format).
Understanding these elements helps in identifying specific areas for improvement. While resolution directly impacts the potential for detail, addressing sharpness, noise, and color fidelity are equally vital for a truly high-quality image.
Why Enhance Image Quality? The Imperative for Flawless Visuals
The motivation to increase image quality is multi-faceted, driven by both practical and aesthetic considerations pertinent to the diverse applications showcased on Tophinhanhdep.com:

- For Printing: Perhaps the most common reason. A low-resolution image printed at a large size will appear blurry, pixelated, and unprofessional. High resolution ensures crisp details, smooth gradients, and vibrant colors even in large-format prints, making it ideal for art prints, posters, or canvases.
- For Cropping: Photographers often capture scenes wider than their final desired composition. Higher-resolution images allow for significant cropping without sacrificing detail, providing flexibility in post-production and enabling creative ideas for thematic collections.
- For Professional Use: Stock photos, digital photography portfolios, and e-commerce product images demand impeccable quality. High-resolution images convey professionalism and build trust, crucial for photographers looking to feature their work or for businesses seeking impactful visual design.
- For Digital Display: While screens are more forgiving than print, higher resolution still matters. Images for high-definition wallpapers, backgrounds, or social media aesthetics look significantly better when optimized for quality, offering a richer, more immersive viewing experience.
- For Photo Manipulation and Graphic Design: When performing digital art, photo manipulation, or graphic design, starting with a high-quality base image is critical. It provides more data to work with, allowing for seamless edits, complex composites, and the integration of intricate elements without introducing artifacts or compromising the final output.
- Preserving Memories: Old photographs, once scanned, often yield low-resolution digital files. Enhancing their quality can breathe new life into cherished memories, making them suitable for modern display or archiving.
In essence, enhancing image quality is about unlocking the full potential of a visual asset, allowing it to be used flexibly and effectively across various mediums while consistently delivering visual excellence.
Traditional Software-Based Enhancement: Mastering Pixel Manipulation
For decades, professional photographers and designers have relied on powerful image editing software to refine and enhance their images. These tools offer granular control over every aspect of an image, making them indispensable for complex adjustments, including increasing resolution. The process, often referred to as “upsampling” or “resampling,” involves adding new pixels to an image based on existing data.
Adobe Photoshop: The Industry Standard for Image Enhancement
Adobe Photoshop remains the undisputed heavyweight in the realm of image manipulation. Its sophisticated algorithms and extensive feature set make it a go-to choice for increasing image resolution while striving to preserve detail. The process in Photoshop is largely centered around the “Image Size” dialogue, which allows users to control pixel dimensions and resolution.
Understanding Resampling in Photoshop: When you increase the size of an image in Photoshop, you are “resampling” it. This means Photoshop creates new pixels where none existed before. The quality of this process depends heavily on the interpolation method chosen, which dictates how Photoshop calculates the values of these new pixels based on their neighbors.
Steps to Increase Resolution in Adobe Photoshop:
- Open Your Image: Launch Photoshop and open the image you wish to enhance.
- Access Image Size: Navigate to
Image > Image Size(or pressAlt+Ctrl+Ion Windows,Option+Cmd+Ion Mac). This opens the Image Size dialog box, displaying current dimensions and resolution. - Set Dimensions and Resolution:
- Link Dimensions: Ensure the chain icon between width and height is active to maintain the aspect ratio.
- Change Units: For ease of use, you can change the measurement units to “Percent” if you want to scale by a factor, or “Pixels” if you have a target pixel dimension.
- Adjust Resolution: While changing pixel dimensions will automatically update the resolution (and vice-versa), you can directly set your desired resolution (e.g., 300 DPI for print).
- Input New Values: Enter your desired width, height, or resolution.
- Crucial: Enable Resample: Make sure the “Resample” checkbox is ticked. This tells Photoshop to add new pixels. If unchecked, changing dimensions only affects print size without altering pixel count.
- Choose an Interpolation Method: This is critical for quality preservation:
- Automatic (Default): Photoshop attempts to select the best method based on your image and scaling.
- Preserve Details 2.0 (Enlargement): This is the most advanced option in recent Photoshop versions (CC 2018 and later), specifically designed for upscaling. It uses machine learning to intelligently add pixels and preserve details, often reducing noise. To enable it, go to
Edit > Preferences > Technology Previewsand tick “Enable Preserve Details 2.0 Upscale.” - Bicubic Smoother (Enlargement): A good general-purpose method that produces smoother results, ideal for images with gradual color transitions.
- Bicubic Sharper (Reduction): Primarily used for downsampling (reducing size) as it sharpens edges. Avoid for enlargement.
- Bicubic: A more complex method that examines surrounding pixels. Generally good for most scaling.
- Preview and Confirm: As you make changes, Photoshop often provides a preview. Examine critical areas of your image for detail and unwanted artifacts. Once satisfied, click “OK.”
- Refine Sharpness (Optional): After upsampling, images might appear slightly soft. You can apply sharpening filters:
- Go to
Filter > Sharpen > Unsharp MaskorFilter > Sharpen > Smart Sharpen. - Adjust “Amount,” “Radius,” and “Threshold” sliders carefully. Over-sharpening can introduce halos or noise.
- Go to
- Save Your Work: Go to
File > Save Asto save your enhanced image, preferably in a non-lossy format like TIFF or PNG if further editing is planned, or a high-quality JPEG for distribution.
While Photoshop offers immense control, resampling still involves educated guesswork by the software. It cannot magically invent details that were never present. The key is to start with the best possible original image and use the most appropriate interpolation method.
GIMP: A Free and Powerful Alternative for Image Resolution Adjustment
For those who don’t have access to Adobe Photoshop or prefer open-source software, GIMP (GNU Image Manipulation Program) stands as a robust and free alternative. While its interface might take some getting used to, GIMP offers powerful tools for image enhancement, including the ability to adjust image resolution.
Steps to Increase Resolution in GIMP:
- Open Your Image: Launch GIMP and open the image you intend to modify.
- Access Scale Image: Go to
Image > Scale Imagefrom the menu bar. This will open the “Scale Image” dialog box. - Set New Dimensions:
- Lock Aspect Ratio: Ensure the chain icon next to “Width” and “Height” is linked to maintain proportions.
- Adjust Resolution: You can enter your desired resolution in the “X Resolution” and “Y Resolution” fields. Typically, changing one will automatically update the other if linked.
- Input New Pixel Values: Directly enter new values for width and height in pixels.
- Choose Interpolation Quality: In the “Quality” section, select an interpolation method from the dropdown. “Cubic” is generally recommended for upscaling as it produces smoother results compared to “Linear” or “None.”
- Scale and Review: Click the “Scale” button to apply the changes. Review your image for quality.
- Optional Sharpening: Similar to Photoshop, you may find that the image appears slightly soft after scaling. You can apply sharpening by going to
Filters > Enhance > Sharpen (Unsharp Mask). Adjust the “Radius,” “Amount,” and “Threshold” carefully. - Export Your Image: GIMP uses its own native
.xcfformat for projects. To save your enhanced image in a common format, go toFile > Export As...and choose JPEG, PNG, or TIFF, then click “Export.”
GIMP, despite being free, provides considerable functionality for improving image quality, making it a valuable tool, especially for those venturing into digital photography and editing styles without an initial investment in commercial software.
Leveraging AI for Superior Image Upscaling: The Future of Quality Enhancement
The advent of Artificial Intelligence and Machine Learning has revolutionized image processing, offering capabilities that far surpass traditional methods of upsampling. AI-powered upscalers don’t just add pixels; they intelligently analyze and reconstruct image details, effectively “guessing” what the missing information should look like based on vast datasets of images. This results in significantly higher quality enlargements with minimal loss of fidelity or introduction of artifacts. Tophinhanhdep.com, with its focus on advanced Image Tools like AI Upscalers, recognizes this as a pivotal advancement for high-resolution photography and digital art.
The Power of AI-Driven Enhancers
Unlike conventional software that relies on interpolation algorithms to average surrounding pixel data, AI upscalers are trained on millions of images. This training allows them to recognize patterns, textures, and structures within an image. When asked to enlarge a photo, the AI doesn’t just stretch pixels; it generates new, plausible details, effectively “dreaming up” what a higher-resolution version of the image would genuinely look like.
Key advantages of AI upscaling include:
- Detail Reconstruction: AI can recover fine textures, sharpen edges, and even reduce noise and JPEG artifacts that were present in the original low-resolution image.
- Natural Results: The generated details often look more natural and less “blurry” or “pixelated” than those produced by traditional interpolation.
- Significant Scaling: AI tools can often scale images by 4x, 6x, or even more, maintaining impressive quality, which is crucial for large prints or visual design projects.
- Face Refinement: Many advanced AI upscalers incorporate facial recognition, specifically enhancing facial features to maintain natural appearance even after substantial enlargement.
These capabilities are particularly beneficial for increasing the quality of scanned old photos, preparing small web images for print, or enhancing lower-resolution digital art for high-definition display.
Step-by-Step with an AI Upscaler (General Approach)
While specific AI upscaling tools might have slightly different interfaces, the general workflow remains intuitive and user-friendly. Many leading platforms offer dedicated AI upscaling software or online services that automate much of the complex processing.
General Steps for Using an AI Upscaler:
- Select Your AI Tool: Choose a reputable AI image upscaling software or an online AI enhancer. Many offer free trials or a limited number of free images to process.
- Upload Your Image: Open the software or navigate to the online platform. You’ll typically find a prominent “Upload Image” or “Drag and Drop” area. Select the low-resolution image you wish to enhance. Most tools support common formats like JPEG, PNG, and TIFF.
- Choose Scaling Factor/Enhancement Mode:
- Scaling Factor: Most AI upscalers allow you to choose how much you want to enlarge the image (e.g., 2x, 4x, 6x, or custom dimensions).
- Enhancement Presets: Some tools offer specific modes, such as “Standard,” “Art,” “Photo,” or “Face Enhance,” which optimize the AI’s processing for different types of images.
- Adjust Settings (Optional): Many tools provide sliders for fine-tuning, such as:
- Noise Reduction: To eliminate graininess.
- Sharpening/Blur Removal: To crisp up soft details.
- Face Refinement: To ensure natural-looking faces in portraits.
- Color Correction: To improve vibrancy and accuracy.
- Often, an “Auto” setting leverages the AI’s intelligence to make the best adjustments.
- Preview the Result: The AI tool will typically process a preview of your enhanced image. Most platforms offer a side-by-side comparison with the original, allowing you to scrutinize the improvements in detail and sharpness.
- Process and Download: Once satisfied with the preview, initiate the full processing. Depending on the image size and chosen scaling factor, this can take a few seconds to several minutes. After processing, download your new, high-resolution image to your computer or device.
The results from AI upscalers can be astonishing, often making previously unusable low-resolution images perfectly viable for large prints, detailed visual design elements, or high-definition aesthetic collections. They represent a significant leap forward in image quality enhancement, aligning perfectly with Tophinhanhdep.com’s vision for delivering exceptional visuals.
Online Tools and Mobile Solutions for Quick Enhancements
Not everyone needs a professional desktop application or has the time for intricate software adjustments. For quick enhancements, convenient access, or on-the-go editing, online image tools and mobile applications offer practical solutions to boost image quality. These platforms leverage simplified interfaces and often integrate AI capabilities to deliver satisfactory results without a steep learning curve. Tophinhanhdep.com also highlights such converters, compressors, and optimizers as essential Image Tools for creators seeking efficient workflows.
Web-Based Upscaling for Accessibility
Online image enhancers are accessible directly through a web browser, eliminating the need for software installation. This makes them incredibly convenient for users who need to enhance an image quickly from any device with an internet connection. Many of these services offer basic resizing and quality improvement features, while others incorporate sophisticated AI algorithms similar to dedicated desktop software.
Advantages of Online Enhancers:
- No Installation Required: Simply visit a website and start enhancing.
- Cross-Platform Compatibility: Works on Windows, Mac, Linux, or even mobile browsers.
- User-Friendly Interfaces: Designed for ease of use, often with drag-and-drop functionality.
- Basic to Advanced Features: From simple resizing to AI-powered upscaling and artifact removal.
General Steps for Using an Online Image Enhancer:
- Choose an Online Platform: Several reputable online tools are available that offer image upscaling and quality enhancement. Look for platforms that prioritize user privacy and offer a good balance of features and ease of use.
- Upload Your Image: Click the “Upload” button or drag and drop your low-resolution image onto the designated area.
- Select Enhancement Options:
- Desired Size/Scale: Specify the new dimensions (e.g., 200% larger, 1920x1080 pixels) or a scaling factor (e.g., 2x, 4x).
- Quality Presets: Some platforms offer “enhance” or “super-resolution” options that automatically apply internal algorithms for improvement.
- Other Adjustments: Look for options like “sharpen,” “denoise,” or “remove JPEG artifacts” if available.
- Process and Download: Initiate the enhancement. The website will process your image, and a preview might be available. Once complete, download the higher-quality image. Keep an eye on file size, as larger resolutions can lead to larger files.
These online tools are excellent for enhancing images for social media, updating blog post visuals, or quickly preparing images for aesthetic collections on platforms like Tophinhanhdep.com.
Enhancing Images on the Go with Mobile Apps
With the proliferation of powerful smartphones, mobile apps have emerged as viable solutions for image quality enhancement. These apps cater to users who want to edit and improve their photos directly on their devices, whether captured with a phone camera or sourced from elsewhere. Many popular photo editing apps now include features for resizing, sharpening, noise reduction, and even AI-powered upscaling.
Benefits of Mobile Photo Enhancers:
- Convenience: Edit anytime, anywhere, directly from your phone.
- Intuitive Touch Interfaces: Designed for easy navigation and adjustment.
- Integrated with Camera Roll: Seamless access to your device’s photo library.
- Shareability: Easily share enhanced images to social media or messaging apps.
General Steps for Using a Mobile Photo Enhancement App:
- Install a Photo Editor App: Download a reputable photo editing app with enhancement features from your device’s app store. Apps known for their upscaling capabilities often advertise “AI enhance” or “super resolution.”
- Import Your Photo: Open the app and select the option to import a photo from your camera roll or gallery. You might also be able to take a new photo directly within the app.
- Navigate to Enhancement Tools: Look for tools related to “Resize,” “Resolution,” “Enhance,” “Sharpen,” or “Detail.”
- Adjust Settings:
- Resizing: Enter desired pixel dimensions or choose from preset sizes.
- Quality Enhancements: Apply automatic enhancement features or manually adjust sliders for sharpness, noise reduction, and color correction. Some AI-driven apps will have a simple “Enhance” button that does most of the work.
- Cropping: Use cropping tools to refine the composition after increasing resolution.
- Save/Export: Once satisfied, save the modified image back to your phone’s gallery. Most apps also offer direct sharing options to various social media platforms.
Mobile apps are perfect for refining sad/emotional images, making quick edits to nature shots, or ensuring your backgrounds and wallpapers look their best on a mobile device. They empower casual users and content creators to maintain high visual standards even when a desktop setup isn’t available.
Best Practices for Maintaining and Achieving High-Quality Images
While techniques to increase image quality after the fact are invaluable, the best approach always begins with foundational practices that prioritize quality from capture to final output. Integrating these principles into your workflow ensures that any post-processing enhancement starts from the strongest possible base. Tophinhanhdep.com advocates for a holistic approach to visual excellence, encompassing initial photography skills to final image optimization.
Shooting for Quality: Foundations of Digital Photography
The quality of an image cannot magically exceed the quality of its original capture. Therefore, solid photography fundamentals are the first line of defense against low-quality images.
- High-Resolution Capture: Always shoot at the highest possible resolution your camera allows. More pixels captured initially means more data to work with, providing greater flexibility for cropping, printing, and later enhancement. This aligns perfectly with the “High Resolution” aspect of Digital Photography featured on Tophinhanhdep.com.
- Proper Focus and Sharpness: Ensure your subject is in sharp focus. Blurry images are notoriously difficult to fix convincingly, even with advanced software or AI. Utilize your camera’s autofocus effectively or master manual focusing.
- Good Lighting: Adequate and appropriate lighting is crucial. Poorly lit images often suffer from excessive noise and lack of detail, which are challenging to rectify. Natural light is often preferred, but understanding artificial lighting is also key.
- Correct Exposure: Avoid underexposed (too dark) or overexposed (too bright) images. Extreme exposure issues can lead to lost detail in highlights and shadows, hindering quality restoration.
- Shoot in RAW Format: If your camera supports it, shoot in RAW format. RAW files contain uncompressed, unprocessed image data directly from the camera sensor, offering maximum flexibility for editing (exposure, white balance, color, sharpness) without quality loss. JPEGs, being compressed, already discard some information at the point of capture. This is a core tenet of professional Digital Photography.
- Stable Shooting: Use a tripod or ensure a steady hand to minimize camera shake, which causes blur.
By adhering to these basic photography principles, you lay a robust foundation for any subsequent quality enhancement, making the job of upscaling software much easier and the results far more impressive.
File Formats and Compression: Balancing Quality and Size
The choice of file format and understanding compression are critical for maintaining image quality throughout its lifecycle, from storage to sharing. This is where Image Tools like Converters and Compressors become relevant.
- Lossy vs. Lossless Compression:
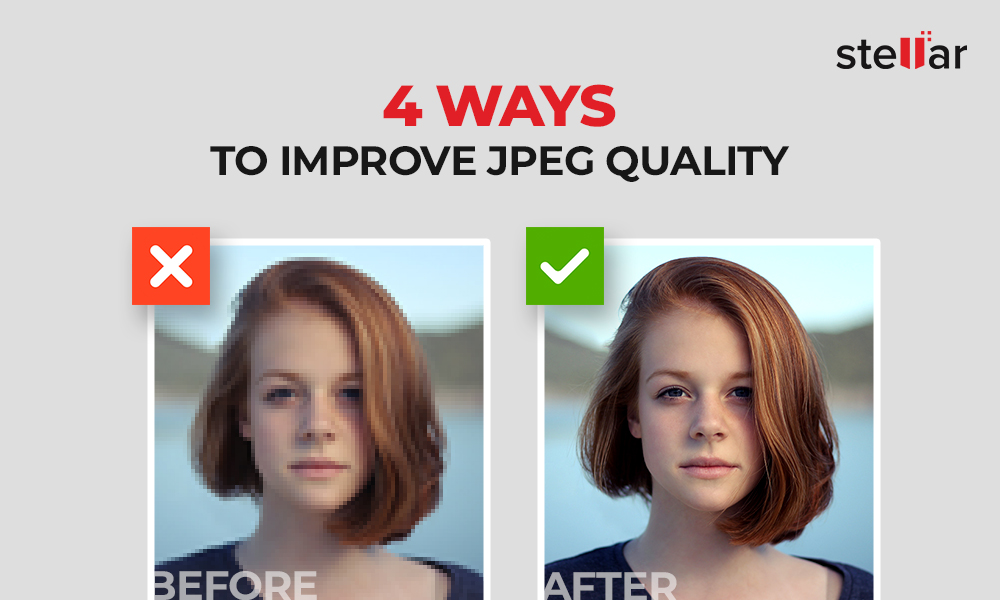
- JPEG (Joint Photographic Experts Group): A common “lossy” format. It reduces file size by permanently discarding some image data. While excellent for web use and sharing due to smaller files, repeated saving or editing of JPEGs leads to cumulative quality degradation and the introduction of “JPEG artifacts” (blocky patterns). For archival or extensive editing, use it only as a final output format.
- PNG (Portable Network Graphics): A “lossless” format, meaning it compresses files without discarding any data. Ideal for images with sharp edges, text, or transparent backgrounds. Files are typically larger than JPEGs.
- TIFF (Tagged Image File Format): Another “lossless” format, often used by professionals for archiving and high-quality prints. TIFF files are typically much larger but preserve maximum detail.
- RAW: Not an image format in the traditional sense, but a container for raw sensor data. It’s lossless and provides the highest quality starting point for editing.
- Converting Formats: Use reliable Image Converters to change formats without compromising quality unnecessarily. For instance, if you need to convert a RAW file to JPEG for web use, ensure you do so only after all edits are finalized and save at the highest quality setting possible.
- Strategic Compression: While this article focuses on increasing quality, it’s also important to understand optimizing quality for delivery. When you need to reduce file size (e.g., for faster website loading, an aspect often covered by Image Optimizers), do so carefully. Many online Image Compressors allow you to reduce file size while minimizing visible quality loss. The key is to compress only when necessary and to the lowest acceptable level.
- Work on Copies: Always work on duplicate copies of your images, especially when making significant changes like upscaling or applying heavy compression. This preserves the original file for future use or if you need to revert changes.
By understanding the nuances of file formats and compression, you can effectively manage the quality of your images, ensuring they remain vibrant and detailed across all their applications, whether for an abstract art piece, a beautiful landscape, or an emotional portrait, as curated on Tophinhanhdep.com.
Conclusion: Elevating Your Visuals with Tophinhanhdep.com
Increasing the quality of an image is a multifaceted endeavor, blending the art of photography with the precision of digital enhancement. As we’ve explored, achieving superior image quality—whether for large-scale prints, professional portfolios, engaging digital art, or simply beautiful aesthetic collections—requires a combination of foundational shooting practices and strategic post-processing techniques.
From the granular control offered by industry-standard software like Adobe Photoshop and open-source alternatives like GIMP, to the revolutionary intelligence of AI upscalers, and the convenience of online tools and mobile apps, there’s a method for every need and skill level. The power of Artificial Intelligence, in particular, has ushered in a new era of image enhancement, making it possible to reconstruct and elevate details with unprecedented accuracy, transforming previously unusable images into high-resolution masterpieces.
At Tophinhanhdep.com, we are committed to empowering creators and enthusiasts alike with the knowledge and resources to achieve visual excellence. Our comprehensive guides, extensive collections of stunning wallpapers and backgrounds, and a curated selection of Image Tools are designed to inspire creative ideas and simplify the journey from concept to captivating visual.
Remember, the goal is not just to add pixels, but to enhance the visual narrative, to bring out the subtle textures, vibrant colors, and compelling details that make an image truly remarkable. By understanding the principles of resolution, leveraging the right tools, and applying best practices from capture to final output, you can consistently elevate your imagery, ensuring every visual asset you create or curate shines with unparalleled quality. Explore Tophinhanhdep.com to find inspiration, discover trending styles, and utilize the tools necessary to make your images not just good, but extraordinary.