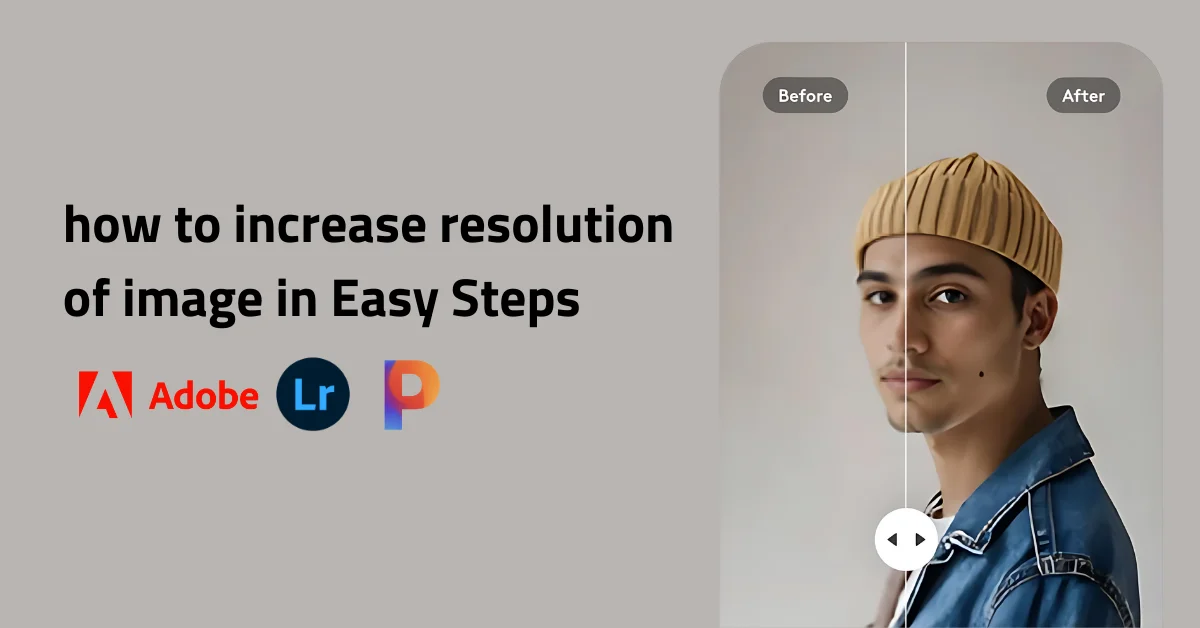
How to Increase Quality of Image: A Comprehensive Guide for Tophinhanhdep.com Users

In the vibrant world of visual content that Tophinhanhdep.com champions, where breathtaking wallpapers, captivating backgrounds, and stunning photography are the norm, image quality reigns supreme. Whether you’re curating aesthetic mood boards, diving into nature photography, crafting abstract digital art, or simply seeking to enhance a cherished memory, the clarity and resolution of your images can make all the difference. A high-quality image isn’t just a luxury; it’s a necessity for impactful visual communication and truly immersive experiences.
Imagine downloading a gorgeous nature wallpaper only to find it pixelated on your large monitor, or attempting to print a beautiful photograph for your collection, only to be met with a blurry, indistinct result. These scenarios highlight the critical importance of understanding and mastering image enhancement techniques. For the diverse community of Tophinhanhdep.com – from enthusiasts exploring trending styles to professionals engaged in graphic design and digital photography – knowing how to elevate image quality is a fundamental skill.
This guide, brought to you by Tophinhanhdep.com, delves deep into the art and science of increasing image quality. We’ll explore foundational concepts, walk through step-by-step processes using both professional-grade software and accessible online tools, and equip you with the knowledge to transform your low-resolution images into crisp, detailed masterpieces. Our focus is not just on making images larger, but on doing so while preserving and even enhancing their inherent beauty, ensuring they meet the high standards expected by Tophinhanhdep.com’s discerning audience.
Understanding Image Quality: The Fundamentals for Tophinhanhdep.com Users
Before we embark on the journey of enhancing images, it’s crucial to grasp the core concepts that define image quality. For anyone involved with visual design or digital photography, particularly those curating content for Tophinhanhdep.com, a solid understanding of these fundamentals is paramount.

The Power of Pixels: Resolution Explained
At its heart, digital image quality is inextricably linked to resolution. When Tophinhanhdep.com features high-resolution stock photos or breathtaking digital art, it’s the pixel density that allows for such intricate detail and clarity.
What is Resolution? Resolution refers to the number of pixels (picture elements) that make up an image, typically measured in width by height. For instance, an image with a resolution of 1920x1080 contains 1920 pixels horizontally and 1080 pixels vertically. The total number of pixels is derived by multiplying these two values (e.g., 1920 * 1080 = 2,073,600 pixels, or approximately 2 megapixels).
- Pixel Density and Detail: The more pixels an image has, the more information it contains, leading to finer details and sharper edges. This is why high-resolution images are essential for things like large prints, detailed aesthetic backgrounds, and professional graphic design projects featured on Tophinhanhdep.com.
- Dots Per Inch (DPI) / Pixels Per Inch (PPI): While often used interchangeably, DPI (Dots Per Inch) typically refers to print resolution, indicating how many ink dots a printer places per inch of paper. PPI (Pixels Per Inch) refers to screen resolution, or how many pixels are displayed per inch on a screen. For quality prints, a standard of 300 DPI/PPI is often recommended, ensuring that images remain crisp and detailed even when enlarged. For web use, 72 PPI is generally sufficient, but higher resolutions are increasingly preferred for retina displays and future-proofing content on platforms like Tophinhanhdep.com.
Why is Resolution Important? Low-resolution images, when enlarged, often suffer from pixelation – where individual pixels become visible, making the image appear blocky and blurry. This is particularly noticeable with images meant for large screens or physical prints. For Tophinhanhdep.com’s collection of beautiful photography, nature wallpapers, and abstract art, maintaining high resolution is key to delivering an immersive visual experience. High-resolution images allow for:
- Larger Prints: Essential for professional photographers and artists wanting to showcase their work in galleries or homes.
- Heavy Cropping: More pixels mean you can crop into an image more aggressively without losing significant detail, offering greater flexibility in visual design.
- Future-Proofing: As screen technologies advance, higher resolutions ensure your content remains sharp and relevant.
- Professionalism: High-quality visuals reflect positively on the creator and the platform, aligning with Tophinhanhdep.com’s commitment to excellence.
Resampling vs. Changing Dimensions
When discussing image quality, particularly in the context of increasing resolution, two terms often arise: resampling and simply changing display dimensions. It’s vital for Tophinhanhdep.com users to understand the distinction.
- Resampling (Upsampling/Downsampling): This is the process of changing the actual number of pixels in an image.
- Upsampling (Increasing Resolution): When you upsample, the software “invents” new pixels based on the surrounding ones. This is a complex process, and if not done carefully, it can lead to a loss of sharpness or the introduction of artifacts. Modern AI upscalers, as we’ll explore, have significantly improved this process.
- Downsampling (Decreasing Resolution): This involves removing pixels. While generally leading to smaller file sizes, excessive downsampling can permanently reduce image detail.
- Changing Display Dimensions (without resampling): This alters how an image is displayed or printed without changing its underlying pixel data. For example, telling a program to print a 300 PPI image at 10 inches wide instead of 5 inches wide will result in a larger print, but the quality will suffer as the existing pixels are stretched over a larger area, reducing the effective PPI.
For Tophinhanhdep.com’s content, the goal is often to genuinely increase resolution through smart upsampling, ensuring that images intended for visual design or beautiful photography collections maintain their integrity and aesthetic appeal.
Leveraging Desktop Software for Superior Image Enhancement
Desktop software offers powerful tools for increasing image quality, providing granular control and robust algorithms. For serious photographers, graphic designers, and digital artists who contribute to or appreciate Tophinhanhdep.com’s curated collections, these applications are indispensable.
Adobe Photoshop: A Professional’s Toolkit for Resampling and Refinement
Adobe Photoshop stands as a cornerstone in digital imaging, a comprehensive graphic design application that excels at photo manipulation. For Tophinhanhdep.com users seeking to elevate their images, Photoshop offers a sophisticated approach to increasing resolution, known as resampling.
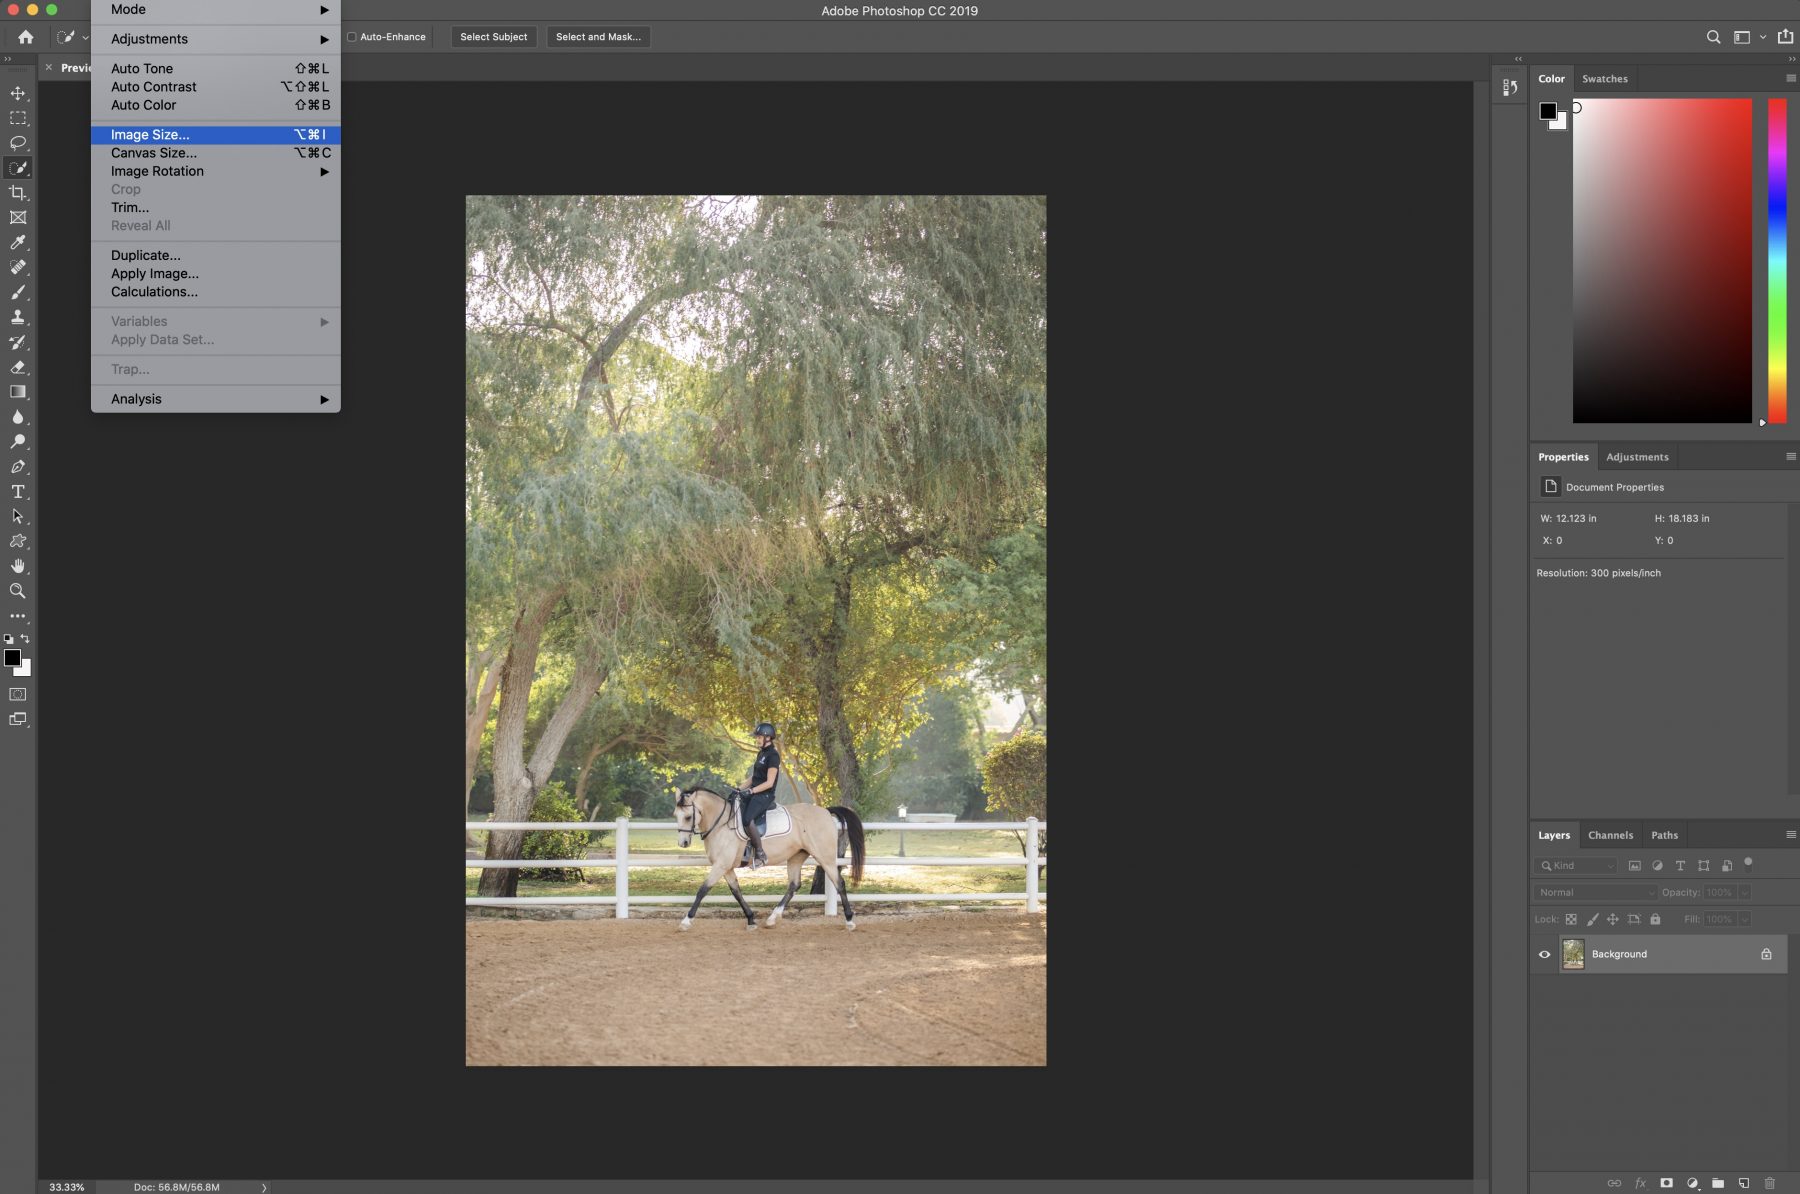
Resampling in Photoshop (Older Versions to CC 2018): In earlier versions of Photoshop, increasing image resolution involved navigating the “Image Size” dialogue box with careful consideration of interpolation methods.
- Open Your Image: Launch Photoshop and open the image you wish to enhance.
- Access Image Size: Go to
Image>Image Size. - Adjust Dimensions: In the dialogue box, you can change the
WidthorHeightvalues. It’s often easier to switch the unit toPercentto scale up uniformly. Ensure theResamplebox is ticked. - Choose Interpolation Method: Next to
Resample, a dropdown menu offers various interpolation algorithms.Bicubic Smoother (enlargement)was a popular choice for upscaling, aiming to create smooth transitions between new pixels. For sharp images,Bicubic Sharper (reduction)could paradoxically improve quality by sharpening existing pixels before resizing. - Set Resolution: For print-standard quality, 300 PPI is generally recommended.
- Apply and Save: Click
OKto apply the changes, thenFile>Export>Export As(orSave As) to save your enhanced image, choosing appropriate formats like JPEG or TIFF for preserving quality.
Enhancements in Modern Photoshop (CC 2019 to Current): Preserve Details 2.0 and Neural Filters Adobe has significantly advanced its upscaling capabilities, integrating more intelligent algorithms.
- Enable Preserve Details 2.0 Upscale: For the best results in recent Photoshop versions, Tophinhanhdep.com users should first enable this feature: Go to
Edit>Preferences>Technology Preferences(orPhotoshop>Preferences>Technology Previewson macOS) and tickEnable Preserve Details 2.0 Upscale. This AI-powered option better retains image detail during enlargement. - Access Image Size: Similar to older versions, go to
Image>Image Size. - Set Dimensions and Resolution: Adjust
Width,Height, andResolutionas needed, ensuringResampleis ticked. - Select Preserve Details 2.0: In the
Resampledropdown, choosePreserve Details 2.0. Photoshop’s AI will now intelligently add new pixels while trying to maintain the original texture and sharpness. - Reduce Noise (Optional): After upscaling, you might notice some noise. Use the
Reduce Noiseslider within the Image Size dialogue or apply theFilter>Noise>Reduce Noisefilter afterwards. - Neural Filters: Super Zoom (Advanced Enhancement): For an even more dramatic increase in resolution and detail, Tophinhanhdep.com’s advanced users can explore Neural Filters.
- Go to
Filter>Neural Filters. - Select
Super Zoom. This filter leverages AI to intelligently upscale and enhance parts of an image, allowing you to “zoom in” on specific areas while significantly boosting their resolution and detail. Adjust the sliders for desired output, keeping in mind its computational intensity.
- Go to
Essential Post-Processing Techniques in Photoshop: Beyond simple upscaling, Photoshop offers powerful tools to refine and enhance image quality.
- Sharpening (Smart Sharpen & Unsharp Mask):
- Go to
Filter>Sharpen>Smart Sharpen. This tool provides precise control over sharpening, allowing you to adjustAmount(intensity),Radius(area of sharpening), andReduce Noise. Unsharp Mask(Filter>Sharpen>Unsharp Mask) is another classic, working by finding edges and increasing their contrast.- Tophinhanhdep.com recommends subtle sharpening to avoid artifacts, especially for delicate aesthetic images.
- Go to
- Adjusting Contrast and Color (Levels & Curves):
- Levels: (
Image>Adjustments>Levels) allows you to adjust the tonal range and color balance by mapping the black, white, and mid-tone points of an image. This can significantly improve depth and contrast. - Curves: (
Image>Adjustments>Curves) offers even more precise control over tonal adjustments, allowing you to manipulate specific ranges of brightness and contrast across the image. Mastering Curves is key for achieving rich, professional-grade colors and contrast in your beautiful photography and digital art featured on Tophinhanhdep.com.
- Levels: (
- Noise Elimination: Photoshop’s
Filter>Noise>Reduce Noiseis crucial for cleaning up grain, especially in older or poorly lit photographs. - Reconstruction of Missing Components: For damaged or incomplete images (perhaps old family photos or unique abstract art pieces), tools like the
Clone Stamp Tool,Healing Brush Tool, andContent-Aware Fillcan be used for photo manipulation to intelligently reconstruct missing areas, offering creative ideas for restoration.
AI Upscalers: Revolutionizing Image Enlargement with Topaz Gigapixel AI and More
While Photoshop has integrated AI, dedicated AI upscaling software has emerged as a game-changer for increasing image resolution without noticeable quality degradation. Tophinhanhdep.com frequently highlights how these tools are transforming high-resolution photography and digital art.
Topaz Gigapixel AI: Recommended by Tophinhanhdep.com for its exceptional results, Topaz Gigapixel AI is a standalone software application that leverages advanced artificial intelligence and machine learning to enlarge images by up to 600%. Unlike traditional methods that simply interpolate pixels, Gigapixel AI “understands” how new pixels should be created by sampling millions of similar images, resulting in incredibly sharp and natural-looking enlargements.
- Download and Install: Obtain a free trial or purchase Gigapixel AI from Topaz Labs. Ensure your computer meets the system requirements, as the software is computationally intensive.
- Open Your Image: Launch Gigapixel AI. You can drag and drop
.png,.tiff, or.jpegimages into the interface, or clickOpento browse. (Note: RAW files need prior conversion). - Resize Your Image:
- On the right-hand panel, select your desired
Magnification(e.g., 2x, 4x, 6x, or a custom value). - You can choose
Scale,Width, orHeightfor resizing control. - Enable
Autosettings for the AI to optimize noise suppression and blur removal, or opt forManualcontrol. - Face Refinement: A standout feature for Tophinhanhdep.com users working with portrait photography. This option uses face recognition technology to retain detail and sharpness in faces, minimizing distortion when scaling up significantly.
- On the right-hand panel, select your desired
- Preview and Compare: The interface shows a split view, allowing you to compare your original image with the AI-enhanced preview in real-time. This is invaluable for fine-tuning.
- Save & Export: Once satisfied, click
Save. Choose yourImage Format(JPEG, TIFF, PNG),Filename,Save Directory, andColour Profile. The software then processes the image, which can take a minute or two depending on size and settings.
Benefits of Gigapixel AI for Tophinhanhdep.com:
- Exceptional Sharpness: Dramatically increases resolution without typical pixelation.
- Detail Retention: Machine learning reconstructs detail rather than blurring.
- Ease of Use: A remarkably simple interface despite its powerful underlying technology.
- Professional Outcomes: Ideal for preparing images for large prints, high-resolution wallpapers, and detailed stock photos.
Other Dedicated Upscaling Software:
- ON1 Resize (formerly Genuine Fractals/Perfect Resize): Another highly respected tool, often used as a plugin for Photoshop or as a standalone application. It’s known for producing high-quality enlargements and prints. While Photoshop users might not need it, Tophinhanhdep.com recognizes its value for those seeking dedicated resizing solutions.
- Wondershare Fotophire Maximizer: This tool offers enlargement up to 1000% without blur or pixelation, along with other editing features like background removal and effects, making it a versatile option for Tophinhanhdep.com users.
Embracing AI and Online Platforms for Effortless Image Upscaling
Not everyone has access to professional desktop software, or perhaps needs a quicker solution for a smaller task. For Tophinhanhdep.com’s diverse audience, a range of online tools and AI-powered platforms offer convenient and often free ways to enhance image quality.
Online Platforms for Quick Enhancements: Let’s Enhance and Fotojet
The rise of AI has democratized high-quality image upscaling, making it accessible through web browsers. Tophinhanhdep.com notes these tools as excellent resources for artists and photographers looking for efficient solutions.
Let’s Enhance: An AI image upscaler that not only increases resolution but also intelligently fixes pixelation, corrects colors and lighting, and removes JPEG artifacts. It’s a fantastic resource for improving general image quality, especially for images destined for aesthetic collections or mood boards on Tophinhanhdep.com.
- Access the Website: Visit the Let’s Enhance website.
- Upload Your Image: Drag and drop your image or click the
Try for Freebutton to upload. - Create an Account: You’ll typically need to create a free account to get a certain number of free enhancements (e.g., 10 images).
- Confirm Email & Use: Confirm your email and start using the app.
- Select Options: Choose your desired
Image Size(e.g., 2x, 4x), and other enhancement options likeSmart EnhanceorSmart Resize. - Process and Download: Click
Start Processing. Once complete,Downloadyour high-resolution image.
Benefits of Let’s Enhance for Tophinhanhdep.com:
- AI-Powered Correction: Beyond just upscaling, it tackles common image imperfections.
- User-Friendly: Simple drag-and-drop interface, ideal for quick edits.
- Accessibility: Web-based, no software installation required.
- Versatility: Useful for fixing low-quality social media images, enhancing graphic design elements, or improving stock photos.
Fotojet: A versatile online photo editor that also offers tools to increase image resolution. Fotojet provides a range of editing features beyond just upscaling, making it a good all-in-one choice for basic photo manipulation and visual design tasks for Tophinhanhdep.com’s audience.
- Visit Fotojet: Open www.fotojet.com in your browser.
- Import Image: Import your image from your PC or social media.
- Access Resize: Go to the
Editmenu, then selectResizeunder theBasicsection. - Enter Dimensions: Enter new dimensions for
WidthandHeight, or check the box to increase resolution by aPercentage. - Apply and Save: Click
Applyand thenSaveyour edited image.
Other Online Image Upscalers:
- Waifu2x: Originally designed for anime-style art, it also performs well on general photographs, often excelling at noise reduction during upscaling.
- AI Image Enlarger: Another popular AI-driven online tool offering various enhancement options.
Free and Accessible Alternatives: GIMP, Paint, and Pixlr
For users who prefer free software or need basic editing capabilities, several options exist. While they may not offer the sophisticated AI of dedicated upscalers, they provide valuable functionality for Tophinhanhdep.com users on a budget.
GIMP (GNU Image Manipulation Program): A powerful, free, and open-source image editor that serves as a robust alternative to Photoshop for many tasks, including increasing image resolution.
- Open Image: Launch GIMP and open your image (
File>Open). - Scale Image: Go to
Image>Scale Image. - Adjust Resolution: In the dialogue box, link the X and Y resolutions (chain icon), then enter your desired resolution (e.g., 300 PPI). You can also adjust
WidthandHeight. - Interpolation Quality: Under
Quality, choose anInterpolationmethod (e.g.,CubicorLoHalofor better detail). - Scale and Save: Click
Scaleto apply, thenFile>Save Asto save your enhanced image.
Paint (Windows Native Application): For very basic resizing, Windows’ built-in Paint application can change image dimensions, though it doesn’t offer advanced upsampling algorithms. It’s more suitable for downscaling or minor adjustments for images that are already high quality.
- Open in Paint: Right-click your image and select
Edit(or open Paint andFile>Open). - Resize: Go to
Hometab, clickResize. - Adjust Dimensions: Enter
PercentageorPixelsforHorizontalandVerticalvalues. - Save: Click
OKandFile>Save Asto save.
Pixlr (Internet-Based Photo Editor): An excellent free online photo editor that provides more advanced features than Paint, including sharpening, color adjustments, and image resizing. Tophinhanhdep.com considers Pixlr a great starting point for those new to image editing.
- Visit Pixlr: Go to pixlr.com and choose
Advanced Pixlr E. - Open Image: Click
Open Imageand select your file. - Image Size: Go to
Image>Image Size. - Set Dimensions: Specify desired dimensions and click
OK. - Save:
File>Save. ChooseJPGformat and setQualityto 100% for best results, thenDownload.
Mobile Solutions and Practical Tips for On-the-Go Improvement
In an era where much of Tophinhanhdep.com’s content (especially aesthetic and sad/emotional photography) originates from mobile devices, enhancing image quality on smartphones and tablets has become essential.
Boosting Quality on Your Mobile Device: Apps for On-the-Go Photographers
Mobile apps have come a long way, offering powerful image editing capabilities directly from your phone. These are perfect for quick adjustments before sharing to Tophinhanhdep.com’s collections or social media.
- Remini: This popular AI photo enhancer specializes in clarifying old, blurry, or low-resolution photos, often with stunning results. It’s particularly effective for faces, making it ideal for portraiture that might feature in Tophinhanhdep.com’s beautiful photography or emotional categories.
- PicsArt Photo Editor: A comprehensive mobile editing suite.
- Open Image: Launch PicsArt, tap the purple plus icon, and upload your image.
- Resize: Go to
Tools>Resize. - Enter Values: Type in new
WidthandHeightvalues. - Sharpen (Optional): Use the
Adjusttool to subtly sharpen the image. - Save: Tap
Nextto save or share.
- Adobe Lightroom Mobile: While primarily for color grading and RAW editing, Lightroom Mobile also offers excellent tools for sharpness, noise reduction, and general enhancements that contribute to overall image quality. It’s an indispensable tool for serious mobile photographers.
- Photo Resizer: A straightforward app dedicated to resizing images, allowing you to input specific pixel, inch, millimeter, or centimeter values. It’s simple for quick dimension changes without complex editing features.
Tips for Mobile Photography on Tophinhanhdep.com:
- Shoot in Good Light: Always the first rule of quality photography.
- Use Native Camera App: Often provides the best quality and least compression.
- Avoid Digital Zoom: It merely crops the image, reducing resolution. Use optical zoom if available.
- Edit Subtly: Over-editing can degrade quality, especially on mobile.
Maintaining and Optimizing Image Quality: Beyond Upscaling
Increasing resolution is just one part of the equation. For Tophinhanhdep.com, maintaining optimal image quality means considering file formats, compression, and general best practices.
-
File Formats and Compression:
- JPEG/JPG: The most common format for photos. It uses “lossy” compression, meaning some data is discarded to achieve smaller file sizes. When saving JPEGs, always choose the highest quality setting to minimize loss. Repeatedly saving an edited JPEG will degrade quality.
- PNG: A “lossless” format, ideal for images with transparency or sharp lines (like graphic design elements). PNGs retain all image data but result in larger file sizes than JPEGs.
- TIFF/TIF: Another lossless format, often used by photographers and designers for archival purposes or high-quality prints. Files are very large.
- RAW: Unprocessed data straight from the camera sensor, offering maximum flexibility for editing but requiring conversion before use. Many tools for Tophinhanhdep.com’s photography section accept RAW.
-
When to Use Which:
- For web display (wallpapers, backgrounds, blog posts): Optimized JPEGs (high quality, but reasonable file size) or PNGs for graphics.
- For prints or professional design work: TIFF, high-quality JPEG, or edited RAW files.
-
Image Optimizers and Compressors:
- Tophinhanhdep.com understands the need for fast loading times. Tools like online image optimizers (e.g., TinyPNG, Compressor.io) reduce file size without visibly impacting quality, which is crucial for web performance while keeping images visually appealing. These tools apply smart compression techniques, especially for PNGs and JPEGs.
-
Repairing Imperfections: Tools for Damaged Images Sometimes, images aren’t just low-resolution; they’re damaged (corrupted, old, scratched, noisy). For Tophinhanhdep.com users who cherish old memories or work with historical images, specialized repair tools are invaluable.
- Stellar Repair for Photo: This software is designed to fix corrupt or imperfect JPEG/JPG files, restoring them to their original quality. It can handle various issues from minor glitches to severe corruption, and even extract thumbnails if a file is beyond repair. This is crucial for preserving unique photographic content.
- Photo Eraser tools: For unwanted objects (date stamps, watermarks, stray elements) in otherwise good photos, tools like Jihosoft Photo Eraser or features within Photoshop (Content-Aware Fill) can seamlessly remove them, improving the overall aesthetic of nature or beautiful photography.
Final Words from Tophinhanhdep.com
The journey to increase image quality is multifaceted, encompassing a blend of technical understanding, strategic tool selection, and artistic sensibility. For the Tophinhanhdep.com community, whether you’re uploading stunning wallpapers, curating thematic collections, or experimenting with new editing styles, high-quality images are the bedrock of compelling visual experiences.
From the granular control offered by professional desktop software like Adobe Photoshop and the revolutionary capabilities of AI upscalers such as Topaz Gigapixel AI, to the accessible convenience of online platforms like Let’s Enhance and the on-the-go power of mobile apps like Remini, a solution exists for every need and skill level. We’ve explored how understanding resolution, resampling, and essential post-processing techniques like sharpening and contrast adjustment can transform your visual content. Furthermore, we’ve highlighted the importance of file formats, compression, and specialized repair tools for maintaining and restoring image integrity.
As an authority in visual content, Tophinhanhdep.com encourages you to experiment with these methods. Don’t let a low-resolution image diminish the impact of your creative ideas or the beauty of your photography. Embrace these tools and techniques to elevate your images, ensuring they are always crisp, clear, and ready to inspire. The ultimate goal is to empower you to create, share, and enjoy images that resonate with beauty and clarity, consistently meeting the high visual standards that define Tophinhanhdep.com.