How to Increase the Resolution of an Image for Stunning Visuals

In the rapidly evolving digital landscape, where visual content reigns supreme, the resolution of an image is paramount. Whether you’re a professional photographer, a graphic designer, a hobbyist creating aesthetic wallpapers, or simply someone looking to preserve precious memories, the ability to increase image resolution is an invaluable skill. Low-resolution images can appear pixelated, blurry, and lack the crisp detail required for high-quality prints, compelling digital art, or even sharp display on modern screens. Fortunately, thanks to advancements in image processing and artificial intelligence, transforming a low-resolution image into a high-resolution masterpiece is not only possible but also more accessible than ever before.
This comprehensive guide, brought to you by Tophinhanhdep.com – your leading resource for stunning images, photography insights, and powerful image tools – will walk you through various methods to enhance your image resolution. We’ll explore everything from cutting-edge AI upscalers and industry-standard desktop software like Adobe Photoshop to convenient online services and mobile applications. By the end of this article, you’ll be equipped with the knowledge and tools to ensure your images always look their best, ready for anything from a breathtaking nature background to a pivotal element in a creative visual design project.

Understanding Image Resolution and Why It Matters for Visual Excellence
Before diving into the “how-to,” it’s crucial to grasp what image resolution entails and why it holds such significance in the world of digital visuals. Tophinhanhdep.com emphasizes high-resolution imagery across all its collections, from abstract art to beautiful photography, because it is the foundation of quality.
The Core of Image Resolution: Pixels, DPI, and Megapixels

At its heart, image resolution refers to the amount of detail an image holds. This detail is measured in pixels, which are the tiny colored squares that make up a digital image. The more pixels packed into an image, the higher its resolution and the clearer its appearance.
- Pixel Dimensions: This refers to the total number of pixels along an image’s width and height (e.g., 1920x1080 pixels). A higher number indicates a larger image with potentially more detail.
- DPI (Dots Per Inch) / PPI (Pixels Per Inch): These terms quantify the pixel density. DPI typically refers to print resolution (dots of ink per inch), while PPI refers to screen resolution (pixels per inch). For print, a common standard is 300 DPI to achieve sharp, professional results. For web display, 72 PPI is often sufficient, although higher resolutions are increasingly common with retina displays.
- Megapixels (MP): A megapixel is one million pixels. Digital cameras are often rated by their megapixel count, indicating the maximum resolution they can capture. A 50 MP camera, for example, can produce images with a total of 50 million pixels.
When you crop an image, you effectively remove pixels, reducing its overall resolution. This is why starting with a high-resolution original is always ideal, giving you more flexibility for editing and various applications, a principle central to Tophinhanhdep.com’s “High Resolution” photography guidelines.
Why High Resolution is Non-Negotiable in Modern Visuals
In today’s visually-driven world, high resolution is not just a preference; it’s often a necessity.
- Print Quality: For any physical output, be it a large-format poster, a canvas print of stunning nature photography, or pages in a professional magazine, high resolution ensures crisp details, smooth gradients, and vibrant colors. Low-resolution images, when printed large, become visibly pixelated, undermining the visual impact.
- Digital Display: While screens have lower PPI requirements than print, high-resolution images still look superior. They provide sharper visuals, especially on high-density displays (like Retina screens), offering a more immersive experience for viewers of wallpapers, backgrounds, or digital art.
- Cropping Flexibility: Higher resolution gives photographers and designers the freedom to crop aggressively without destroying the image’s quality. This is vital for refining composition or adapting an image for different aspect ratios.
- Professionalism and Credibility: Whether for a business website, an online portfolio showcasing aesthetic images, or stock photos for sale, high-resolution visuals convey professionalism and attention to detail. Blurry, low-res images can deter potential clients or viewers.
- Visual Design and Photo Manipulation: For graphic designers and digital artists, working with high-resolution source images is fundamental. It allows for detailed manipulation, seamless integration of elements, and scaling without degradation, enabling “Creative Ideas” and complex “Photo Manipulation.”
Tophinhanhdep.com consistently advocates for and provides resources that enable users to achieve the highest possible resolution for their visual projects, recognizing that superior quality is key to captivating audiences.
Harnessing AI Power for Effortless Resolution Upscaling
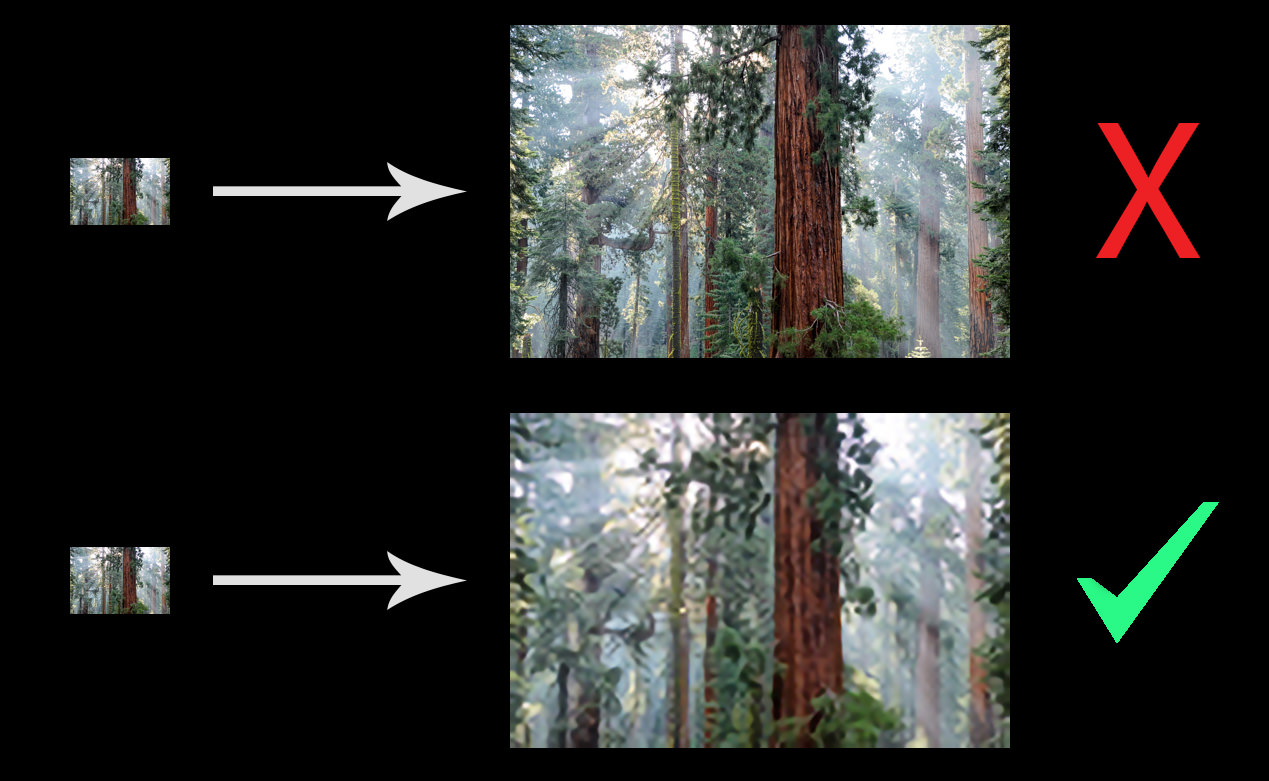
The advent of Artificial Intelligence (AI) has revolutionized image upscaling, offering solutions that were once deemed impossible. Unlike traditional methods that simply interpolate pixels (filling in gaps with averaged colors), AI-driven tools leverage machine learning to intelligently “invent” missing detail, resulting in remarkably sharp and natural-looking high-resolution images.
Tophinhanhdep.com’s Recommended AI Upscalers: A New Era of Detail
Tophinhanhdep.com features and recommends a new generation of AI upscaling software that stands out for its ability to enlarge images by significant margins (up to 600% or more) without the typical loss of quality. These “AI Upscalers” are a cornerstone of our “Image Tools” section.
The underlying technology involves training AI models on millions of images, allowing them to understand patterns, textures, and object structures. When an AI upscaler processes your image, it doesn’t just stretch pixels; it analyzes the existing data and, based on its vast knowledge, reconstructs finer details, reduces noise, and sharpens edges. Some even incorporate face recognition technology to refine facial features, which is particularly beneficial for portrait photography.
A Step-by-Step Guide to AI-Powered Image Enhancement
While specific interfaces may vary, the general workflow for using AI upscalers featured on Tophinhanhdep.com is straightforward, designed to deliver professional results with minimal effort.
Step 1: Access Your Chosen AI Upscaler Begin by downloading a reputable AI upscaling software or accessing an online AI upscaler service recommended by Tophinhanhdep.com. Many offer free trials, allowing you to test their capabilities. Ensure your computer meets the system requirements if installing desktop software, as AI processing can be resource-intensive.
Step 2: Open or Upload Your Image Launch the application or navigate to the online tool’s interface. You’ll typically find an option to “Open” or “Upload” your image. Most AI upscalers support common image formats like JPEG, PNG, and TIFF. If you’re working with a RAW file, you might need to convert it to a supported format first using a tool available on Tophinhanhdep.com’s “Converters.”
Step 3: Define Your Upscaling Parameters Once your image is loaded, you’ll see options to control the upscaling process.
- Scale Factor: Choose how much you want to enlarge your image. Options usually range from 2x, 4x, 6x, or even a custom percentage. Consider your final output (e.g., print size) when making this selection.
- Enhancement Settings: Many AI tools offer additional controls. These might include:
- Noise Suppression: To remove graininess and digital noise.
- Sharpening/Blur Reduction: To enhance crispness.
- Face Refinement: Specifically designed to improve detail in faces, crucial for high-resolution portraits.
- AI Models: Some tools offer different AI models optimized for various image types (e.g., photos, digital art, text). Experiment to find the best fit.
The software will often provide a real-time preview, allowing you to compare the original with the upscaled version side-by-side. This is your opportunity to fine-tune the settings for optimal results.
Step 4: Process and Save Your Enhanced Image Once satisfied with the preview, initiate the enhancement process. This can take anywhere from a few seconds to several minutes, depending on the image size, the chosen scale factor, and your computer’s processing power.
After processing, you’ll be prompted to “Save” or “Export” your new high-resolution image. Select your desired file format (JPEG, PNG, or TIFF are common), a filename, and a destination folder. You may also have options to adjust the color profile. Your image is now ready for use as a stunning high-resolution wallpaper, a detailed stock photo, or a component in your latest graphic design project.
Professional Control: Increasing Resolution with Desktop Software
While AI upscalers offer incredible convenience and results, traditional professional photo editing software like Adobe Photoshop and GIMP continue to be powerful tools for increasing image resolution, offering granular control over the process. These tools are indispensable for “Digital Photography” and “Photo Manipulation.”
Mastering Upsampling with Adobe Photoshop
Adobe Photoshop is the industry standard for graphic design and photo editing, offering a robust set of features, including sophisticated methods for increasing image resolution, a process known as resampling or upsampling. Tophinhanhdep.com frequently provides guides on advanced Photoshop techniques for our “Visual Design” community.
Step 1: Open Your Image in Photoshop
Launch Adobe Photoshop. You can open your image by dragging and dropping it into the Photoshop icon, using File > Open, or selecting “Open” from the welcome screen. Photoshop supports a wide array of file formats, including RAW files, which can be directly processed or converted using Adobe Camera Raw.
Step 2: Access the Image Size Dialogue Box
Navigate to Image > Image Size from the top menu bar. This will open a dialogue box displaying your image’s current dimensions, resolution, and file size. The keyboard shortcut Option + Command + I (Mac) or Alt + Control + I (Windows) can also be used.
Step 3: Configure Upsampling Settings Within the Image Size dialogue box, you’ll adjust several parameters:
- Units: Change the unit of measurement for Width and Height to “Percent” for easier scaling, or “Inches” if you’re targeting a specific print size.
- Dimensions: Enter your desired new width or height. By default, Photoshop links the width and height to maintain the aspect ratio. If you need to change them independently (though this can distort the image), click the chain icon to unlink them.
- Resolution (DPI/PPI): Adjust this value if you’re preparing for print (e.g., 300 DPI). For web use, it’s less critical as screen resolution is fixed, but 72 PPI is a common standard. Changing DPI will also affect the physical print dimensions and file size.
- Resample: Crucially, ensure the “Resample” box is checked. This tells Photoshop to add new pixels.
- Resample Method: This dropdown menu offers various algorithms for pixel interpolation. For enlarging images, select:
- “Preserve Details 2.0” (or “Preserve Details (enlargement)” in older versions): This is Photoshop’s most advanced upsampling algorithm, specifically designed for enlargement. It includes a “Reduce Noise” slider to minimize artifacts.
- “Bicubic Smoother”: A good general-purpose option for enlarging images, designed to produce smoother tonal gradations.
Step 4: Apply Changes and Sharpen Click “OK” to apply the image resizing. The process is usually very fast. Once resized, it’s a good practice to apply a slight sharpening to compensate for any perceived softness introduced during upsampling.
- Go to
Filter > Sharpen > Unsharp Mask. - Adjust
Amount(e.g., 75-150%) andRadius(e.g., 0.5-2.0 pixels) to enhance edge definition without creating halos or over-sharpening.
Step 5: Save and Export
After perfecting your image, go to File > Export > Export As or File > Save As. Choose your desired format (e.g., JPEG for web, TIFF for print), quality settings, and a destination folder. Photoshop’s comprehensive tools make it ideal for preparing “High Resolution” images for diverse applications, from “Digital Art” to “Stock Photos.”
GIMP: A Free and Powerful Alternative for Resolution Boosts
For those seeking a free and open-source alternative to Photoshop, GIMP (GNU Image Manipulation Program) is an excellent choice. It offers robust image editing capabilities, including the ability to increase image resolution effectively. Tophinhanhdep.com supports accessibility in photography and design, making GIMP a valuable tool in our “Image Tools” recommendations.
Step 1: Open Your Image in GIMP
Launch GIMP and open your image via File > Open.
Step 2: Access the Scale Image Dialogue Box
Go to Image > Scale Image from the menu bar. This dialogue box allows you to adjust the image’s dimensions and resolution.
Step 3: Adjust Dimensions and Resolution
- Width and Height: Enter your desired new width or height. Ensure the chain icon between them is locked to maintain the aspect ratio. GIMP will automatically calculate the other dimension.
- X and Y Resolution: These fields represent the PPI/DPI. For print, set both to 300. For web, 72 is standard.
- Interpolation: This is GIMP’s equivalent of Photoshop’s resampling method. For upscaling, choose “Cubic (smoother)” to get the best quality.
Step 4: Apply and Save Click “Scale” to apply the changes. The image will be resized on your canvas.
Once you’re happy with the results, save your image by going to File > Save As. Choose your preferred file format (e.g., JPEG, PNG, TIFF) and a destination. GIMP empowers users to achieve “High Resolution” results without a financial investment, aligning with the “Creative Ideas” fostered by Tophinhanhdep.com.
On-the-Go and Online: Accessible Resolution Enhancement Options
For quick fixes, batch processing, or when professional desktop software isn’t readily available, online tools and mobile applications provide convenient ways to increase image resolution. Tophinhanhdep.com recognizes the need for versatile “Image Tools” and highlights these accessible options.
Quick Resolution Fixes with Tophinhanhdep.com’s Online Tools
Many web-based services offer image upscaling, often utilizing AI in a user-friendly online interface. These are perfect for enhancing images for “Wallpapers,” “Backgrounds,” or general “Photo Ideas.” Tophinhanhdep.com directs users to reliable “AI Upscalers” accessible directly through their browser.
How Online Tools Work: Typically, you upload your low-resolution image, select a desired scale factor (e.g., 2x, 4x), and click an “Enhance” or “Process” button. The service then uses its algorithms (often AI-driven) to upscale the image on its servers, and you can download the high-resolution result.
General Steps:
- Visit an Online Upscaler: Navigate to an online image upscaler recommended on Tophinhanhdep.com.
- Upload Your Image: Click the “Upload” or “Drag and Drop” area to select your image file.
- Choose Enhancement Options: Select the desired scaling factor (e.g., 2x, 4x) and any available enhancement options like noise reduction or sharpening. Some services offer free accounts that allow a limited number of images to be processed per month.
- Start Processing: Initiate the upscaling process.
- Download Result: Once complete, download your newly enhanced, high-resolution image.
Online tools are a fantastic solution for individuals needing to quickly boost the resolution of images for sharing on social media or for including in “Mood Boards” without needing to install any software. However, be mindful of file size limitations for uploads and downloads, and consider privacy policies for sensitive images.
Mobile Apps for Enhancing Image Resolution Anywhere
With smartphones becoming primary cameras for many, the ability to enhance image resolution directly on your mobile device is a huge advantage. Apps designed for this purpose bring powerful editing capabilities to your fingertips, perfect for enhancing “Aesthetic” photos or “Sad/Emotional” images captured spontaneously. Tophinhanhdep.com showcases mobile “Editing Styles” and tools.
How Mobile Apps Work: Mobile image editing apps offer varying levels of resolution enhancement. Some use simple interpolation, while more advanced ones incorporate AI for better results. They often integrate seamlessly with your phone’s photo gallery.
General Steps (using a typical photo editor app):
- Download a Reputable App: Install a photo editing app from your device’s app store that features resizing or enhancing capabilities (e.g., those mentioned on Tophinhanhdep.com’s “Image Tools” section).
- Open Your Image: Launch the app and import the image you wish to enhance from your phone’s gallery.
- Access Resize/Enhance Tools: Look for tools like “Resize,” “Image Size,” “Upscale,” or “Enhance.”
- Adjust Dimensions: Enter your desired new width or height. Many apps will automatically maintain the aspect ratio.
- Apply Sharpening/Other Adjustments: If available, use sharpening sliders or AI enhancement modes to improve clarity.
- Save/Export: Save the enhanced image back to your phone’s gallery or share it directly.
Mobile apps offer incredible convenience for managing your “Digital Photography” on the go, allowing you to quickly prepare high-resolution images for sharing or for incorporating into “Thematic Collections.”
Optimizing Your Images: Beyond Just Increasing Resolution
While increasing resolution is a primary goal, effective image management involves a broader approach to quality and utility. Tophinhanhdep.com’s comprehensive resources cover all aspects of “Photography” and “Image Tools.”
Best Practices for Maintaining Image Quality
- Start with the Best Possible Original: The fundamental rule remains: it’s easier to maintain quality when starting with a high-resolution, well-exposed original. Upscaling a severely pixelated or blurry image will yield limited results, even with the best AI.
- Understand File Formats: Choose the appropriate file format for your output. JPEG is good for web and general use due to compression, but can introduce artifacts. PNG is better for graphics with transparency. TIFF is a lossless format ideal for print and professional work where maximum quality is needed. Tophinhanhdep.com provides guides on “Converters” to help you choose wisely.
- Balance File Size and Quality: Increasing resolution often means larger file sizes. While desirable for quality, massive files can be slow to load online or consume significant storage. Use “Compressors” and “Optimizers” (available on Tophinhanhdep.com) to strike a balance, especially for web images, ensuring your “Trending Styles” load quickly.
- Check Print Requirements: If printing, always consult your print studio for their minimum resolution requirements. This prevents disappointment and ensures your “Beautiful Photography” translates perfectly to physical form.
The Tophinhanhdep.com Advantage: Your Hub for High-Resolution Imagery
Tophinhanhdep.com is dedicated to empowering creators and enthusiasts with the knowledge and tools to master image resolution. Our platform not only offers a vast collection of “Wallpapers,” “Backgrounds,” and diverse “Images” (Nature, Abstract, Aesthetic, Sad/Emotional) but also serves as an authoritative source for “Photography Guides,” “Image Tools,” and “Visual Design” insights.
We constantly update our recommendations for “AI Upscalers,” “Converters,” and “Optimizers” to ensure you have access to the latest and most effective solutions. Whether you’re seeking “Image Inspiration,” looking to curate “Mood Boards,” or aiming to improve your “Digital Photography” skills, Tophinhanhdep.com is your go-to resource. Our commitment is to help you create, enhance, and share visuals that truly stand out, making every pixel count.
In conclusion, the journey to increase the resolution of an image is multifaceted, offering solutions for every need and skill level. From the transformative power of AI upscaling to the precise control of professional editing software, and the convenience of online and mobile applications, the tools are at your disposal. By understanding the principles of resolution and employing the right techniques, you can ensure your images are always crisp, clear, and ready to make a stunning visual impact, enhancing everything from your personal photo collections to your most ambitious “Graphic Design” projects. Explore Tophinhanhdep.com today to unlock your full creative potential.