How to Increase the Resolution of an Image for Stunning Visuals

In the vast and vibrant world of digital imagery, the resolution of your photos plays a pivotal role in their impact and versatility. Whether you’re crafting breathtaking “Beautiful Photography” for a portfolio, designing “Aesthetic” social media graphics, preparing “High Resolution Stock Photos,” or simply wanting to print a cherished memory at a larger size, understanding how to increase image resolution is an invaluable skill. Low-resolution images can appear pixelated, blurry, or simply lack the crisp detail needed to truly captivate an audience, severely limiting their potential.
Fortunately, the landscape of image processing has evolved dramatically. Gone are the days when increasing image size inevitably led to a noticeable drop in quality. Today, thanks to advancements in “Digital Photography” techniques, sophisticated “Image Tools” like AI upscalers, and powerful photo editing software, achieving higher resolution images without compromise is not just possible, but often surprisingly straightforward. At Tophinhanhdep.com, we understand the importance of visual excellence across all your “Images” and “Visual Design” projects. This comprehensive guide will delve into the leading methods for boosting your image resolution, ensuring your visuals always stand out, from intricate “Nature” shots to compelling “Abstract” designs. We’ll explore various approaches, from cutting-edge AI technology to the precision of professional editing suites and convenient online solutions, empowering you to unlock the full potential of your visual content.

Understanding Image Resolution: Why It Matters for Your Visuals
Before diving into the “how-to,” it’s crucial to grasp what image resolution truly signifies and its implications for your “Photography” and “Visual Design” endeavors.
The Pixel Powerhouse: What is Resolution?
At its core, image resolution refers to the number of pixels (picture elements) an image contains, typically expressed as width x height (e.g., 1920x1080 pixels). It also translates to pixel density, often measured in Pixels Per Inch (PPI) or Dots Per Inch (DPI). The higher the pixel count and density, the more detailed and sharper your image will appear, especially when viewed at larger sizes or printed.
Consider a “Wallpaper” or “Background” image: a high-resolution version will offer crisp lines and vibrant colors on a large monitor or projector, while a low-resolution one will quickly reveal jagged edges and blurriness. Similarly, for “Beautiful Photography” or “Digital Art,” superior resolution ensures that every nuance and texture is preserved, allowing for greater immersion and appreciation of the artist’s craft. For “Graphic Design” and “Photo Manipulation,” starting with a high-resolution image provides more flexibility for cropping and editing without degradation.

Printing vs. Web: Different Needs, Different Resolutions
The optimal resolution for an image largely depends on its intended use:
- For Print: High-quality prints demand significantly higher resolutions. A standard recommendation for professional printing is 300 DPI. This density ensures that individual pixels are not discernible to the naked eye, resulting in smooth transitions and fine detail. If you aim to create large prints of your “Nature” or “Abstract” photography, increasing resolution is non-negotiable.
- For Web and Digital Screens: Digital displays, including monitors, smartphones, and tablets, typically render images at a much lower DPI, often around 72 DPI. While a 300 DPI image won’t look “better” on a 72 DPI screen than a 72 DPI image of the same dimensions, having higher resolution allows for greater zoom capabilities and future-proofing for higher-density screens. For “Wallpapers” or “Backgrounds,” adequate resolution ensures they fill modern screens without stretching or pixelation.
Understanding these distinctions will guide your choices when increasing resolution, helping you select the right tools and settings for your specific “Creative Ideas” and “Thematic Collections.”
Leveraging AI for Superior Image Upscaling
The advent of Artificial Intelligence (AI) has revolutionized how we approach image resolution enhancement. AI-powered upscalers don’t just stretch pixels; they intelligently analyze image data, predict missing details, and reconstruct the image at a higher resolution with remarkable accuracy, often without noticeable loss of quality. This technology is a game-changer for anyone working with “Stock Photos,” “Digital Photography,” or even recovering detail from older, “Sad/Emotional” or “Vintage” photographs.
On Tophinhanhdep.com, our “Image Tools” section features a curated selection of “AI Upscalers” that harness machine learning to enlarge your images significantly. These tools are designed to be user-friendly, providing professional-grade results without requiring extensive photo editing expertise.
How AI Upscalers Work Their Magic
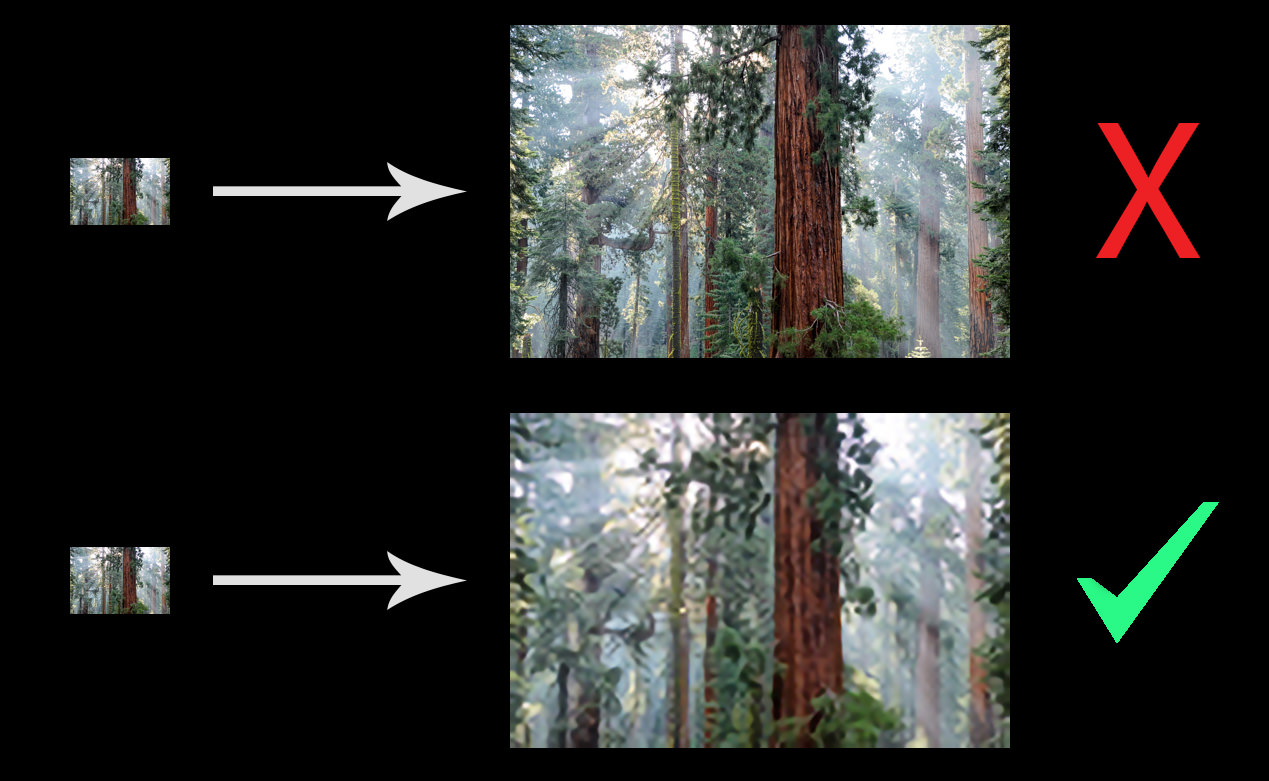
Traditional image resizing methods often rely on interpolation, which essentially fills in new pixels by averaging the colors of surrounding pixels. This can lead to a soft, blurry, or “blocky” appearance, especially with large increases in size. AI upscalers, however, operate differently:
- Deep Learning Analysis: They are trained on millions of images, learning intricate patterns, textures, and structures. This allows them to “understand” how new pixels should be created, rather than just guessing.
- Detail Generation: When you feed a low-resolution image into an AI upscaler, it doesn’t just stretch; it intelligently generates new pixels that mimic realistic detail, enhancing sharpness and clarity. Some even include face recognition technology to refine facial features in portraits.
- Noise and Artifact Reduction: Many AI upscalers also incorporate algorithms to reduce noise, remove blur, and correct JPEG compression artifacts during the upscaling process, resulting in cleaner, more pristine images.
Steps to Upscale with Tophinhanhdep.com’s Recommended AI Tools
While specific interfaces may vary, the general process for using AI upscalers found on Tophinhanhdep.com is incredibly intuitive:
- Select Your Tool: Visit the “AI Upscalers” section under “Image Tools” on Tophinhanhdep.com and choose an upscaling application or online service that fits your needs. Many offer free trials or a limited number of free upscales.
- Upload Your Image: Most platforms support common formats like JPEG, PNG, and TIFF. If you have a RAW file from your camera, you’ll typically need to convert it to a compatible format first.
- Choose Upscaling Factor: You can usually select a magnification factor (e.g., 2x, 4x, 6x) or input custom dimensions. For critical images like “Beautiful Photography,” experiment with settings to find the optimal balance.
- Refine (Optional): Some tools offer additional controls for noise suppression, blur reduction, or face refinement. Leverage these features, especially for “Portrait” shots or images requiring extra touch-ups.
- Preview and Save: The software will generate a preview, allowing you to compare the original with the enhanced version. Once satisfied, save the high-resolution image to your desired location.
Using an AI upscaler, you can take a low-resolution “Aesthetic” image and transform it into a stunning, large-format print, or prepare “High Resolution” versions of your “Digital Photography” for demanding clients.
Traditional Photo Editing Software: Mastering Resolution with Precision
While AI upscalers offer incredible convenience, professional-grade photo editing software remains indispensable for photographers and designers who demand granular control and a vast suite of editing capabilities. Tools like Adobe Photoshop and GIMP have long been the backbone of “Photo Manipulation” and “Graphic Design,” offering powerful interpolation methods and sharpening tools to increase resolution effectively.
Photoshop: The Industry Standard for Detailed Resampling
Adobe Photoshop is a comprehensive “Image Tool” that offers advanced control over image resolution, a process it refers to as “resampling.” It’s ideal for “Digital Photography,” intricate “Visual Design,” and creating “Creative Ideas” that demand pixel-perfect precision.
Steps to Increase Resolution in Photoshop:
- Open Your Image: Launch Photoshop and open the image you wish to enhance.
- Access Image Size: Navigate to
Image > Image Size...(or use the shortcutAlt + Ctrl + Ion Windows,Option + Command + Ion Mac). - Adjust Dimensions and Resolution:
- Ensure the “Resample” box is ticked. This allows Photoshop to add new pixels.
- Change the unit for Width and Height to “Percent” or “Pixels.”
- To maintain aspect ratio, click the chain icon linking width and height.
- Input your desired new dimensions or percentage increase.
- For print, you might adjust the “Resolution” field to 300 Pixels/Inch, but remember this primarily affects print dimensions, not necessarily screen display.
- Choose a Resampling Mode: This is crucial. For enlargement, “Preserve Details (enlargement)” or “Bicubic Smoother” (for smoother gradients) are generally recommended. “Bicubic Sharper” can also be used but might introduce more artifacts if overused.
- Sharpening (Post-Resample): After resizing, a subtle sharpening can significantly improve clarity. Go to
Filter > Sharpen > Unsharp Mask...or explore “Neural Filters” for “Super Zoom” in newer Photoshop versions. AdjustAmountandRadiussliders carefully to enhance details without over-sharpening. - Save/Export: Once satisfied, save your enhanced image. For optimal quality, use
File > Export > Export As...to choose format (JPEG, PNG, TIFF) and quality settings, orFile > Save As...for preserving layers and full editability.
Photoshop’s versatility makes it a go-to for tasks like scaling “Stock Photos” for various uses or perfecting “Beautiful Photography” for exhibition prints.
GIMP: A Free and Powerful Alternative
GIMP (GNU Image Manipulation Program) stands as a robust, free, and open-source alternative to Photoshop, offering similar capabilities for increasing image resolution. It’s a fantastic “Image Tool” for enthusiasts and professionals on a budget, capable of handling “Photo Manipulation” and enhancing various “Images.”
Steps to Increase Resolution in GIMP:
- Open Your Image: Launch GIMP and open your image.
- Scale Image: Go to
Image > Scale Image.... - Adjust Resolution and Dimensions:
- In the “Scale Image” dialog, you can adjust the
WidthandHeight(linked by default to maintain aspect ratio) andX resolutionandY resolution(also linked). - Enter your desired values. For print, setting X and Y resolution to 300 px/in is a good starting point.
- Under “Interpolation,” select a suitable algorithm for upscaling. “Cubic” or “LoHalo” are often good choices for maintaining detail.
- In the “Scale Image” dialog, you can adjust the
- Scale: Click “Scale” to apply the changes.
- Sharpen (Optional): Similar to Photoshop, you can add sharpness after scaling. Explore
Filters > Enhance > Sharpen (Unsharp Mask)to fine-tune the image’s clarity. - Export: Go to
File > Export As...to save your image in your preferred format (e.g., JPEG, PNG, TIFF).
GIMP is a testament to how accessible powerful “Image Tools” can be, allowing anyone to enhance their “Photography” for “Creative Ideas” without financial investment.
Quick Fixes with macOS Preview
For macOS users, the built-in Preview application offers a surprisingly capable and quick way to adjust image size and resolution without needing third-party software. While less feature-rich than Photoshop or GIMP, it’s perfect for simple adjustments for “Images” or “Backgrounds.”
Steps to Increase Resolution in Preview:
- Open Image: Right-click your image file and choose
Open With > Preview. - Adjust Size: Go to
Tools > Adjust Size.... - Modify Dimensions and Resolution:
- In the “Image Dimensions” dialog, ensure “Scale proportionally” is checked to maintain the aspect ratio.
- Tick the “Resample image” box.
- Change the
Resolution(e.g., to 300 pixels/inch for print) and then adjustWidthorHeightvalues to your desired size. Preview will automatically recalculate the other dimension and file size.
- OK & Save: Click
OKto apply, thenFile > Save(to overwrite) orFile > Export...(to save as a new file, preserving the original).
This method is quick and convenient for general “Image Inspiration & Collections” where high precision isn’t paramount.
Online Solutions and Mobile Apps for On-the-Go Enhancement
In our fast-paced digital world, the need for quick and accessible “Image Tools” is ever-present. Tophinhanhdep.com recognizes this demand, highlighting various online services and mobile applications that allow you to increase image resolution and enhance visuals directly from your browser or smartphone. These options are perfect for rapidly improving “Wallpapers,” “Backgrounds,” or images for “Trending Styles” on social media.
Web-Based Upscaling for Convenience
Online AI image upscalers provide a browser-based solution, eliminating the need for software downloads. These platforms utilize powerful cloud-based AI algorithms, making them incredibly accessible for anyone needing to enhance “Digital Photography” or “Stock Photos” on the fly.
General Steps for Online Upscalers (as featured on Tophinhanhdep.com’s Image Tools):
- Visit Tophinhanhdep.com’s Image Tools: Navigate to our “AI Upscalers” or “Optimizers” section to find recommended online enhancers.
- Upload Your Photo: Most services allow you to drag and drop your image or click an upload button.
- Choose Enhancement Options: Select your desired upscaling factor (e.g., 2x, 4x, 8x) and any additional enhancement features like noise reduction, color correction, or artifact removal.
- Process and Download: Initiate the enhancement process. Once completed, you can preview the results and download your newly high-resolution image.
These tools are incredibly useful for busy content creators, offering a streamlined way to get high-quality “Images” for their projects, especially for “Creative Ideas” that need quick execution.
Mobile Apps: Enhance on the Go
For smartphone photographers capturing moments for “Aesthetic” posts or updating their “Wallpapers,” mobile image enhancement apps offer a portable solution. Many apps, some of which are showcased on Tophinhanhdep.com, leverage AI to make resolution boosting both effective and effortless.
General Steps for Mobile Image Upscaling Apps:
- Download a Recommended App: Search for image upscaling or photo enhancer apps on your phone’s app store. Look for those highlighted on Tophinhanhdep.com for their efficacy.
- Import Image: Open the app and import the low-resolution image from your phone’s gallery.
- Select Resize/Enhance Option: Look for options like “Resize,” “Enhance,” or “AI Upscale.” You might be able to manually enter new dimensions or select a magnification preset.
- Apply Enhancements & Save: Some apps offer additional tools to sharpen or reduce noise. Apply these as needed, then save the enhanced image back to your gallery.
Mobile apps are perfect for casual “Photography” and enhancing snapshots for personal use or quick sharing, ensuring your “Thematic Collections” look great across all platforms.
Best Practices for Achieving and Maintaining High-Resolution Images
Increasing resolution isn’t always about fixing a problem; it’s also about optimizing your workflow and understanding the limitations. For optimal “High Resolution” results across all your “Images” and “Photography,” consider these best practices:
Start with the Best Possible Quality
The golden rule of image enhancement is that it’s always easier to work with a high-quality original. While AI can work wonders, it cannot magically create details that were never there. If you’re capturing “Beautiful Photography,” always shoot at the highest resolution your camera allows. For “Stock Photos” or existing “Images,” try to source the largest available file.
Optimizing for Print vs. Web
- For Print: Always aim for 300 DPI at the target print size. For example, if printing an 8x10 inch photo, your image should be 2400x3000 pixels (8300 x 10300).
- For Web: While screens only display at ~72 DPI, exporting images at 1500-2000 pixels on the longest side for general web use provides a good balance of detail and manageable file size. For “Wallpapers” or “Backgrounds,” match common screen resolutions (e.g., 1920x1080, 2560x1440).
Tophinhanhdep.com offers guides on “Optimizers” and “Compressors” in our “Image Tools” section to help you manage file sizes for web, ensuring fast loading times without sacrificing too much visual fidelity.
Preventing Pixelation: The Limits of Upscaling
While modern tools are powerful, there are limits to how much an image can be upscaled before artifacts or a “painted” look become evident. Excessive upscaling of very low-resolution images can still result in artificial-looking textures. Always preview your results and compare them to the original to ensure you’re achieving a natural, high-quality outcome.
Key Takeaways from the FAQs:
- Adding Pixels: Yes, upsampling adds pixels, making the image sharper and more detailed.
- Quality Improvement: Increasing resolution, especially with AI, generally improves quality by adding detail, but the extent depends on the original image and the tool used.
- File Size Impact: Higher resolution images invariably lead to larger file sizes due to the increased pixel data. Be mindful of storage and processing power.
Conclusion: Elevate Your Visuals with Tophinhanhdep.com
Mastering the art of increasing image resolution is a fundamental skill for anyone passionate about “Photography,” “Visual Design,” and creating captivating “Images.” From boosting a cherished family photo for print to preparing “High Resolution” assets for professional “Graphic Design” projects, the methods and “Image Tools” available today offer unprecedented control and quality.
At Tophinhanhdep.com, we are dedicated to helping you become a better visual creator. We provide comprehensive “Photography Guides,” curate the best “Image Tools” (including “AI Upscalers,” “Converters,” and “Optimizers”), and offer “Image Inspiration & Collections” to fuel your “Creative Ideas.” By applying the techniques discussed in this guide and exploring the resources on our site, you can ensure your “Wallpapers,” “Backgrounds,” “Aesthetic,” “Nature,” “Abstract,” and “Beautiful Photography” always shine with stunning clarity and detail.
Don’t let low resolution limit your creative vision. Visit Tophinhanhdep.com today to discover the perfect tools, learn new “Editing Styles,” and find the inspiration you need to elevate your visual content to new heights. Transform your low-res images into high-impact masterpieces and make every pixel count!