How to Increase the Resolution of an Image for Breathtaking Visuals

In an increasingly visual world, the quality of an image can make or break its impact. From stunning digital art pieces to professional photography prints, and from engaging social media content to eye-catching website backgrounds, high-resolution images are no longer a luxury but a fundamental necessity. A low-resolution image, characterized by a lack of detail and often appearing blurry or pixelated when enlarged, can detract significantly from your message and aesthetic, regardless of how captivating the subject might be.
Fortunately, thanks to advancements in image processing software and artificial intelligence, transforming a low-resolution image into a high-resolution masterpiece is more accessible than ever. This comprehensive guide, brought to you by Tophinhanhdep.com, will walk you through the various techniques and tools available to dramatically improve your image resolution. Whether you’re a professional photographer aiming for flawless prints, a graphic designer seeking crisp source materials, or simply someone looking to enhance your personal collection of wallpapers and backgrounds, Tophinhanhdep.com is dedicated to empowering you with the knowledge and resources to achieve unparalleled visual quality. Our platform offers everything from inspiring image collections and thematic mood boards to powerful image tools and in-depth photography guides, all designed to help you create and appreciate the world of high-resolution visuals.

Understanding Image Resolution: The Foundation of Visual Quality
Before diving into the “how-to,” it’s crucial to grasp what image resolution truly means and why it holds such immense importance in digital imaging. Resolution is the bedrock upon which all visual quality is built, influencing everything from the sharpness of a tiny detail to the smoothness of a large-format print.
Pixels, DPI, and Megapixels Explained
At its core, image resolution refers to the number of individual pixels that compose an image, typically expressed as a width by height measurement (e.g., 1920 x 1080 pixels). Each pixel is a tiny square of color information, and the more pixels packed into a given area, the finer the detail and the higher the resolution.
Beyond pixel dimensions, resolution is often quantified by DPI (Dots Per Inch) or PPI (Pixels Per Inch). While often used interchangeably, PPI specifically refers to the pixel density of a digital image, indicating how many pixels are contained within one inch of the image. For instance, an image destined for print might require 300 PPI for optimal clarity, ensuring smooth tones and continuous color transitions. In contrast, images viewed on a screen (like those used for wallpapers or website backgrounds on Tophinhanhdep.com) typically appear sharp at a lower density, often around 72 PPI, because screen pixels are larger and fixed. Understanding this distinction is vital for preparing images for their intended output.

Your digital camera’s sensor size and pixel density directly influence the maximum resolution an image can achieve. A camera producing images of 8256 x 6192 pixels yields a total of over 51 million pixels, translating to a 51-megapixel (MP) image. However, when you crop an image—a common practice in digital photography—you are essentially removing pixels, thereby reducing its overall resolution. This means a heavily cropped image will have a lower megapixel count and less detail than the original, limiting its potential for large-scale reproduction.
Why Upscaling is Essential for Modern Visuals
The pursuit of higher resolution isn’t merely a technical endeavor; it’s a creative necessity that unlocks a world of possibilities for visual content. Upscaling, the process of increasing an image’s pixel dimensions, becomes essential for several reasons:
- Large-Format Printing: For photographers aiming to produce gallery-quality prints or graphic designers creating large banners, sufficient resolution is non-negotiable. A low-res image printed large will inevitably appear pixelated and blurry, undermining its artistic value.
- Professional Presentation: Whether it’s for stock photos, client presentations, or website portfolios (like those featured on Tophinhanhdep.com), high-resolution images convey professionalism and attention to detail. They ensure your visuals look crisp and impressive on diverse screens and devices.
- Cropping Flexibility: Higher resolution images provide more leeway for creative cropping without sacrificing quality. You can zoom in on specific elements or adjust compositions while retaining enough pixel data for a sharp final output.
- Enhanced Aesthetic and Digital Art: For creating stunning aesthetic wallpapers, dynamic backgrounds, or intricate digital art, starting with or achieving a high-resolution base is paramount. It allows for rich detail, smooth gradients, and vibrant textures, all of which contribute to a superior visual experience. Tophinhanhdep.com’s extensive collections of nature, abstract, and beautiful photography thrive on high resolution to deliver this impact.
- Future-Proofing Content: As display technologies advance, higher resolution becomes the standard. Upscaling older, lower-resolution images ensures they remain usable and visually appealing for years to come.
However, upscaling isn’t without its challenges. Simply stretching an image without adding intelligent pixel data often results in pixelation and a noticeable loss of sharpness. This is where advanced tools and techniques come into play, helping to mitigate these issues and preserve or even enhance image quality during the resolution increase. Tophinhanhdep.com not only provides high-resolution backgrounds and photography but also guides you through the tools to ensure your own images meet these exacting standards.
The Power of AI: Smart Upscaling with Tophinhanhdep.com’s Recommended Tools
The advent of Artificial Intelligence has revolutionized image upscaling, transforming what was once a compromise-filled process into a sophisticated enhancement. AI upscalers represent the cutting edge of image resolution technology, offering a solution that goes far beyond simple pixel stretching.
Leveraging Tophinhanhdep.com’s AI Upscaler for Superior Results
AI image upscalers utilize machine learning algorithms trained on millions of images to intelligently “guess” and create new pixels, effectively adding detail rather than merely interpolating existing ones. This results in significantly improved image quality, with minimized pixelation, reduced noise, and enhanced sharpness that traditional upscaling methods often struggle to achieve. Some advanced AI tools even incorporate face recognition technology to refine facial details, ensuring portraits retain their natural appearance even after substantial enlargement.
Tophinhanhdep.com is at the forefront of this technology, offering its own proprietary AI upscaler designed to elevate your images with remarkable precision and ease. Whether you’re looking to enhance an aesthetic image for your personal collection, prepare digital art for print, or transform a cherished low-resolution photograph into a high-resolution masterpiece, our AI tool delivers professional-grade outcomes.
Here’s a general step-by-step guide to using an advanced AI upscaler like the one available on Tophinhanhdep.com:
- Upload Your Image: Begin by visiting Tophinhanhdep.com’s Image Tools section and selecting the AI Upscaler. You can easily drag and drop your image file (most commonly JPG or PNG) or use the upload button to select it from your device. Our platform is designed to handle a wide variety of image types, from nature landscapes to detailed portraits.
- Select Your Magnification: Once uploaded, you’ll be presented with options to scale your image. Tophinhanhdep.com’s AI upscaler typically offers preset magnifications such as 200% (2x), 400% (4x), or even up to 800% (8x) for paid members, along with options for custom scaling. Choosing the right magnification depends on your original image quality and desired final output.
- Initiate Enhancement: With your settings chosen, simply click the “Start” or “Enhance” button. The AI will then begin its magic. During this process, the machine learning algorithms will analyze your image, remove common artifacts like JPEG “blocky noise,” reduce blur, suppress noise, and intelligently generate new pixels to increase the resolution without sacrificing original detail. This is where the power of AI shines, recreating entire images in higher resolution while preserving their integrity.
- Preview and Download: After the processing is complete (which may take a moment depending on the image size and selected magnification), you can preview the enhanced image directly on Tophinhanhdep.com. Compare it side-by-side with your original to truly appreciate the significant photo quality increase. Once satisfied, you can download your new high-resolution image to your device, ready for use as a stunning wallpaper, a component for your graphic design project, or a high-quality print.
Our AI upscaler’s benefits extend beyond mere pixel addition; it includes advanced features like intelligent detail preservation, automatic artifact removal, and even color and lighting correction. This makes it an indispensable tool for anyone involved in visual design, digital art, or simply seeking to enhance their collection of images, ensuring they always meet the high-resolution standards synonymous with Tophinhanhdep.com.
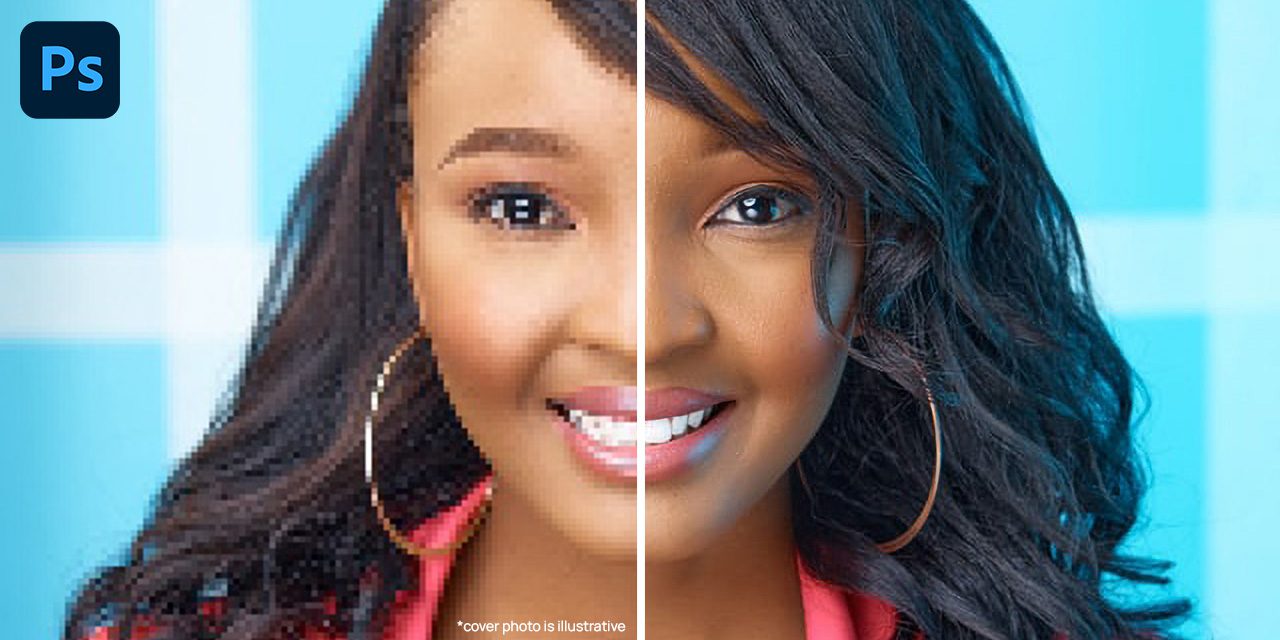
Adobe Photoshop’s Super Resolution: An AI-Driven Approach
While specialized online tools offer quick and powerful AI upscaling, professional-grade software like Adobe Photoshop also integrates advanced AI capabilities. Photoshop’s Super Resolution feature, accessible through Camera Raw, provides an AI-driven method to effectively double the resolution of your photos, quadrupling the total pixel count, all within the familiar Adobe ecosystem.
Here’s how to utilize Photoshop’s Super Resolution, a technique highly recommended for Tophinhanhdep.com users involved in high-resolution stock photography and detailed photo manipulation:
- Open Image in Camera Raw: In Photoshop, navigate to
File > Open Asand select your image. From the small dropdown menu, chooseOpen as Camera Raw, then clickOpen. Alternatively, if the image is already open, you can apply Camera Raw as a filter. - Access Enhance Feature: Once your image loads in the Camera Raw interface, right-click anywhere on the picture and select
Enhancefrom the contextual menu. - Apply Super Resolution: In the
Enhancedialog box that appears, ensure theSuper Resolutionoption is checked. You’ll see an estimated time for the process. Photoshop’s AI will then work its magic, doubling both the width and height of your image, resulting in a 4x increase in total pixels. This process intelligently reconstructs details, minimizing the usual quality degradation associated with manual enlargement. - Compare and Save: After the enhancement is complete, a new, higher-resolution DNG file (a digital negative format) will be generated and appear in the Camera Raw interface alongside your original. You can compare the two versions to assess the improvements. Once you’re happy with the result, you can open it in Photoshop for further editing or save it in your desired format (e.g., JPEG, TIFF) for high-resolution stock photos or other creative projects.
Adobe Photoshop’s Super Resolution is an invaluable tool for Tophinhanhdep.com users who require precise control over their digital photography editing and graphic design projects. It allows for the creation of incredibly detailed images, perfect for integrating into complex photo manipulations or preparing for creative ideas that demand the highest possible resolution.
Traditional Software Techniques for Increasing Image Resolution
While AI-powered upscaling has set new benchmarks for quality and ease of use, traditional image editing software still provides robust methods for increasing image resolution. These techniques, often relying on precise control over resampling algorithms and manual adjustments, remain essential tools in the arsenal of any photographer or visual designer, offering flexibility and fine-tuning capabilities that complement AI solutions.
Mastering Upsampling in Adobe Photoshop
Adobe Photoshop, renowned for its comprehensive suite of image editing features, offers powerful traditional methods for increasing image resolution through a process known as resampling. Upsampling in Photoshop means adding new pixels to an image, as opposed to downsampling, which involves removing pixels.
Here’s a detailed, step-by-step guide to increasing image resolution in Adobe Photoshop:
- Open Your Image: Launch Photoshop and open the image you wish to resize. You can do this by dragging the file onto the Photoshop icon, or by going to
File > Openand selecting your image. Photoshop supports a wide range of file formats, including RAW files, though for RAW, you might first use Adobe Camera Raw or Lightroom for initial processing. - Access Image Size Dialog: Navigate to
Image > Image Size...(or use the shortcutOption + Command + Ion Mac,Alt + Ctrl + Ion Windows). This dialog box is your primary control panel for managing image dimensions and resolution. - Configure Resampling Options:
- Dimensions: By default, dimensions might be shown in pixels. For easier control, especially when aiming for a proportional increase, change this to “Percent.” You can then enter a percentage value (e.g., 150% for a 50% increase in size).
- Constrain Aspect Ratio: Ensure the chain-link icon between the Width and Height fields is locked. This ensures that when you change one dimension, the other automatically adjusts, maintaining the image’s original proportions and preventing distortion.
- Resample: Crucially, make sure the “Resample” box is ticked. This tells Photoshop to add new pixels intelligently rather than just changing the display size without altering the pixel data.
- Resampling Method: This dropdown menu is critical for the quality of your upscaling. For general image enlargement and preserving detail, select
Preserve Details (enlargement). For smoother results, particularly for images without sharp lines,Bicubic Smootheris an excellent choice. If your image contains clear typography or hard-edged graphics (e.g., for certain digital art pieces),Nearest Neighborcan help preserve those sharp edges, though it can introduce jaggedness in photographic content.
- Adjust Resolution (DPI/PPI): Below the dimensions, you’ll find the Resolution field, usually set to 72 PPI for web or 300 PPI for print. While changing this value without resampling will only affect the print size metadata, when “Resample” is checked, adjusting this number will also affect the pixel dimensions. For print, aim for 300 PPI.
- Apply and Sharpen: Click “OK” to apply your changes. The resampling process is typically fast. After upsampling, images can sometimes appear slightly soft or blurred due to the added interpolated pixels. To counteract this, a light application of sharpening is often beneficial.
- Go to
Filter > Sharpen > Unsharp Mask. Start with settings likeAmount: 100%andRadius: 1.0and adjust to taste, carefully observing the preview to avoid over-sharpening which can create artifacts. For more advanced control,Smart Sharpen(also underFilter > Sharpen) offers more options for fine-tuning. - For images with typography, applying a
Gaussian Blur(lightly) followed bySmart Sharpenor adjusting threshold layers can help clean feathered edges.
- Go to
- Save and Export: Once you’re satisfied with the resized and sharpened image, save it.
File > Save Asallows you to save in various formats. For maximum quality and further editing, save as a TIFF or PSD.- For web use,
File > Export > Export As...provides options to optimize file size for different platforms while managing image quality, format (JPEG, PNG), and color profile.
Mastering these traditional Photoshop techniques gives Tophinhanhdep.com users unparalleled control over their digital photography editing, ensuring high-resolution outcomes for graphic design projects, intricate photo manipulation, and preparing images for specific visual design needs.
GIMP and macOS Preview: Accessible Upscaling Solutions
For those who may not have access to Adobe Photoshop or prefer open-source alternatives, other tools like GIMP (GNU Image Manipulation Program) and macOS Preview offer practical solutions for increasing image resolution. These tools provide accessibility for a wide range of Tophinhanhdep.com users, from those experimenting with creative ideas to casual photographers.
Using GIMP for Image Resolution Enhancement
GIMP is a powerful, free, and open-source image editor available for Windows, macOS, and Linux. While its interface can be daunting for beginners, it provides robust features for image manipulation, including upscaling.
- Open Your Image in GIMP: Launch GIMP and go to
File > Opento select and open your image. - Create a High-Resolution Canvas: To ensure your final image has a high pixel density (e.g., 300 PPI for print), it’s often best to start by setting the canvas. Go to
File > Newto open the “Create a New Image” dialog box.- Under “Advanced Options,” adjust the X and Y resolutions to your desired PPI (e.g., 300). Keep the width and height at their default settings (which should match your original image’s dimensions after it’s loaded). Click
OK.
- Under “Advanced Options,” adjust the X and Y resolutions to your desired PPI (e.g., 300). Keep the width and height at their default settings (which should match your original image’s dimensions after it’s loaded). Click
- Copy and Paste Original Image: Return to your original image window, select the entire image (
Ctrl+AorCommand+A), and copy it (Ctrl+CorCommand+C). Then, switch to your newly created high-resolution canvas window and paste the image (Ctrl+VorCommand+V). - Scale the Pasted Layer: Your pasted image will likely be smaller than the new canvas. In the Layers dialog, ensure “Floating Selection (Pasted Layer)” is selected. Then, select the
Scale toolfrom the Toolbox. Click on the pasted image, and in the “Scale” dialog box, ensure the chain icon is locked. Enter the desired new width (or height) for your image, which should fill the new canvas, then clickScale. GIMP will resample the image to fit the new dimensions. - Check Quality and Export: Zoom in (
View > Zoom) to inspect the quality of your upscaled image. Once satisfied, click theAnchor Layericon (in the Layers dialog) to merge the floating selection with the background. Finally, to save your image, go toFile > Export As.... Choose your desired format (e.g., JPEG or PNG) and set the quality. For best results, especially for print, ensure compression is set to minimal or zero if available for your chosen format.
Increasing Resolution with macOS Preview
For Mac users, the built-in Preview application offers a quick and simple way to resize and effectively increase the resolution of images, particularly for less demanding tasks.
- Open Image with Preview: Locate your image file in Finder, right-click it, and choose
Open With > Preview. - Access Adjust Size Tool: Click on the
Markup Toolbaricon (looks like a pen tip) in the toolbar. Then, click theAdjust Sizeicon (often depicted as three nested boxes or a ruler icon). - Resize and Resample: In the “Image Dimensions” dialog box, ensure the lock icon (constrain proportions) is closed. You can then adjust the width or height to your desired new dimensions. Critically, ensure “Resample Image” is checked. This tells Preview to add new pixels rather than just changing the display size. Preview uses its internal algorithms for interpolation.
- Save Your Changes: After adjusting the size, click
OK. The image will be resized. You can then go toFile > Saveto overwrite the original, orFile > Export...to save it as a new file in a different format or quality setting.
These accessible tools, while perhaps not as feature-rich as Photoshop, make high-resolution image creation achievable for everyone, supporting creative ideas for backgrounds, simple photo manipulation, and quick enhancements of visual content featured on Tophinhanhdep.com.
Best Practices and Tips for Optimal Resolution Enhancement
Regardless of whether you choose an advanced AI upscaler or a traditional software technique, adhering to certain best practices is crucial for achieving the best possible results when increasing image resolution. These guidelines will help you maximize quality, minimize unwanted artifacts, and ensure your enhanced images meet the high standards expected by Tophinhanhdep.com and its discerning audience.
General Guidelines for Any Upscaling Method
- Start with the Highest-Quality Source: This is perhaps the most critical tip. Upscaling can only work with the information present in the original image. A heavily compressed, pixelated, or low-detail source image will yield subpar results even with the most advanced AI. Always begin with the largest, cleanest version of your image available. JPEG compression artifacts, in particular, will be amplified during upscaling.
- Avoid Excessive Enlargement: While AI upscalers are impressive, there are still practical limits. For non-AI methods, try to limit increases to 30-40% of the original dimensions to avoid noticeable quality degradation. For AI, while larger magnifications are possible, scrutinize the results closely. Pushing any image too far will introduce an unnatural, “painted” look or pixelation.
- Work Non-Destructively (in Photoshop): When using Photoshop, always convert your image layer to a
Smart Object(Layer > Smart Objects > Convert to Smart Object) before applying any resizing or filters. Smart Objects preserve the original image data, allowing you to re-edit, scale down, or change filter settings without permanently altering the pixels, providing immense flexibility in your workflow. - Sharpen Selectively and Judiciously: Sharpening is often necessary after upscaling to restore perceived detail, but it should be applied with care. Over-sharpening introduces halos, noise, and an artificial look. Apply sharpening (e.g.,
Unsharp MaskorSmart Sharpen) as a final step, and consider using layer masks to selectively sharpen only the areas that need it (e.g., avoiding skin tones in portraits) - Apply Noise Reduction When Necessary: Upscaling can sometimes exaggerate existing noise or introduce new artifacts, especially in areas of uniform color or shadow. If you notice excessive noise after enlargement, use noise reduction tools (e.g.,
Filter > Noise > Reduce Noisein Photoshop). Apply this sparingly to avoid smoothing out legitimate details. - Consider the Final Purpose: The optimal resolution and quality settings depend on the image’s intended use.
- For Print: Aim for 300 PPI at the final print size. Consider CMYK color profiles if required by your printer.
- For Web/Digital Displays: Resolutions around 72-150 PPI are usually sufficient. Optimize file size (e.g., using Tophinhanhdep.com’s image compressor) to ensure fast loading times without sacrificing too much visual quality.
- Choose Appropriate File Formats:
- JPEG: Ideal for web use due to its efficient compression, but it’s a “lossy” format, meaning some data is discarded. Use for final web images, but avoid repeatedly saving JPEGs during editing.
- PNG: A “lossless” format excellent for web graphics, logos, and images requiring transparency. Larger file sizes than JPEG but preserves quality.
- TIFF/PSD: Lossless formats best suited for professional printing, archiving, and intermediary editing steps where maximum quality retention is critical.
Integrating High-Resolution Images into Your Visual Workflow with Tophinhanhdep.com
Tophinhanhdep.com is designed to be your comprehensive resource for all things visual, and integrating high-resolution images seamlessly into your creative workflow is at the core of our mission.
- Diverse Image Collections: Explore Tophinhanhdep.com’s vast array of high-resolution images, including stunning wallpapers, aesthetic backgrounds, nature photography, abstract art, and beautiful photography. These collections serve as perfect starting points for your projects or as inspiration for your mood boards and thematic collections.
- Expert Photography Guides and Editing Styles: Our detailed guides on digital photography and editing styles provide the knowledge you need to capture and refine high-resolution images from the outset. Learn techniques that minimize the need for drastic upscaling, ensuring your photos are always print-ready and web-optimized.
- Advanced Image Tools: Beyond enhancing resolution, Tophinhanhdep.com offers a suite of image tools, including converters, compressors, and optimizers. These tools allow you to manage file formats, reduce file sizes for faster web loading, and maintain optimal quality across all your visual assets.
- Visual Design and Creative Ideas: For graphic designers and digital artists, high-resolution source images are the foundation of exceptional work. Tophinhanhdep.com’s resources empower you to find, create, and manipulate images with confidence, turning your creative ideas into visually stunning realities.
Conclusion
The ability to increase image resolution effectively is a powerful skill in today’s visually-driven landscape. Whether you’re a professional aiming for gallery-quality prints or a hobbyist enhancing personal memories, the methods and tools available are more sophisticated and accessible than ever before. From the intelligent, detail-preserving capabilities of AI upscalers (such as Tophinhanhdep.com’s proprietary tool or Adobe Photoshop’s Super Resolution) to the meticulous control offered by traditional software techniques in Photoshop, GIMP, and macOS Preview, you have a diverse arsenal at your disposal.
By understanding the fundamentals of pixels and PPI, selecting the appropriate upscaling method, and adhering to best practices like starting with high-quality sources and sharpening judiciously, you can transform low-resolution images into breathtaking visuals that captivate and impress.
Tophinhanhdep.com stands as your premier destination for all high-resolution image needs. Our platform not only provides a rich tapestry of stunning images—from inspiring nature scenes and emotional photography to modern abstract designs—but also equips you with the advanced image tools and insightful guides necessary to elevate your own visual content. Explore our collections, delve into our photography tutorials, and leverage our cutting-edge AI upscalers and other image tools to unlock the full potential of your images. Begin your journey with Tophinhanhdep.com today and transform your visual ideas into high-resolution reality.