Mastering Image Resolution: A Comprehensive Guide to Enhancing Quality in Photoshop and Beyond

In today’s visually-driven world, where every scroll and click is dominated by captivating imagery, the quality of your photographs and graphics is paramount. Whether you’re a seasoned photographer capturing breathtaking landscapes, a graphic designer crafting intricate visual concepts, or an enthusiast curating stunning wallpapers and backgrounds, achieving high-resolution images is crucial. Low-quality, pixelated visuals can undermine even the most compelling subject matter, diminishing its impact across digital platforms and print media. This comprehensive guide from Tophinhanhdep.com delves into the art and science of increasing image resolution, with a particular focus on Adobe Photoshop’s powerful capabilities, alongside exploring effective alternative tools and strategies.
At Tophinhanhdep.com, we understand the diverse needs of our audience, from those seeking beautiful photography and aesthetic images to users leveraging advanced image tools and visual design techniques. Our goal is to equip you with the knowledge and practical steps necessary to elevate your image quality, ensuring your visuals consistently impress, whether they are high-resolution stock photos or vibrant abstract art. We’ll cover everything from the fundamental principles of resolution to advanced AI-powered upscaling techniques and essential post-processing adjustments.

Understanding Image Resolution: The Foundation of Quality
Before diving into the practical steps of increasing resolution, it’s essential to grasp what image resolution truly means and why it holds such significance. Resolution dictates the level of detail and sharpness an image possesses, directly impacting its versatility for various applications, from screen display to large-format printing.
What is Resolution? Pixels, DPI/PPI, and Megapixels
At its core, image resolution refers to the number of pixels in an image, typically expressed as its width and height in pixels (e.g., 8256 x 6192 pixels). Each pixel is a tiny square of color information, and the more pixels packed into a given area, the finer and more detailed the image appears. The total number of pixels in an image can also be expressed in megapixels (MP), calculated by multiplying the width and height and dividing by one million. For instance, an 8256 x 6192 pixel image totals over 51 million pixels, equating to a 51 MP image. Cameras, depending on their sensor size and pixel density, produce images of a specific resolution.
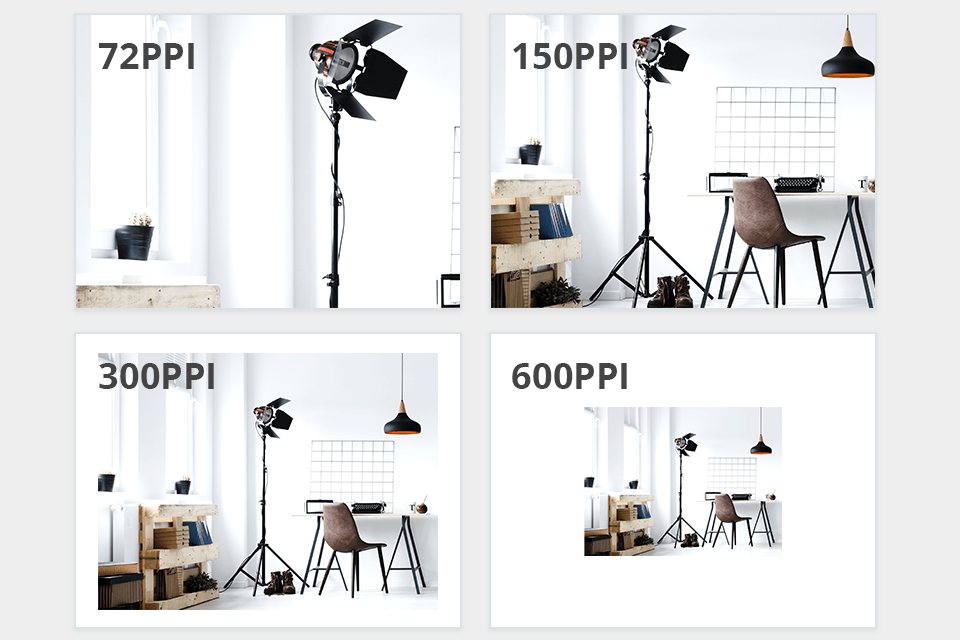
Another critical measure of resolution, particularly for print, is DPI (dots per inch) or PPI (pixels per inch). These terms describe the density of pixels or ink dots within a physical inch of an image. A higher DPI/PPI means more pixels are crammed into each inch, resulting in a sharper, more detailed output. While DPI technically refers to printer dots and PPI to image pixels, they are often used interchangeably in common discourse. For example, a standard print resolution is 300 PPI, meaning 300 pixels are mapped to every inch of the printed output. In contrast, most computer screens typically display around 72 PPI, which has historically been a common default for online images.
When you crop an image, you are effectively removing pixels, thereby lowering its overall resolution. This is why a heavily cropped image will naturally have a lower resolution than the original, uncropped photograph, directly impacting its potential for enlargement or high-quality printing.
Why High Resolution Matters for Tophinhanhdep.com Users
For the diverse range of content featured on Tophinhanhdep.com – from stunning wallpapers and backgrounds to professional stock photos and intricate digital art – high resolution is not merely a preference; it’s a necessity.
- For Printing: High-resolution images are indispensable for quality prints. Whether you’re creating a large canvas print of a beautiful nature photograph or a detailed graphic design poster, sufficient pixel density ensures smooth color transitions, continuous tones, and sharp details without pixelation. A low-resolution image, when forced into a large print, will appear blurry, blocky, and unprofessional.
- For Digital Display: While screens display at a lower PPI, high-resolution images offer flexibility. They allow for precise cropping without significant loss of detail, enabling you to extract specific elements from a wider shot while maintaining quality. This is vital for aesthetic images and mood boards where composition is key.
- Detail and Clarity: More pixels inherently mean more detail. This is crucial for capturing the intricate textures in abstract art, the delicate nuances of a sad/emotional portrait, or the fine lines in a complex digital painting. High-resolution images offer superior clarity, making them more engaging and impactful.
- Future-Proofing: Starting with a high-resolution image gives you more options for future use. You can always downscale an image for web optimization, but upscaling a low-resolution image without quality degradation is a much greater challenge. This foresight is invaluable for maintaining a high-quality library of your photography and visual designs.
The Limits of Upscaling: When Pixels Become Visible
While it is possible to increase an image’s resolution, there’s a fundamental limit to how far you can push it without introducing undesirable artifacts like pixelation. Pixelation occurs when an image is enlarged so much that the individual square pixels become visibly discernible, leading to a blocky, jagged appearance. This limitation underscores the importance of starting with the highest possible quality source image. As much as advanced algorithms can “guess” and create new pixels, they cannot invent genuine detail that wasn’t present in the original data. Understanding this balance is key to managing expectations and achieving the best possible results when working with images.
Increasing Resolution in Adobe Photoshop: A Step-by-Step Guide
Adobe Photoshop remains the industry standard for image manipulation, offering robust tools for adjusting image resolution. This section provides a detailed, step-by-step guide to increasing the resolution of your images within Photoshop, ensuring clarity and quality.
1. Accessing the Image Size Dialogue Box
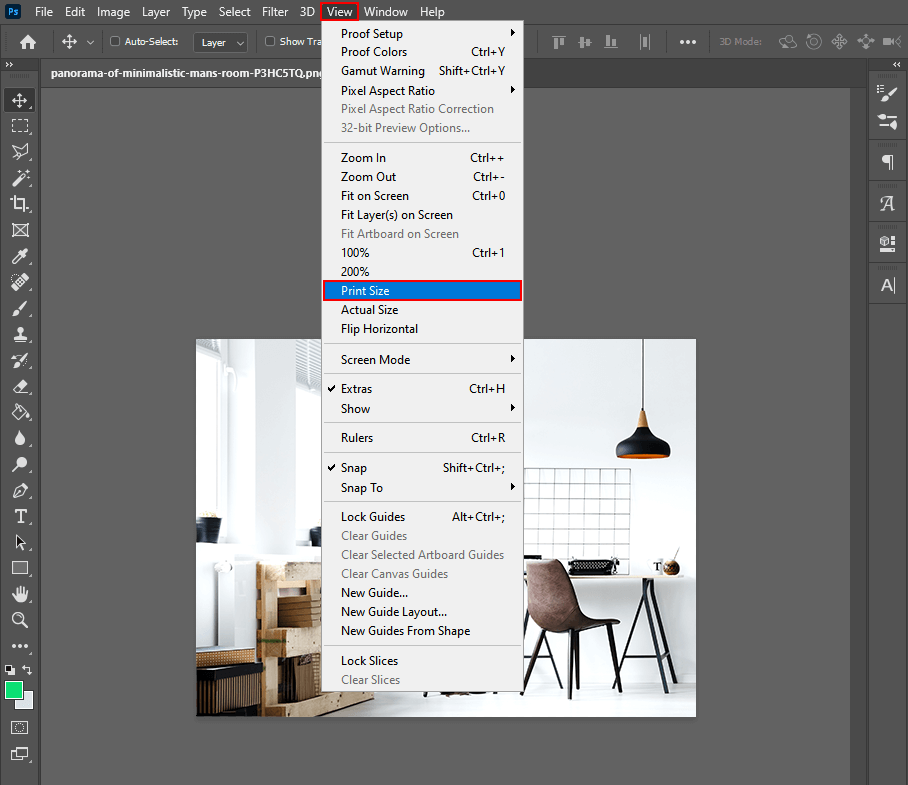
The journey to resizing your image begins with the “Image Size” dialogue box. To open it:
- Go to Image > Image Size… in the top menu bar.
- Alternatively, use the keyboard shortcut: Option + Command + I (Mac) or Alt + Ctrl + I (Windows).
Upon opening, you’ll see a window displaying your image’s current dimensions in pixels (width and height), its resolution (typically in pixels per inch), and the current file size. This dialogue box is your central control panel for resolution adjustments.
2. Navigating Image Dimensions and Aspect Ratios
Within the “Image Size” dialogue box, you have several options for altering your image’s dimensions:
- Units: Photoshop defaults to pixels, but you can change this to inches, centimeters, or even a percentage.
- Presets: For common print sizes, you can select from the “Fit To” drop-down menu, which offers standard document and print dimensions. For digital use, it’s often more effective to manually set your desired size.
- Manual Input: To change the size, simply type new values into the “Width” or “Height” boxes. By default, Photoshop keeps the aspect ratio constrained, meaning if you change the width, the height automatically adjusts to prevent distortion. This is indicated by a chain-link icon between the width and height fields. If you need to change width and height independently (be cautious, as this can distort your image), click this chain icon to unlink the dimensions.
As you adjust these values, keep an eye on the file size displayed at the top of the dialogue box. Increasing dimensions will generally result in a larger file size, which is an important consideration for storage and online loading speeds.
3. Understanding DPI/PPI in the Context of Output
The “Resolution” field in the Image Size dialogue box sets the number of pixels per inch (or centimeter). This setting is crucial primarily for print output.
- Print Standards: The widely accepted standard for high-quality prints is 300 PPI. This density is generally considered the limit of resolution discernible by the human eye, ensuring sharp and detailed prints. Always confirm the minimum resolution requirements with your printing studio, especially for large banners or specialized prints, as they might have different recommendations.
- Online Images: For images displayed exclusively online, the PPI value is less critical. Most screens display at around 72 PPI, so setting an image to 300 PPI for web-only use won’t make it look “better” on screen, but it will result in a larger file size. For Tophinhanhdep.com users creating web content like wallpapers or aesthetic backgrounds, optimizing for web (e.g., 2000 pixels on the longest side, under 1MB) is often more important than a high PPI.
- Impact on Size: Changing the PPI without resampling (see next step) will directly affect the physical print size of your image. For example, if you change a 300 PPI image to 150 PPI without resampling, its physical dimensions (in inches/cm) will double, but the total pixel count will remain the same, leading to a less dense, potentially pixelated print if the original image wasn’t robust enough.
4. Choosing the Right Resampling Mode
Resampling is the process Photoshop uses to add or remove pixels when you change an image’s dimensions and resolution. When you increase resolution, Photoshop needs to invent new pixels, and the “Resample” mode tells Photoshop which algorithm to use for this interpolation.
- Enable Resample: Make sure the “Resample” box is ticked to allow Photoshop to add new pixels. If unchecked, changing the resolution (PPI) will only affect the print size, not the pixel dimensions.
- Bicubic Smoother (enlargement): Historically, this has been a go-to for enlarging images. It’s designed to create smooth tonal gradations when scaling up.
- Preserve Details (and Preserve Details 2.0): These are more advanced algorithms, especially “Preserve Details 2.0” (available in newer Photoshop versions). They are designed to analyze the image and generate new pixels while attempting to preserve crucial details and textures, often producing superior results with fewer artifacts. When activating “Preserve Details 2.0” in Photoshop versions 2019-2023, you might find it under Preferences > Technology Previews > Enable Preserve Details 2.0 Upscale.
- Automatic: Photoshop can analyze your image and attempt to choose the best resampling method automatically.
- Other Modes: While other modes like “Nearest Neighbor” or “Bicubic Sharper” exist, they are generally less suitable for increasing resolution, as they can introduce jagged edges or over-sharpening artifacts. “Bicubic Sharper” is often preferred for reducing image size.
Experiment with different resampling modes and zoom in to compare the results. The best choice can depend on the specific image content and the degree of enlargement.
5. Essential Post-Upscaling Sharpening
After increasing an image’s resolution, it’s almost always a good idea to apply a touch of sharpening. The resampling process, even with advanced algorithms, can sometimes result in a slightly softer image due to the interpolation of new pixels.
- Unsharp Mask: This is a classic and highly effective sharpening tool.
- Go to Filter > Sharpen > Unsharp Mask.
- Amount: Controls the intensity of the sharpening. Start around 100%.
- Radius: Determines the size of the area around edges where sharpening is applied. A good starting point for enlarged images is 1.0 pixels.
- Threshold: Prevents sharpening of areas with little contrast (like smooth skin tones or clear skies), reducing noise. Adjust as needed.
- Smart Sharpen: A more advanced sharpening filter that offers finer control, including options to reduce halos and adjust sharpening based on the type of blur.
- Go to Filter > Sharpen > Smart Sharpen.
- Similar to Unsharp Mask, adjust Amount and Radius.
- Explore Reduce Noise and Remove (for different blur types) options for more refined results.
Always apply sharpening judiciously and on a duplicate layer or Smart Object for non-destructive editing. Zoom in to 100% or 200% to accurately assess the effect and avoid over-sharpening, which can introduce artifacts and an unnatural look. This post-processing step is vital for achieving the crisp, high-resolution quality expected from digital photography and visual design elements.
Advanced Techniques and AI Upscaling in Photoshop
Beyond the fundamental steps, Photoshop offers advanced features and AI-powered tools that revolutionize how we approach image upscaling, delivering significantly better results, especially with modern versions.
1. Leveraging Photoshop’s Super Resolution (Camera Raw Integration)
One of Adobe’s most groundbreaking recent additions is the “Super Resolution” feature, embedded within the Camera Raw filter. This AI-powered tool utilizes machine learning to intelligently upscale images, effectively doubling their width and height, resulting in a 4x increase in the total pixel count, all while preserving remarkable detail and sharpness. For instance, a 16-megapixel image can become a 64-megapixel image with improved fidelity. This is particularly beneficial for photographers seeking to extract maximum detail from their high-resolution captures or graphic designers needing to enlarge source material.
Here’s how to use it:
- Open as Camera Raw: In Photoshop, go to File > Open As… or File > Open in Camera Raw…. Navigate to your image, select it, and ensure “Camera Raw” is chosen from the “Open as” dropdown menu before clicking “Open.” This step is crucial, as Super Resolution operates within the Camera Raw interface.
- Enhance Option: Once the image loads in Camera Raw, right-click anywhere on the picture. From the context menu, select Enhance.
- Activate Super Resolution: In the “Enhance Details” dialogue box that appears, ensure “Super Resolution” is checked. You’ll see an estimated time for the process. Photoshop will provide a small preview of the enhanced area.
- Processing and Saving: Click “Enhance.” The process can take some time, depending on your image size and system specifications. Once complete, a new DNG file (a high-quality raw file format) will be created alongside your original image in Camera Raw. You can then right-click this new image and choose “Save Image…” to export it in your desired format (e.g., JPEG, TIFF, PNG) for further editing or use on Tophinhanhdep.com.
Super Resolution represents a significant leap forward in upscaling technology, making it an invaluable tool for enhancing images for high-resolution stock photos, intricate digital art, or detailed photography.
2. Smart Objects for Non-Destructive Resizing
Working with Smart Objects is a best practice in Photoshop, especially when performing transformations like resizing. A Smart Object is a container that holds all the original image data, regardless of how many times you scale, rotate, or distort it.
- Convert to Smart Object: Before you begin resizing, right-click on your image layer in the Layers panel and choose Convert to Smart Object, or go to Layer > Smart Objects > Convert to Smart Object.
- Benefits:
- Non-Destructive Scaling: You can scale a Smart Object up and down multiple times without losing the original image quality. If you scale it down and then need to scale it back up, Photoshop uses the original pixel data rather than the degraded, smaller version. This is critical when you are exploring different visual design ideas or photo manipulation concepts.
- Filter Flexibility: Filters applied to Smart Objects become Smart Filters, which are non-destructive and can be easily edited, toggled, or removed at any time. This allows for experimentation with sharpening, noise reduction, and other effects post-upscaling.
While converting to a Smart Object doesn’t increase resolution, it prevents further degradation during repeated resizing, making it an indispensable technique when working with any image you anticipate modifying extensively.
3. Utilizing Filters for Enhanced Detail and Contrast
Beyond basic sharpening, Photoshop offers a suite of filters and adjustment layers that can refine the appearance of an upscaled image by enhancing detail and contrast, crucial for beautiful photography and aesthetic images.
- High-Pass Sharpening: This technique offers more controlled sharpening.
- Duplicate your image layer (or Smart Object).
- Go to Filter > Other > High Pass. Adjust the radius to highlight only the edges (typically 1-3 pixels). The image will turn gray with highlighted edges.
- Change the blending mode of this high-pass layer to Overlay, Soft Light, or Hard Light. This applies sharpening only to the edges, often producing a cleaner result than traditional sharpening filters, especially for high-resolution images.
- Levels and Curves for Contrast: Adjusting contrast can significantly enhance the perceived sharpness and impact of an image.
- Levels (Image > Adjustments > Levels): Allows you to adjust the tonal range and color balance by mapping the black and white points. Dragging the black slider inward deepens shadows, and dragging the white slider inward brightens highlights, increasing overall contrast.
- Curves (Image > Adjustments > Curves): Offers even finer control over tonal adjustments. By creating an S-curve, you can deepen shadows and brighten highlights, making the image pop.
Always use adjustment layers (Layer > New Adjustment Layer) for Levels and Curves to work non-destructively, allowing for easy modifications and experimentation with different editing styles.
4. Noise Reduction for Smoother Enlargements
Upscaling an image, especially from a lower-quality source, can sometimes amplify noise or introduce artifacts. Photoshop’s noise reduction tools can help smooth these imperfections without excessively blurring important details.
- Reduce Noise Filter:
- Go to Filter > Noise > Reduce Noise.
- Strength: Controls the overall amount of noise reduction.
- Preserve Details: Helps retain edge details while reducing noise.
- Reduce Color Noise: Specifically targets color speckles.
- Sharpen Details: Applies a small amount of sharpening post-noise reduction.
- Camera Raw Noise Reduction: If your image is opened in Camera Raw, you can access powerful noise reduction tools under the “Detail” tab (luminance and color noise sliders), which often provide superior results.
Apply noise reduction judiciously. Excessive application can lead to a “plastic” or overly smooth appearance, sacrificing texture and fine detail. Balancing noise reduction with detail preservation is an art, particularly for maintaining the integrity of beautiful photography and digital art.
Beyond Photoshop: Alternative Tools and AI Upscalers for Tophinhanhdep.com’s Audience
While Photoshop is a powerhouse, a variety of other tools, including AI-powered upscalers, offer convenient and effective ways to increase image resolution, catering to different user needs and skill levels. Tophinhanhdep.com emphasizes accessibility to powerful image tools, including converters, compressors, optimizers, and AI upscalers.
1. Online Image Upscalers
For quick enhancements without software installation, online AI upscalers are an excellent choice. Many leverage sophisticated artificial intelligence to enlarge images while minimizing quality loss, making them perfect for preparing images for social media or simple web use.
- How They Work: You upload your image, select the desired upscale factor (e.g., 2x, 4x), and the AI processes it, often using deep learning models trained on vast datasets of images to intelligently “fill in” missing pixels.
- Examples: Tools like Waifu2x (great for anime/illustrations), Let’s Enhance, and the AI Upscalers offered through Tophinhanhdep.com’s “Image Tools” section provide accessible solutions. Some platforms also offer features like background removal or color correction alongside upscaling.
- Considerations: While convenient, be mindful of privacy policies when uploading sensitive images. Free versions may have limitations on file size, output resolution, or processing speed. The output quality, while generally good for digital use, might not always match professional software for very large prints.
2. Desktop Software Alternatives
Several dedicated desktop applications and plugins offer specialized algorithms for image enlargement, often providing more control and higher output quality than basic online tools. These are particularly valuable for users engaged in high-resolution photography, detailed photo manipulation, and professional graphic design.
- Wondershare PixCut / Fotophire Maximizer: As discussed on Tophinhanhdep.com, tools like Wondershare PixCut and Fotophire Maximizer are designed for easy, one-click resolution enhancement. Fotophire Maximizer, for example, boasts the ability to enlarge photos up to 1000% without significant quality degradation, offering various effects and object removal capabilities. These tools prioritize user-friendliness while delivering impressive results, aligning with the “Image Tools” focus of Tophinhanhdep.com.
- Adobe Lightroom’s Super Resolution: Similar to Photoshop’s Camera Raw integration, Lightroom Classic and Lightroom CC also feature Super Resolution, allowing photographers to upscale their raw files directly within their catalog, maintaining a seamless workflow for high-resolution images.
- Topaz Gigapixel AI: Widely regarded as a leader in AI upscaling, Gigapixel AI is a standalone application and Photoshop/Lightroom plugin known for its ability to enlarge images by up to 600% while intelligently recovering detail and sharpness, making it a powerful choice for stock photos and detailed nature photography.
- ON1 Resize (formerly Genuine Fractals): Part of the ON1 Photo RAW suite, ON1 Resize utilizes “Genuine Fractals” technology for state-of-the-art resizing, particularly effective for massive enlargements for print projects.
These applications typically offer more advanced settings, batch processing capabilities, and better handling of complex image data, making them ideal for serious photographers and designers.
3. Mobile Apps for On-the-Go Resolution Enhancement
For users who primarily work on mobile devices, there are numerous photo editing apps that include resizing and enhancement features. While they may not offer the granular control of desktop software, they provide convenient solutions for quick adjustments.
- Photo Resizer Apps: Many apps, like “Photo Resizer” (various versions available on app stores), allow you to specify output dimensions in pixels, centimeters, or inches. Some even incorporate AI-like features for quality preservation.
- Integrated Editors: Popular mobile photo editors often include basic resizing and sharpening tools.
- Considerations: Mobile upscaling is best suited for images intended for social media, messaging, or smaller digital displays. For critical applications like large prints, desktop software or online AI upscalers are generally more reliable.
When to Choose an Alternative: Ease of Use vs. Advanced Control
The choice between Photoshop, dedicated desktop software, or online tools often boils down to your specific needs:
- For maximum control and professional-grade output: Photoshop or specialized desktop software like Topaz Gigapixel AI are the best options, especially for high-resolution stock photos or digital art where every detail matters.
- For quick, high-quality upscaling with minimal effort: AI upscalers (both online and desktop) are excellent. They democratize advanced image enhancement for users across all skill levels.
- For mobile-first content creators: Mobile apps offer convenience for on-the-go adjustments, particularly for content related to trending styles or quick photo ideas.
Tophinhanhdep.com encourages exploring these diverse “Image Tools” to find the perfect fit for your workflow, whether you’re converting, compressing, optimizing, or upscaling your images.
Optimizing Images for Various Platforms and Purposes
Increasing image resolution is not a one-size-fits-all process. The optimal resolution and file characteristics depend heavily on the final destination of your image. Understanding these distinctions is crucial for Tophinhanhdep.com users who work with everything from high-resolution wallpapers to optimized web backgrounds and print-ready graphic designs.
1. Resolution for Web: Speed, Quality, and Protection
When preparing images for online platforms, the goal is often to strike a balance between visual quality, fast loading times, and practical file size.
- Social Media & Websites: Most social media platforms and websites will automatically compress and resize your uploaded images. Overly large files slow down page loading, negatively impacting user experience and SEO.
- Recommended Practice: For general web use, including wallpapers and backgrounds on Tophinhanhdep.com, images typically don’t need to exceed 2000 pixels on their longest side. A file size of under 1MB is often a good benchmark. This ensures images load quickly without appearing pixelated on most screens.
- Platform-Specific Guidelines: Each social media site (Facebook, Instagram, Pinterest, etc.) has its own recommended dimensions and compression levels. Referencing these guidelines ensures your images look their best and aren’t overly degraded by platform-specific processing.
- Image Protection: Posting lower-resolution images online also serves a protective function. By not uploading your full-resolution original, you make it more challenging for others to use your work without permission, a concern for high-resolution stock photos and professional photography.
- Tophinhanhdep.com’s Image Tools: Tools for compression and optimization, often found in Tophinhanhdep.com’s “Image Tools” section, are invaluable here. After ensuring your image has sufficient resolution for digital display, these tools can reduce file size without a perceptible loss of visual quality, making your content load faster and perform better online.
2. Resolution for Print: Precision and Physicality
Printing demands significantly higher resolution than digital display due to the physical nature of ink on paper and the close proximity at which prints are often viewed.
- Standard Print (e.g., Photos, Magazines): As mentioned, 300 PPI (pixels per inch) is the industry standard for high-quality prints. This density ensures that individual dots of ink are virtually indistinguishable to the naked eye, resulting in smooth tones and crisp details in your beautiful photography and graphic designs.
- Large Formats (e.g., Banners, Billboards): For very large prints that are viewed from a distance, the required PPI can be lower. A banner seen from across a room might only need 100-150 PPI to look sharp, as the human eye’s ability to discern detail decreases with distance. Always consult with your printing studio for their minimum resolution requirements for specific print sizes and media.
- Archival Quality: For images intended for long-term storage or museum-quality reproductions, resolutions can be extremely high, sometimes 1200 PPI or even more. This ensures every minute detail is preserved for posterity, regardless of future printing needs.
- Color Profile: For print, it’s also important to use the correct color profile (e.g., CMYK for many commercial prints) alongside high resolution to ensure accurate color reproduction.
3. Balancing Quality and File Size
A common dilemma in image management is balancing high quality with manageable file sizes. High-resolution images inherently lead to larger files.
- Trade-offs: While a 51 MP image offers incredible detail, it’s impractical for a website background or a quick email attachment. You often need to make strategic decisions about resolution based on the image’s purpose.
- File Formats: Choosing the right file format also plays a role.
- JPEG: Excellent for photographs with continuous tones, offering good compression but with some quality loss (lossy). Ideal for web use where file size is critical.
- PNG: Best for images with transparency, sharp edges, or limited colors (e.g., logos, graphic design elements). Offers lossless compression but can result in larger files than JPEGs.
- TIFF/PSD: Preferred for archival, print, and professional editing due to their lossless nature and ability to retain layers, but they produce very large files.
- Tophinhanhdep.com’s Tools: Utilizing Tophinhanhdep.com’s “Image Tools” such as compressors and optimizers allows you to maintain the best possible quality while reducing file size for web and other applications, making your high-resolution images accessible without compromise.
4. Integrating High-Resolution Practices into Your Photography Workflow
For photographers and visual artists, establishing a workflow that prioritizes high resolution from capture to final output is key to success.
- Shoot in Raw: Always capture images in your camera’s raw format. Raw files contain the maximum amount of image data, offering the most flexibility for editing and upscaling without introducing artifacts.
- Mind Your Cropping: Be judicious with cropping. While it’s a powerful compositional tool, excessive cropping reduces native resolution. Plan your shots to minimize the need for heavy crops, especially if large prints are a goal.
- Organize and Archive: Maintain an organized library of your high-resolution originals. Use cloud storage or external drives for backups. For inspiration and thematic collections on Tophinhanhdep.com, having a clean, high-res archive simplifies content creation.
- Continuous Learning: The landscape of image editing and resolution enhancement is constantly evolving, with new AI tools and techniques emerging regularly. Staying informed, perhaps by exploring “Image Inspiration & Collections” on Tophinhanhdep.com, ensures you’re always equipped with the best practices for enhancing your visual creations.
Conclusion
The pursuit of high-resolution imagery is a cornerstone of impactful visual communication in today’s digital age. From breathtaking wallpapers to professional stock photography and compelling graphic designs, image quality directly translates to engagement and effectiveness. While Adobe Photoshop offers unparalleled control and cutting-edge features like Super Resolution, the broader ecosystem of image tools, including online AI upscalers and specialized desktop applications, provides solutions for every need and skill level.
As you navigate the world of images, remember the fundamental principle: starting with the highest possible quality source image is always the best foundation. Beyond that, a thoughtful approach to resolution, guided by the intended use of your image – be it a vibrant print, a fast-loading web background, or an intricate piece of digital art – will ensure optimal results.
At Tophinhanhdep.com, we are committed to empowering you with the knowledge and tools to bring your visual ideas to life with stunning clarity. By mastering the techniques discussed in this guide, you can confidently enhance your images, transform them into high-resolution masterpieces, and leave a lasting impression, whether you’re curating aesthetic collections, developing creative ideas, or simply sharing beautiful photography with the world. Continue to explore, experiment, and elevate your visual creations with the power of high resolution.