Mastering Image Resolution: Elevating Your Visuals for Tophinhanhdep.com

In today’s visually-driven world, the quality of an image can make or break its impact. Whether you’re curating stunning wallpapers, designing compelling graphics, or preparing beautiful photography for print, resolution is paramount. Low-resolution images can appear pixelated, blurry, and unprofessional, diminishing the aesthetic appeal you strive for. At Tophinhanhdep.com, we understand the critical role high-resolution images play across all visual categories, from “Aesthetic” and “Nature” backgrounds to “High Resolution” stock photos and “Digital Art.” This comprehensive guide will explore various techniques and tools, including how to efficiently increase the resolution of an image in Preview and leveraging cutting-edge AI technology, to transform your low-quality visuals into breathtaking, sharp masterpieces.
Understanding the Nuances of Image Resolution
Before diving into the “how-to,” it’s essential to grasp what “resolution” truly means in the context of digital images. The term is often used interchangeably, but it refers to two distinct aspects that significantly impact image quality and scalability:
Pixel Dimensions: The Building Blocks of Your Image
The most fundamental aspect of image resolution is its pixel dimensions, expressed as width by height (e.g., 3024 x 4032 pixels for a modern smartphone photo). Each tiny pixel represents a captured piece of information—a sample of color and light intensity. More pixels generally mean more detail and a larger canvas for manipulation without noticeable degradation. These dimensions are crucial when considering “Wallpapers” or “Backgrounds” that need to fit various screen sizes without distortion.
Pixel Density (DPI/PPI): Mapping Pixels to Physical Size

Pixel density, often measured in dots per inch (DPI) for print or pixels per inch (PPI) for screens, dictates how tightly these pixels are packed when displayed or printed. Most images captured by digital cameras are set at 72 PPI by default, which is suitable for online viewing. However, for “Beautiful Photography” destined for high-quality prints, a much higher density, typically 300 PPI, is recommended. A 72 PPI image might look fine on a screen, but printing it large at the same density would result in a massive, pixelated output. Higher DPI in printing allows for a finer reproduction of color and detail, especially important for “Digital Photography” and “Photo Manipulation.”
The key takeaway here is that an image can have high pixel dimensions but low pixel density for print, or vice-versa. Understanding this distinction is the first step toward effectively increasing your image’s resolution for its intended purpose.
Traditional Approaches: Adjusting Resolution with Built-in and Standard Software
For many common scenarios, you don’t necessarily need to add more information to an image, but rather adjust how its existing information is interpreted. This is where basic image editing functionalities come into play, especially for Mac users looking to increase the resolution of an image in Preview.
Using macOS Preview: Your Built-in Resolution Adjuster
macOS Preview is a powerful, yet often underestimated, tool for basic image manipulation, including resolution adjustment. It offers two primary ways to handle resolution: changing pixel density without resampling, and upscaling with resampling.
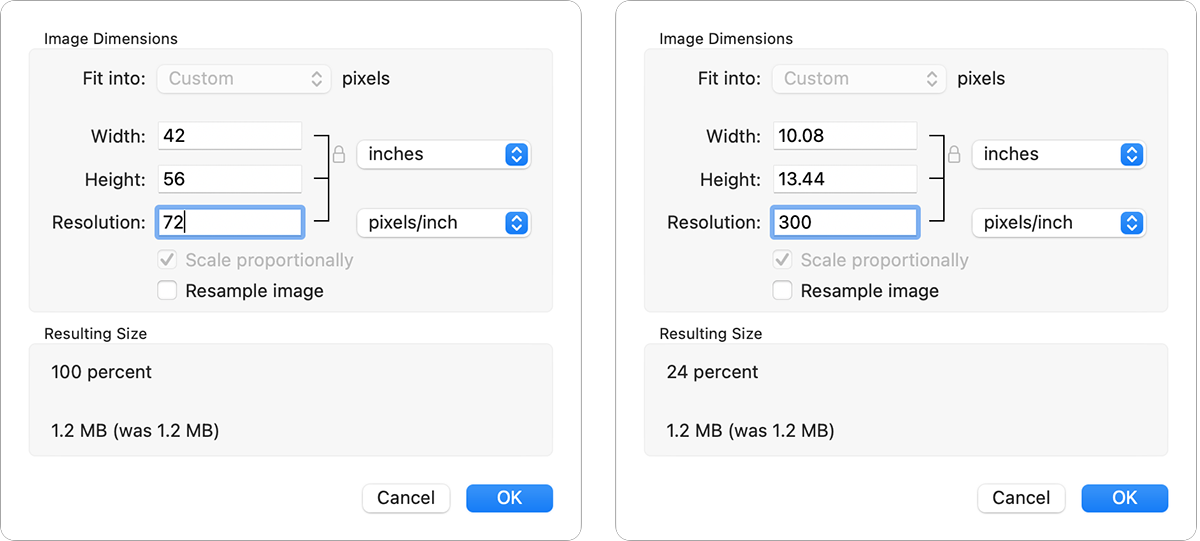
Adjusting Pixel Density Without Resampling (No Information Loss)
If your goal is to change the image’s effective print size by altering its PPI/DPI without adding or removing any pixel data, Preview can do this seamlessly. This is ideal when the image already contains sufficient pixel dimensions for your desired output, but the density setting is too low.
Steps to Adjust Pixel Density in Preview:
- Launch Preview: Open the Preview application on your Mac.
- Open Your Image: Navigate to
File > Openor drag your image directly into the Preview icon. - Work on a Copy: Always work on a copy to preserve your original. Go to
File > Duplicateor holdOptionand chooseFile > Save Asto create a new file. - Access Adjust Size: From the menu bar, select
Tools > Adjust Size. - Uncheck “Resample Image”: This crucial step prevents Preview from adding or removing pixels. Instead, it will only modify how existing pixels are mapped.
- Enter New Resolution: In the “Resolution” field, enter your desired PPI/DPI value (e.g., 300 for high-quality printing).
- Preview Dimensions: With “inches” (or cm/mm) selected in the
WidthandHeightdropdowns, you can observe how the physical dimensions of your image will change with the new resolution. - Confirm and Save: Click
OK, thenFile > Saveto apply and store your changes.
By following these steps, you effectively tell Preview how to map the existing pixels against a new display or print size. The image data itself remains untouched, ensuring no loss or gain of information, making it perfect for preparing “Stock Photos” for specific print requirements.
Upscaling with Resampling (Adding New Pixels)
Sometimes, you truly need a larger image with more pixel data, perhaps because you’ve heavily cropped a photo or require significantly larger dimensions for a poster-sized print. In this scenario, Preview can “upscale” by adding new pixels, though with limitations compared to more advanced software.
Steps to Upscale an Image in Preview:
- Follow Steps 1-4 from above (Launch Preview, Open Image, Duplicate, Tools > Adjust Size).
- Ensure “Resample image” is checked: This tells Preview to generate new pixel information.
- Enter New Dimensions or Resolution:
- You can directly enter a new
WidthorHeightin pixels or physical units (inches, cm, mm). - Alternatively, you can change the “Resolution” (e.g., to 300 PPI) and then adjust
WidthorHeight. Preview will calculate the necessary upscaling percentage. - Ensure “Scale proportionally” is checked to maintain the original aspect ratio, preventing distortion.
- You can directly enter a new
- Confirm and Save: Click
OK, thenFile > Save.
It’s important to note that Preview’s upscaling method involves averaging adjoining pixels to fill in new ones. While it increases the dimensions, the results may appear soft or slightly blurry when viewed at 100% zoom, as it cannot intelligently create new detail where none existed. For superior results in “Photo Manipulation” or high-end “Digital Photography,” more sophisticated tools are usually preferred.
Leveraging Professional Image Editing Suites
For greater control and higher-quality results, especially when “Graphic Design” or intricate “Editing Styles” are involved, professional image editing suites offer advanced resampling algorithms. Tools like those recommended on Tophinhanhdep.com’s “Image Tools” section provide multiple interpolation methods designed for different image types.
When using such an advanced tool (which might be part of Tophinhanhdep.com’s “AI Upscalers” or “Optimizers”), you would typically:
- Open the Image: Import your low-resolution image.
- Access Image Size/Resample Options: Locate the “Image Size” or “Canvas Size” dialogue, usually under an “Image” menu.
- Enable Resampling: Ensure the resampling option is activated.
- Choose an Interpolation Method: Select from various algorithms like Bicubic Smoother (for enlargements), Bicubic Sharper (for reductions), or Preserve Details, each suited for different source material and desired outcomes. For example, “Bicubic Smoother” would be excellent for a “Nature” photograph, while “Bicubic Sharper” might suit a “Geometric Abstract” image.
- Set New Dimensions/Resolution: Input your target width, height, or resolution.
- Apply Sharpening (Optional but Recommended): After resampling, a subtle application of sharpening (e.g., an Unsharp Mask filter) can help restore crispness lost during the pixel-averaging process. This is a common step in refining “Beautiful Photography.”
- Save the New Image: Export your enhanced image in a suitable format.
These professional tools, often recommended by Tophinhanhdep.com for “Digital Photography” and “Visual Design,” provide a much finer degree of control over how new pixels are generated, minimizing artificial-looking artifacts.
The Revolution of AI Upscaling: Intelligent Resolution Enhancement
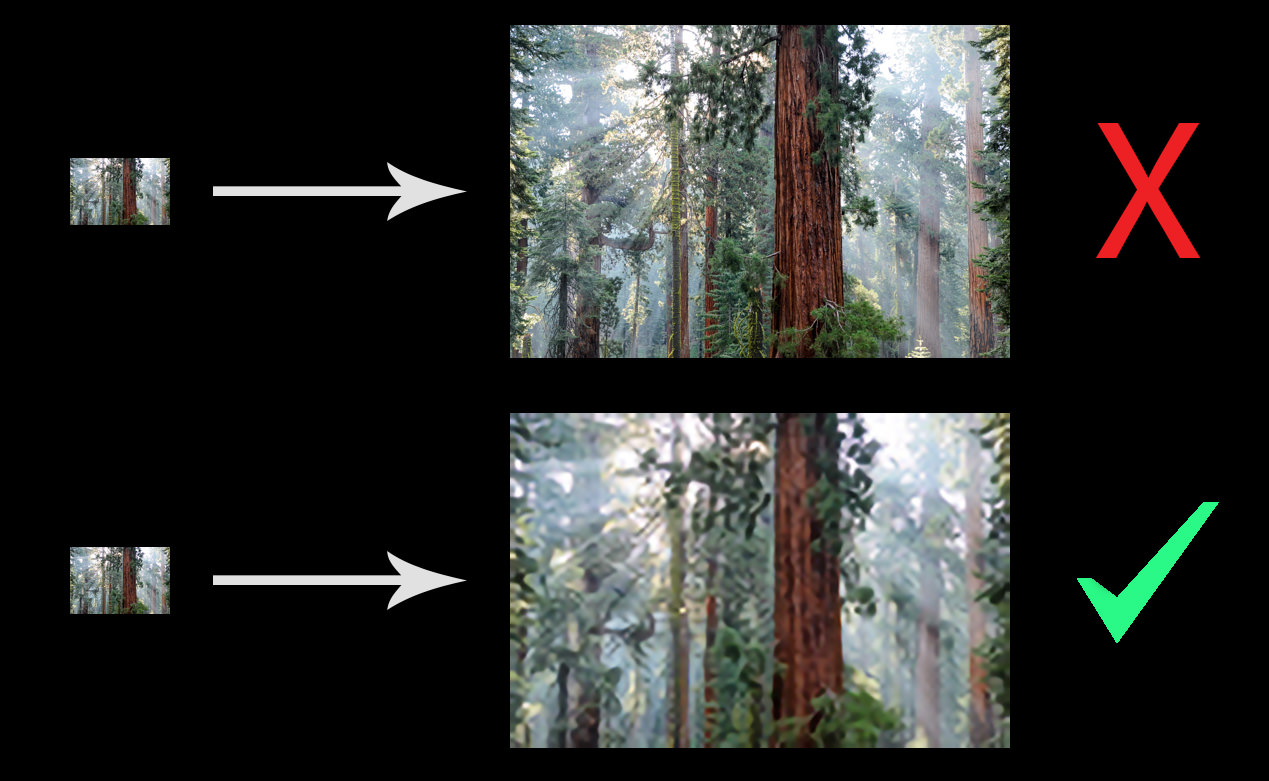
While traditional methods of upscaling merely interpolate existing pixels, the advent of machine learning and Artificial Intelligence (AI) has revolutionized image resolution enhancement. AI upscalers, a prominent feature within Tophinhanhdep.com’s “Image Tools,” go beyond simple pixel averaging.
How AI Upscalers Work
AI upscaling software is trained on vast datasets of images, learning patterns, textures, and structures within various types of visuals. When you feed a low-resolution image to an AI upscaler, it doesn’t just average surrounding pixels; it intelligently infers and generates new detail based on its learned knowledge.
For instance, if an AI upscaler encounters a blurry face in a low-resolution “Sad/Emotional” image, it can use its understanding of human facial structures to reconstruct sharper features, smoother skin tones, and more defined contours. This process can:
- Remove Hard Edges and Pixelization: Smoothing out blocky artifacts that are common in traditionally upscaled images.
- Enhance Textures and Patterns: Adding convincing detail to elements like foliage in a “Nature” scene or the intricate patterns in “Abstract” art.
- Preserve Natural Tones: Ensuring color gradients and lighting remain realistic, especially crucial for “Beautiful Photography.”
The result is an image that not only has increased pixel dimensions but also appears genuinely sharper and more detailed, often without the blurriness associated with conventional upscaling. This technology is a game-changer for those looking to breathe new life into old, cropped, or intrinsically low-resolution images, transforming them into “High Resolution” assets suitable for any purpose.
Utilizing Tophinhanhdep.com’s Recommended AI Upscalers
Tophinhanhdep.com highly recommends integrating AI upscaling into your workflow, especially for “Digital Photography,” “Graphic Design,” and creating high-quality “Wallpapers.” While the underlying algorithms are complex, using these tools is surprisingly straightforward.
General Steps for AI Upscaling (as offered or recommended by Tophinhanhdep.com):
- Access the AI Upscaler: Visit the “Image Tools” section of Tophinhanhdep.com or access one of our recommended standalone/plugin AI upscalers.
- Upload Your Image: Drag and drop your low-resolution image file. Most tools support common formats like JPEG, PNG, and TIFF.
- Select Upscaling Factor: Choose your desired enlargement factor (e.g., 2x, 4x, 6x, or a custom pixel dimension).
- Apply Enhancement Modes (Optional): Many AI tools offer specific modes for different image types (e.g., photo, art, text, face refinement). Select the one that best suits your image. This is particularly useful for optimizing “Aesthetic” or “Portrait Photography.”
- Preview the Results: The tool will typically provide a side-by-side comparison of the original and the upscaled image. Zoom in to assess the new details and sharpness.
- Download the High-Resolution Image: Once satisfied, save the enhanced image to your device. The output will be a significantly larger file with enhanced detail.
These “AI Upscalers” are invaluable for breathing new life into older, sentimental photographs or preparing “Stock Photos” for demanding applications. They embody the cutting edge of “Digital Photography” enhancement.
Practical Applications and Tophinhanhdep.com’s Vision
Increasing image resolution isn’t just a technical exercise; it’s a vital step in realizing your creative vision across various applications, many of which are central to Tophinhanhdep.com’s offerings.
Enhancing Wallpapers, Backgrounds, and Aesthetic Collections
For “Wallpapers,” “Backgrounds,” and “Aesthetic” image collections, high resolution is non-negotiable. A beautiful landscape will lose its grandeur if pixelated on a large display. By increasing resolution, particularly with AI, you ensure that every detail, every color gradient, and every artistic choice is preserved and enhanced, providing a stunning visual experience. Tophinhanhdep.com’s curated “Thematic Collections” and “Trending Styles” rely on the highest quality images to inspire and captivate.
Preparing Images for Print and Large Displays
Whether it’s a cherished “Beautiful Photography” piece destined for a large canvas print or “Digital Art” to be showcased in a gallery, sufficient resolution is critical. Increasing the DPI (dots per inch) ensures that prints are crisp and clear, free from blurry lines or pixelated edges. This also applies to images intended for large digital displays or presentations, where clarity at scale is paramount. Our “Image Inspiration & Collections” often feature images that benefit immensely from resolution enhancement for these purposes.
Optimizing Visuals for Graphic Design and Photo Manipulation
In “Graphic Design” and “Photo Manipulation,” starting with high-resolution source material or intelligently upscaling existing images prevents quality degradation during complex editing. When combining elements or applying intricate “Editing Styles,” having ample pixel data provides flexibility and ensures the final output maintains professional quality. Tophinhanhdep.com offers resources on “Creative Ideas” that often hinge on the ability to work with pristine image files.
Creating “High Resolution” Stock Photos and Digital Assets
For contributors to “Stock Photos” platforms, delivering high-resolution images is a standard requirement. Learning to effectively increase resolution means your visual assets meet industry standards and are more versatile for potential buyers. Similarly, converting “Image-to-Text” for archival or accessibility purposes can also benefit from clearer, higher-resolution source images.
Revitalizing Old or Cropped Images
Many users encounter situations where a favorite “Sad/Emotional” photograph from the past is low quality, or a perfect shot had to be heavily cropped, reducing its effective resolution. AI upscaling, in particular, offers a fantastic opportunity to revitalize these images, bringing back lost detail and enabling them to be displayed or printed beautifully.
Choosing the Right Tool for Your Needs
Tophinhanhdep.com understands that different users have different needs and skill levels. Here’s a summary of considerations when choosing your resolution enhancement method:
- For Mac Users (Quick & Basic): Preview is excellent for simple DPI adjustments or minor upscaling of “Wallpapers” when you have sufficient pixel dimensions. It’s built-in and free.
- For Desktop Power Users (Control & Quality): Professional image editing software provides the most control over interpolation and post-upscaling refinements, ideal for “Digital Photography” and “Photo Manipulation.” Look for options with advanced algorithms.
- For Revolutionary Enhancement (AI-Powered Detail): AI upscalers are the best choice for truly adding inferred detail, smoothing pixelation, and achieving remarkable results, especially for significant enlargements or low-quality originals. Tophinhanhdep.com’s “AI Upscalers” section offers top recommendations.
- For On-the-Go Editing (Mobile Convenience): Mobile apps provide convenient solutions for quick resolution boosts directly from your phone, perfect for social media or immediate sharing of “Aesthetic” shots. Tophinhanhdep.com reviews the best mobile editing options.
- For Online Accessibility (Browser-Based Tools): Various online tools allow you to upload and upscale images without installing software, great for occasional use or when you need quick “Image Converters” or “Compressors.” Tophinhanhdep.com lists reputable online solutions.
Conclusion
The ability to effectively increase image resolution is a cornerstone of modern digital imaging, empowering creators to achieve higher quality results across a multitude of applications. From precisely adjusting pixel density using macOS Preview to leveraging the intelligent detail generation of cutting-edge AI upscalers, the tools and techniques available today are more powerful than ever.
At Tophinhanhdep.com, we are committed to providing you with the knowledge, “Image Tools,” and “Image Inspiration & Collections” necessary to elevate your visuals. Whether you’re enhancing “Nature” backgrounds, perfecting “Beautiful Photography,” designing intricate “Digital Art,” or curating “Trending Styles,” mastering image resolution ensures your work always looks its best. Embrace these methods, explore the resources on Tophinhanhdep.com, and transform your images into stunning, high-resolution assets that truly make an impact.