How to Increase Image Size: A Comprehensive Guide to Enlarging Your Photos with Quality

In today’s visually-driven world, images are everywhere – from professional presentations and high-resolution digital art to personal social media feeds and cherished printed photographs. Often, however, we encounter situations where an existing image isn’t quite large enough for its intended purpose. Whether you’re trying to print a small snapshot as a poster, meet strict upload requirements for online applications, or simply want to zoom into a detail without pixelation, knowing “how to increase the size of an image” is an invaluable skill. This guide from Tophinhanhdep.com will delve into the various methods for enlarging your photos, ensuring you maintain the highest possible quality and achieve stunning results for all your visual projects.
The challenge with image enlargement traditionally lies in the risk of losing quality. Simply stretching an image often leads to a blurry, pixelated, or “blocky” appearance. This is where advanced tools and understanding proper techniques become critical. At Tophinhanhdep.com, we understand the nuances of digital photography and visual design, offering a suite of image tools specifically designed to help you achieve perfect image sizes, resolutions, and aesthetics. From AI-powered upscalers that intelligently add detail to simple online resizing tools for specific file size requirements, we’ve got you covered.

Understanding the Fundamentals of Image Size and Quality
Before diving into the “how-to,” it’s essential to grasp the core concepts of what constitutes an image’s “size” and “quality.” These terms are often used interchangeably, but they refer to distinct aspects that collectively determine how an image appears and performs.
Decoding Image Dimensions, Resolution, and File Size
When we talk about image size, we’re typically referring to several interconnected attributes:
- Dimensions (Pixels): This is the most straightforward measure, indicating the width and height of an image in pixels. For example, a 1920x1080 pixel image means it’s 1920 pixels wide and 1080 pixels high. When you increase the size of an image, you are primarily increasing its pixel dimensions.
- Resolution (DPI/PPI): Resolution refers to the density of pixels within a given physical area, typically measured in Dots Per Inch (DPI) for print or Pixels Per Inch (PPI) for screens. A higher DPI/PPI means more pixels are packed into each inch, resulting in a sharper, more detailed image, especially when printed. While dimensions dictate the total number of pixels, resolution dictates how those pixels are distributed physically. Increasing resolution without increasing pixel dimensions typically means the image will appear smaller in print but with finer detail. Conversely, increasing pixel dimensions allows for a higher effective resolution for larger prints.
- File Size (KB/MB): This refers to the amount of data the image file occupies on your storage, measured in Kilobytes (KB) or Megabytes (MB). File size is influenced by pixel dimensions, image resolution, color depth, and the compression method used (e.g., JPEG uses lossy compression, while PNG uses lossless). Larger pixel dimensions and higher resolutions generally lead to larger file sizes, especially with less compression. Many online platforms impose restrictions on file size, requiring users to increase or decrease KB/MB to fit specific criteria.
Understanding these distinctions is crucial because different enlargement goals may prioritize one aspect over another. For instance, increasing an image for a high-resolution print requires attention to both pixel dimensions and DPI, while simply making an image larger for a social media post might prioritize pixel dimensions without a strong emphasis on print-ready DPI.

Why Enlarging Images Matters
The need to enlarge images arises in numerous personal and professional contexts. At Tophinhanhdep.com, we see users seeking solutions for a wide range of applications:
- Printing Projects: Perhaps the most common reason to enlarge an image is for printing. A small image suitable for screen viewing will look pixelated and blurry when scaled up for a large print, poster, or banner. Professional high-resolution photography often starts with large files specifically for print flexibility, but sometimes a smaller image needs to be adapted.
- Online Submission Requirements: Many websites, especially those for job applications, academic submissions, or government forms, have specific minimum dimension or file size requirements. An image might be too small in terms of pixels or too low in KB/MB, preventing successful upload.
- Visual Design and Graphic Art: Designers often need to integrate images of varying sizes into their projects. Enlarging an image without quality loss is critical for creating seamless digital art, compelling graphic designs, or manipulating photos for creative ideas. High-resolution stock photos are often preferred, but sometimes a specific smaller image is the only option.
- High-Resolution Backgrounds and Wallpapers: For users looking for aesthetic wallpapers or backgrounds for high-definition screens, a small image will appear stretched and unprofessional. Enlarging it helps ensure it fills the screen crisply.
- Detailed Views and Cropping: Sometimes, you want to crop a small section of an image and blow it up for a close-up. Without proper enlargement techniques, this cropped detail will lack sharpness.
- Archiving and Future-proofing: Having a higher-resolution version of a beloved photo ensures it can be used for various purposes in the future, including potential high-quality prints or digital displays.
Whether for functional necessities or creative aspirations, the ability to effectively increase image size is a fundamental skill for anyone working with digital visuals.
Leveraging Tophinhanhdep.com’s Advanced Tools for Image Enlargement
Tophinhanhdep.com is dedicated to providing robust and user-friendly image tools for all your photography and visual design needs. Our specialized solutions are engineered to increase image size and resolution without the common pitfalls of quality degradation, thanks to cutting-edge AI technology.
Online AI Image Upscaler: Seamless Quality Enhancement
For those seeking a quick, effective, and hassle-free way to enlarge photos without any software installation, Tophinhanhdep.com’s Online AI Image Upscaler is the ideal solution. This web-based application leverages artificial intelligence to intelligently analyze and add missing details to your image as it’s enlarged, ensuring the output remains sharp, clear, and free from pixelation or blur.
Key Features of Tophinhanhdep.com’s Online AI Image Upscaler:
- AI-Powered Enlargement: Our advanced algorithms reconstruct image details during upscaling, allowing you to zoom pictures up to 400% or even 800% without noticeable quality loss. This is a game-changer for making a picture higher resolution from a smaller original.
- No Installation Required: As an online platform, you can access and use the tool directly from your browser, making it convenient for users on any operating system.
- Beginner-Friendly Interface: Designed with simplicity in mind, the process is intuitive, requiring just a few clicks to achieve professional results, perfect for students uploading images for forms or social media users.
- Supports Various Formats: Compatible with popular image formats like JPG, PNG, BMP, and TIFF, ensuring versatility for your image collection.
How to Use Tophinhanhdep.com’s Online AI Image Upscaler:
- Access the Tool: Navigate to the dedicated “Enlarge Image” section on Tophinhanhdep.com.
- Upload Your Image: Click on the “Upload Photo” button or drag and drop your image file directly into the designated area. Our system will immediately begin processing.
- Select Magnification: Once uploaded, the tool will often offer options to increase the size by a factor (e.g., 2x, 4x, 6x, 8x). You’ll typically see a preview of the enlarged image, allowing you to compare it with the original.
- Download Your Result: After achieving the desired size and quality, simply click the “Save” or “Download” button. Your high-resolution, enlarged image will be ready for use, whether for beautiful photography projects or digital art.
This online tool is perfect for increasing image size for casual use, such as uploading to social media, making an image bigger for a presentation, or quickly blowing up pictures for simple print projects.
Desktop Image Maximizer: Professional-Grade Control
For users who require more extensive control, batch processing capabilities, and the highest possible quality for demanding projects like graphic design, large-format printing, or detailed photo manipulation, Tophinhanhdep.com offers a dedicated Desktop Image Maximizer software. This powerful application integrates directly with your computer, providing a robust environment for image enlargement.
Key Features of Tophinhanhdep.com’s Desktop Image Maximizer:
- Unparalleled Zooming: Our desktop software provides ultra-zoom capabilities, allowing you to increase image size up to 1000% without pixelation or blur, far exceeding typical online tools. This is crucial for making a high-resolution photo from a moderate-sized original.
- Advanced Quality Retention: Utilizing sophisticated algorithms, it ensures the original look and sharpness are maintained, producing stunning high-resolution output. It’s often considered a premier alternative to complex professional photo editing software for enlargement tasks.
- Flexible Sizing Options: You can precisely control the output size by specifying width and height, percentage, long edge, short edge, or even target megapixels, offering granular control over your final image dimensions.
- Print-Ready Enlargement: Specifically designed to enlarge photos for printing projects, posters, banners, and other physical displays where clarity and detail are paramount.
- Batch Processing: Efficiently enlarge multiple images simultaneously, saving significant time for photographers and designers working with large collections.
- Correction Tools: Includes features to correct low-light photos with a single click and enhance sharpness, further improving the quality of your enlarged images.
- Preset Saving: Save your preferred enlargement settings as presets for consistent results across different projects.
How to Use Tophinhanhdep.com’s Desktop Image Maximizer:
- Installation and Launch: Download and install the Tophinhanhdep.com Desktop Image Maximizer on your Windows or Mac computer. Launch the application and select the “Photo Maximizer” module.
- Import Your Images: Click “Open” to browse and select images from your computer, or simply drag and drop them into the interface.
- Configure Enlargement Settings: In the “Maximizer” panel, you’ll find various options:
- Slider Control: Use a simple slider to increase image size by a percentage.
- Dimension Input: Manually enter desired width and height in pixels, inches, or centimeters.
- Resolution Adjustment: Fine-tune the output resolution (DPI/PPI).
- Sharpness Enhancement: Adjust sharpness to counteract any minimal softening from enlargement.
- Preview and Save: Review the enlarged image in the preview window. Once satisfied, click “Save” to export your high-quality, increased-size image to your desired location.
This desktop software is ideal for high-resolution stock photos, digital photography enhancements, and complex visual design tasks where every detail counts.
Mastering File Size Adjustments (KB to MB)
A common requirement, especially for online forms and email attachments, is to adjust an image’s file size to a specific KB or MB limit. Tophinhanhdep.com provides specialized tools for this precise control, allowing you to increase image size in KB or MB without altering pixel dimensions if desired, or simultaneously adjusting both for optimal results.
Our “Photo Size Increaser” online tool specifically addresses the need to increase image size to target KB or MB values. This is particularly useful when websites stipulate image uploads from, for example, 50KB to 100KB, or 1MB to 5MB.
How to Increase Image Size in KB/MB with Tophinhanhdep.com’s Online Photo Size Increaser:
- Access the KB/MB Increaser: Go to the dedicated “Increase Image Size in KB” or “Increase Image Size in MB” tool on Tophinhanhdep.com.
- Upload Image: Select or drag and drop your image file.
- Specify Target Size: Enter your desired file size in the input box (e.g., “100” for 100KB, or “2” for 2MB).
- Initiate Increase: Click the “Increase Size” or “Resize Image” button. The tool will process the image, adjusting its compression and potentially subtle quality aspects to meet the target file size while maintaining visual integrity as much as possible.
- Download: Once processed, download your image, now optimized to the specified KB or MB.
This tool is invaluable for ensuring your images meet the precise requirements of various online platforms, making it easy to comply with stipulations for government portals, online applications, and email attachments without compromising the overall appearance.
Native and Traditional Methods for Resizing Images
While Tophinhanhdep.com offers advanced, purpose-built solutions for image enlargement, it’s also useful to be aware of the native tools available on your operating system and the capabilities of professional photo editing software. These methods can be suitable for less demanding tasks or as part of a broader editing workflow.
On Mac: Using Built-in Preview Application
Mac users have a convenient, built-in tool for basic image resizing: the Preview application. This app can perform simple dimension adjustments without needing to install any third-party software.
How to Increase Image Size Using Preview on Mac:
- Open Image with Preview: Locate your image file in Finder, right-click (or Ctrl-click) on it, select “Open With,” and choose “Preview.” Alternatively, double-clicking an image will usually open it in Preview by default.
- Access Adjust Size: Once the image is open, go to the “Tools” menu in the top menu bar and select “Adjust Size.”
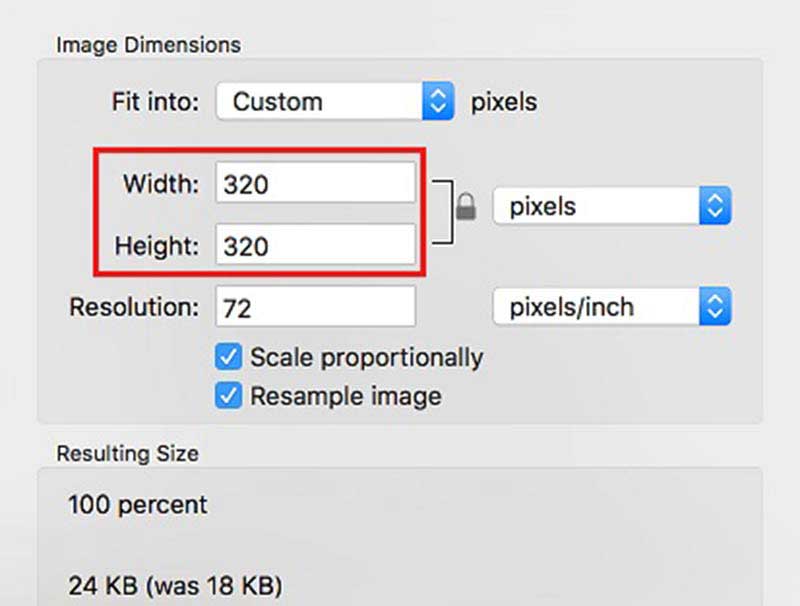
- Adjust Dimensions: A dialog box will appear. Ensure the “Scale proportionally” checkbox is ticked to maintain the aspect ratio. You can then increase the “Width” or “Height” value. Preview also allows you to adjust resolution (pixels per inch). Increasing the pixel dimensions here will make the image larger.
- Save Changes: After entering your desired dimensions, click “OK.” Then, go to “File” > “Save” or “File” > “Export” to save the modified image. If you choose “Export,” you can select a different format or adjust quality settings, which will impact file size (KB/MB).
Preview is effective for straightforward increases in pixel dimensions, though it may not offer the sophisticated quality preservation of AI-powered upscalers when dealing with significant enlargements.
On Windows: Utilizing Basic Photo Editors
Windows users can leverage basic photo editing applications that come pre-installed, such as Photos or Paint, for fundamental image resizing. While these tools are not as advanced as Tophinhanhdep.com’s offerings, they can handle minor adjustments.
How to Increase Image Size Using a Basic Photo Editor on Windows (e.g., Paint):
- Open Image: Right-click on your image file, select “Open with,” and choose “Paint” (or a similar basic photo editor like the Photos app).
- Access Resize Option: In Paint, look for the “Resize” option in the “Image” panel on the menu bar.
- Set New Dimensions: In the “Resize and Skew” dialog box, you can choose to resize by “Percentage” or “Pixels.” For enlargement, select “Pixels” and increase the “Horizontal” or “Vertical” values. Make sure “Maintain aspect ratio” is checked to avoid distorting the image.
- Confirm and Save: Click “OK” to apply the changes. You will see the image enlarge in the canvas. Finally, go to “File” > “Save” to overwrite the original or “File” > “Save as” to create a new, enlarged version.
Like Preview on Mac, these basic Windows tools are suitable for small increases in image size but may result in noticeable quality degradation with larger scaling factors.
Professional Software Approaches
For experienced users, professional photo editing software like Adobe Photoshop offers powerful tools for image enlargement. These programs provide granular control over resampling algorithms and other advanced settings.
General Steps for Enlarging in Professional Software:
- Open Image: Open your image in the professional photo editing software.
- Access Image Size Dialog: Navigate to the “Image” menu and select “Image Size.”
- Configure Settings: In the Image Size dialog, you’ll find options to adjust width, height, and resolution. Crucially, you’ll also find “Resample” options (e.g., Bicubic Smoother for enlargement, Preserve Details 2.0 with noise reduction).
- Constrain Proportions: Always ensure this is checked to maintain the image’s aspect ratio.
- Adjust Dimensions: Enter new, larger values for width or height. The other dimension will adjust automatically.
- Select Resampling Method: Choose an appropriate resampling method. For enlargement, algorithms like “Bicubic Smoother” or “Preserve Details” are designed to add pixels intelligently.
- Adjust Resolution (DPI/PPI): You can also directly adjust the resolution, which will affect the print size if dimensions are linked.
- Apply and Save: Click “OK” to apply the changes. The software will process the image. Then, save your file, often choosing a format and quality setting that balances file size and visual fidelity.
While professional software offers extensive control, it often requires a deeper understanding of image processing and can be time-consuming, especially for batch operations. Tophinhanhdep.com’s Desktop Image Maximizer aims to offer similar high-quality results with a more streamlined and intuitive workflow.
Essential Tips for Successful Image Enlargement
No matter which method you choose, a few best practices can help you achieve the best possible results when increasing image size.
Prioritizing Quality: When and How
- Start with the Best Possible Original: The golden rule of image enlargement is that you can’t create detail that wasn’t there to begin with. Always start with the highest quality, largest dimension image you have available. An AI upscaler like Tophinhanhdep.com’s can intelligently fill in gaps, but it performs best when it has more initial data to work with.
- Understand Your End Goal: Are you printing a billboard or just a larger social media image? The level of enlargement and the quality retention required will dictate the tools and methods you should use. For critical print projects, Tophinhanhdep.com’s Desktop Image Maximizer is indispensable.
- Utilize AI Upscaling for Significant Increases: For any substantial enlargement (e.g., doubling or tripling dimensions), AI-powered tools are your best bet. They are specifically designed to minimize pixelation and blur, crucial for high-resolution output and detailed close-ups.
- Consider File Type: Lossy formats like JPEG lose information each time they are saved, especially after editing. If possible, work with lossless formats (PNG, TIFF) or RAW files when making significant changes to preserve maximum detail.
Avoiding Common Pitfalls
- Don’t Over-Enlarge Non-AI-Enhanced Images: Simply stretching an image in basic editors beyond a certain point will inevitably lead to pixelation and a “soft” or blurry appearance. Know the limits of basic scaling.
- Beware of “Magic Buttons” without Understanding: Some tools promise instant perfect enlargement. Always preview your results carefully, especially for critical applications. Tophinhanhdep.com’s tools provide clear previews to help you assess quality.
- Manage File Size: While increasing image size, the file size (KB/MB) will naturally grow. If you have specific file size targets, use Tophinhanhdep.com’s dedicated KB/MB increaser to achieve them without over-compressing or losing too much visual quality.
- Check DPI/PPI for Print: If your goal is printing, always verify the final DPI/PPI alongside the dimensions. A high-resolution image on screen might still print poorly if the DPI is too low for the printer’s capabilities.
Beyond Enlargement: A Glimpse into Tophinhanhdep.com’s Offerings
While increasing image size is a crucial aspect of digital imagery, it’s just one facet of what Tophinhanhdep.com offers. Our platform is a comprehensive hub for all things related to images and photography.
Image Editing and Optimization
Beyond enlargement, Tophinhanhdep.com provides a wide array of image tools to perfect your visuals:
- Converters: Easily switch between different image formats (e.g., PNG to JPEG, HEIC to JPG).
- Compressors: Reduce file size (KB/MB) without significant quality loss for web optimization or email.
- Optimizers: Fine-tune images for faster loading times and better performance online.
- Image-to-Text: Extract text from images using advanced OCR technology.
- Background Removal: Instantly remove or change image backgrounds for product photography or creative compositions.
These tools are essential for digital photography workflows, ensuring your images are not only the right size but also perfectly prepared for their intended use.
Creative Inspiration and Visual Design
Tophinhanhdep.com isn’t just about tools; it’s about fostering creativity and providing inspiration:
- Graphic Design & Digital Art: Our platform supports graphic designers and digital artists with features like photo manipulation, allowing for complex artistic creations.
- Creative Ideas & Mood Boards: Explore photo ideas and thematic collections to spark your imagination. Enlarged, high-quality images can be the foundation of stunning mood boards and visual concepts.
- Trending Styles: Stay abreast of trending styles in imagery and photography, ensuring your visual content remains fresh and impactful.
Whether you’re crafting aesthetic backgrounds, designing unique digital art, or simply seeking inspiration, Tophinhanhdep.com equips you with the resources to elevate your visual projects.
High-Resolution Photography and Stock Images
We emphasize the importance of high-resolution imagery across all categories:
- Wallpapers & Backgrounds: Browse collections of high-quality images suitable for any screen, ensuring clarity and detail. Enlarging your personal photos for this purpose becomes easy with our tools.
- Nature & Abstract Photography: Discover breathtaking nature and abstract photography, often available in high resolution, and learn how to maintain this quality in your own work.
- Beautiful & Emotional Photography: Explore curated collections of beautiful and emotional photography, understanding how resolution contributes to impact.
Tophinhanhdep.com is your ultimate destination for everything related to images – from practical tools to creative inspiration.
Conclusion
Increasing the size of an image, whether to meet specific online requirements, prepare for a large print, or enhance details for graphic design, no longer has to be a daunting task. While traditional methods offer basic enlargement, the real power lies in leveraging advanced tools like Tophinhanhdep.com’s Online AI Image Upscaler and Desktop Image Maximizer. These solutions intelligently add pixels and reconstruct details, preserving the original quality and sharpness even during significant scale-ups.
At Tophinhanhdep.com, we understand the diverse needs of photographers, designers, students, and casual users. Our comprehensive suite of image tools, including dedicated options for increasing image size in KB to MB, ensures you have the right solution for every scenario. By combining our cutting-edge technology with the fundamental principles outlined in this guide, you can confidently enlarge your photos and achieve professional-quality results every time, unlocking the full potential of your visual content across all platforms. Explore Tophinhanhdep.com today and transform how you manage and manipulate your images.