How to Increase the DPI of an Image for Sharp, Scalable Visuals on Tophinhanhdep.com

In the dynamic world of digital imagery, where every pixel counts, understanding and mastering DPI (Dots Per Inch) is paramount. Whether you’re a photography enthusiast looking to print breathtaking nature scenes, a graphic designer crafting intricate digital art, or simply someone wanting to ensure your aesthetic wallpapers look crisp on any screen, the DPI of your images dictates their clarity and quality. Tophinhanhdep.com, your ultimate resource for stunning images, photography insights, and powerful image tools, is here to guide you through the intricacies of increasing image DPI to achieve professional-grade results.
This comprehensive guide will delve into what DPI truly means, differentiate between simply changing metadata and genuinely enhancing pixel density, and provide you with practical, step-by-step instructions using Tophinhanhdep.com’s advanced tools and other common software. We’ll ensure your images—from high-resolution stock photos to personalized mood boards—are always sharp, scalable, and ready for any application in 2025 and beyond.
Demystifying DPI, PPI, and Image Resolution: The Core of Image Quality
Before diving into how to increase DPI, it’s crucial to grasp what these terms signify and why they matter for your visual content, especially within the context of a rich image platform like Tophinhanhdep.com. Often, “DPI” and “PPI” are used interchangeably, leading to confusion. Let’s clarify:
- DPI (Dots Per Inch): This term specifically refers to the number of ink dots a physical printer places within one linear inch of an image for print output. A higher DPI value means more dots of ink, resulting in a finer, more detailed, and higher-quality print.
- PPI (Pixels Per Inch): This relates to the pixel density of a digital image on a screen display or within the digital file itself. It defines how many pixels are packed into one inch of digital space. For digital photographers and visual artists, PPI is often the more relevant metric as it describes the inherent resolution of the digital file.
- Image Resolution: This is the total number of pixels in an image, typically expressed as width x height (e.g., 1920x1080 pixels). It’s the absolute count of individual picture elements that make up your image.
While DPI and PPI technically differ, for simplicity and common understanding, many digital tools and discussions (including often on Tophinhanhdep.com’s guides) use “DPI” to refer to the pixel density or resolution relevant to both digital display and print preparation. The key takeaway is that true image quality for printing, or for displaying large, high-resolution visuals like those found in Tophinhanhdep.com’s extensive collections, stems from the actual number of pixels in your image, not just a metadata tag.
The Critical Difference: DPI Metadata vs. Actual Pixel Density
One of the most common misconceptions is that simply altering the DPI value in an image’s metadata instantly improves its quality. This is largely untrue. Changing the DPI value without increasing the actual pixel count does not add any new detail, sharpness, or clarity to your image. It merely tells a program (like a word processor or printing software) how large to interpret the image for display or print, based on its existing pixel dimensions.
Consider an image with 1000 x 800 pixels.
- If you set its DPI metadata to 100, a printing program might interpret it as a 10 x 8-inch print (1000 pixels / 100 DPI = 10 inches).
- If you change the DPI metadata to 300, the same 1000 x 800 pixel image would now be interpreted as a much smaller print, approximately 3.3 x 2.6 inches (1000 pixels / 300 DPI = 3.3 inches).
In both scenarios, the image still has only 1000 x 800 pixels. No new visual information has been created. The true measure of an image’s ability to produce a high-DPI print is its total pixel resolution. To genuinely increase the DPI without reducing the print size, you must increase the image’s pixel resolution. For instance, to print that same 10 x 8-inch photo at 300 DPI, you would need to increase its resolution to 3000 x 2400 pixels. This is where advanced AI upscaling tools, like those offered by Tophinhanhdep.com, become indispensable.
Having a higher resolution in your source file allows you to pack more pixels into every inch of your photo, yielding a higher effective DPI when printed and ensuring your beautiful photography and visual designs retain their integrity.
How to Check Your Image’s DPI
Knowing the current DPI (or PPI) metadata of your image is the first step in assessing its print readiness or compatibility with various digital platforms. You can check this value easily using most file managers or photo editing software.
On Windows 10/11:
- Open File Explorer and navigate to the folder containing your image.
- Right-click on the image file.
- Select “Properties” from the context menu.
- Go to the “Details” tab.
- Look for “Horizontal Resolution” and “Vertical Resolution” under the “Image” section. These values represent the DPI (or PPI).
On macOS:
- Open Finder and locate your image.
- Right-click on the image and choose “Open with” > “Preview.”
- In Preview, go to the menu bar, click “Tools,” then select “Show Inspector” (or press Command + I).
- In the Inspector window, navigate to the “General Info” tab (often represented by a small ‘i’ icon).
- You’ll find the “Image DPI” listed there.
While checking the DPI metadata is straightforward, remember that this value alone doesn’t tell the whole story about an image’s actual quality or resolution for larger prints or demanding visual design projects.
Mastering DPI Enhancement with Tophinhanhdep.com: The Power of AI Upscaling
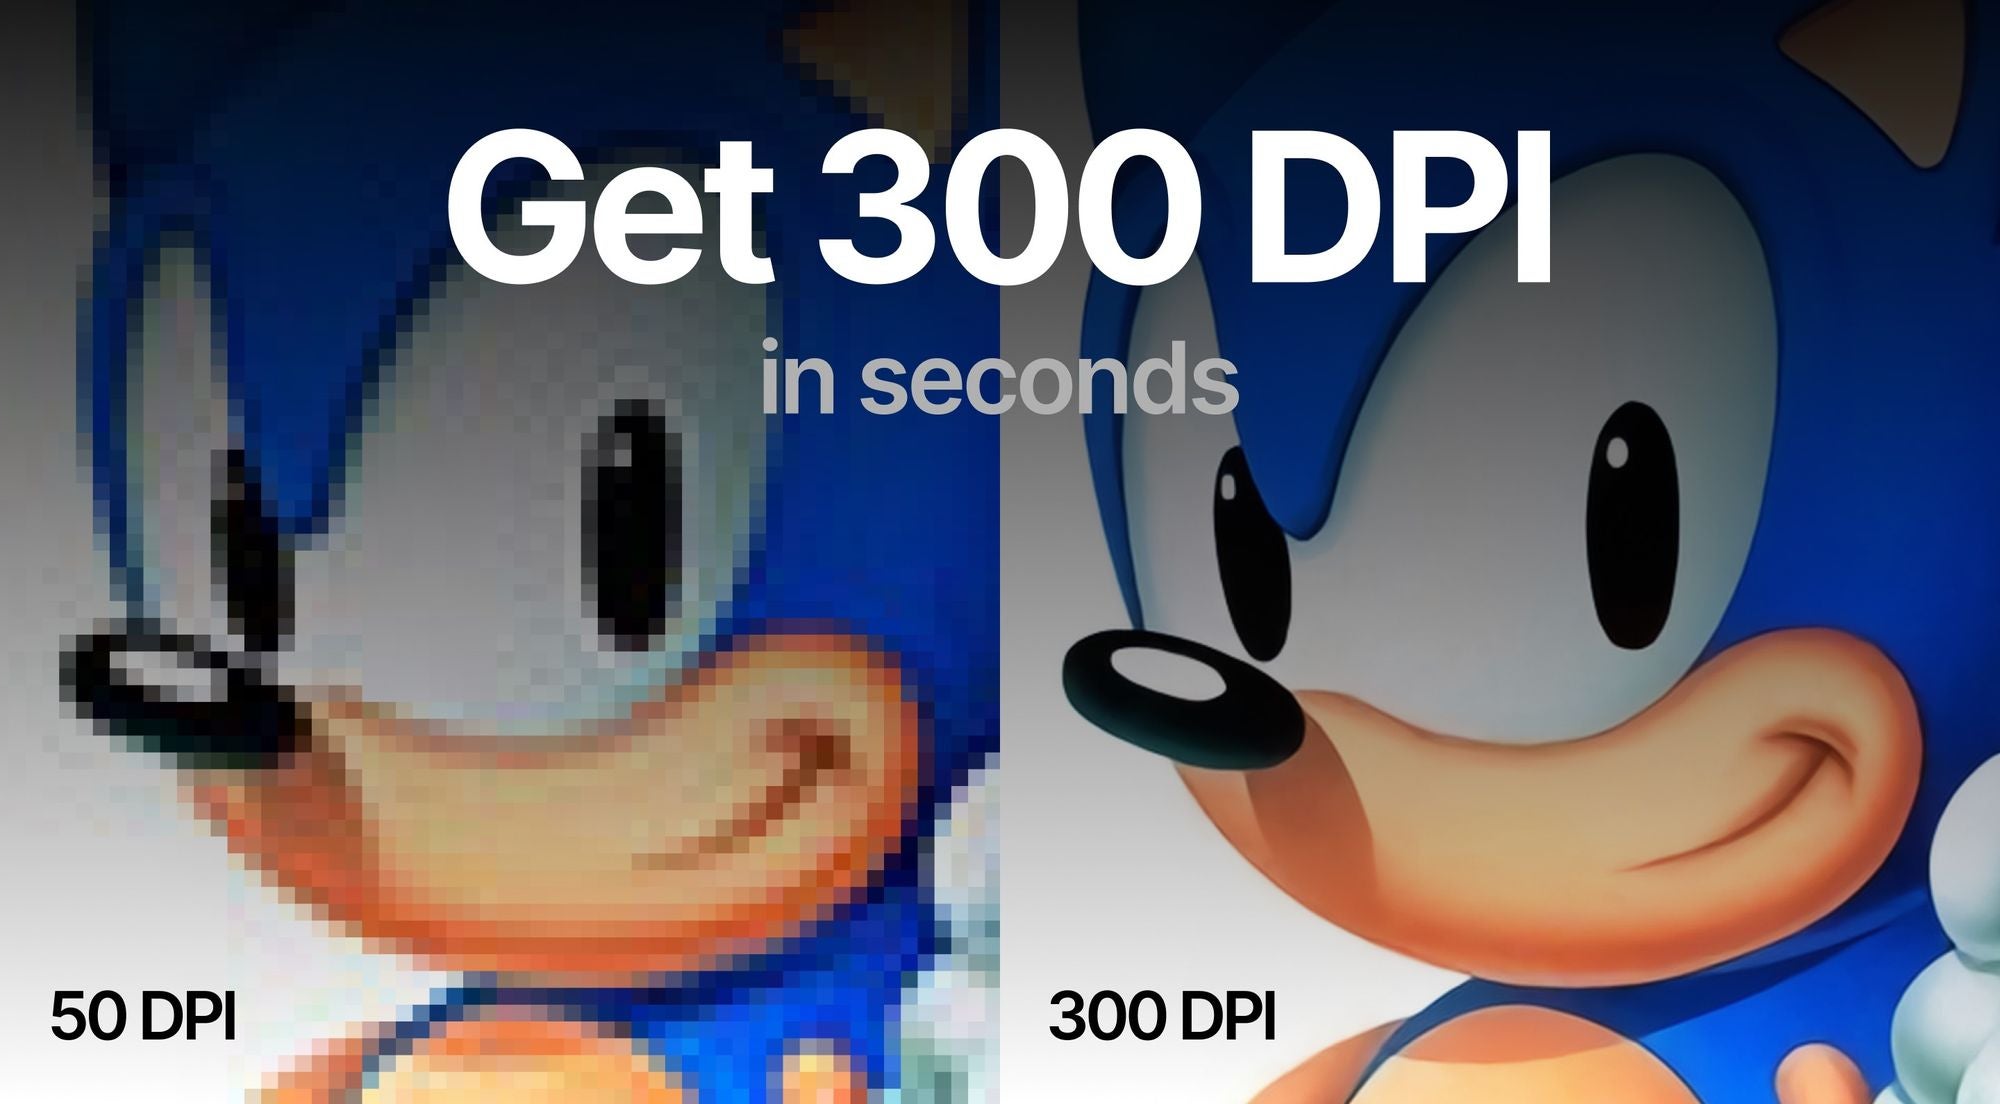
Tophinhanhdep.com offers a state-of-the-art solution for increasing your image’s DPI by fundamentally enhancing its pixel density. Our advanced AI upscalers go beyond simple pixel interpolation, intelligently adding new, high-quality pixels to your image, resulting in truly sharper, more detailed, and print-ready visuals. This is a game-changer for anyone working with digital photography, stock photos, or creating stunning wallpapers and abstract art that demands high resolution.
Gone are the days when increasing resolution meant blurry, artifact-ridden images. Traditional photo editors often use older upscaling algorithms that can degrade image quality and lose fine details. With Tophinhanhdep.com’s AI-powered technology, you can almost magically add more pixels to your source photo, making it suitable for larger prints, high-resolution displays, and intricate visual design projects.
Step-by-Step Guide to Upscaling with Tophinhanhdep.com
Transforming your photos into high-resolution masterpieces with Tophinhanhdep.com is simple and intuitive. Follow these steps to prepare your images for bigger, crisper prints and stunning digital displays:
Step 1: Log in to Tophinhanhdep.com Access your Tophinhanhdep.com account. If you’re new, a quick sign-up will give you access to a suite of powerful image tools. You can often sign in conveniently using your Google account.
Step 2: Upload Your Images You can upload photos you wish to enhance using various methods:
- Drag & Drop: Simply drag your image files directly into the designated upload area.
- Select Files: Click the upload button to choose images from your device.
- Import from Cloud/URL: For convenience, you may also import files directly from cloud storage services or by providing a URL. As you upload, Tophinhanhdep.com’s interface will often display key information, including the estimated output DPI value below the resolution, giving you an immediate preview of potential enhancement.
Step 3: Set Your Desired Resolution and Enhancement Type Tophinhanhdep.com’s default DPI for most operations is set to 300. If your uploaded image has a different DPI value, the output DPI will be adjusted to 300 by default unless you specify otherwise.
Tophinhanhdep.com features several unique AI upscalers, each optimized for different image types and enhancement goals. These tools can typically increase resolution up to 16x or to impressive pixel counts, often exceeding 500 megapixels, making them perfect for creating high-resolution backgrounds, detailed nature photography, or intricate digital art:
- Gentle: Ideal for subtle enhancements on text-heavy images like product labels, maps, or posters where minor details are critical.
- Balanced: Offers improved clarity and detail for everyday photos such as landscapes, architectural shots, and food photography. This is a great all-around choice for many of Tophinhanhdep.com’s “Beautiful Photography” and “Nature” collections.
- Strong: Specifically designed to fix blur and enhance faces, particularly useful for small portraits or emotional imagery where facial clarity is key.
- Ultra: Our most transformative upscaler, providing superior quality and detail enhancement across a broad range of images, perfect for creating stunning “Aesthetic” or “Abstract” visuals.
- Digital Art: Tailored for illustrations, graphic design, and anime, preserving or reimagining artistic elements based on your creativity settings.
- Old Photo: A specialized tool to fix scratches, fading, and damage in vintage photos, and even add realistic color to black & white images, bringing old memories to life in high DPI.
Crucial Note: Changing only the DPI metadata without increasing the pixel count will not add more details or result in better prints. To achieve a true DPI increase, ensure you upscale the image’s width & height by at least 2x.
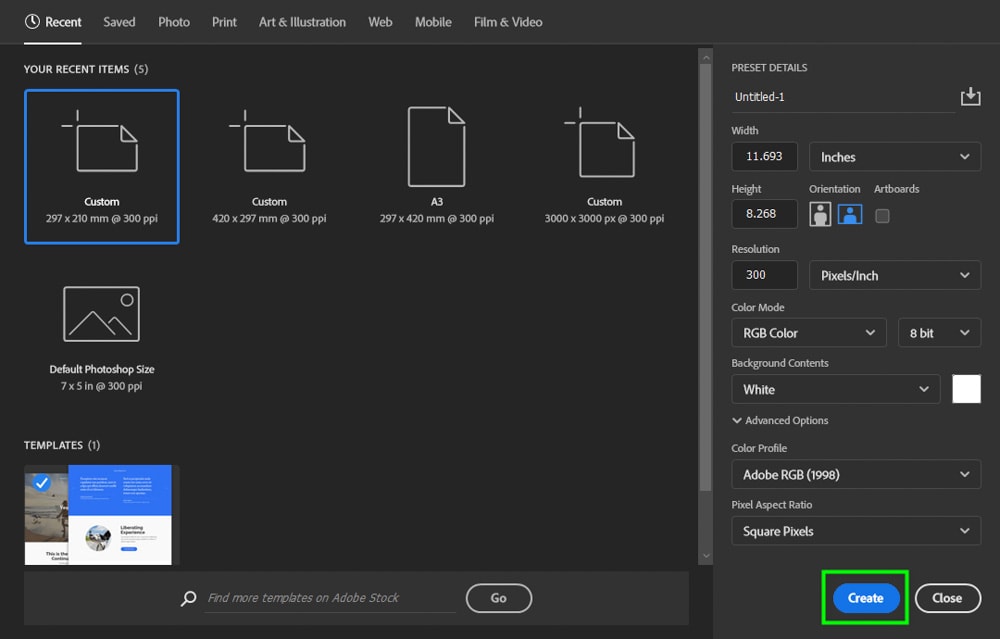
In the Tophinhanhdep.com interface, navigate to the “Width & Height” tab on the Size sidebar. Here, you can set your desired resolution. For example, if you have a low-resolution image (e.g., 1162 x 702 pixels) and want to print it as a larger, high-DPI photo, you can set the larger side’s resolution to, say, 5250 pixels. The smaller side will automatically adjust proportionally. This transformation will allow you to print a much larger photo (e.g., 15 x 9.06 inches) at a high DPI (e.g., 350 DPI), maintaining excellent clarity. This is essential for showcasing your “High Resolution” photography or creating bespoke “Wallpapers.”
Step 4: Initiate Processing Once your settings are dialed in, click the “Enhance” or “Process” button. Our AI will get to work, transforming your image. The processing time will vary depending on the image size and selected enhancement options.
Step 5: Download Your Enhanced Image When the process is complete, the image thumbnail will transition from blurry to clear, and a download button will appear. Save the new, high-DPI file to your device. Tophinhanhdep.com often stores your enhanced photos in the cloud for a set period, offering easy access to your revitalized visuals.
Now, that previously low-resolution image can be printed at a significantly larger size with superior DPI, suitable for any professional application or personal display.
Intelligent Presets for Effortless Printing and Design
To further simplify your workflow, Tophinhanhdep.com offers a variety of ready-made presets designed for common printing and display needs. These are particularly useful for graphic designers, digital artists, and anyone needing to prepare images for specific outputs.
You can select from popular standards for posters, photos, and international paper sizes (from A5 to A0). Our intelligent application will automatically calculate and set the appropriate resolution for your chosen preset at a default of 300 DPI. For instance, if you want to print an image on A4 paper, Tophinhanhdep.com will adjust the resolution to match A4 dimensions at 300 DPI (e.g., 5806 x 3508 pixels), ensuring your “Beautiful Photography” or “Creative Ideas” translate perfectly to print.
These presets eliminate guesswork, making it easier than ever to achieve perfect DPI for your visual design projects and printed collections, from high-resolution stock photos for a corporate brochure to emotional images for a personal photo album.
Adjusting DPI Metadata: When and How
While Tophinhanhdep.com excels at increasing actual pixel density for superior quality, there are instances where you only need to modify the DPI metadata of an image. This is often the case for online platforms or legacy systems that require a specific minimum DPI/PPI value in the file’s properties, even if they don’t necessarily perform a quality check on the pixel count. For example, some stock photo sites might request 300 DPI images, even if a 72 DPI image with sufficient pixel dimensions would render identically on their platform.
Pro Tip: If your goal is purely to override the DPI metadata without improving image quality (e.g., for website requirements), Tophinhanhdep.com might recommend using lighter, free tools. However, for any real quality enhancement, especially for visual design, digital art, or high-resolution photography, our AI upscaler remains the go-to solution.
Changing DPI in Popular Photo Editing Software
Many popular photo editing programs allow you to modify DPI metadata. Here’s how to do it in some widely used software:
Adobe Photoshop: Photoshop is a professional standard for photo manipulation and graphic design, offering precise control over image properties.
- Open your image in Adobe Photoshop.
- Go to “Image” > “Image Size.”
- In the “Image Size” dialog box, ensure that the “Resample” checkbox is UNCHECKED. This is crucial to prevent Photoshop from resizing (resampling) your image pixels and potentially making it blurry or stretched.
- Set your desired DPI value in the “Resolution” field (ensure “Units” are set to “Pixels/Inch”).
- Click “OK.”
- To save these changes:
- Go to “File” > “Save” to apply changes to the current file.
- Go to “File” > “Save As” to create a new file with the modified DPI metadata, preserving your original. For true resolution increase, Photoshop also features an “Enhanced Sampling” or “Super Resolution” option, which Tophinhanhdep.com has benchmarked alongside its own advanced AI upscaling capabilities, often demonstrating superior results from our platform.
GIMP (GNU Image Manipulation Program): GIMP is a powerful, free, and open-source photo editor available for Windows, Mac, and Linux, making it an accessible option for many.
- Open your image in GIMP.
- Go to “Image” > “Print Size.”
- Set your desired DPI value for the “X resolution” field. The “Y resolution” will automatically adjust if the chain icon (aspect ratio lock) is intact.
- Click “OK.”
- To save the changes:
- Go to “File” > “Save” to update the current file.
- Go to “File” > “Save As” to save it under a new name.
- Go to “File” > “Save a Copy” to create a duplicate.
Other Photo Programs (e.g., Irfanview, XnView - or similar generic tools): Many other image viewers and basic editors provide similar functionality. The core principle remains the same:
- Open your image.
- Look for an option like “Image Size,” “Resize,” or “Print Size” in the Image menu.
- Crucially, ensure any “Resample Image” or “Resize Pixels” option is deselected or unchecked. You only want to change the DPI metadata, not the pixel dimensions.
- Enter the desired DPI value in the “Resolution” or “DPI” field.
- Save the image, preferably with a new name (e.g.,
image_300dpi.jpg) to distinguish it from the original.
Quick Online DPI Converters for Metadata Adjustment
For users who need a rapid, simple way to change DPI metadata without installing software, several free online tools are available. These tools are quick but remember, they only alter the metadata and do not improve image quality or add pixels.
- Access an Online Tool: Search for “online image DPI converter” or “change image DPI online.”
- Upload Your Image: Click the “Choose Image” or “Upload” button and select your file (typically supporting JPEG, PNG, BMP, TIFF, ICO).
- Set Desired DPI: Enter the target DPI value (e.g., 300).
- Convert and Download: Click “Convert” or “Process.” The image with the new DPI metadata will be processed and downloaded to your device within seconds.
These online tools can also be used on mobile devices (iPhone or Android smartphones) for quick metadata changes. However, for any task involving true image enhancement, Tophinhanhdep.com’s dedicated AI upscaler remains the superior choice for preserving and elevating your visual content.
Optimizing DPI for Diverse Applications: Print, Web, and Design
Choosing the right DPI for your images isn’t a one-size-fits-all decision. The optimal DPI depends heavily on the intended use of the image – whether it’s for printing a stunning piece of digital art, displaying a high-resolution background on a screen, or preparing a beautiful photograph for a website. Generally, aiming for 300 DPI or more is recommended when possible, especially for print. However, there are scenarios where lower pixel density is acceptable or even preferable.
To estimate the minimal DPI required, consider three primary factors: viewing distance, subject matter, and printing material.
Key Factors for Print Quality: Viewing Distance, Subject, and Material
1. Viewing Distance: The closer people will look at your photo or design, the higher the DPI you’ll need to make it appear crisp and detailed. This is a crucial consideration for photographers and visual designers preparing content for various formats, from intimate photo books to large-scale posters.
| Viewing Distance | Minimum Recommended DPI |
|---|---|
| Less than 0.6m / 2ft | 300+ |
| 0.6m / 2ft (Arm’s Length) | 300 |
| 1m / 3.3ft | 180 |
| 2m / 6.5ft | 90 |
| 5m / 16ft | 35 |
| 15m / 50ft | 12 |
| 50m / 160ft | 4 |
| 200m / 650ft | 1 |
For instance, 300-400 DPI is an excellent target for photo books, flyers, brochures, or any printed material that will be viewed closely. These are ideal settings for your “Beautiful Photography” or “Aesthetic” collections that demand fine detail. For large posters, banners, or placards, where viewers will be several feet away, even 100-200 DPI might suffice. Imagine a billboard from a block away – even 1 DPI can sometimes be acceptable because of the extreme viewing distance.
2. Subject Matter: What’s depicted in your image also influences the required DPI. The more intricate details your main subject possesses, the higher the pixel density you’ll need to capture them. For example, a detailed nature photograph of a forest canopy with individual leaves might require higher DPI than a smooth, abstract background to render all its nuances clearly. Similarly, a finely textured portrait from a “Sad/Emotional” or “Beautiful Photography” series will benefit from higher DPI to show subtle facial expressions and skin tones.
3. Printing Material: The quality and type of paper or material you print on significantly impact how well it can hold ink and render detail.
- Coated glossy paper: This type of paper holds ink exceptionally well and allows for superior detail. You can confidently set your DPI to 300 or even higher for optimal results on glossy finishes, perfect for high-resolution stock photos or professional digital art prints.
- Uncoated paper: Uncoated paper absorbs ink more, which can lead to slight spreading and less crisp detail. For such materials, there’s often no significant benefit in going beyond 200-250 DPI, as the paper itself becomes the limiting factor in perceived sharpness.
Always remember to check with your printing service about their minimum DPI requirements. Many services, for instance, might require images to be at least 150 DPI for acceptable quality. Tophinhanhdep.com encourages users to achieve the highest possible DPI with our tools to ensure maximum flexibility and quality across all printing scenarios.
DPI for Web and Digital Displays: A Different Perspective
For images displayed exclusively on websites, social media, or digital screens (like desktop wallpapers or presentation backgrounds), the DPI metadata is not directly important. What truly matters for web display is the image’s pixel dimensions (width x height). A 1920x1080 pixel image will look the same on a screen, regardless of whether its metadata says 72 DPI, 96 DPI, or 300 DPI.
Web images are typically optimized for fast loading times, which often means reducing their physical pixel dimensions and sometimes compressing them. While you might encounter recommendations for “72 DPI for web,” this is largely a legacy standard. The actual pixel count (e.g., an image being 1920 pixels wide) is what determines its size and clarity on a screen. High-resolution images, like those found in Tophinhanhdep.com’s “Wallpapers” and “Backgrounds” collections, are defined by their ample pixel dimensions, ensuring they look stunning on various screen sizes and resolutions, not by a high DPI metadata tag.
However, if you’re a visual designer preparing images for a responsive website, starting with a high-resolution, high-DPI image (achieved through Tophinhanhdep.com’s upscalers) provides flexibility. You can then downsample and optimize different versions for various screen sizes without losing crucial detail from the original, ensuring your “Creative Ideas” adapt beautifully across all devices.
Tophinhanhdep.com: Your Ultimate Partner for Image Enhancement and Visual Design
In the vast landscape of digital imagery, from capturing a fleeting moment in beautiful photography to crafting intricate digital art, the quality and resolution of your images are foundational. Tophinhanhdep.com stands as a beacon for creators, photographers, and enthusiasts alike, offering not just a rich repository of images but also the essential tools to elevate them to their highest potential.
Our commitment extends beyond providing breathtaking wallpapers, backgrounds, and thematic collections. We empower you with advanced “Image Tools” like AI upscalers that are indispensable for achieving truly high-resolution outputs. Whether you’re enhancing a cherished “Nature” photograph for a large print, perfecting a “Sad/Emotional” portrait for a gallery display, or creating a vibrant “Abstract” piece for a digital art portfolio, Tophinhanhdep.com ensures your vision is realized with unparalleled clarity.
The ability to increase the actual pixel density and, consequently, the effective DPI of an image with Tophinhanhdep.com is critical for every aspect of “Visual Design.” Graphic designers rely on crisp imagery for logos and branding, digital artists demand high fidelity for their creations, and photo manipulation experts require robust source material. Our platform facilitates all of this, enabling “Creative Ideas” to flourish without the constraints of low resolution.
Furthermore, for those seeking “Image Inspiration & Collections,” Tophinhanhdep.com provides a foundation of quality. A high-DPI image ensures that your photo ideas, mood boards, and trending styles can be presented with the impact they deserve, free from pixelation or blur. By leveraging our AI-powered upscaling technology, you can take any image—whether from your personal archives or a high-resolution stock photo—and prepare it for the most demanding applications, guaranteeing that your visuals are always at their best.
Frequently Asked Questions
What is the difference between DPI and PPI? DPI (Dots Per Inch) refers to the number of ink dots a printer places per inch on paper. PPI (Pixels Per Inch) refers to the pixel density of a digital image on a screen or within the file. While technically distinct, they are often used interchangeably, particularly in discussions about digital image resolution for print. Tophinhanhdep.com uses these terms to simplify guidance on achieving optimal image quality.
What is DPI in printers’ settings? In printer settings, choosing a higher DPI generally increases print quality but uses more ink and can slow printing speed. Printers use combinations of color ink dots to simulate the vast color range of digital pixels. While some printers allow you to select exact DPI values (e.g., 100 to 1000), this is often a simplified number, and the actual dot placement is managed by the printer’s internal software.
Is 72 DPI a high resolution? No, 72 DPI and 96 DPI are largely legacy numbers from old industry standards, primarily for early screen displays. These values embedded in image files don’t directly indicate image quality. What truly matters for image quality, especially for print or large digital displays, is the total pixel resolution of the image (its megapixel count). For any significant quality enhancement, Tophinhanhdep.com focuses on increasing this actual pixel resolution.
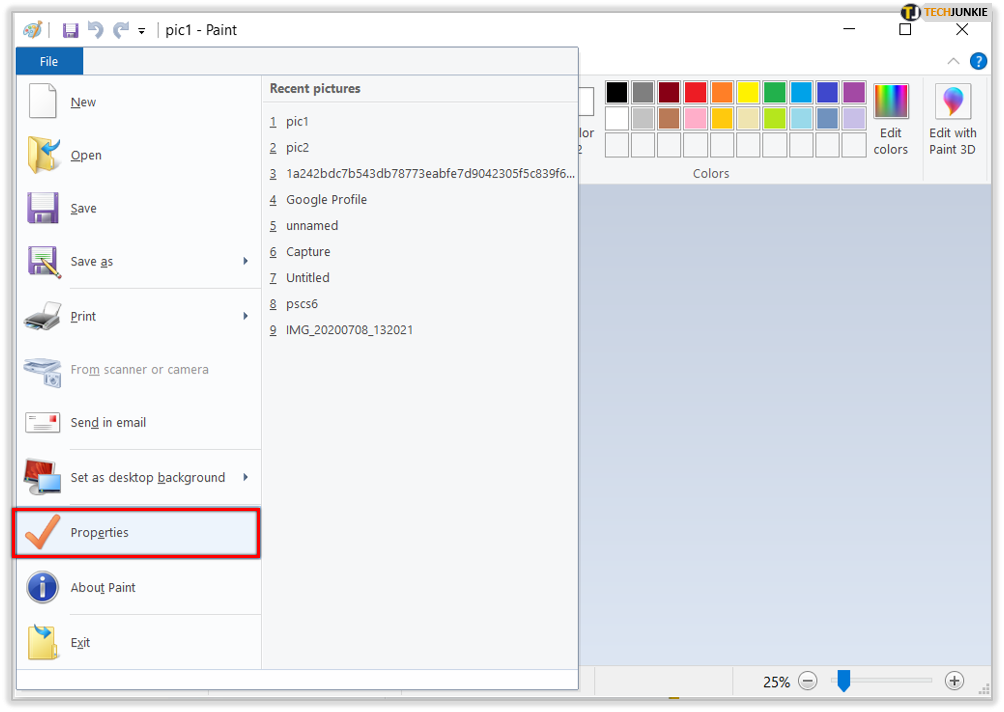
How to change DPI in Paint? Microsoft Paint (MS Paint) typically does not offer a direct option to change DPI metadata. While you can resize images in Paint, it doesn’t provide precise DPI control. For checking DPI in Paint, you can go to File > Properties. For genuine DPI adjustment or enhancement, tools like Tophinhanhdep.com, GIMP, or Photoshop are recommended.
Can I convert a 72 DPI image to 300 DPI? Yes, you can change the DPI metadata from 72 to 300. However, simply altering this value won’t add any detail or improve image quality. To truly convert a 72 DPI effective print size image into a 300 DPI effective print size image without reducing its physical dimensions, you’ll need to use advanced upscaling techniques, such as Tophinhanhdep.com’s AI upscalers, to increase the actual pixel resolution.
Does DPI matter for images on websites? Not directly. For web display, the image’s pixel dimensions (width x height) are far more critical than the DPI value in its metadata. A 1920x1080 image will display at the same size and clarity on a screen regardless of whether its DPI metadata is 72 or 300. Optimizing for the web primarily involves managing pixel dimensions and file size for fast loading.
How does increasing DPI affect file size? Increasing the DPI along with the actual pixel resolution will increase the file size. This is because you are adding more data (pixels) to the image. A higher-resolution image, while offering superior quality, will naturally take up more storage space. Tophinhanhdep.com’s upscaling ensures this added data translates directly into a higher-quality, more detailed image.
Final Tips
The optimal DPI for your images hinges on several factors: the amount of small detail within your photograph, the expected viewing distance, and the type of material it will be printed on. A good rule of thumb is to aim for 300 DPI as the optimal pixel density for high-quality photos, brochures, and other printed materials that people will view at arm’s length or closer. This ensures your “Beautiful Photography” or “Graphic Design” elements are rendered with exceptional clarity.
If you plan to use a professional printing service, always remember to inquire about their minimum DPI requirements. Print services often specify these to guarantee satisfactory output quality.
In situations where you need a higher DPI for your desired print size or visual design project, Tophinhanhdep.com is your invaluable resource. Our AI-powered tools not only allow you to increase the DPI metadata to 300+ but, more importantly, enhance the actual resolution and pixel density of your photos. This results in genuinely crisp, detailed prints of any size, perfect for showcasing your “High Resolution” images or creating stunning “Aesthetic” visuals.
So, explore Tophinhanhdep.com today. Try our powerful tools for free and witness the transformative difference in your images. And if you’re a printing company or a professional visual design studio, discover our specialized solutions tailored for your business needs, designed to elevate your output and streamline your workflow with unparalleled image enhancement capabilities.