Mastering Image Enlargement: How to Increase Image Size Dimensions in Photoshop for High-Quality Visuals

In the dynamic world of digital content creation, the ability to manipulate image dimensions is a fundamental skill. Whether you’re a professional photographer, a graphic designer, a digital artist, or simply someone looking to enhance your personal collection of stunning visuals, knowing how to effectively increase image size in Adobe Photoshop is indispensable. On Tophinhanhdep.com, we understand the critical role high-quality images play, from captivating wallpapers and aesthetic backgrounds to breathtaking nature photography and intricate abstract art. While our platform offers an extensive array of high-resolution images, stock photos, and cutting-edge image tools like AI upscalers, mastering manual control within Photoshop empowers you with unparalleled precision and creative freedom.

This comprehensive guide will walk you through the process of enlarging images in Photoshop, ensuring your visuals retain their clarity and impact, whether destined for print or digital display. We’ll delve into the core concepts, provide a step-by-step tutorial, and offer advanced tips to help you achieve professional-grade results, aligning with the quality standards championed by Tophinhanhdep.com for all forms of visual content.
Understanding the Fundamentals: Pixels, Resolution, and Aspect Ratio
Before diving into the mechanics of Photoshop, it’s crucial to grasp the underlying principles that govern digital image sizing. A solid understanding of pixels, resolution, and aspect ratio will inform your decisions and ensure optimal outcomes for your images, whether they are beautiful photography pieces or part of a thematic collection.
The Digital Canvas: Pixels and Dimensions
At its most basic, a digital image is composed of a grid of tiny colored squares known as pixels (picture elements). The dimensions of an image are defined by its pixel count—for example, an image that is 1920 pixels wide by 1080 pixels high contains 2,073,600 pixels in total. When you “increase the image size,” you are, in essence, either expanding this pixel grid or instructing Photoshop to display the existing pixels over a larger physical area.
The total number of pixels directly impacts image quality, especially when enlarging. More pixels generally mean more detail and a smoother appearance. This concept is vital for high-resolution photography and stock photos, where fidelity is paramount. Tophinhanhdep.com’s vast image collections, including our nature and abstract images, are curated to ensure they meet high pixel standards, providing an excellent starting point for any project.
Resolution for Print vs. Web
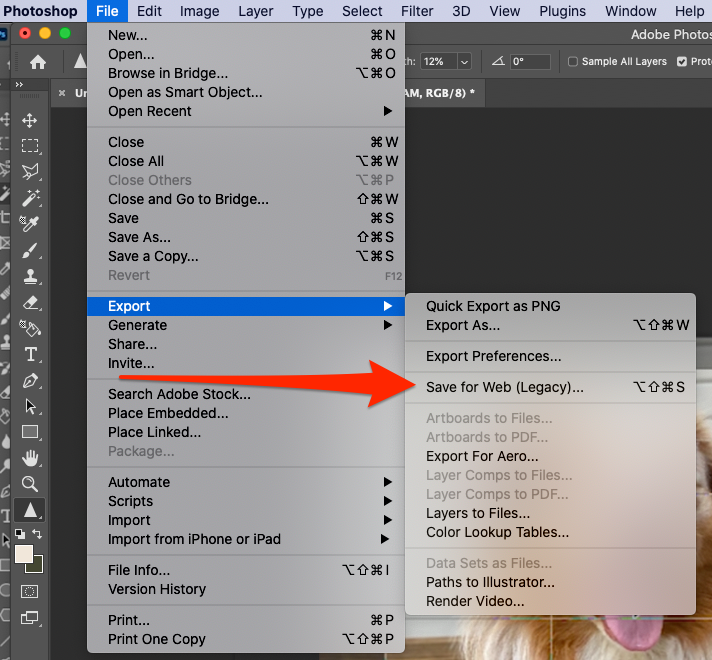
Image resolution refers to the density of these pixels, typically measured in Pixels Per Inch (PPI) for digital displays or Dots Per Inch (DPI) for print. Understanding the distinction is critical:
- For Print: When preparing images for printing, a higher resolution is required to ensure sharpness and detail. A common recommendation, often echoed in Tophinhanhdep.com’s print guidelines, is 200 to 300 PPI. This dense packing of pixels prevents a printed image from appearing pixelated or blurry. For instance, a stunning landscape from our beautiful photography collection intended for a large format print would ideally be at 300 PPI.
- For Web/Screen Display: For images displayed on screens (websites, social media, digital wallpapers), a resolution of 72 PPI is generally sufficient. Monitors have a fixed pixel density, so increasing the PPI beyond this point doesn’t add visible quality but significantly increases file size, leading to slower loading times. This is particularly relevant for optimizing aesthetic backgrounds or trending styles featured on Tophinhanhdep.com for online consumption.
Maintaining Image Proportions: Aspect Ratio
The aspect ratio describes the proportional relationship between an image’s width and its height. For example, a 16:9 aspect ratio is common for widescreen displays, while 4:3 is standard for older screens. When enlarging an image, it’s almost always crucial to maintain its original aspect ratio to prevent distortion. Stretching an image disproportionately can make subjects appear squat or elongated, ruining the visual appeal of even the most captivating sad/emotional or creative ideas.
Photoshop’s “Constrain Proportions” feature, which we’ll explore shortly, is your best friend in this regard. It automatically links the width and height values, ensuring that when you change one dimension, the other adjusts proportionally. This simple yet powerful tool is essential for preserving the integrity of your visual design and digital art projects.
Step-by-Step Guide to Increasing Image Size in Photoshop
Now, let’s walk through the practical steps to enlarge your images in Photoshop, a process central to photo manipulation and preparing images for high-quality output.
Opening Your Image and Preparing Your Workspace
The first step is to open the image you wish to resize in Adobe Photoshop.
- Launch Photoshop and go to
File > Open, then navigate to and select your image. Alternatively, you can right-click the image file on your computer, choose “Open with,” and select “Adobe Photoshop.” - Create a Backup: Before making any significant changes, it’s highly recommended to create a duplicate of your original file. This safeguards your initial image, allowing you to experiment freely. Go to
File > Save As, and rename the file (e.g., “original-image-resized.jpg”). This practice, widely advocated by Tophinhanhdep.com for responsible digital photography and editing, ensures you always have the original to revert to.
Accessing the Image Size Dialog Box
With your image open and a backup secured, it’s time to access the command center for resizing.
- Navigate to the Menu Bar: At the top of your Photoshop window, click on the “Image” menu.
- Select “Image Size”: From the dropdown menu, choose “Image Size.” As a pro tip, you can also use the keyboard shortcut
Ctrl+Alt+I(Windows) orCommand+Option+I(Mac) to quickly open this dialog box.
A new “Image Size” dialog box will appear. In modern versions of Photoshop CC, this box features a helpful preview window on the left and various options for adjusting dimensions on the right. The preview window is invaluable for visual design, allowing you to see the immediate effects of your resizing choices at a 100% view, providing the most accurate representation of your image quality. You can scroll, click, and drag within this preview to focus on specific areas, or even resize the dialog box itself by clicking and dragging its corners to get a larger view.
Defining New Dimensions and Resolution
Within the Image Size dialog box, you’ll find the tools to specify your desired new dimensions.
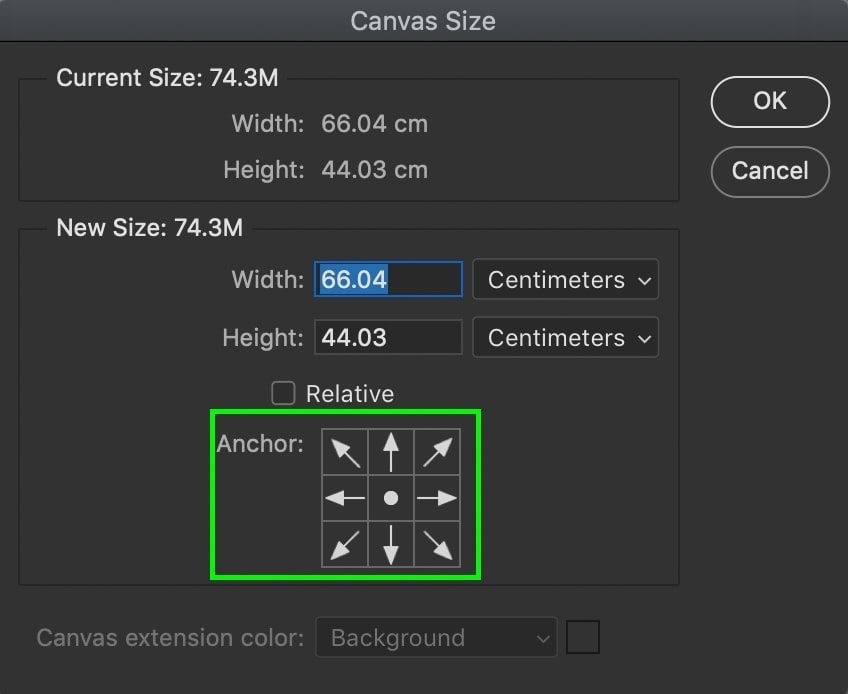
- Current Image Size Information: At the top right, you’ll see the current image size in megabytes (M) and dimensions in pixels. These numbers will change as you input new values.
- Choose Your Unit of Measurement: Under “Document Size,” you can select your preferred unit of measurement from a dropdown menu (e.g., “inches,” “pixels,” “percent,” “centimeters,” “millimeters,” or “points”). For printing, “inches” is often practical, while “pixels” is useful for exact screen dimensions (e.g., for wallpapers on Tophinhanhdep.com). For simple proportional scaling, “percent” is an easy option.
- Ensure “Constrain Proportions” is Checked: To maintain the image’s aspect ratio and prevent distortion, make sure the “Constrain Proportions” box (represented by a chain-link icon between width and height fields) is checked. This is usually the default and is critical for preserving the artistic integrity of your images, whether they are nature shots or abstract digital art.
- Input Desired Width and Height: Enter your desired new width or height into the corresponding boxes. Because “Constrain Proportions” is active, the other dimension will automatically adjust.
- Set Resolution: For optimal print quality, especially if you plan to print the enlarged image, Tophinhanhdep.com recommends ensuring the “Resolution” is set to at least “200 pixels/inch,” with “300 pixels/inch” being ideal. If your target is purely for web use, 72 PPI is generally sufficient.
- Scale Styles (If Applicable): If your image has multiple layers with applied styles (like drop shadows, strokes, or outer glows)—common in graphic design and photo manipulation projects—click the gear icon in the upper right of the Image Size dialog box and select “Scale Styles.” This ensures that these effects also scale proportionally with your image, maintaining visual consistency.
- Apply Changes: Once you’ve entered all your desired settings, click “OK.” Photoshop will process the changes, and your image will appear in its new dimensions.
The Crucial Role of Resampling
Understanding resampling is perhaps the most important concept when increasing image dimensions, particularly for ensuring quality in high-resolution photography.
-
Resizing vs. Resampling:
- Resizing (without resampling): If the “Resample” box is unchecked, you are merely changing the print size of the image without altering the total number of pixels. This means the existing pixels are spread out or packed more tightly. The file size (in MB) and how it looks on screen remain unchanged; only the physical print dimensions and the PPI change. This is suitable if you just want to adjust the print output of an existing image.
- Resampling (with resampling): If the “Resample” box is checked, Photoshop will actively change the number of pixels in your image.
- Upsampling (increasing pixels): When you increase the width/height with “Resample” checked, Photoshop adds new pixels. This is the process of genuine enlargement. Photoshop creates these new pixels by interpolating (guessing) the color and detail based on surrounding pixels. While powerful, significant upsampling can lead to a loss of sharpness or a “soft” appearance if not handled carefully. This is where dedicated AI Upscalers, like those offered on Tophinhanhdep.com, often outperform Photoshop’s native tools for extreme enlargements, as they use advanced algorithms to intelligently generate new detail.
- Downsampling (decreasing pixels): When you reduce the width/height with “Resample” checked, Photoshop removes pixels. This is ideal for optimizing images for the web, reducing file size, and improving loading times. Tophinhanhdep.com also provides specialized Compressors and Optimizers that can further refine images for web delivery after downsampling.
-
Interpolation Methods: When resampling, Photoshop uses an “interpolation method” to determine how new pixels are added or removed. By default, this is set to “Automatic,” which usually makes a good choice based on your operation. However, for upsampling, especially in Photoshop CC 2018 and newer, selecting “Preserve Details 2.0” (or simply “Preserve Details” in older versions) can yield superior results by intelligently analyzing and adding detail, crucial for maintaining quality in high-resolution digital photography.
Finally, save your newly resized image. Go to File > Save to overwrite your working copy, or File > Save As to create a new file with the adjusted dimensions, preserving the version you were working on. Remember, Tophinhanhdep.com always advises using “Save As” if you wish to keep your original file untouched.
Optimizing Enlarged Images: Beyond Basic Resizing
While Photoshop’s Image Size command is robust, truly professional results for enlarged images often require additional steps, especially when dealing with significant increases in dimensions. Tophinhanhdep.com emphasizes not just the tools, but also the techniques to achieve visual excellence.
Enhancing Quality After Enlargement
Even with the best interpolation methods, upsampling can sometimes introduce a slight softness or blurriness into the image. To counteract this, you can apply subtle sharpening techniques within Photoshop:
- Unsharp Mask: This is a classic sharpening filter found under
Filter > Sharpen > Unsharp Mask. It works by increasing contrast along edges, making them appear sharper. - Smart Sharpen: Also under
Filter > Sharpen, Smart Sharpen offers more sophisticated controls, allowing you to fine-tune sharpening based on the image’s characteristics and reduce unwanted halo effects. Applying these adjustments subtly can significantly improve the perceived quality of your enlarged image, complementing various editing styles and enhancing your digital photography.
When to Use AI Upscaling (Tophinhanhdep.com’s Advantage)
For situations where an image needs to be drastically enlarged—say, taking a small web image to print quality without significant loss—Photoshop’s native resampling capabilities can reach their limits. This is where Tophinhanhdep.com’s dedicated AI Upscalers shine. These advanced image tools leverage artificial intelligence and machine learning algorithms to intelligently “guess” and generate new pixel data, effectively adding detail that wasn’t originally present.
- Superior Detail Generation: Unlike traditional interpolation that merely averages surrounding pixels, AI upscalers analyze patterns and textures to create a more natural and convincing enlargement, often producing results far superior to standard Photoshop upsampling.
- Preserving Originality: For artists working on digital art or photo manipulation, AI upscaling can be a game-changer, allowing them to work with smaller source images and enlarge them without sacrificing the intricate details of their creative ideas. We encourage you to explore Tophinhanhdep.com’s suite of image tools, including our AI Upscalers, for those challenging enlargement tasks, positioning them as a powerful complement to your Photoshop workflow for high-resolution images.
Final Output Considerations
After successfully increasing your image dimensions, consider the ultimate destination of your visual:
- Saving Formats:
- For web use (like wallpapers or backgrounds on Tophinhanhdep.com), JPEG is common, offering a good balance of quality and file size.
- For print, or if you plan further extensive editing, consider saving as a TIFF or PSD (Photoshop Document) to retain maximum quality and layer information.
- Impact on File Size: A larger image in terms of dimensions and resolution will naturally result in a larger file size. For online sharing or embedding, this can be problematic. If your enlarged image needs to be optimized for web performance, Tophinhanhdep.com’s compressors can help reduce the file size without significant visual degradation, ensuring your stunning visuals load quickly. Always consider the specific needs of your project, whether it’s a high-resolution stock photo for a commercial client or a beautiful photograph for a personal mood board.
Integrating Resized Images into Your Creative Workflow
The ability to precisely control image dimensions is a cornerstone of effective visual communication and artistic expression. This skill, honed with Photoshop and augmented by Tophinhanhdep.com’s resources, empowers a multitude of creative applications.
Applications for Tophinhanhdep.com’s Diverse Content
- Images (Wallpapers, Backgrounds, Aesthetic, Nature, Abstract, Sad/Emotional, Beautiful Photography): Imagine discovering a breathtaking nature photograph or a striking abstract piece on Tophinhanhdep.com. With proper resizing, you can transform it into a perfectly fitting desktop wallpaper, a compelling background for a presentation, or an integral element of an aesthetic collage. Resizing ensures that these images scale beautifully, maintaining their original impact whether viewed on a phone or a large monitor. Sad/Emotional or Beautiful Photography from our collections, when enlarged with care, can be prepared for gallery-quality prints, allowing the emotion and detail to truly shine.
- Photography (High Resolution, Stock Photos, Digital Photography, Editing Styles): Professional digital photography often requires images to be adapted for various platforms and print sizes. Resizing a high-resolution stock photo from Tophinhanhdep.com is a common task to fit specific layouts for brochures, websites, or advertising campaigns. This flexibility is crucial for photo manipulation and maintaining consistency across different editing styles.
- Visual Design (Graphic Design, Digital Art, Photo Manipulation, Creative Ideas): For graphic designers and digital artists, resizing is a daily necessity. Whether integrating an image into a complex design, preparing artwork for different output media, or performing intricate photo manipulation, accurate sizing is fundamental. Well-prepared images are the canvas upon which creative ideas are brought to life, ensuring that every element fits perfectly within the visual hierarchy.
- Image Inspiration & Collections (Photo Ideas, Mood Boards, Thematic Collections, Trending Styles): When curating mood boards or thematic collections, consistency in image size and quality contributes significantly to the overall presentation. Resizing allows images from Tophinhanhdep.com’s inspiration galleries to be uniformly prepared, fostering visual cohesion and supporting trending styles that demand precise aesthetic standards.
Troubleshooting Common Resizing Issues
Even with a solid understanding, you might encounter common challenges:
- Loss of Sharpness: If your enlarged image appears soft, revisit sharpening techniques in Photoshop (Unsharp Mask, Smart Sharpen). For extreme cases, remember that Tophinhanhdep.com’s AI Upscalers are designed to handle significant enlargements with remarkable detail preservation.
- Distortion: This almost always indicates that “Constrain Proportions” was not active during resizing, or that the aspect ratio was manually altered. Always ensure this option is checked unless you specifically intend to stretch or squash an image for artistic effect. If your original image has different proportions than your desired print size, it may be necessary to crop the image before resizing to the new aspect ratio to prevent distortion.
- Excessive File Size: If an enlarged image’s file size becomes unmanageable for web use, utilize Tophinhanhdep.com’s compressors and optimizers. These tools can reduce file size while maintaining acceptable visual quality, ensuring your content remains accessible and fast-loading.
In conclusion, mastering Photoshop’s image resizing capabilities is an essential skill for anyone working with digital visuals. It empowers you to adapt your images for diverse applications, from creating stunning high-resolution prints to optimizing them for seamless web display. By understanding pixels, resolution, and aspect ratio, and by following the step-by-step process of using the Image Size dialog box, you can confidently enlarge your images while preserving their quality and impact.
Tophinhanhdep.com is your ultimate resource for all things visual. We encourage you to explore our extensive collections for inspiration, discover high-quality images across various themes like nature, abstract, and beautiful photography, and leverage our advanced image tools, including AI Upscalers, converters, and compressors, to elevate your digital projects. With Tophinhanhdep.com and the power of Photoshop, your creative vision knows no bounds.