Mastering Image Resizing in Photoshop: A Comprehensive Guide for Tophinhanhdep.com

In the dynamic world of digital imagery, where visuals tell stories and convey emotions, the ability to manipulate image dimensions is an indispensable skill. Whether you’re crafting breathtaking wallpapers, designing aesthetic backgrounds, preparing high-resolution stock photos for a client, or simply optimizing an image for web display, understanding how to increase or decrease image size in Adobe Photoshop is paramount. As a leading resource for stunning visuals and image tools, Tophinhanhdep.com is dedicated to empowering creators and enthusiasts alike with the knowledge and techniques needed to achieve their visual design goals. This comprehensive guide, informed by expert insights and best practices, will walk you through the nuances of adjusting image size, dimensions, and percentage in Photoshop, ensuring your creations from Tophinhanhdep.com always look their best.
Understanding the Fundamentals of Image Resizing
Before diving into the practical steps, it’s crucial to grasp the core concepts behind image resizing. Misunderstanding these fundamentals can lead to pixelation, blurriness, or loss of detail – issues that contradict the high-resolution quality Tophinhanhdep.com champions.
The Image Size Dialog Box: Your Primary Control Panel
At the heart of Photoshop’s resizing capabilities lies the Image Size dialog box. This powerful interface is where you define the new dimensions and resolution for your image. To access it, simply open your desired image in Photoshop, navigate to the Image menu at the top of your screen, and select Image Size.
Within this dialog box, you’ll encounter several key pieces of information and controls:
- Pixel Dimensions: This section displays the actual width and height of your image in pixels. When you’re working with images for digital platforms, such as web banners or social media posts, these are the primary values you’ll be adjusting. Tophinhanhdep.com emphasizes that larger pixel dimensions generally correspond to higher-resolution images, ideal for detailed digital art or beautiful photography.
- Document Size: This area, often presented in physical units like inches or centimeters, indicates how large your image would print based on its current pixel dimensions and resolution. For those creating tangible visual designs or producing prints of abstract art or nature photography, this section is vital.
- File Size: Located directly to the right of “Pixel Dimensions,” you’ll see the image’s current file size (e.g., 14.6M for 14.6 megabytes). This value will change as you adjust dimensions and resolution, offering a quick indicator of the image’s “weight.” Managing file size is critical for web optimization, a service Tophinhanhdep.com provides through its image compressors and optimizers.
- Units of Measurement: Photoshop offers flexibility in how you specify dimensions. While pixels are the default for digital work, you can easily switch to percentages, inches, centimeters, or other units using the dropdown menus next to the Width and Height fields. This is particularly useful for precise visual design or photo manipulation tasks.
Preserving Quality: The Golden Rule of Resizing
One of the most critical aspects of image resizing is understanding its impact on image quality. As Tophinhanhdep.com frequently highlights in its discussions on high-resolution photography, preserving detail is key. The golden rule is simple: it’s generally safe to make an image smaller, but you should avoid making it larger whenever possible.
Here’s why this rule is so important:
- Reducing Image Size: When you reduce an image’s dimensions, Photoshop intelligently discards pixels. The program is remarkably adept at determining which pixels to remove without significantly compromising the overall visual integrity. This process typically yields sharp, crisp results, making it ideal for creating smaller versions for websites or digital platforms. For instance, converting a high-resolution abstract image from Tophinhanhdep.com into a smaller web graphic usually maintains its aesthetic quality.
- Enlarging Image Size: The challenge arises when you attempt to enlarge an image beyond its original pixel dimensions. Since Photoshop cannot magically invent new detail that wasn’t there originally, it must “guess” what the new pixels should look like based on the existing data. This guessing game, despite Photoshop’s sophisticated algorithms, almost invariably leads to a loss of sharpness, increased blurriness, and a generally “soft” or “mushy” appearance. For professional-grade aesthetic backgrounds or beautiful photography, this degradation is unacceptable.
To safeguard your original work and ensure non-destructive editing, Tophinhanhdep.com strongly advises creating a backup before any significant resizing. Simply open your image, go to File > Save As, and append “_resized” (e.g., nature_photo-resized.jpg) to the filename. This way, your original high-resolution image from Tophinhanhdep.com remains untouched, allowing for creative experimentation without permanent loss.
Step-by-Step Guide to Resizing by Dimensions or Percentage
Resizing an image in Photoshop, whether by precise pixel measurements or by a scalable percentage, is a fundamental skill for any digital artist or photographer. Tophinhanhdep.com offers a wealth of images perfect for practicing these techniques.
Adjusting Image Dimensions (Width and Height)
The most direct way to resize an image is by manually inputting your desired width and height values into the Image Size dialog box.
- Open Your Image: Launch Photoshop and open the image you wish to resize. For example, grab a stunning landscape wallpaper from Tophinhanhdep.com to work with.
- Access Image Size: Go to Image > Image Size (or use the shortcut
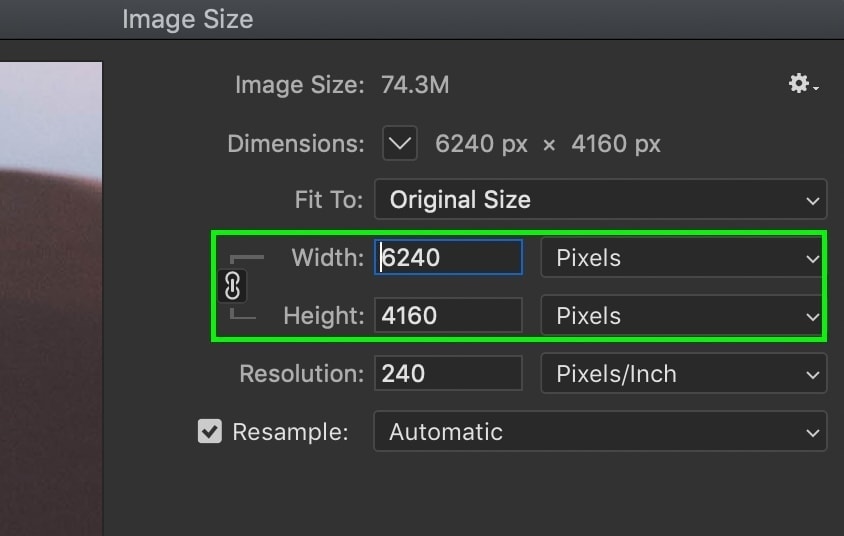
Ctrl+Alt+Ion Windows,Command+Option+Ion Mac). - Enter New Dimensions: In the “Pixel Dimensions” section, you’ll see the current width and height. Click into either the Width or Height box and type your new desired value.
- Maintaining Aspect Ratio: By default, Photoshop links the Width and Height values together. You’ll see a small “link” icon between them. This feature, known as “Constrain Proportions,” is crucial for preventing distortion. When linked, changing one dimension automatically adjusts the other to maintain the original aspect ratio, ensuring your abstract art or nature photos don’t look stretched or squashed.
- Intentional Distortion (Use with Caution!): If, for a specific creative effect or photo manipulation, you need to change the width and height independently (e.g., to deliberately stretch an image), click the “link” icon to unlink the measurements. Be aware that this will distort your image. This is a technique best reserved for very specific visual design ideas where the distortion is a deliberate artistic choice, not an accidental outcome.
- Using Percentage: Instead of precise pixel values, you can resize by a percentage of the original size. Next to the Width and Height input boxes, click on the dropdown menu (which usually says “pixels”) and select Percent. Now, you can type
50to reduce the image to 50% of its original size, or200to double its size. This method is particularly intuitive for quick adjustments, like uniformly shrinking a collection of sad/emotional images for a mood board. - Scaling Styles: If your image contains layers with applied styles (like drop shadows or bevels, common in digital art), click the small gear icon at the top-right corner of the Image Size window and select Scale Styles. This ensures that any effects applied to your layers scale proportionally with the image, maintaining the integrity of your visual design.
- Confirm and Save: Click OK to apply the changes. Then, go to File > Save (or File > Save As if you want to keep the original untouched) to save your newly resized image.
Mastering Resampling for Optimal Results
The concept of “resampling” is pivotal to understanding how Photoshop handles pixels during resizing. Tophinhanhdep.com stresses that resampling directly impacts image quality, especially when dealing with high-resolution photography.
Within the Image Size dialog box, you’ll find the Resample option. This checkbox determines whether Photoshop creates or discards pixels during the resizing process:
- Resample Disabled: When “Resample” is unchecked, Photoshop does not add or remove any pixels. Instead, it re-distributes the existing pixels. Changing the Width, Height, or Resolution values will result in the other two adjusting proportionally to maintain the total number of pixels. This means the actual “image size” (in terms of pixel count) remains the same, but the “document size” and “resolution” for print change. This is useful for adjusting print output without altering the fundamental image data.
- Resample Enabled: When “Resample” is checked, Photoshop does add or remove pixels. This is the setting you use when you want to change the actual pixel dimensions of your image. This action directly affects the image’s quality, as new pixels are interpolated (added) or existing ones are discarded. The dropdown menu next to “Resample” becomes active, offering various interpolation methods:
- Automatic (Default): Photoshop analyzes your image and the direction of your resize (enlarging or reducing) and intelligently chooses the best resampling method. This usually delivers good all-around results and is recommended for most users on Tophinhanhdep.com.
- Bicubic Smoother (Enlargement): Optimized for enlarging images, this method helps to smooth out pixel transitions and minimize jagged edges, making it a better choice when you absolutely must increase the size of a low-resolution beautiful photography piece.
- Bicubic Sharper (Reduction): Specifically designed for reducing image size, this method applies slight sharpening during the process to help retain detail and crispness, perfect for shrinking high-resolution images for web use.
- Bicubic: A more general-purpose method that produces good results with tonal gradients, making it versatile for various editing styles.
- Nearest Neighbor: This is a faster but less precise method, best suited for images with hard edges and no gradients, like pixel art. It can produce a blocky, aliased look in photographs.
For most aesthetic images and digital photography from Tophinhanhdep.com, “Automatic” or specific Bicubic options (Smoother for enlarging, Sharper for reducing) will yield the best balance of quality and performance. Experimentation with different methods can help you understand their impact on your specific image types.
Advanced Resizing Techniques for Visual Perfection
Beyond simple dimension adjustments, Photoshop offers sophisticated tools for resizing that are crucial for precise visual design and photo manipulation. These techniques allow for more control over composition and offer creative opportunities for imagery, from abstract designs to thematic collections.
Resizing with the Crop Tool: Precision and Composition
The Crop Tool (C on your keyboard) is indispensable not just for trimming unwanted parts of an image, but also for resizing while simultaneously defining composition and aspect ratio. This is particularly useful when preparing images for specific output sizes or creating aesthetic backgrounds.
- Activate the Crop Tool: Select the Crop Tool from the Photoshop Toolbar. A cropping frame will appear around your image.
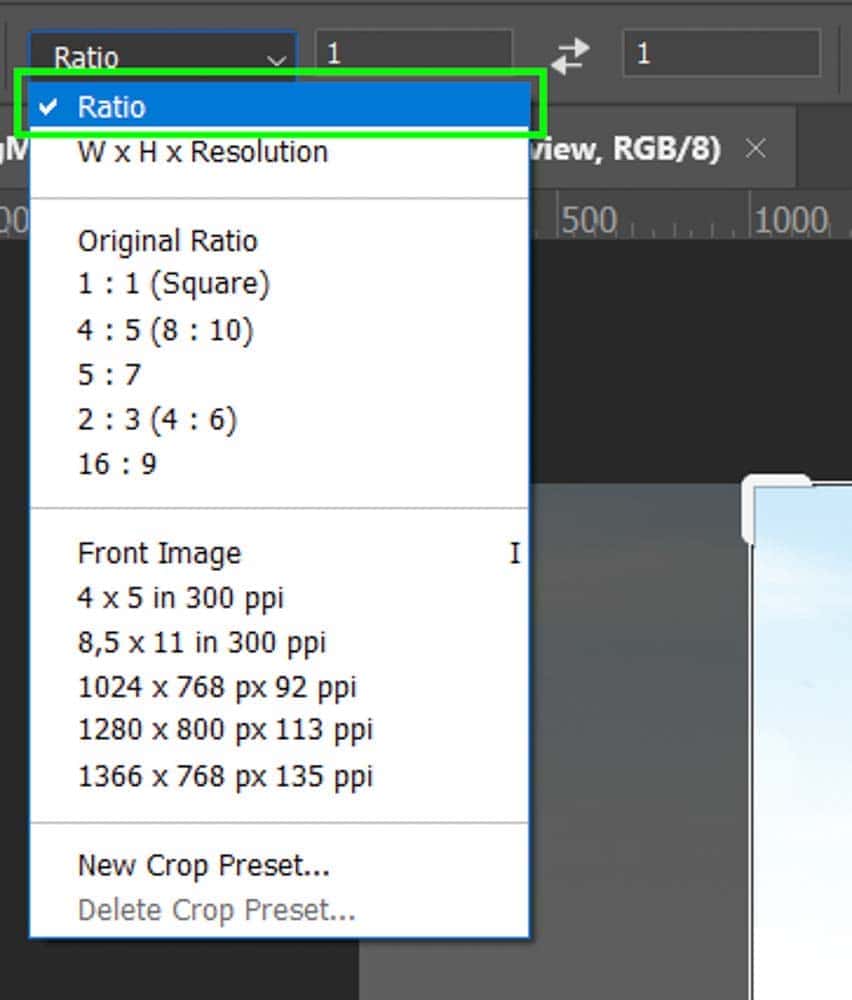
- Set Your Aspect Ratio: In the Options Bar at the top of the screen (while the Crop Tool is active), click the dropdown menu next to the Crop Tool icon. Select Ratio from the options.
- Define Your Ratio: Type your desired aspect ratio into the two input boxes that appear (e.g.,
16:9for widescreen wallpapers,1:1for social media aesthetic images). The cropping frame will instantly conform to this ratio. - Adjust Composition: You can now:
- Resize the Cropping Box: Drag the corner or side handles of the frame inward or outward to define the new dimensions of your image.
- Move the Image within the Frame: Click and drag inside the cropping box to reposition your image, ensuring your focal point (e.g., a striking element in a nature photo or the emotional core of a sad/emotional image) is perfectly centered or aligned according to the rule of thirds.
- Rotate for Straightening: Hover your mouse just outside a corner handle, and your cursor will turn into a curved double-headed arrow. Click and drag to rotate the cropping frame, useful for straightening horizons or creating dynamic angles.
- Confirm the Crop: Once satisfied with your composition and dimensions, click the checkmark in the Options Bar or press
Enter(Windows) /Return(Mac). - Saving Custom Presets: If you frequently use a particular aspect ratio (e.g., a specific banner size for Tophinhanhdep.com, or unique dimensions for digital art prints), you can save it as a preset. After entering your ratio, click the dropdown again and choose New Crop Preset. Give it a descriptive name, and it will be available for quick access in the future, streamlining your workflow for consistent visual design.
A crucial setting in the Crop Tool’s options bar is “Delete Cropped Pixels.” If this is checked, the areas outside the crop box are permanently discarded. If unchecked, they are merely hidden, allowing you to re-adjust the crop later. For advanced photo manipulation, leaving it unchecked provides greater flexibility.
Manipulating Canvas Size: Adding Borders and Context
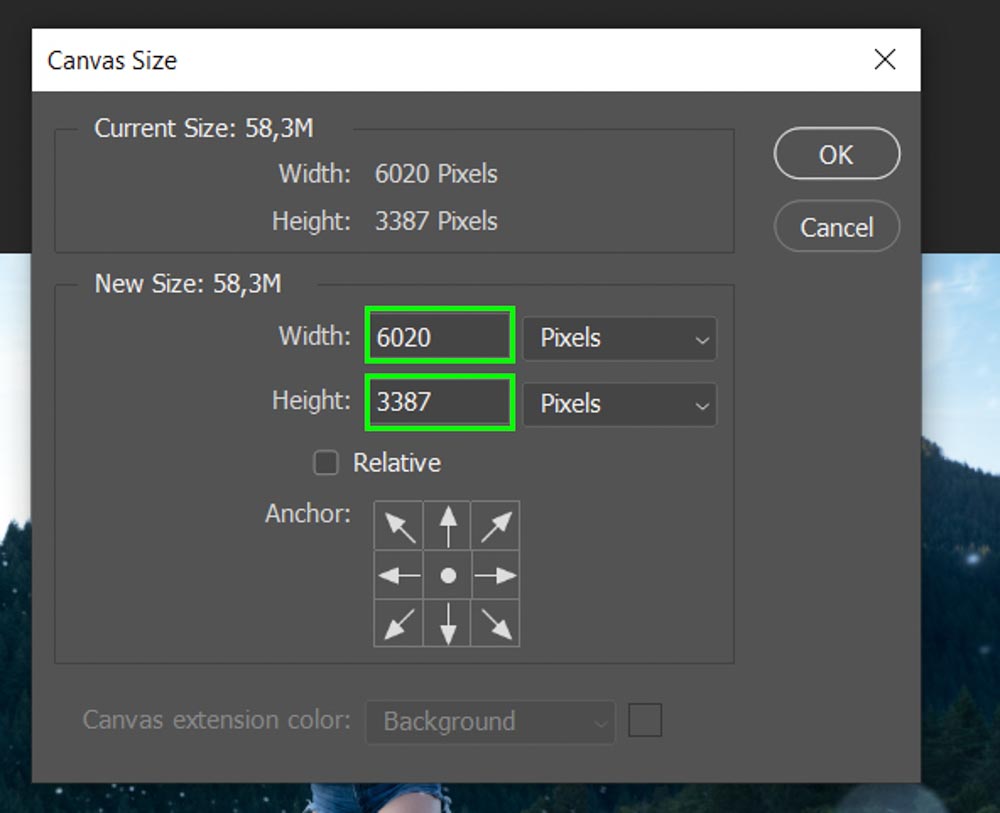
While the “Image Size” command changes the actual pixel dimensions of your image, “Canvas Size” (found under Image > Canvas Size or Ctrl+Alt+C on Windows / Command+Option+C on Mac) alters the overall workspace area around your image. This is distinct from resizing the image itself and serves different, yet equally vital, purposes in visual design.
The Canvas Size dialog box allows you to:
- Add Borders or Frames: Increase the canvas size to add empty space around your image. This space can then be filled with color to create an aesthetic frame, used for graphic design elements like logos or text, or simply to provide breathing room around a striking piece of abstract art. Tophinhanhdep.com’s collection of beautiful photography often benefits from carefully crafted borders that enhance their presentation.
- Extend Backgrounds: If you need to expand an image to fit a new aspect ratio without cropping any existing content or stretching the image (which would cause distortion), you can increase the canvas size to the desired dimensions. The empty space created can then be filled using content-aware fill, cloning, or simply a solid background color. This is an excellent technique for adapting a photograph into a new wallpaper format without losing elements.
- Understanding the Anchor: The Anchor grid within the Canvas Size dialog box determines where the added or subtracted canvas space originates. By default, it’s set to the center, meaning space is added or removed equally from all sides. Clicking on a different square in the grid will shift the anchor point, causing space to be added or removed from a specific direction (e.g., clicking the top-left square will expand the canvas to the right and bottom).
- Canvas Extension Color: At the bottom of the dialog box, you can choose the color that fills any newly added canvas area. This can be the foreground color, background color, white, black, gray, or “Other…” for a custom choice.
Remember, adjusting canvas size does not change the actual resolution or quality of your image pixels. It merely modifies the “container” that holds your image. If you reduce the canvas size to be smaller than your image, it will crop your image without a warning, so always proceed with caution.
Best Practices and Tophinhanhdep.com Recommendations
To ensure your images consistently meet high standards, Tophinhanhdep.com recommends integrating these best practices into your workflow, leveraging the platform’s resources for optimal results.
- Start with High-Resolution Images: The foundation of any quality visual design is a high-resolution source image. Tophinhanhdep.com offers an extensive library of High Resolution Photography and Stock Photos that provide an excellent starting point, minimizing the need for problematic enlargements.
- Always Use “Save As” for Backups: Before performing any resizing, especially if you’re experimenting with different dimensions or resampling methods, use File > Save As to create a duplicate. This ensures your original file, a pristine example of Beautiful Photography or Digital Art from Tophinhanhdep.com, remains intact.
- Consider AI Upscalers for Significant Enlargements: When enlarging an image is unavoidable, traditional Photoshop methods can introduce blurriness. For superior results, explore Tophinhanhdep.com’s Image Tools, particularly AI Upscalers. These advanced tools use artificial intelligence to intelligently add pixels and detail, often yielding much sharper and more natural-looking enlargements than Photoshop’s built-in resampling methods.
- Optimize Images for Web vs. Print: The optimal resolution and file format differ greatly depending on whether an image is for a digital background or a physical print.
- Web Images: For fast loading and crisp display on screens, 72 pixels/inch is typically sufficient, along with Image Compressors and Optimizers available on Tophinhanhdep.com.
- Print Images: For high-quality prints, aim for 200-300 pixels/inch to ensure fine detail, crucial for Nature scenes or intricate Abstract compositions.
- Explore Tophinhanhdep.com’s Collections for Inspiration: Drawing inspiration is a key part of any creative process. Dive into Tophinhanhdep.com’s Image Inspiration & Collections for Photo Ideas, Mood Boards, Thematic Collections, and Trending Styles. Whether you’re seeking Wallpapers, Backgrounds, or exploring Sad/Emotional imagery, understanding current trends can inform your resizing decisions for optimal impact.
- Experiment with Editing Styles: The way you resize and crop can be an integral part of your unique Editing Styles. Don’t be afraid to experiment with different aspect ratios for Digital Photography or use canvas manipulation for Creative Ideas in your Graphic Design projects.
Mastering image resizing in Photoshop is a fundamental skill that significantly impacts the quality and versatility of your visual content. By understanding the tools, techniques, and best practices outlined in this guide, you can confidently adjust dimensions, manage aspect ratios, and maintain impeccable image quality. Tophinhanhdep.com remains your ultimate resource, offering not only a vast array of stunning images for every need—from Aesthetic to Abstract—but also the Image Tools and Visual Design insights to help you bring your creative visions to life. Continue to explore, create, and share your resized masterpieces with the world, always aiming for the high-resolution perfection that defines Tophinhanhdep.com.