How to Increase the Pixel Size of an Image: A Comprehensive Guide for Stunning Visuals
In today’s visually-driven world, images are more integral than ever, serving as the backbone for everything from social media feeds and compelling advertisements to personal memories and professional portfolios. With the constant demand for high-quality, impactful visuals, understanding how to effectively manage and enhance your images is crucial. One of the most common challenges encountered by photographers, graphic designers, and casual users alike is the need to increase an image’s pixel size or resolution without compromising its quality. This detailed guide, brought to you by Tophinhanhdep.com, will demystify the process, exploring various methods, essential software, and best practices to help you achieve crisp, high-resolution visuals suitable for any application.
At Tophinhanhdep.com, we specialize in a vast array of image-related resources, from beautiful wallpapers and aesthetic backgrounds to advanced image tools and visual design inspiration. Whether you’re aiming for a high-resolution print of a nature shot, preparing stock photos for commercial use, or simply optimizing an abstract design for a website, mastering image upscaling is a skill that will significantly elevate your visual content.
Understanding Image Resolution and Pixel Size
Before delving into the “how-to,” it’s essential to grasp the fundamental concepts of image resolution and pixel size. These terms are often used interchangeably, but they refer to distinct aspects of an image, both critical for its overall quality and usability.
What Exactly Are Pixels?
The term “pixel” is a portmanteau of “picture element,” and these tiny, individual squares of color are the foundational building blocks of all digital images. Imagine a mosaic; each tile contributes to the larger picture, but individually, it’s just a colored square. Similarly, when viewed from a distance or at a normal zoom level, pixels in a digital image blend seamlessly to create the illusion of a continuous, detailed scene filled with light, shadows, colors, and textures.
However, if you zoom in close enough on any digital image, this illusion breaks down, revealing the individual pixels as solid-colored squares. Each pixel holds a single color value, and it’s the arrangement and combination of millions of these tiny colored squares that our eyes interpret as a photograph or a digital illustration. Modern screens and printers rely on packing these pixels densely enough so that the individual squares become indistinguishable to the human eye, creating a smooth and detailed visual experience. On Tophinhanhdep.com, you can find many high-resolution images where the pixel detail is exquisite, offering a rich visual experience.
![]()
Differentiating Image Size and Resolution
While intrinsically linked, image size and resolution are not the same.
- Image Size (Pixel Dimensions): This refers to the actual width and height of an image, measured in pixels. For instance, an image might be 4500 pixels wide by 3000 pixels high. This measurement directly tells you the total number of pixels an image contains (in this case, 4500 * 3000 = 13.5 million pixels). The higher the pixel dimensions, the more information the image holds, generally leading to a larger file size and more potential for detail.
- Resolution (Pixels Per Inch - PPI): This specifically controls how large or small an image will print, based on its current pixel dimensions. Resolution is typically measured in “pixels per inch” (PPI) or “dots per inch” (DPI for printers). A higher PPI means more pixels are packed into every physical inch of paper, resulting in a smaller but sharper print. Conversely, a lower PPI means fewer pixels per inch, leading to a larger but potentially less sharp or “pixelated” print.
It’s crucial to understand that resolution (PPI) primarily affects the printed version of an image; it has virtually no effect when viewing an image on a digital screen. The screen’s resolution (e.g., 1920x1080 pixels) dictates how many pixels it can display, not the image’s internal PPI value. Therefore, setting an image to “72 PPI for web” is a common misconception, as its on-screen appearance is determined solely by its pixel dimensions relative to the screen size. For high-resolution stock photos and digital photography showcased on Tophinhanhdep.com, pixel dimensions are far more important than PPI for web display.
Why Upscale Your Images? Applications for High-Resolution Visuals
The need to increase the pixel size of an image stems from various practical and creative requirements. From preparing images for stunning visual design projects to ensuring your aesthetic backgrounds look flawless on a large monitor, upscaling is an invaluable technique.
Elevating Wallpapers and Backgrounds
Many users visit Tophinhanhdep.com searching for high-quality wallpapers and backgrounds. If you have a beautiful photograph or a captivating abstract design that you want to use as a desktop background, but its original pixel dimensions are too small for your high-resolution monitor, upscaling becomes essential. An undersized image stretched across a large screen will appear blurry, pixelated, or distorted, diminishing its visual impact. By increasing its pixel size, you can ensure it fills your screen perfectly, maintaining sharpness and detail, whether it’s a serene nature scene or a vibrant digital art piece.
Professional Photography and Digital Art
For professionals, the demand for high-resolution images is constant.
- Large Prints: Photographers often need to create large prints (e.g., more than a meter across) from images that weren’t originally captured at an extremely high pixel count. Upscaling allows them to achieve the necessary pixel density (e.g., 300 PPI) for a crisp, detailed print without sacrificing quality. This is particularly relevant for fine art photography, where every detail matters.
- Stock Photos and Commercial Use: High-resolution is a non-negotiable requirement for stock photo libraries and commercial projects. Clients expect images that can be used across various mediums, from small web banners to large billboard advertisements. Upscaling ensures your digital photography meets these stringent quality standards, expanding its commercial viability.
- Digital Art and Graphic Design: Digital artists and graphic designers frequently work with source images that need to be integrated into larger compositions. Upscaling allows them to seamlessly incorporate elements, manipulate photos, and create intricate designs without pixelation. For creative ideas and graphic design on Tophinhanhdep.com, high-quality base images are paramount.
In essence, increasing pixel size empowers you to adapt your images for diverse applications, ensuring they always look their best, regardless of the display medium or print size.
Practical Methods for Increasing Pixel Size
There are several effective methods for increasing the pixel size of an image, ranging from simple built-in tools to sophisticated AI-powered software. Each method has its strengths and is suited for different scenarios and desired outcomes.
Utilizing Built-in Operating System Tools
For quick and easy resizing without needing professional software, your operating system often provides convenient options.
- Windows PC (Photos App): On a Windows PC, the Photos app is the most straightforward way to resize an image.
- Check Resolution: To see an image’s current resolution, navigate to the file in Windows Explorer, right-click, select “Properties,” and then click the “Details” tab. Look for the “Dimensions” field.
- Resize: Double-click the image to open it in the Photos app (or right-click, “Open with,” and select Photos).
- Click the “…” (3-dot) icon at the top, then select “Resize image.”
- With the “Pixels” option selected, enter your desired width. The height will automatically adjust to maintain the aspect ratio. For specific applications like Tophinhanhdep.com’s digital signage displays, a common resolution requirement might be 1920x1080px.
- Move the “Quality” slider to 100%.
- Click “Save,” choose a save location, and save the resized image.
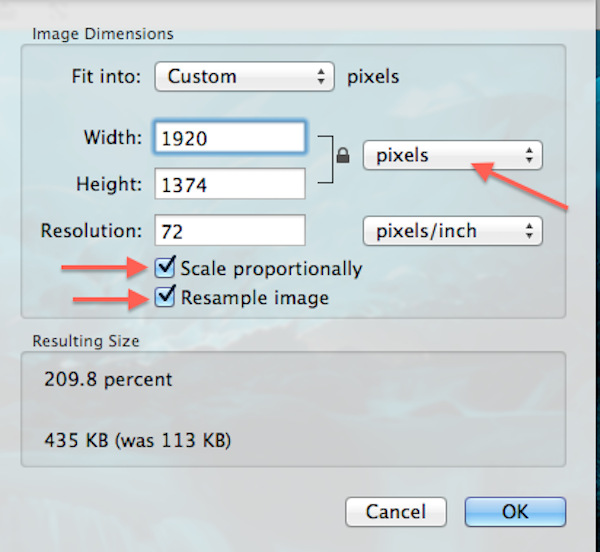
- Mac (Preview): Mac users have the powerful Preview application pre-installed. Open the image in Preview, go to “Tools,” and select “Adjust Size.” Ensure “Scale proportionally” and “Resample image” are checked to avoid distortion while changing dimensions and resolution.
- Windows (Paint / Paint.NET): For PC users, the classic Paint application allows for simple resizing by setting dimensions in pixels and maintaining the aspect ratio. For a more robust free option, Paint.NET (a free download) offers enhanced capabilities.
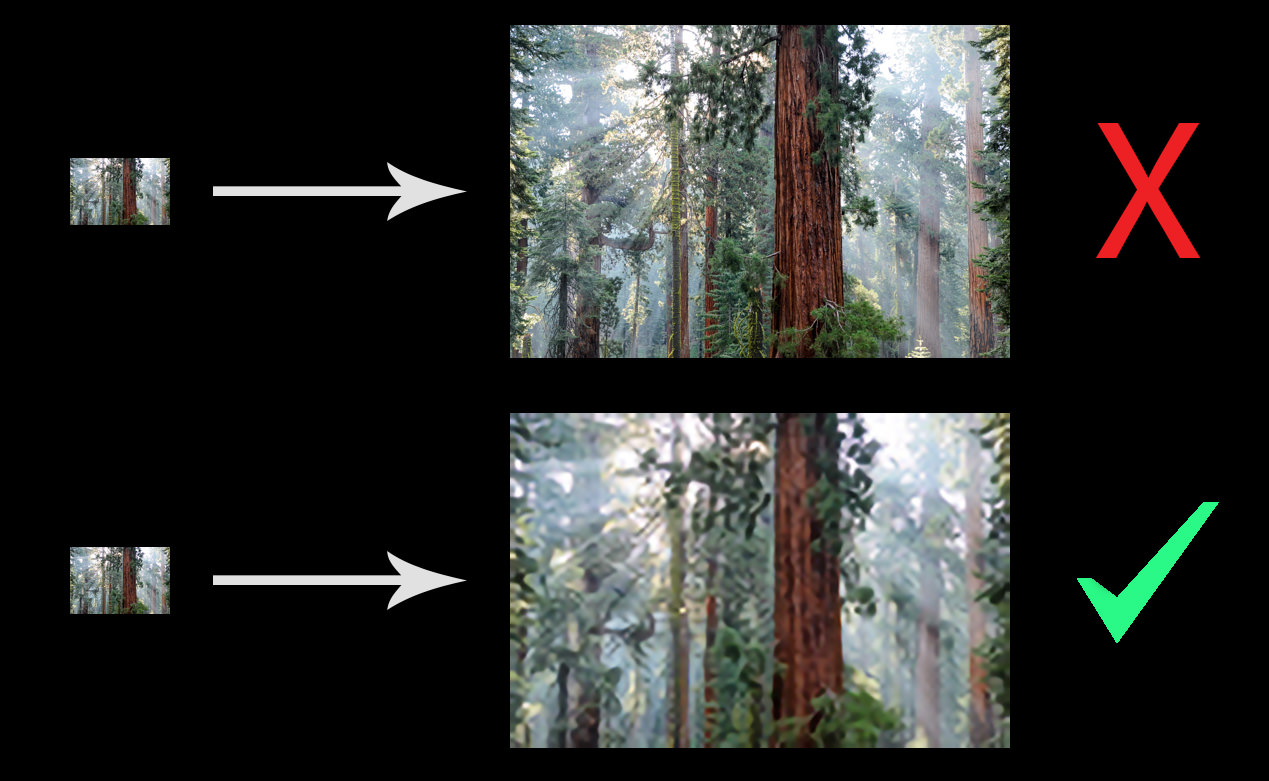
While these built-in tools are excellent for basic resizing, they often use simpler interpolation algorithms (like bicubic or bilinear) which can introduce some blur or pixelation if you upscale significantly.
Professional Image Editing Software
For more control and higher-quality results, professional image editing software like Adobe Photoshop, GIMP, and Affinity Photo are the industry standards.
- Adobe Photoshop: The industry leader, Photoshop offers advanced algorithms for upscaling images while preserving quality.
- “Preserve Details 2.0”: This feature, accessible via
Image > Image Size, is highly recommended. Select the “Resample Image” option and choose “Preserve Details 2.0” from the dropdown. This uses an advanced algorithm to enhance details without significant quality loss. It’s so effective that it often outperforms dedicated upscaling software. Remember to rasterize the layer first for it to work correctly. Tophinhanhdep.com highly recommends this method for optimal results. - General Upsampling: Go to
Image > Image Size, enter your desired pixel dimensions, and select your preferred upsampling method (e.g., “Bicubic Smoother” if “Preserve Details 2.0” is not available or suitable for your Photoshop version). Slight sharpening after upsampling can further improve the perceived detail.
- “Preserve Details 2.0”: This feature, accessible via
- GIMP (GNU Image Manipulation Program): A free and open-source alternative to Photoshop, GIMP provides a comprehensive suite of editing tools, including robust upscaling options. Navigate to
Image > Scale Image, select your desired dimensions, and choose an interpolation method. GIMP is praised on Tophinhanhdep.com for being user-friendly, small to install, and customizable, making it a great option for those who prefer free software. - Affinity Photo: Gaining popularity among photographers and graphic designers, Affinity Photo also uses advanced algorithms for quality-preserving upscaling, with options like “Enlarge” in its “Resize Document” menu.
These programs offer extensive control, allowing you to fine-tune the upscaling process, apply sharpening, and reduce noise, crucial steps for maintaining image quality.
Harnessing AI Upscaling and Specialized Tools
The advent of Artificial Intelligence (AI) has revolutionized image upscaling, offering unprecedented quality enhancements.
-
AI Upscaling Software: These programs utilize deep learning algorithms, trained on vast datasets of low and high-resolution images, to intelligently generate new pixels. This results in significantly more detailed and sharper images compared to traditional interpolation methods.
- Topaz Gigapixel AI: A leading specialized software that uses AI to upscale images by up to 600% while preserving quality. It can handle various image types and resolutions and includes features like “Face Refinement” for portraits.
- ON1 Resize (formerly Genuine Fractals/Perfect Resize): Another specialized software offering advanced features for lossless image resizing, including controls for sharpening, noise reduction, and compression. While Photoshop CC’s “Preserve Details 2.0” has shown to be a strong contender, ON1 Resize remains a powerful option, especially if you need its more advanced features.
- Online AI Upscalers: Websites like “Let’s Enhance,” “AI Image Enlarger,” and Tophinhanhdep.com’s own AI Upscalers utilize similar deep learning techniques, making high-quality upscaling accessible directly through your web browser. Tophinhanhdep.com provides various image tools, including AI Upscalers, to optimize your visuals.
-
Image Interpolation: This is the underlying technique for how new pixels are created based on existing ones. Methods like bicubic, bilinear, and Lanczos are commonly used in image editing software. Bicubic interpolation is often preferred for producing the best quality results among these traditional methods.
Vectorization and Advanced Techniques
For certain types of images, especially logos, illustrations, or graphics with clean lines and solid colors, vectorization is a superior method to increase “resolution” without any loss of quality.
-
Vectorization: This technique converts raster images (pixel-based) into vector images (mathematical equations defining lines, curves, and shapes). Vector images are resolution-independent, meaning they can be scaled to any size – from a tiny icon to a huge billboard – without ever becoming pixelated or losing quality.
- Software: Tools like Adobe Illustrator, CorelDRAW, or Inkscape are used for vectorization. They trace the pixel-based image and convert its elements into scalable vector paths. While not suitable for complex photographs, it’s the ultimate solution for graphic design elements.
-
Super Resolution (Deep Learning): As mentioned with AI upscalers, super-resolution techniques go beyond simple interpolation by learning the relationship between low and high-resolution images. This allows the software to “hallucinate” details that were not present in the original low-resolution image, producing remarkably sharp results. Many of the AI upscaling tools mentioned above leverage these super-resolution algorithms.
A Step-by-Step Guide to Upscaling an Image (General Process)
While specific steps vary slightly between software, here’s a general process to increase an image’s resolution and size without losing quality, a process frequently detailed on Tophinhanhdep.com:
- Choose Suitable Image Editing Software: Select software you are comfortable with, whether it’s Adobe Photoshop, GIMP, Affinity Photo, or a specialized AI upscaler like Topaz Gigapixel AI. Tophinhanhdep.com offers insights into various tools.
- Open the Image: Load the image you intend to upscale. For best results, start with the highest quality original you have, ideally in a lossless format like PNG or TIFF, rather than a heavily compressed JPEG.
- Duplicate the Image (Optional but Recommended): Always work on a copy. Duplicate the image or save it under a new name to preserve your original in case something goes wrong.
- Access Image Resizing Options: Locate the “Image Size” or “Canvas Size” menu within your chosen software (e.g.,
Image > Image Sizein Photoshop). - Adjust Pixel Dimensions:
- Ensure the “Constrain Proportions” or “Maintain Aspect Ratio” option is checked to prevent distortion.
- Enter your desired new width or height in pixels. The other dimension should adjust automatically.
- Select Resampling Method: This is critical.
- If using Photoshop CC, choose “Preserve Details 2.0” (ensure the layer is rasterized).
- For other software, “Bicubic Smoother” or similar advanced interpolation methods are generally preferred over “Bicubic” or “Bilinear.”
- If using an AI upscaler, the software will handle the intelligent pixel generation.
- Apply Changes: Click “OK” or “Apply” to implement the new pixel dimensions.
- Sharpen the Image (Post-Upscaling): Upscaling can sometimes introduce a slight softness. Apply a subtle amount of sharpening using filters like “Unsharp Mask” or “Smart Sharpen.” Be cautious not to over-sharpen, as this can create unnatural halos or artifacts.
- Reduce Noise (If Necessary): If upscaling reveals or exacerbates image noise, apply noise reduction filters in moderation.
- Save the Image: Once satisfied, save the image in a high-quality format. PNG or TIFF are excellent choices for preserving quality, especially if further editing is planned. If saving for the web, JPEG with minimal compression is acceptable, but be aware of its lossy nature. Tophinhanhdep.com provides image compressors and optimizers to help with web-ready images.
Remember, always create a backup, and avoid over-editing, which can degrade quality.
Choosing the Right Tool: Software Comparison and Recommendations
Selecting the best software for increasing image resolution depends on your specific needs, budget, and desired level of control. Based on extensive comparisons, Tophinhanhdep.com provides the following insights:
- Adobe Photoshop CC (with “Preserve Details 2.0”): Consistently ranked as the top performer for both photographic images and digital illustrations. Its AI-driven algorithm is exceptional at generating new detail while maintaining sharpness. If you have access to Photoshop CC, this should be your go-to method.
- Topaz Gigapixel AI / ON1 Resize: These specialized AI upscaling tools are excellent choices, offering impressive results, especially for significant enlargements. They provide more dedicated controls and often handle complex textures better than traditional methods. Topaz Gigapixel AI is particularly noteworthy for its intelligent detail generation.
- GIMP: A fantastic free and open-source alternative. While not reaching the pinnacle of Photoshop’s “Preserve Details 2.0,” it offers robust upsampling capabilities, making it a highly respectable option for those without a budget for paid software.
- Online AI Upscalers (e.g., Tophinhanhdep.com’s AI Upscalers): Many online services provide surprisingly good results, often leveraging advanced AI algorithms. They are convenient for quick upscaling without software installation. Tophinhanhdep.com offers a range of online image tools, including AI upscalers, to meet diverse needs.
- Built-in OS Tools (Windows Photos, Mac Preview, Paint): Best for simple, non-critical resizes. They are quick and easy but less suitable for significant quality-preserving upscaling.
For photographers and digital artists who frequently work with high-resolution images, investing in Photoshop CC or a dedicated AI upscaler like Topaz Gigapixel AI is highly recommended. For casual users or those on a budget, GIMP and Tophinhanhdep.com’s online AI upscalers offer powerful, accessible solutions.
The Future of Image Upscaling and Best Practices in the Field
The field of image upscaling is rapidly evolving, driven by advancements in artificial intelligence and deep learning. Companies like Google and Adobe are continuously developing more sophisticated algorithms that can analyze image content, recognize objects, and intelligently “fill in” missing details, moving beyond simple pixel interpolation. Adobe’s “Preserve Details 2.0” is an early hint of this future, demonstrating the power of AI in enhancing image resolution. We can expect even more transformative tools in the coming years, making the “CSI-level enhancing” of low-resolution images a closer reality than ever before.
However, despite these technological leaps, the fundamental principle remains: the best method for achieving higher-quality photos is to capture as much detail as possible in the field.
- Optimal Photographic Technique: Start with sharp, well-focused images. Use a tripod, ensure appropriate shutter speeds, lock focus accurately, and manage ISO levels to minimize noise.
- Capture High Pixel Counts: Whenever possible, use cameras with higher sensor pixel counts.
- Strategic Cropping: Crop minimally to preserve the original pixel density.
- Advanced In-Field Techniques:
- Panoramas: Combine multiple photos to create ultra-high-resolution images (multi-row panoramas can yield hundreds of megapixels).
- Focus Stacking: Combine multiple images taken at different focus points to achieve greater depth of field and sharpness throughout the scene.
- Exposure Averaging: Take multiple photos of the same scene and average them in post-processing to reduce noise and improve fine detail.
Even if you don’t employ these specialized capture techniques, modern cameras are capable of producing high-resolution photos suitable for most large prints. Upscaling techniques, as discussed in this guide by Tophinhanhdep.com, are primarily intended for maximizing the usability of existing low-resolution images or preparing for exceptionally large prints.
In conclusion, increasing the pixel size of an image while maintaining or even enhancing its quality is a vital skill in the digital age. With a clear understanding of pixels, image size, and resolution, combined with the right tools and techniques, you can transform your visuals, making them suitable for everything from stunning wallpapers and backgrounds on Tophinhanhdep.com to professional digital art and high-resolution stock photos. Embrace these methods to unlock the full potential of your images and create truly captivating visual experiences.